Mapping HPS Peripherals, like I²C or CAN, over the FPGA fabric to FPGA I/O and using embedded Linux to control them
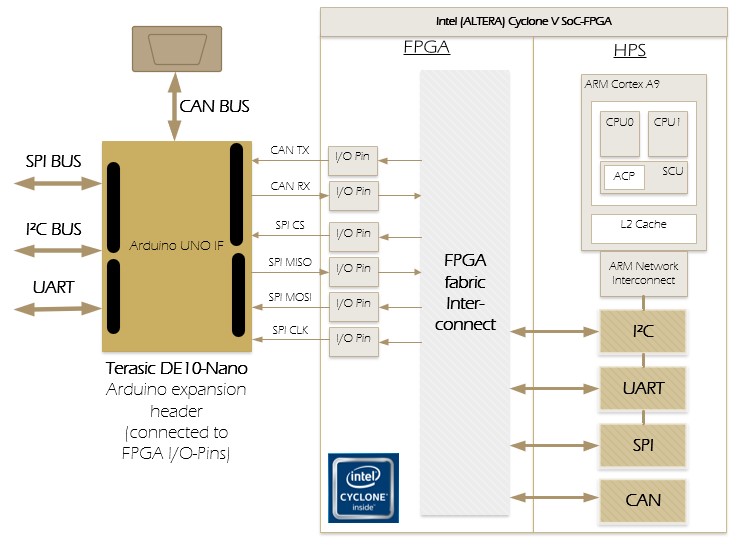
Development Boards for Intel SoC-FPGA allow often only a simple access to FPGA I/O-Pins. The only way to use HPS-Hard-IP Interfaces with these boards is the routing over the FPGA fabric.
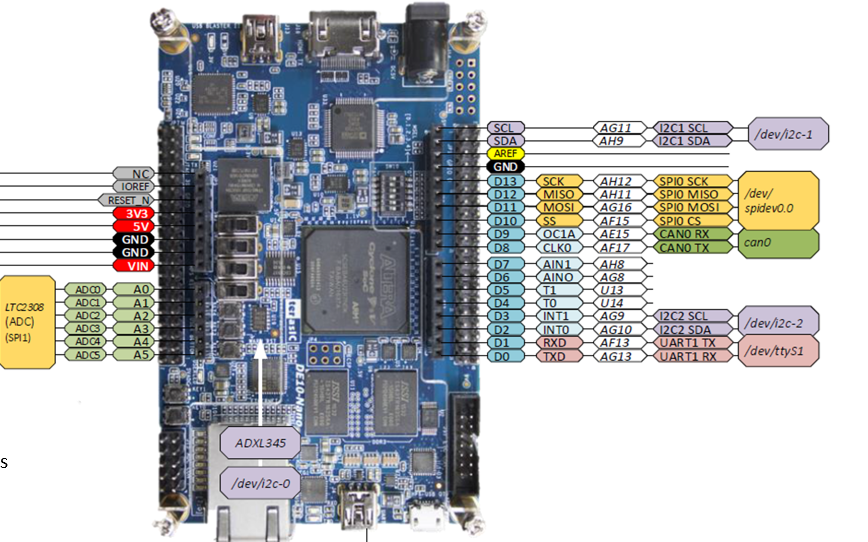
For example, the Terasic DE10-Nano development Board with an Intel Cyclone V SoC-FPGA has an Arduino UNO compatible socket. This is a nice feature, because it is possible to use nearly any Arduino Shield from the huge Arduino community with SoC-FPGA’s. Here are also all digital Pins connected to FPGA I/O Pins. With the Intel NIOSII-Softcore processor and some Soft-IP it is not too complicated to interact with these shields. But if the target applications require the connection of the capabilities of an embedded Linux system, running on the HPS, it will be. One reason is, that I only could find one official guide (AN 706), with a golden reference design witch shows only a chapter of the development process.
With this following step by step guide I will give a complete description and I will also shown as an example, how to transmit CAN-Bus Packages with a simple Linux Python script running on an embadded Linux by using an Arduino Shield with the Terasic DE10-Nano board.
This project is a part of my rsYocto embedded Linux system, that I developed during my master study and I use it here as a reference.
Note: This project is a bit out of date.... I completely redesigned the rsyocto build system (part 2-6). Please follow Part 1 and consider my custom rsyocto version guide. Then you can continue with part 5 to create your Device Tree and with part 7+. In the future I will update this guide... Many Thanks.
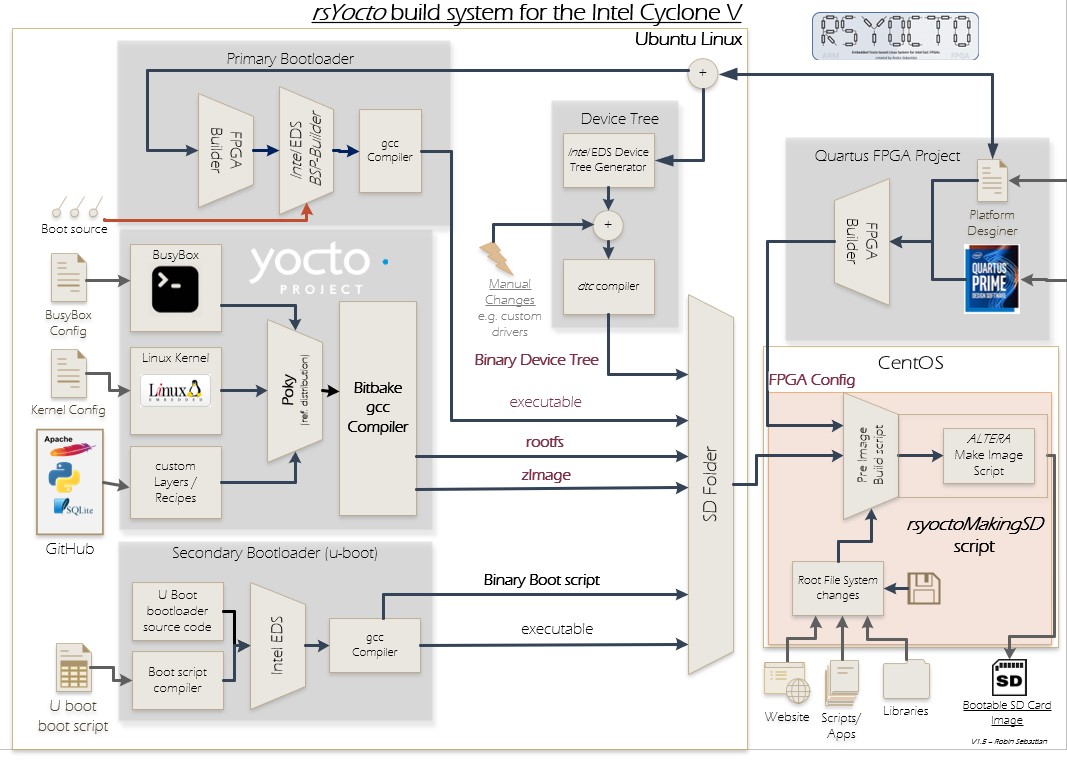
The build flow of rsYocto shows the interaction of all required parts.
The first part of this project is the creation of a Quartus Prime FPGA project to configure the ARM Cortex A9 Hard Processor System (HPS) and the routing of HPS Bus Interfaces through the FPGA fabric. At the end will be the generation of a FPGA configuration file, that can be loaded by the secondary bootloader as shown in the next parts.
-
Use Terasic’s System Builder to generate a new Intel Quartus Prime project with the right I/O-Pin mapping
-
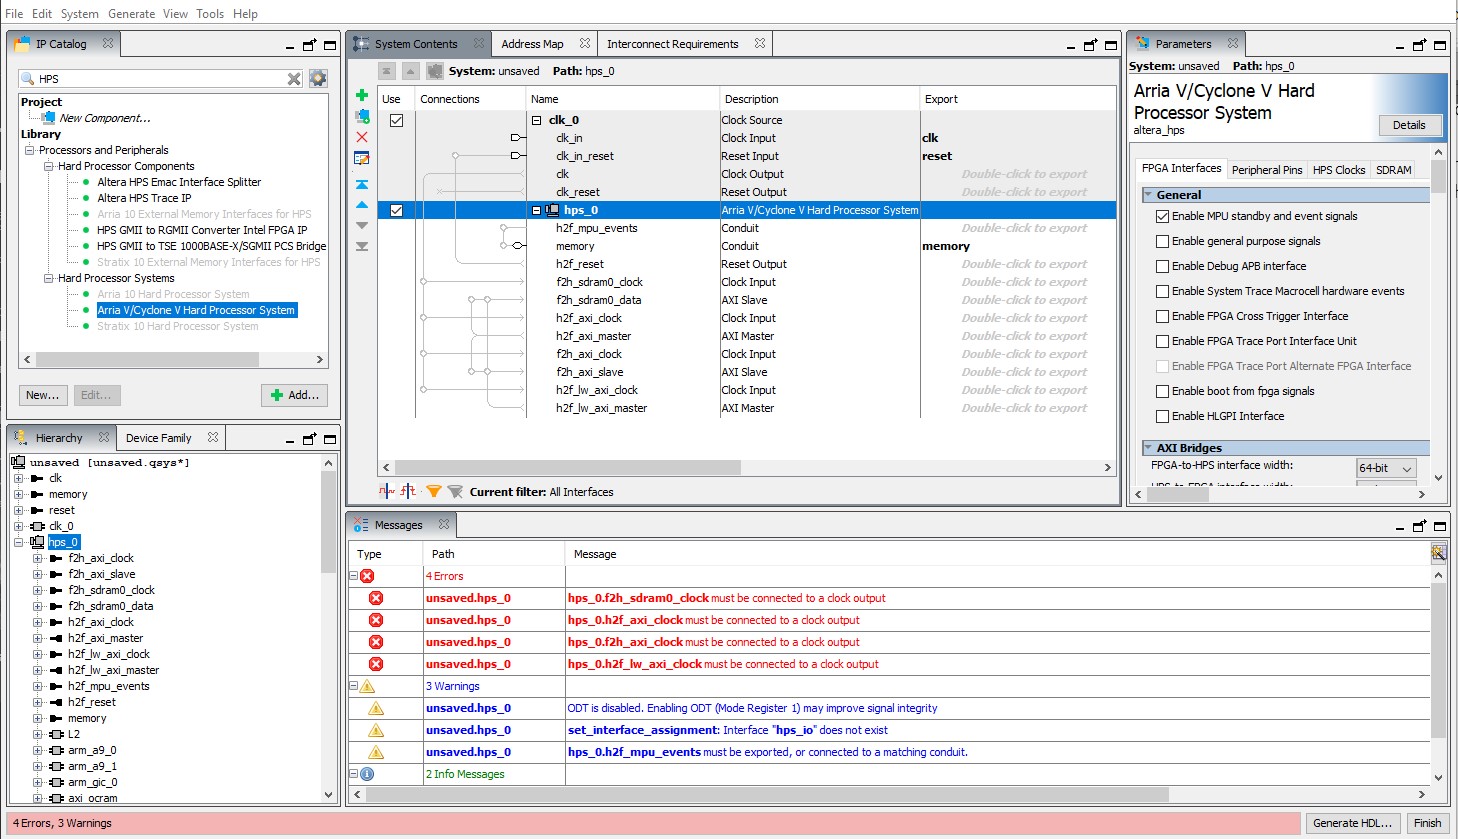
Open this Quartus Prime Project and create a new Platform Designer model
-
Insert the component “Arria V/Cyclone V Hard Processor System” to this model
-
Note: Do not change the name “hps_0”! With a different name some errors could occure in the device tree building process of the Linux system
-
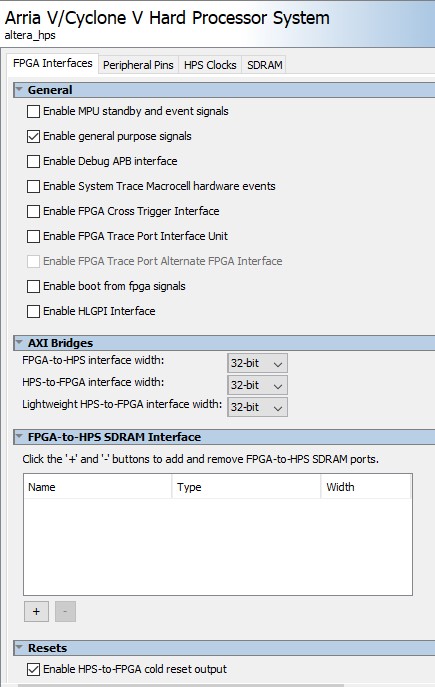
Open the HPS component Editor and select the “FPGA Interfaces”-Tab
-
Here you can configure the system on your own wishes
-
It makes sense to enable all AXI Bridges, they are not required for this project, but if a Linux application tries to access on a disabled bridge address a Linux Kernel panic will be occured.
-
I choose the following configuration:
-
Special Resets-, Interrupts- or DMA-Settings are not required
-
Continue with the “Peripheral Pins”-Tab
-
For the usage of DE10-Nano`s HPS components choose the following settings:
Peripheral Name Status Addional Settings Ethernet Media Access Controller 1 (EMAC1) HPS I/O Set 0 EMAC1 mode: "RGMII" SD/MMC Controller (SDIO) HPS I/O Set 0 SDIO mode ="4-bit Data" USB Controller 1 (USB1) HPS I/O Set 0 USB1 PHY interface mode="SDR with PHY clock output mode" UART Controller 0 (UART0) HPS I/O Set 0 UART0 mode="No Flow Control" I2C Controller 0 (I2C0) HPS I/O Set 0 I2C0 mode="I2C" -
This gives the Linux system SDMMC as boot source
-
To map the I²C-, SPI- , UART- and CAN-Bus to the Arduino interface* by selecting these points addionaly:
Peripheral Name Status Addional Settings UART Controller 1 (UART1) FPGA UART0 mode="Full" I2C Controller 1 (I2C1) FPGA I2C1 mode="I2C" SPI Controller 0 (SPI0) FPGA SPI0 mode="Master" CAN Controller 0 (CAN0) FPGA - -
Open the “SDRAM”-Tab (Do not change the settings of the "HPS-Cock"-Tab)
-
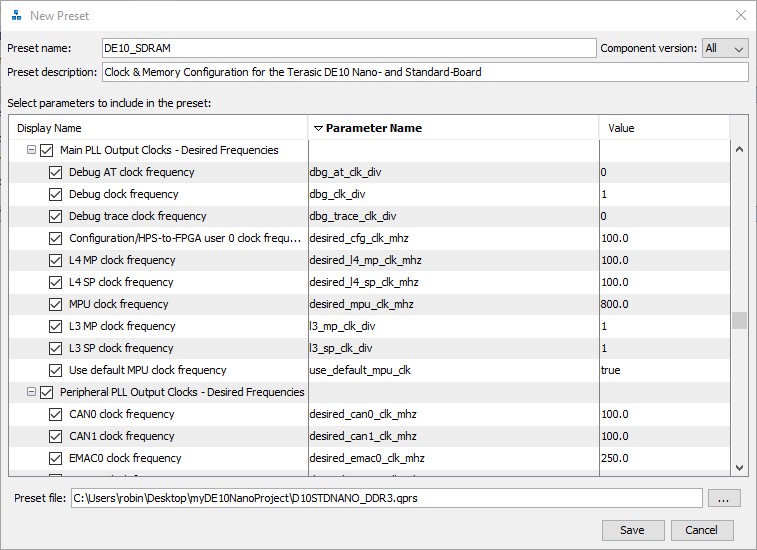
In my GitHub repository is the .qprs-memory configuration file "D10STDNANO_DDR3.qprs" included
-
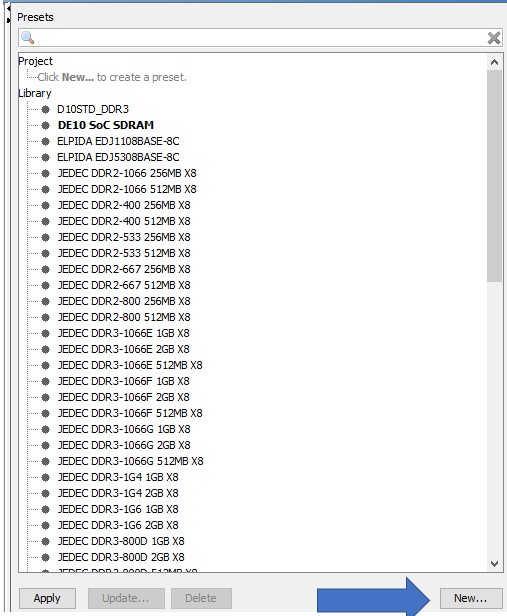
Copy this file to your Quartus Prime project folder and click inside the HPS component editor and presents-bar the "new"-button
-
A new preset window appears, select the .qprs-file and name it.
-
Again, close the preset window, select in the list the previously imported preset and click apply to execute the configuration
-
At this point HPS configuration is done (Press Finish to close the window)
-
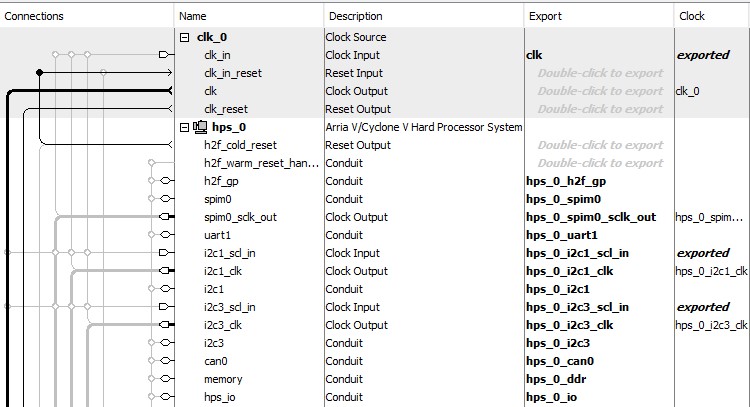
The only necessary connection to use the HPS is: clk_0:clk_in_reset --> hps_0:h2f_cold_reset
-
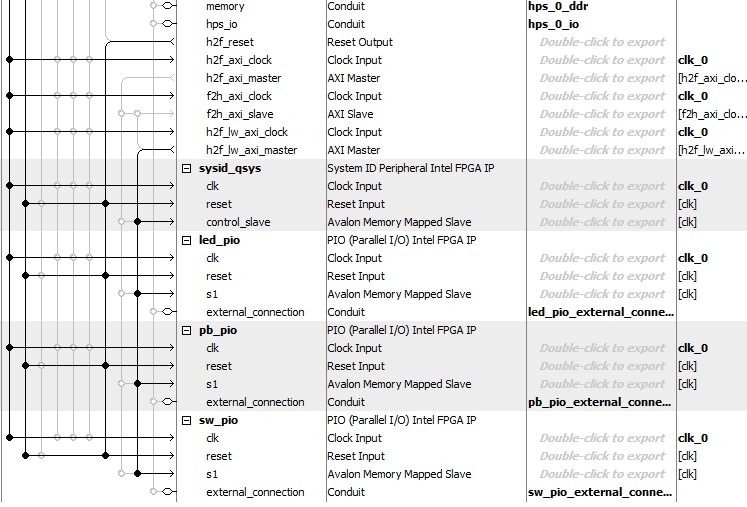
Export the SPI-, UART- ,I2C-, CAN-, memory and hps_IO by double clicking on the export text file
-
Additionally connect PIO (Parallel I/O) Intel FPGA IP-modules to a HPS-to-FPGA interface to LEDs or key-switches
-
Generate with "System/Assign Base Addresses" memory addresses of the HPS Bridge interfaces
-
Finally press the "Generate HDL..."-button to build the final platform
-
Add the ".qip"- and the ".sip" from the Platform Designer to the project files
-
Use following Verilog code inside the top level file to import this HPS-model:
base_hps u0 (
/////////////////////////////////////////////////// CLOCKS //////////////////////////////////////////////////////
   	.clk_clk                    (CLOCK_50),

/////////////////////////////////////////////////////////////////////////////////////////////////////////////////////////////
//////////////////////////////////////////// 	HPS    //////////////////////////////////////////////////////////
////////////////////////////////////////////////////////////////////////////////////////////////////////////////////////////

///////////////////////  Onboard DDR3 1GB Memmory  ///////////////////////////////////
     .hps_0_ddr_mem_a                     ( HPS_DDR3_ADDR     ),
     .hps_0_ddr_mem_ba                    ( HPS_DDR3_BA       ),
     .hps_0_ddr_mem_ck                    ( HPS_DDR3_CK_P     ),
     .hps_0_ddr_mem_ck_n                  ( HPS_DDR3_CK_N     ),
     .hps_0_ddr_mem_cke                   ( HPS_DDR3_CKE      ),
     .hps_0_ddr_mem_cs_n                  ( HPS_DDR3_CS_N     ),
     .hps_0_ddr_mem_ras_n                 ( HPS_DDR3_RAS_N    ),
     .hps_0_ddr_mem_cas_n                 ( HPS_DDR3_CAS_N    ),
     .hps_0_ddr_mem_we_n                  ( HPS_DDR3_WE_N     ),
     .hps_0_ddr_mem_reset_n               ( HPS_DDR3_RESET_N  ),
     .hps_0_ddr_mem_dq                    ( HPS_DDR3_DQ       ),
     .hps_0_ddr_mem_dqs                   ( HPS_DDR3_DQS_P    ),
     .hps_0_ddr_mem_dqs_n                 ( HPS_DDR3_DQS_N    ),
     .hps_0_ddr_mem_odt                   ( HPS_DDR3_ODT      ),
     .hps_0_ddr_mem_dm                    ( HPS_DDR3_DM       ),
     .hps_0_ddr_oct_rzqin                 ( HPS_DDR3_RZQ      ),

/////////////////////////////////////////// HPS Ethernet 1  //////////////////////////////////////////////
     .hps_0_io_hps_io_emac1_inst_TX_CLK ( HPS_ENET_GTX_CLK    ),
     .hps_0_io_hps_io_emac1_inst_TXD0   ( HPS_ENET_TX_DATA[0] ),
     .hps_0_io_hps_io_emac1_inst_TXD1   ( HPS_ENET_TX_DATA[1] ),
     .hps_0_io_hps_io_emac1_inst_TXD2   ( HPS_ENET_TX_DATA[2] ),
     .hps_0_io_hps_io_emac1_inst_TXD3   ( HPS_ENET_TX_DATA[3] ),
     .hps_0_io_hps_io_emac1_inst_RXD0   ( HPS_ENET_RX_DATA[0] ),
     .hps_0_io_hps_io_emac1_inst_MDIO   ( HPS_ENET_MDIO       ),
     .hps_0_io_hps_io_emac1_inst_MDC    ( HPS_ENET_MDC        ),
     .hps_0_io_hps_io_emac1_inst_RX_CTL ( HPS_ENET_RX_DV      ),
     .hps_0_io_hps_io_emac1_inst_TX_CTL ( HPS_ENET_TX_EN      ),
     .hps_0_io_hps_io_emac1_inst_RX_CLK ( HPS_ENET_RX_CLK     ),
     .hps_0_io_hps_io_emac1_inst_RXD1   ( HPS_ENET_RX_DATA[1] ),
     .hps_0_io_hps_io_emac1_inst_RXD2   ( HPS_ENET_RX_DATA[2] ),
     .hps_0_io_hps_io_emac1_inst_RXD3   ( HPS_ENET_RX_DATA[3] ),

/////////////////////////////////////// SD Card (boot drive)  //////////////////////////////////////////
     .hps_0_io_hps_io_sdio_inst_CMD     ( HPS_SD_CMD         ),
     .hps_0_io_hps_io_sdio_inst_D0      ( HPS_SD_DATA[0]     ),
     .hps_0_io_hps_io_sdio_inst_D1      ( HPS_SD_DATA[1]     ),
     .hps_0_io_hps_io_sdio_inst_CLK     ( HPS_SD_CLK   	     ),
     .hps_0_io_hps_io_sdio_inst_D2      ( HPS_SD_DATA[2]     ),
     .hps_0_io_hps_io_sdio_inst_D3      ( HPS_SD_DATA[3]     ),

////////////////////////////////////////// 	USB HOST 	////////////////////////////////////////////
     .hps_0_io_hps_io_usb1_inst_D0      ( HPS_USB_DATA[0]    ),
     .hps_0_io_hps_io_usb1_inst_D1      ( HPS_USB_DATA[1]    ),
     .hps_0_io_hps_io_usb1_inst_D2      ( HPS_USB_DATA[2]    ),
     .hps_0_io_hps_io_usb1_inst_D3      ( HPS_USB_DATA[3]    ),
     .hps_0_io_hps_io_usb1_inst_D4      ( HPS_USB_DATA[4]    ),
     .hps_0_io_hps_io_usb1_inst_D5      ( HPS_USB_DATA[5]    ),
     .hps_0_io_hps_io_usb1_inst_D6      ( HPS_USB_DATA[6]    ),
     .hps_0_io_hps_io_usb1_inst_D7      ( HPS_USB_DATA[7]    ),
     .hps_0_io_hps_io_usb1_inst_CLK     ( HPS_USB_CLKOUT     ),
     .hps_0_io_hps_io_usb1_inst_STP     ( HPS_USB_STP	     ),
     .hps_0_io_hps_io_usb1_inst_DIR     ( HPS_USB_DIR        ),
     .hps_0_io_hps_io_usb1_inst_NXT     ( HPS_USB_NXT        ),

//////////////////////////////////////// UART 0 (Console)  /////////////////////////////////////////////
     .hps_0_io_hps_io_uart0_inst_RX     ( HPS_UART_RX        ),
     .hps_0_io_hps_io_uart0_inst_TX     ( HPS_UART_TX        ),

//////////////////////////////////////////////////////////////////////////////////////////////////////////
///////////////////////////////        	   On Board Components     ///////////////////////////////////

///////////////////////////////////////////  HPS LED & KEY  ///////////////////////////////////////////
     .hps_0_io_hps_io_gpio_inst_GPIO53  ( HPS_LED            ),
     .hps_0_io_hps_io_gpio_inst_GPIO54  ( HPS_KEY            ),

//////////////////////////////////  G-Sensor: I2C0 (Terasic Docu I2C1) /////////////////
   .hps_0_io_hps_io_i2c0_inst_SDA      (HPS_I2C1_SDAT        ),
   .hps_0_io_hps_io_i2c0_inst_SCL      (HPS_I2C1_SCLK        ),

//////////////////////////// Onboard LEDs, Switches and Keys ////////////////////////
     .led_pio_external_connection_export (LEDR               ),
     .pb_pio_external_connection_export  (Switch             ),
     .sw_pio_external_connection_export  (KEY_N              )
);
-
Insert following snippet inside the base model"u0":
-
UART1:
 .hps_0_uart1_cts                    (),
 .hps_0_uart1_dsr                    (),
 .hps_0_uart1_dcd                    (),
 .hps_0_uart1_ri                     (),
 .hps_0_uart1_dtr                    (),
 .hps_0_uart1_rts                    (),
 .hps_0_uart1_out1_n                 (),
 .hps_0_uart1_out2_n                 (),
 .hps_0_uart1_rxd                    (uart1_rx),
 .hps_0_uart1_txd                    (uart1_tx),
-
I2C1:
 .hps_0_i2c1_clk_clk                (scl1_o_e),
 .hps_0_i2c1_scl_in_clk             (scl1_o),
 .hps_0_i2c1_out_data               (sda1_o_e),
 .hps_0_i2c1_sda                    (sda1_o),
-
CAN0:
.hps_0_can0_rxd			    (can0_rx),
.hps_0_can0_txd                     (can0_tx),
-
SPI0:
.hps_0_spim0_sclk_out_clk (spi0_clk), .hps_0_spim0_txd (spi0_mosi), .hps_0_spim0_rxd (spi0_miso), .hps_0_spim0_ss_in_n (1'b1), .hps_0_spim0_ssi_oe_n (spim0_ssi_oe_n), .hps_0_spim0_ss_0_n (spi0_ss_0_n), .hps_0_spim0_ss_1_n (), .hps_0_spim0_ss_2_n (), .hps_0_spim0_ss_3_n (), ```` -
Above the top level file use following lines to create wires as temporary In-/Output-values
 //// IO Buffer Temp I2c 1 & 3
 wire scl1_o_e, sda1_o_e, scl1_o, sda1_o,
      scl3_o_e, sda3_o_e, scl3_o, sda3_o;
 //// IO Buffer Temp SPI 0
 wire spi0_clk, spi0_mosi, spi0_miso,spi0_ss_0_n;
 //// IO Buffer Temp UART 1
 wire uart1_rx,uart1_tx;
 //// IO Buffer Temp CAN 0
 wire can0_rx, can0_tx;
 	````
-
To connect In-/Output-values with physical I/O Pins are I/O-Buffers required
-
The outputs of these Buffers are connected to the following Arduino shield Pins:
-
Add at the end of the file following lines of verilog code
- UART1:
// UART1 -> RX
ALT_IOBUF uart1_rx_iobuf (.i(1'b0), .oe(1'b0), .o(uart1_rx), .io(ARDUINO_IO[1]));
// UART1 -> TX
ALT_IOBUF uart1_tx_iobuf (.i(uart1_tx), .oe(1'b1), .o(), .io(ARDUINO_IO[0]));
- I2C1:
// I2C1 -> SCL
ALT_IOBUF i2c1_scl_iobuf   (.i(1'b0),.oe(scl1_o_e),.o(scl1_o),.io(ARDUINO_IO[15]));
// I2C1 -> SDA
ALT_IOBUF i2c1_sda_iobuf   (.i(1'b0),.oe(sda1_o_e),.o(sda1_o),.io(ARDUINO_IO[14]));
- CAN0:
 // CANO -> RX
 ALT_IOBUF can0_rx_iobuf (.i(1'b0), .oe(1'b0), .o(can0_rx), .io(ARDUINO_IO[9]));
 // CAN-> TX
 ALT_IOBUF can0_tx_iobuf (.i(can0_tx), .oe(1'b1), .o(), .io(ARDUINO_IO[8]));
- SPI0:
// SPI0 -> CS
ALT_IOBUF spi0_ss_iobuf    (.i(spi0_ss_0_n), .oe(1'b1), .o(), .io(ARDUINO_IO[10]));
// SPI0 -> MOSI
ALT_IOBUF spi0_mosi_iobuf  (.i(spi0_mosi), .oe(1'b1), .o(), .io(ARDUINO_IO[11]));
// SPI0 -> MISO
ALT_IOBUF spi0_miso_iobuf  (.i(1'b0), .oe(1'b0), .o(spi0_miso), .io(ARDUINO_IO[12]));
// SPI0  -> CLK
ALT_IOBUF spi0_clk_iobuf   (.i(spi0_clk), .oe(1'b1), .o(), .io(ARDUINO_IO[13]));
- UART1:
-
This Top-level Verilog file is also available inside my Github repository
-
Save the file
-
Start the Compilation process of the previously builded Quartus Prime project
-
In case of an HPS I/O Fitting error run following TCL Script manually
--> Tools/TCL Script .../.../hps_sdram_p0:pin_assignments.tcl
-
In case of Error 14566: "The Fitter cannot place 1 periphery component(s) due to conflicts with existing constraints"
- Run following TCL Command:
set_global_assignment -name AUTO_RESERVE_CLKUSR_FOR_CALIBRATION OF
- Run following TCL Command:
-
To use FPGA I/O-Pins with the HPS is a FPGA configuration necessary
-
Both possible ways requiere different ".raw"-files
- For configuration during the Boot with u-boot use these export settings:
- Type:
Raw Binary File (.rbf) - Mode:
Passive Paralle x8
- Type:
- For configuration of the FPGA with Linux use these export settings:
- Type:
Raw Binary File (.rbf) - Mode:
Passive Paralle x16
- Type:
- For configuration during the Boot with u-boot use these export settings:
-
Use the export function of Quartus prime to generate these two files
-
For more informations look here
-
Now the configuration of the FPGA fabric is done. But to load this configuration and interact with it two different boodloaders and a embedded Linux system must be built. To help to simplify this huge development effort I designed for my own open rsYocto a building system. All components are pre-built and can by changed randomly later on. Internally the Altera make_sdimage.py script is called to put all components together and to build the final image.
You can use the rsYocto-Building script with all components included. Then you only need to replace the files you want to change. To include the previously built FPGA configuration files with the socfpga_nano.rbffile (FPGA configuration file written by the secondary bootloader) and optionally thesocfpga_nano_linux.rbffile (FPGA configuration file can by written by Linux) with your files. The using of this building system is described and availible on the rsYocto-Github repository in Step by step guide 5.
In the next parts I show the building process in details. You can skip this guide and use the final SD-folder with all necessary components included.
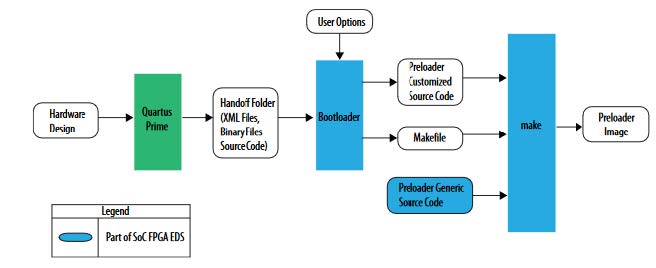
The job of the primary bootloader is the configuration of the HPS and the enabling of all choosen Hard-IP components. During the boot of this bootloader the SDRAM-memory system starts and the secondary bootloader (u-boot) is loaded.
For the Building of this bootloader Intel provides within EDS a tool called "BSP-Editor".
The following illustration shows the Intel EDS BSP Generator Flow for Cyclone V FPGAs:
The Intel Embedded Development Suite (EDS) works with Windows and Linux. I prefere Ubuntu Linux running as a Virtual Machine.
- Download Intel FPGA SoC EDS for Linux
- Download Link
- For this tutorial the EDS Version 18 is used
- Install Intel EDS
- Start with this command the Intel EDS shell:
	 cd ~/intelFPGA/18.1/embedded
	 sudo ./embedded_comand_shell.sh
- Use the next EDS Shell command to start Intel EDS BSP-Editor
(EDS shell)# bsp-editor - The BSP Editor automatically imports all configurations from the Quartus Prime IDE
- All possible settings are documented inside Intel’s EDS Development Guide
- Create a new BSP project by navigating inside the BSP Editor to: "File / New HPS BSP..."
- Select inside the appearing window the Quartus Prime Handoff Folder ".xml"-file
- Choose as the “Preloader setting directory” the Platform Designer "hps_isw_handoff"-Folder inside of the Quartus Prime folder
- Press "OK" to close the "new BSP"-window
- Modify the prealoader settings:
-
Choose SDMMC for the SD-Card as boot source by checking BOOT_FROM_SDMMC at following position:
- spl --> boot --> BOOT_FROM_SDMMC
-
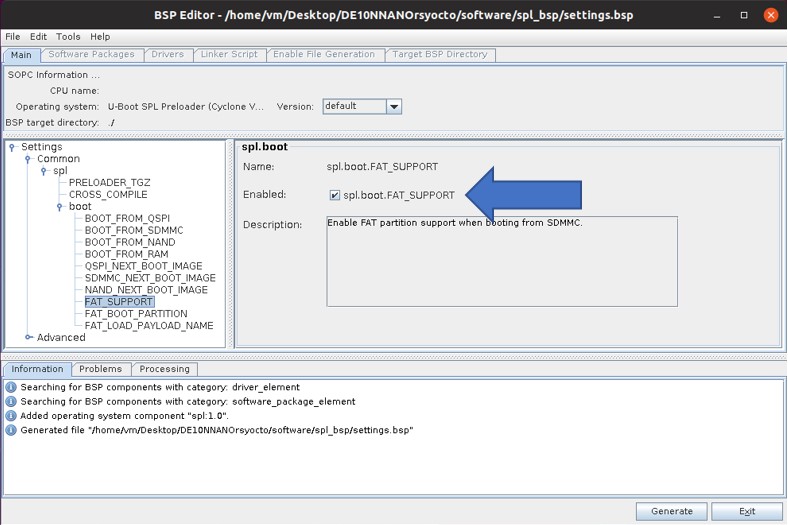
Enable the FAT-filesystem support:
-
Press inside the main BSP-Editor window the "Generate" button
-
The application generates all necessary code files for the primary bootloader
-
Close the BSP Editor
-
The BSP-Editor puts the generated primary bootloader code to the folder "software" inside the Quartus Prime Project folder.
- Navigate with the EDS shell to this folder:
cd <Qurtus Prime project> /software/spl_bsp
- Build the code:
(EDS shell)# make- Note: Be sure that this command was called inside the Intel EDS command shell!
- The compiler should output after a successfull build a file called "preloader-mkimage.bin"
- This file contains the executable bootloader and must be pre installed on the boot SD-card later
The primary bootloader starts the secondary bootloader (u-boot). His job is to enable the HPS to FPGA bridges, to pre-configre the FPGA fabric and to load Linux then. A final working u-boot executable is availible inside the SD-folder on the rsYocto-Github repository. The important part of the u-boot bootloader is the execution of a bootloader script. This feature is inside this u-boot version pre-enabled.
-
Create a new file: "uboot_cy5.script"
-
Insert following lines to the script and modify it on your own.
 #
 #  u-boot Bootloader script for loading embedded Yocto Linux for the Terasic DE10 Boards #
 #  Robin Sebastian (2018-20)
 #
 echo ********************************************
 echo --- starting u-boot boot sequence scipt (u-boot.scr) ---
 echo -- for Intel Cyclone V SoC-FPGAs to boot rsYocto --
 echo --- by Robin Sebastian (https://github.com/robseb) ---
 echo ********************************************


 # reset environment variables to default
 env default -a
 echo --- Set the kernel image ---

 setenv bootimage zImage;
 # address to which the device tree will be loaded
 setenv fdtaddr 0x00000100

 echo --- Set the devicetree image ---
 setenv fdtimage socfpga.dtb;

 echo --- set kernel boot arguments, then boot the kernel
 setenv mmcboot 'setenv bootargs mem=1024M console=ttyS0,115200 root=${mmcroot} rw rootwait; bootz ${loadaddr} - ${fdtaddr}';

 echo --- load linux kernel image and device tree to memory
 setenv mmcload 'mmc rescan; ${mmcloadcmd} mmc 0:${mmcloadpart} ${loadaddr} ${bootimage}; ${mmcloadcmd} mmc 0:${mmcloadpart} ${fdtaddr} ${fdtimage}'

 echo --- command to be executed to read from sdcard ---
 setenv mmcloadcmd fatload

 echo --- sdcard fat32 partition number ---
 setenv mmcloadpart 1

 echo --- sdcard ext3 identifier ---
 setenv mmcroot /dev/mmcblk0p2

 echo --- standard input/output ---
 setenv stderr serial
 setenv stdin serial
 setenv stdout serial

 # save environment to sdcard (not needed, but useful to avoid CRC errors on a new sdcard)
 saveenv

 echo --- Programming FPGA ---
 echo --- load FPGA config to memory

 # load rbf from FAT partition into memory
 fatload mmc 0:1 ${fpgadata} socfpga.rbf;

 echo --- write the FPGA configuration ---
 fpga load 0 ${fpgadata} ${filesize};

 echo --- enable HPS-to-FPGA, FPGA-to-HPS, LWHPS-to-FPGA bridges ---
 bridge enable;

 echo --- Booting the Yocto Linux ---
 echo -> load linux kernel image and device tree to memory
 run mmcload;

 echo --- set kernel boot arguments, then boot the kernel ---
 echo *** leaving the u-boot boot sequence scipt (u-boot.script) ***
 run mmcboot;
-
Run with the EDS shell following command to build this script:
mkimage –A arm – O linux –T script –C none –a 0 –e 0 \
-n u-boot –d uboot_cy5.script \
uboot_cy5.script.scr
-
Mkimage generates the compiled script file: "uboot_cy5.script.scr"
-
Replace this file inside the rsYocto SD-folder
Inside my designed meta-intelfpga BSP layer I describe in details how to get started with the Yocto project for Intel SoC-FPGAs.
Also I published a Yocto project meta layer to bring tools to update the FPGA configuration with the running Linux and to interact with simple command with the FPGA fabric.
Please follow these guides to build your own embedded Linux or overjump this point by using the finished rsYocto.
During the boot of Linux the Devices Tree is loaded. It contains system specific informations about the drivers to load. It is possible to use the Yocto project to build the device tree as well. I recommend the usage of my handmade published device tree. To enable the loading of other drivers for Hard-IP components, like I2C- or CAN-bus, use following lines:
- UART1:
serial1@ffc03000 { // Base address compatible = "snps,dw-apb-uart-16.1", "snps,dw-apb-uart"; // Drivers to load reg = <0xffc03000 0x1000>; interrupts = <0x0 0xa3 0x4>; reg-shift = <0x2>; reg-io-width = <0x4>; clocks = <0x29>; dmas = <0x34 0x1e 0x34 0x1f>; dma-names = "tx", "rx"; phandle = <0x63>; status = "okay"; // Enable this device }; - I2C1:
i2c@ffc05000 { #address-cells = <0x1>; #size-cells = <0x0>; compatible = "snps,designware-i2c"; // Driver to load reg = <0xffc05000 0x1000>; resets = <0x24 0x2d>; clocks = <0x29>; interrupts = <0x0 0x9f 0x4>; status = "okay"; // Enable this device clock-frequency = <0x61a80>; // Imported: I2C default freq.= 400kHz phandle = <0x54>; }; - SPI1:
spi@fff00000 { compatible = "snps,dw-spi-mmio-16.1", "snps,dw-spi-mmio", "snps,dw-apb-ssi"; #address-cells = <0x1>; #size-cells = <0x0>; reg = <0xfff00000 0x1000>; interrupts = <0x0 0x9a 0x4>; num-cs = <0x4>; clocks = <0x32>; status = "okay"; phandle = <0x5c>; }; - CAN0:
can@ffc00000 { compatible = "bosch,dcan-16.1", "bosch,d_can"; reg = <0xffc00000 0x1000>; interrupts = <0x0 0x83 0x4 0x0 0x84 0x4 0x0 0x85 0x4 0x0 0x86 0x4>; clocks = <0x7>; status = "okay"; phandle = <0x3a>; }; - Note: All in ALTERA linux-socfpga included drivers are here documentated
At this point all required files are together. Now a bootable image file with three different partitions embedded must be built. The rsYocto-Building can generate this system with a single command. Please follow these instructions how to download and use the rsYocto-SD folder.
The next table shows the requiered partitions with their content for this project.
| File name | Part of Creation in this guide | Description | Disk Partition |
|---|---|---|---|
| "makersYoctoSDImage.py" | - | the automatic rsYocto script | - |
| "make_sdimage.py" | - | Altera SD image making script | - |
| "infoRSyocto.txt" | - | rsYocto splech screen Infos | - |
| "network_interfaces.txt" | 6 | The Linux Network Interface configuration file (/etc/network/interfaces) | - |
| "rootfs_cy5.tar.gz" | 4 | compresed rootFs file for Cyclone V | 2.Partition: ext3 |
| "preloader_cy5.bin" | 2 | prestage bootloader | 1.Partition: RAW |
| "uboot_cy5.img" | - | Uboot bootloader | 2.Partition: vfat |
| "uboot_cy5.scr" | 3 | Uboot bootloader script | 3.Partition: vfat |
| "zImage_cy5" | 4 | compressed Linux Kernel | 3.Partition: vfat |
| "socfpga_cy5.dts" | - | Linux Device Tree | 3.Partition: vfat |
| "socfpga_nano.rbf" | 1 | FPGA configuration file written by u-boot | 2.Partition: ext3 |
| "socfpga_nano_linux.rbf" | 1 | FPGA Configuration that can be written by Linux | 2.Partition: ext3 |
-
Enable the CAN Network interface
- Create the new file: "network_interfaces.txt"
- This file contains the Linux Network configuration (/etc/network/interfaces)
- To enable Ethernet 0 with dynamic iPv4-address request add following lines to this file:
# Ethernet 0 auto eth0 iface eth0 inet dhcp - A Loopback is also necessary:
# The loopback interface auto lo iface lo inet loopback - The following instructions enable CAN 0 Network interface:
# CAN Bus interface
# Enable CAN0 with 125kBit/s
auto can0
iface can0 inet manual
  pre-up /sbin/ip link set can0 type can bitrate 125000 on
  up /sbin/ifconfig can0 up
 down /sbin/ifconfig can0 down
- Save and close the file
- The Building script copy that file to the rootFs (/etc/network/interfaces)
-
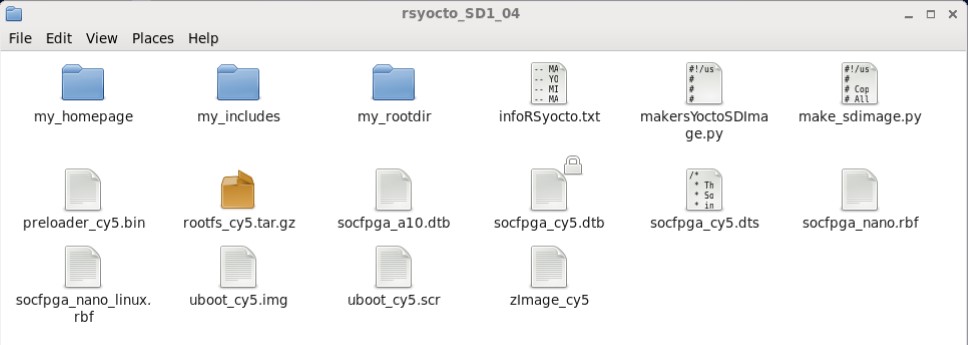
Files from other boards and platforms can be deleted. Replace selfcreated files. The folder should now look like this:
Use following command on a CentOS-Linux computer to start the building script:
sudo python makersYoctoSDImage.py The script will be generated a ".img"-file. It can be deployed to any SD-Card.
To install the embedded Linux image file to a bootable SD-card following these instructions. This guide shows how to setup a Terasic DE10-Nano board.
The Arduino shield header has a "SDA"- and "SCL"- pin for the I2C-Bus. In Part 1 the Hard-IP I2C-Controller 1
was connected to these FPGA I/O-Pins. Also here a Serial Port, a SPI master and a CAN Channel are connected.
On rsYocto the i2c-tools are pre-installed: follow these instructions
In this part shown how simple it is to transmit CAN-packages within a Python script with embedded Linux.
- To start the CAN0 execute this command on rsYocto to enable the CAN network Port:
ip link set can0 type can bitrate 125000
ip link set up can0
- Install
python-canwith python pip on the running rsYoctopip install python-can
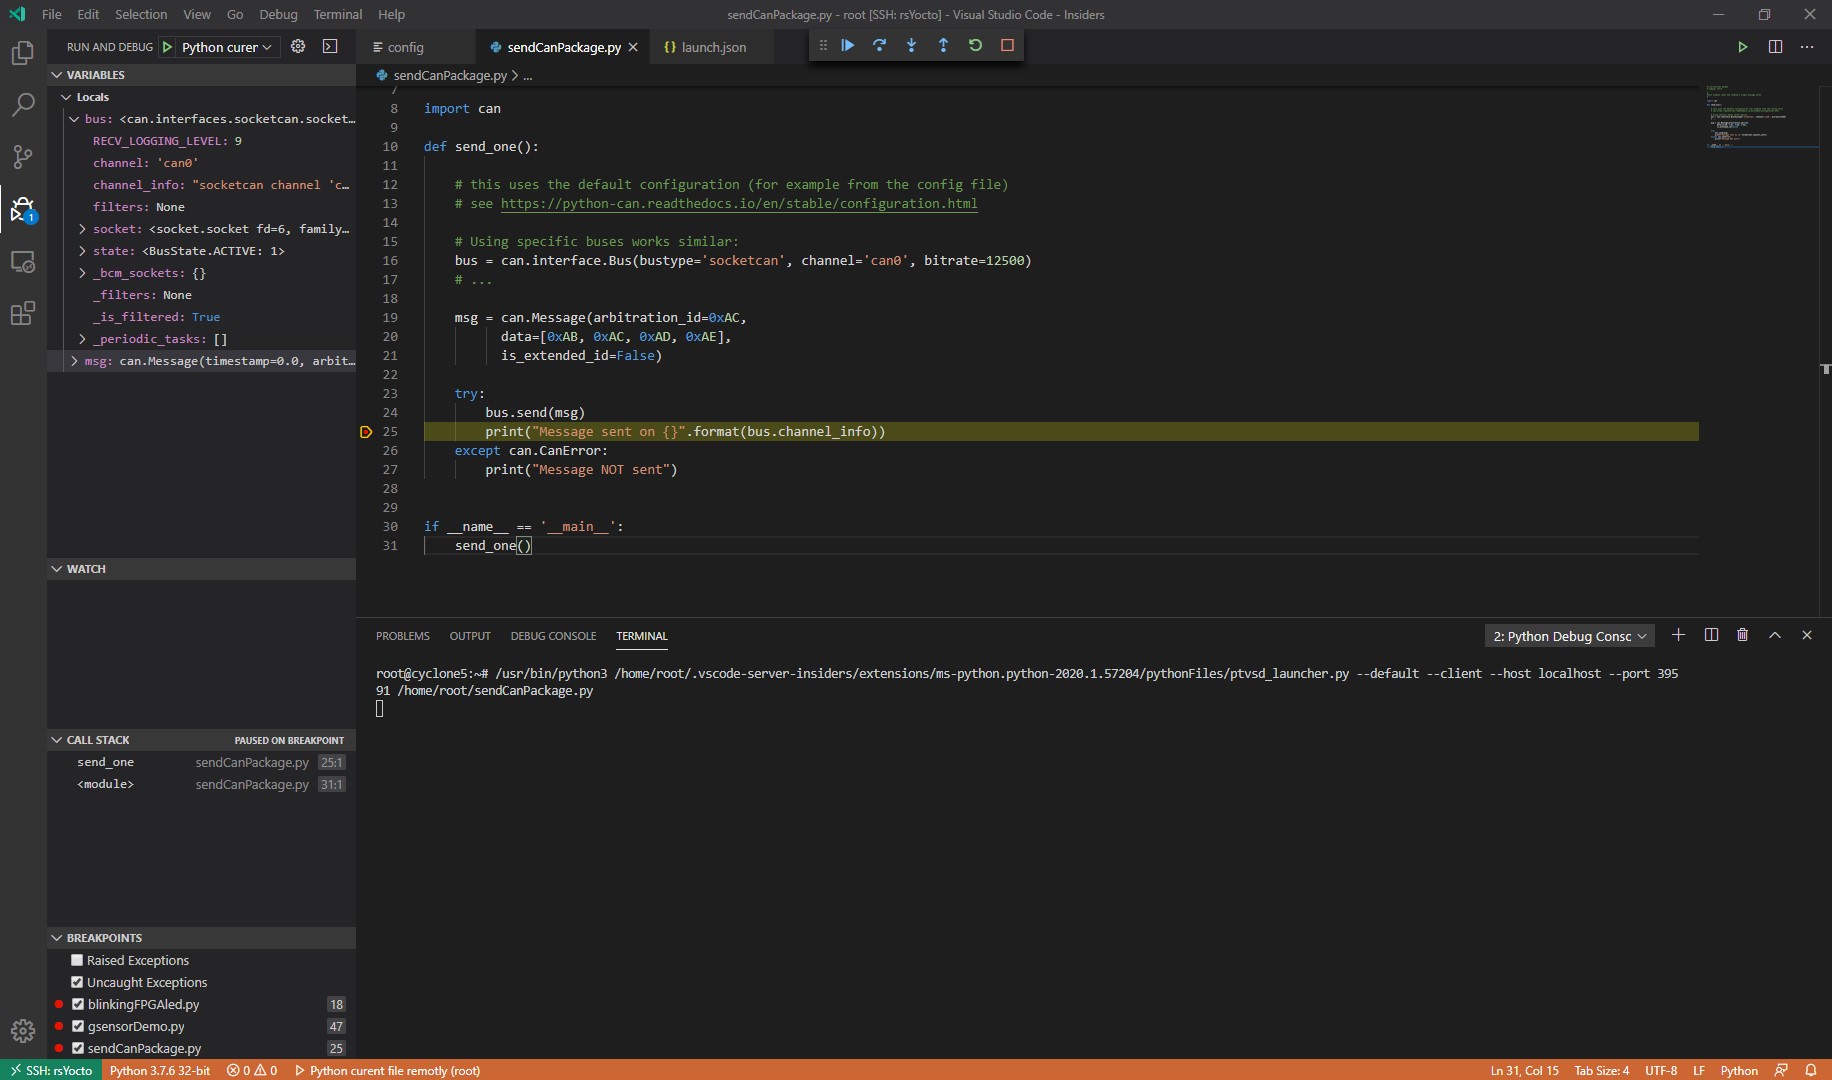
Use Visual Studio Code Insider to debug this python-can application remotely (see here).
Or to use the onboard nanoeditor to write the python code.
-
Create a new Python file, for example:
nano sendCanPackage.py
-
Insert following lines to this python file as shown in the python-can documentation
#!/usr/bin/env python
# coding: utf-8

#
#This example shows how sending a single message works.
#

import can

def send_one():

	# this uses the default configuration (for example from the config file)
	# see https://python-can.readthedocs.io/en/stable/configuration.html

	# Using specific buses works similar:
	bus = can.interface.Bus(bustype='socketcan', channel='can0', bitrate=12500)
	# ...

	msg = can.Message(arbitration_id=0xAC,
		  data=[0xAB, 0xAC, 0xAD, 0xAE],
		  is_extended_id=False)

	try:
		bus.send(msg)
		print("Message sent on {}".format(bus.channel_info))
	except can.CanError:
		print("Message NOT sent")


if __name__ == '__main__':
	send_one()
-
Save and close this python file or start a debugging session with Visual Studio Code Insider
-
Connect to the Adrunio Pin D8 to CAN TX and the Pin D9 to CAN RX on a 3.3V Can-Bus Transiver
-
Execute the python script
python3 sendCanPackage.py
-
Debugging of this code with Visual Studio Code Insider
-
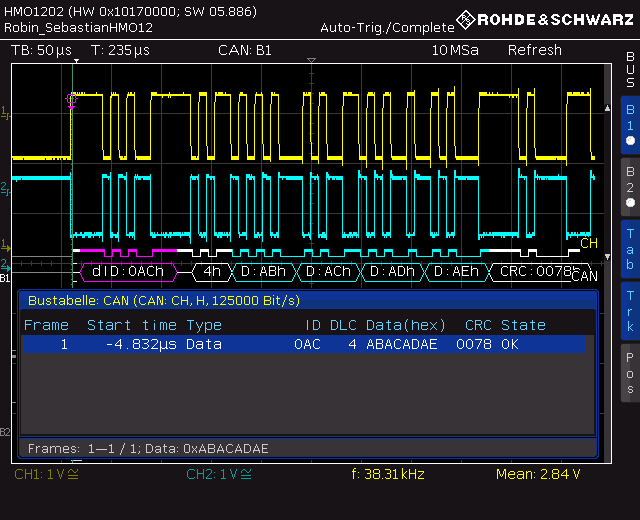
Now the Cyclone V SoC-FPGA transmits a CAN package through the Arduino header with the ID 0xAC and the Payload 0xABACADAE:
root@cyclone5:~# python3 sendCanPackage.py
Message sent on socketcan channel 'can0'
If no one acknowledged this package the Bosch CAN-Controller re-transmit the package with the maximum available resources automatically until a ACK happen. The embedded Bosch CAN-Controller can also detect linkage errors. In case of a missing connection to a CAN-Bus member a Kernel Message will be triggered and the CAN Controller shuts down. Use the following command to restart the CAN-Controller:
link set down can0
ip link set up can0
In the same way it is also possible to communicate with Adrunio Shields via UART,SPI or I²C. On rsYocto python scripts for these usecases are preinstalled.
With the remote development of Visual Studio it is also possible to write C++ -applications to interact with these buses (see here).
To read and write the AXI Bridge or write the FPGA configuration with the running Linux please look here.
- rsyocto; Robin Sebastian,M.Sc. (LinkedIn)
rsyocto is a self-developed project in which no other companies are involved. It is specifically designed to serve students and the Linux/FPGA open-source community with its publication on GitHub and its open-source MIT license. In the future, rsyocto will retain its open-source status and it will be further developed.
Due to the enthusiasm of commercial users, special features for industrial, scientific and automotive applications were developed and ready for the implementation in a highly optimazed closed commercial version. Partnerships as an embedded SoC-FPGA design service to fulfil these specific commercial requirements are offered. It should help, besides students with the rsyocto open-source version, commercial users, as well.
For commercial users, please visit the rsyocto embedded service provider website: rsyocto.com
