8 bit UART with tests, documentation, timing diagrams
For simulation and Electronic Design Automation
Consists of TX module and RX module. The two modules are also downloadable in an Icestudio .ice block, pre-packaged.
Full validation of the UART is described below in 30 tests.
Select the rates:
CLOCK_RATE = 12000000
BAUD_RATE = 115200
Select mode 8-N-1 or 8-N-2 (8 bits data, no parity, and 1 or 2 stop bits):
TURBO_FRAMES = 0   // The default 2 stop bits - more robust communication
TURBO_FRAMES = 1   // 1 stop bit - higher max bandwidth
The code: See UART8.v and supporting .v files (Uart8Transmitter.v, Uart8Receiver.v, ...).
UART.ice block: You can explore a hierarchical design workflow and plug this UART in your larger design:
![]() Download "
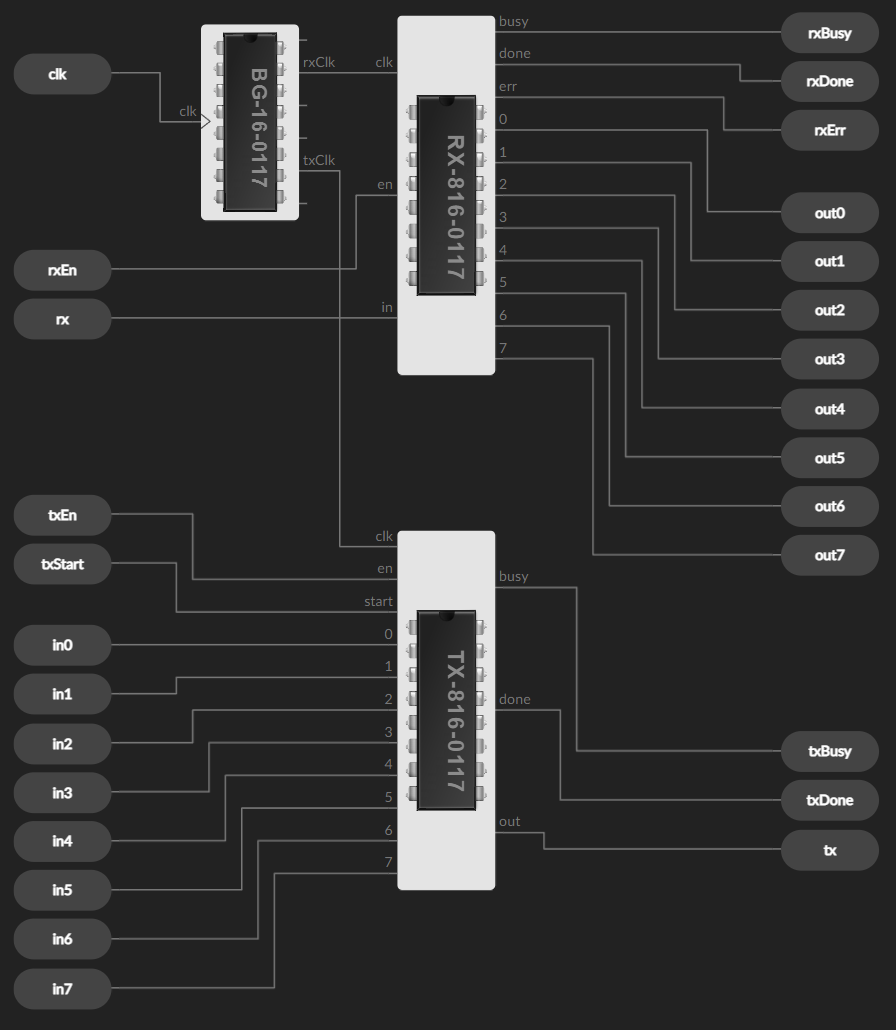
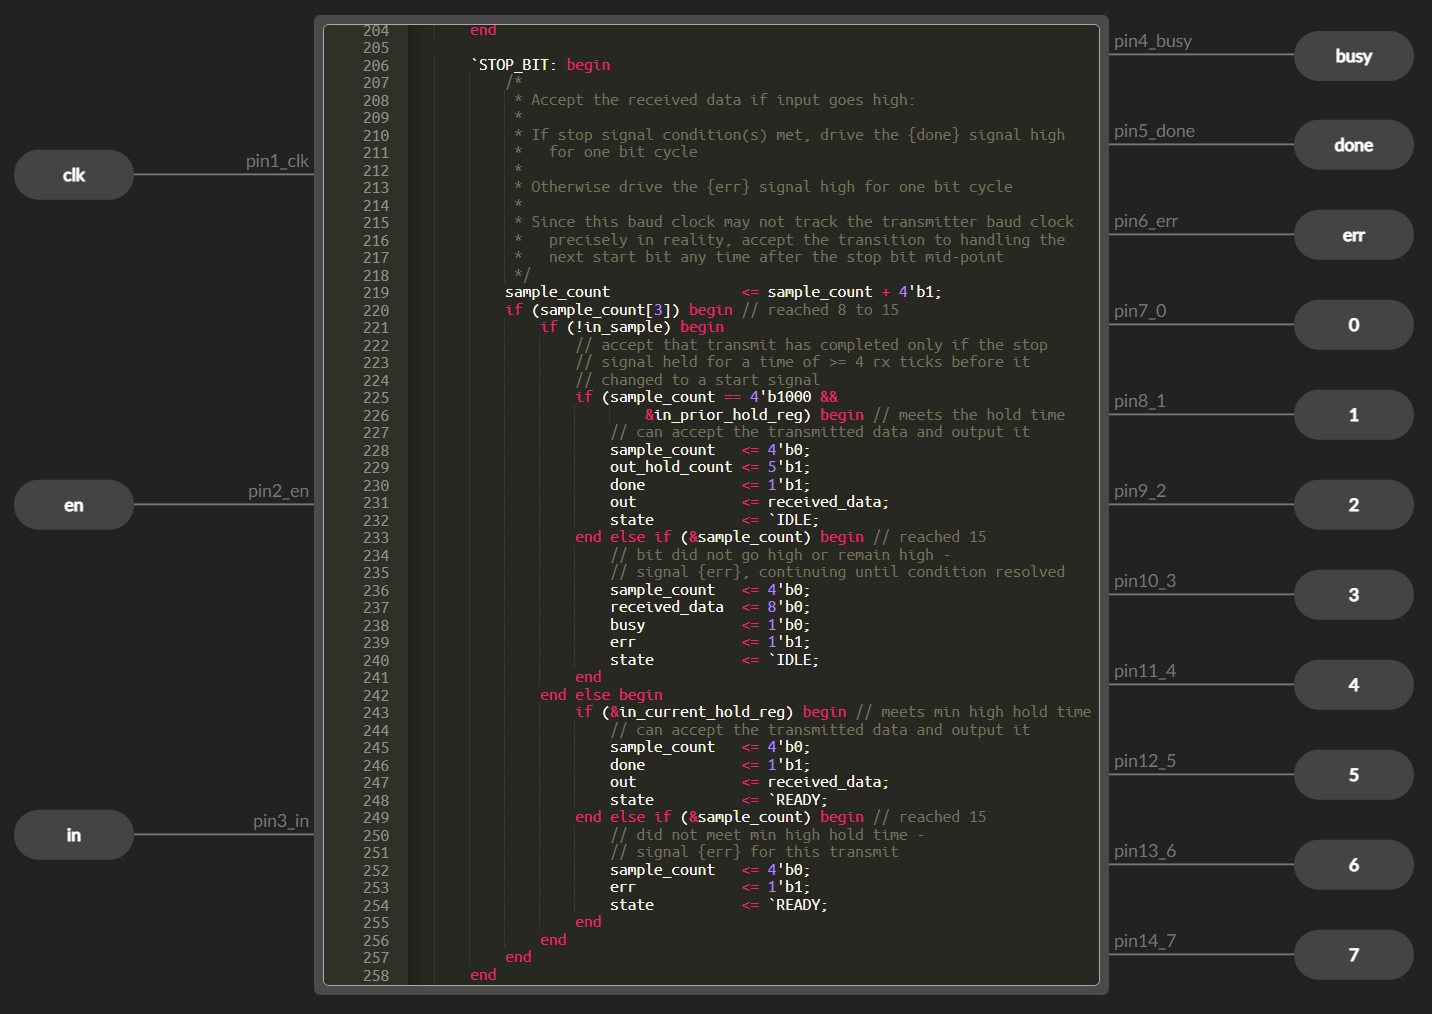
Download "UART01-V" device. Then use Icestudio for virtual breadboarding (aka programming an FPGA). Screenshots below show this: It mixes graphical editing with Verilog. The editing/design environment allows you to load a hardware design onto an FPGA and be testing how the circuit functions in minutes.
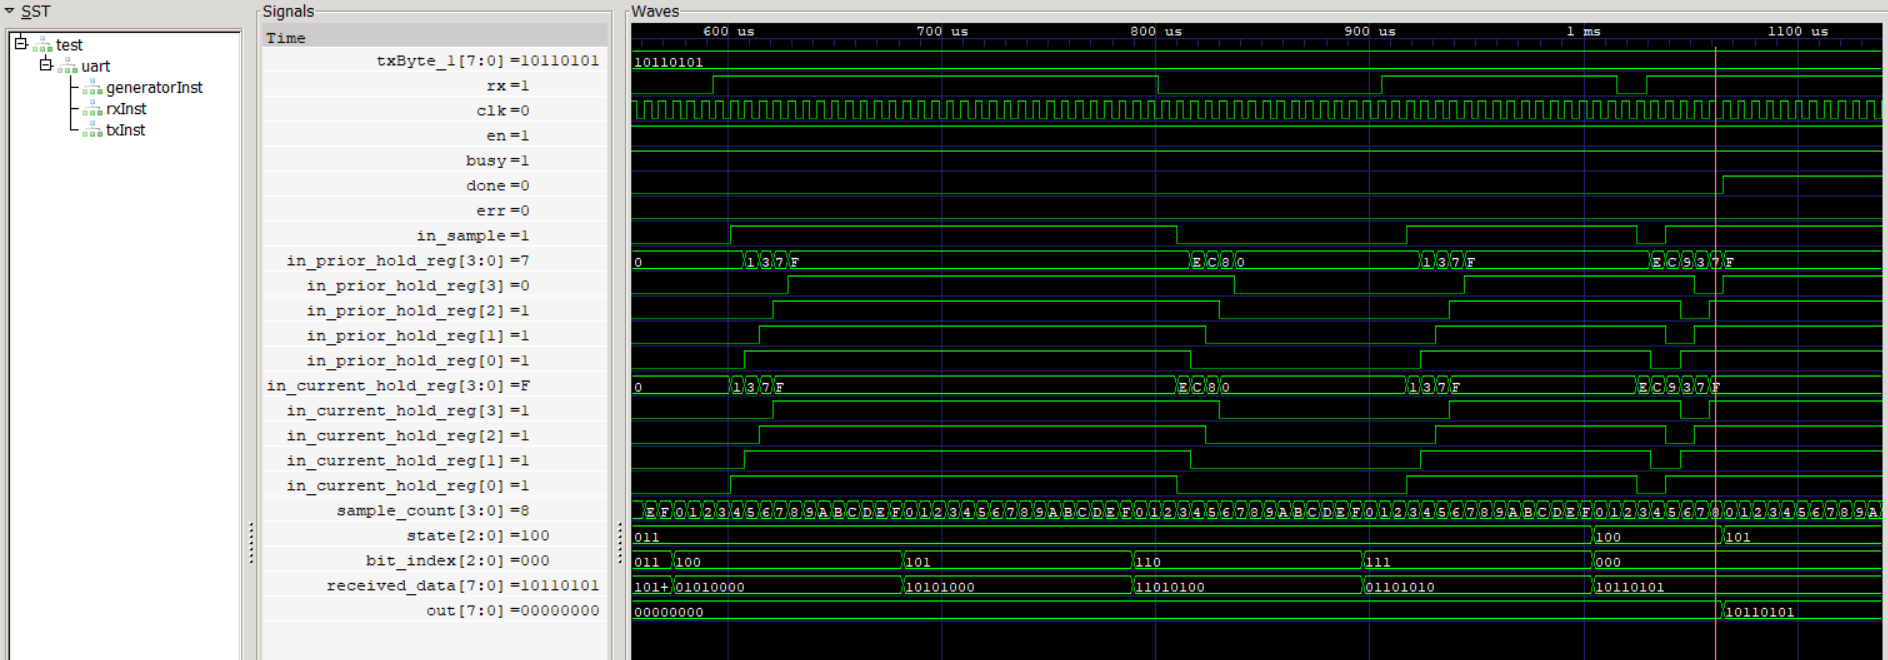
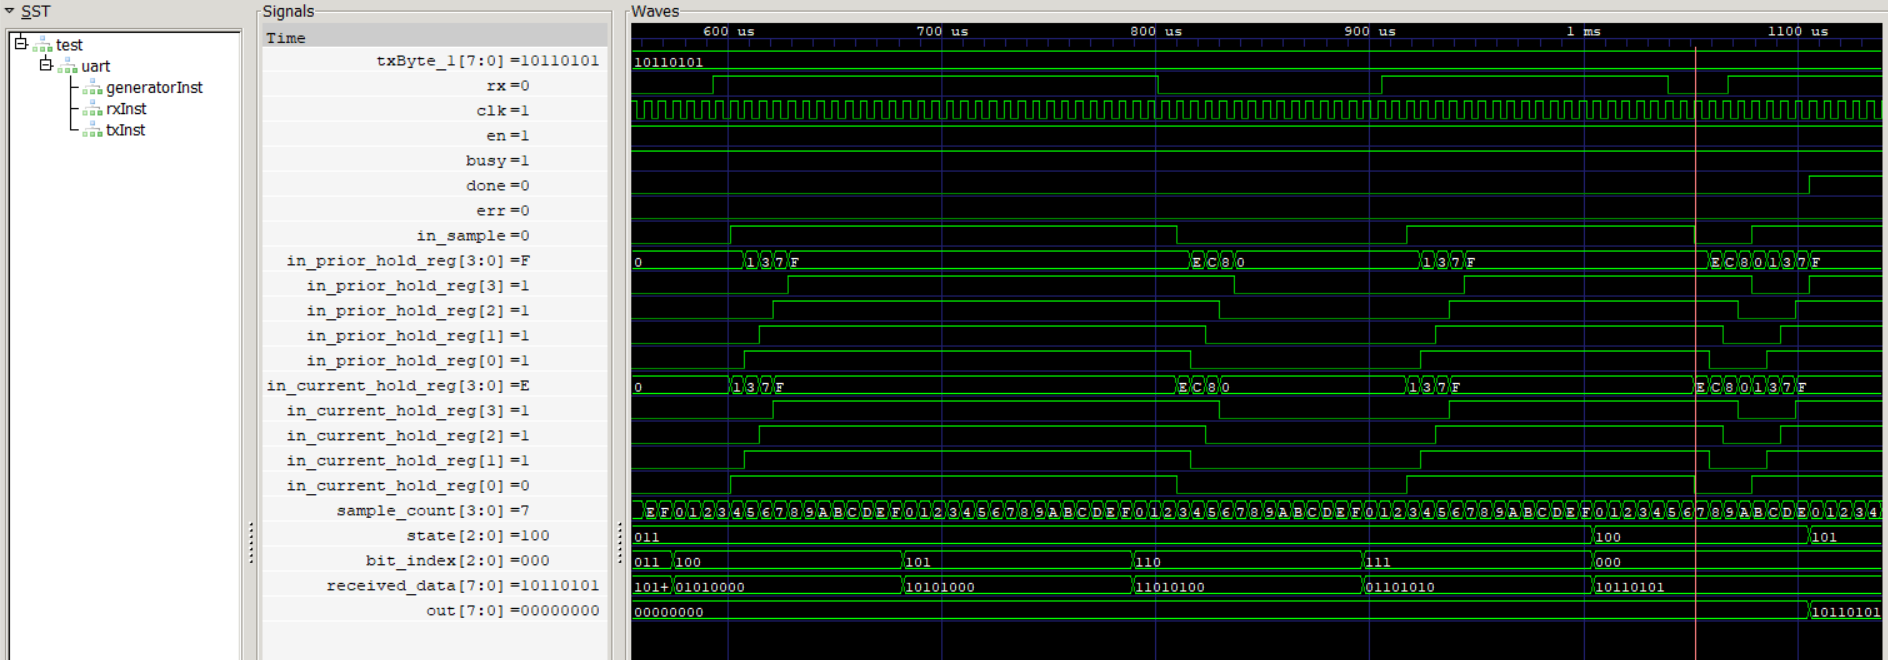
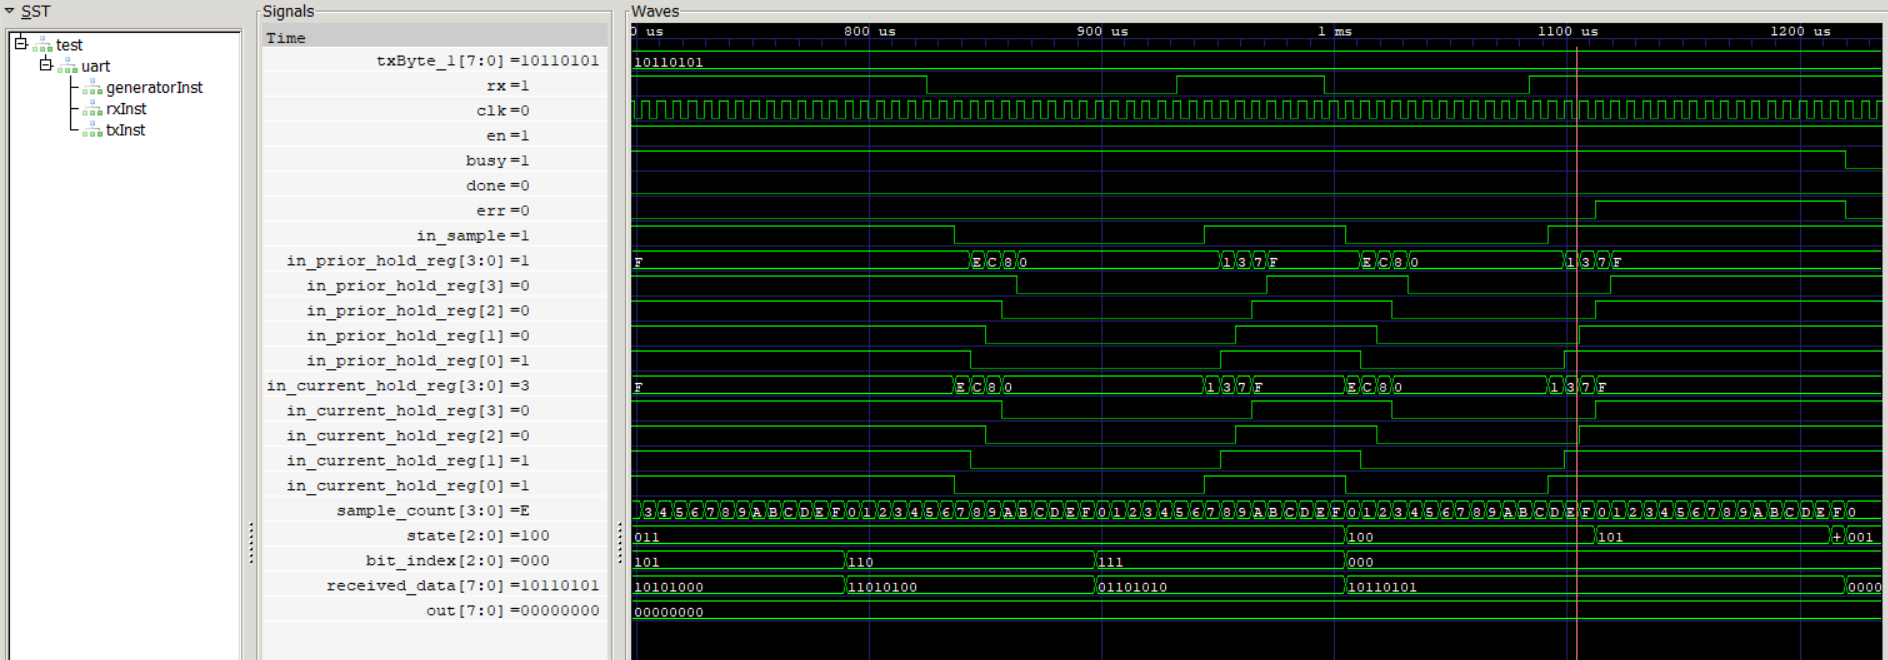
Tests section: The tests are meant to relate the visuals (zooming in on transmission waveform in a specific context) to the Verilog (line numbers in the code). Each different behaviour is described. Understand more about UART serial transmission, learn about the UART itself & how the code works, brush up on Verilog HDL. There are sidebars about interesting or educational details, that walk you into the Verilog.
The representation of the UART in Icestudio as it's placed and wired - the details inside are always expandable:
For reference
CodeCoverageIndex.md · Lists all the non-trivial if-else branches in the code; lists tests that cover each
The reverse index of the code coverage is below: From each test the code lines are linked, and highlighted.
Other notes
-
Red marker in each test points to where the essential action is
-
The tests without .png screenshots you can easily view with GTKWave on your own copy of the repo
Group 1 tests use two different UART chips, with one's transmitter talking to the other's receiver. A UART chip has the two fully independent submodules so transmission can go either direction between two systems.
Test results would be identical, however, if a loopback configuration were used: testing on one chip only, connecting its tx pin to its rx pin. The equivalence is demonstrated by test variant #1a: It's the same as test #1 but with the one-chip configuration. The delta of the test bench setup can be seen here: 1.v ←→ 1a.v.
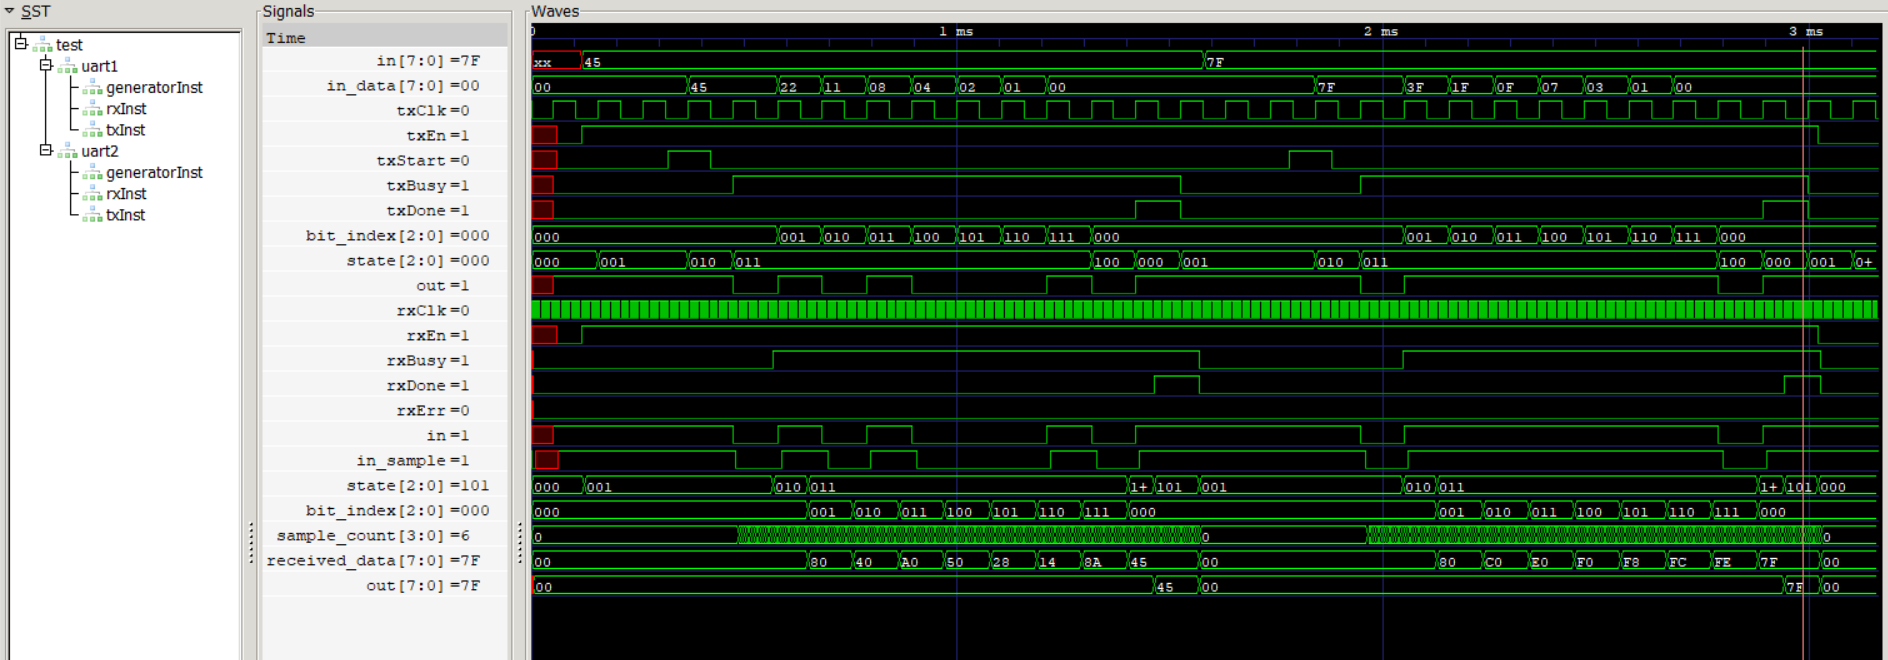
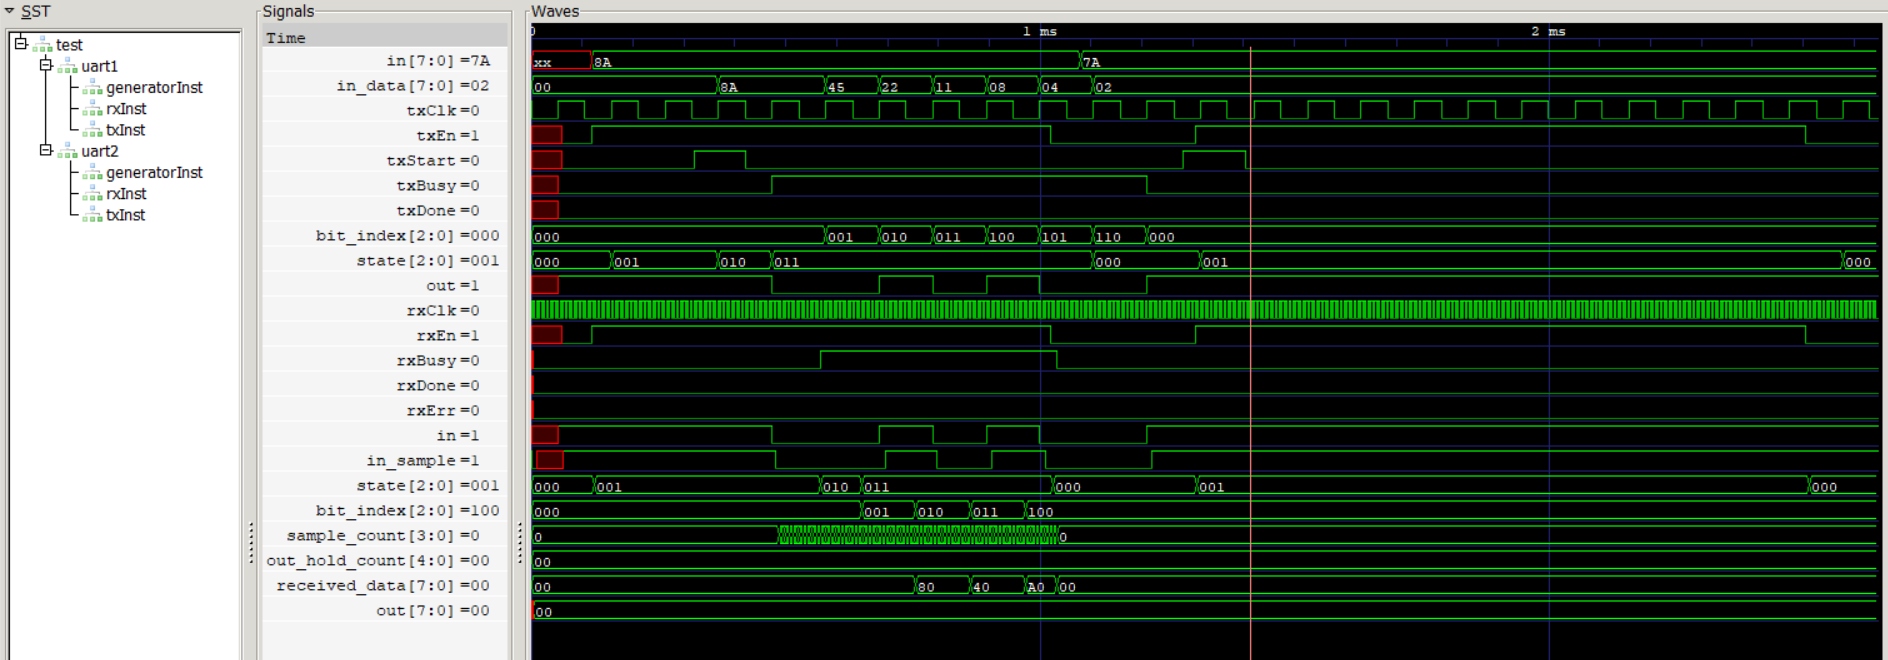
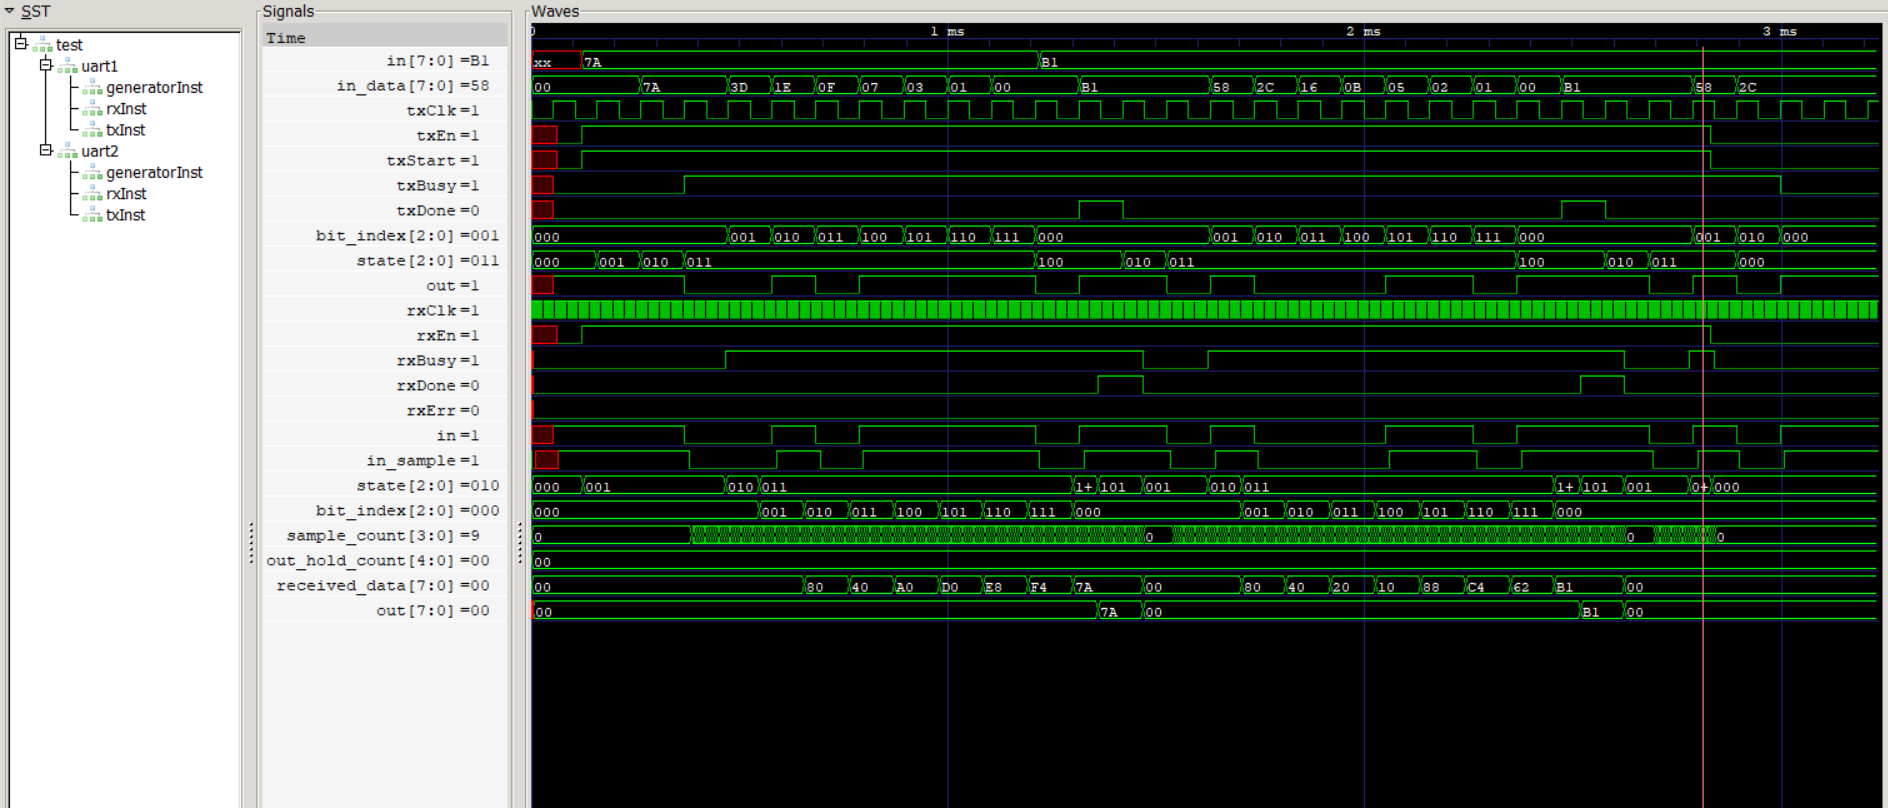
Group 1 traces show the communication as an integrated whole:
-
Relative timing of the bits sent, synched, received
-
How the Uart8Transmitter (top half) and Uart8Receiver (bottom half) each indicates when it's busy, done, or the transmission is in error:
txBusy,txDone,rxBusy,rxDone,rxErrsignals are for purpose of external control -
Result at a glance: When successful, the
outvalue at bottom matches theinvalue at upper left
Code Coverage Refs
Uart8Transmitter: 84, 127
Uart8Receiver: 133, 134, 148, 238, 269
Observations
-
txStartmust be asserted over the time when data byte "45" is accepted for transmit -
txEnandrxEnmust hold for the transmit and receive durations, otherwise the transmission halts in the middle -
rxDoneis the output that can be monitored for the purpose of grabbing theoutdata "45", becauseoutis only available for a limited time -
in_datais the byte of data to transmit;received_datais the byte being reassembled on the other sideBut what's the reason "in_data" changes during the progression?
First, note signal
inis shown at the top of tests #4 and following - not shown in this test.inis a wire by which the data,45, is presented to the transmitter.in_data, however, is a register accepting that data.The bits are shifted through the register (
Uart8Transmitterref above, line102). When the lowest-order bit of the5is taken away and shifted out, what's left is2; the higher-order bits that form the4shift to follow, so what's left in that position is2.The
45->22->...is just an implementation detail, but worth mentioning because the design choice does not help with understandability and transparency. Not many people will ever look at that value inin_data, but you are looking at it. So the reason it is shifted 8 times is that each bit is only needed once by the next stage in processing, the bits are needed in order, and that's it: They can be thrown away as the progression happens. The shift register mechanism is very practical, very no-frills for the purpose required (see comment at line102).received_datashows it has the same implementation. Given that the lowest bit comes first in the transmission sequence, the shift implementation dictates how it needs to work: the bit shows up in the highest bit position, following which it progressively moves into place!
Tolerance for mismatch in transmit, receive clocks
Observations
-
Tests #2 and #3 tweak the parameter
RX_OVERSAMPLE_RATEto distort the relation betweentxClkandrxClk -
By design, the frequency ratio is
1:16, but in reality the transmitting and receiving UARTs' clocks are independent, so unsynchronized. A degree of synchronization occurs through the UART protocol, though: Every 8 bits the receiver waits and listens for the idle-to-start transition. See the idle waiting interval in other tests, for example #4, #5 -
The idle interval between each 8-bit packet gives a "reset" for sampling drift (from the precise middle of each bit) that may build up
Observations
RX_OVERSAMPLE_RATEis outside the range where the sampling of 8 bits by the receiver actually aligns with the 8 bits, so this demonstrates how communication will go wrong when two systems don't have the same UART protocol configured, or don't have the same clock rate
Two transmission frames: Enabling, disabling and the use of "txStart" signal
Code Coverage Refs
Uart8Transmitter: 127
Observations
-
Demonstrates the indefinitely long idle time for the transmitter (while enabled): After
txBusyandtxDone, transmitter state is001 -
IDLEstate001is ended by thetxStartsignal being clocked in -
Receiver is very much the same, except it relies on the transmitter to wake it from
IDLEstate001 -
Note transmitter
outand receiverin/in_sample: The1value of these is known as a "mark" and it signals waiting, in a state between transmits (terminology that I use here will be "stop bit"). The drop to0is the signal to start receiving. Because it is not the data yet, but a fixed length pause before the data, this0is known as a "space" (terminology here: "start bit") -
Second transmission frame is shortened, but the cutting-off is not enough to affect the result since it's during the output. Note when
rxEndrops to0: It makes therxDonepulse shorter thanrxDonein the first frame, it makes the state101shorter, and makes the availability of the "7F" data shorter
Code Coverage Refs
Uart8Receiver: 244 (*for second frame)
Code Coverage Refs
Uart8Transmitter: 84
Code Coverage Refs
Uart8Transmitter: 84
Code Coverage Refs
Uart8Transmitter: 84, 115, 116, 120, 123
Uart8Receiver: 238, 269
Observations
-
For this mode,
txStartdoes not go low; so for each frame theindata just needs to be set up in time to be captured inin_dataand transmitted -
Limit time for set-up of
in: Before the high-going clock at the high-goingtxDone -
This trace shows a third transmit starting, because
txStartgoes low too late at the end of second transmit -
Since this trace is longer, it reveals there is a lot of clock mismatch
How much clock mismatch is there?
By the end of 8 bits, timing appears about 3.5 RX clock periods off compared to the TX clock (for the baud rate chosen for this testing, anyway).
The mismatch comes from round-off error: It's the fault of
BaudRateGenerator's simplistic code; so it's implementation, not testing-related. (As such, it is a factor of the chosen baud rate.)
Observations
- The second transmit data
inis set up just before the data capture; #9 shows earlier in the same clock cycle
Observations
-
Unlike in #9 and #10, the second
indata byte "B1" lags; at the moment of the high-goingtxDone, the previousinvalue is re-captured inin_data -
Shows a third transmit starting, because
txStartgoes low too late at the end of second transmit -
This test bench uses a feedback method of control to shut off
txStart; so it's suggestive of the idea of external control of the UART; but these tests do not go into how you can use outputs for external control, nor how to decide the timing of inputs -
In general, the test benches rely on tuned timings to present the inputs according to the intent of the test - in other words, empirical or ad hoc timings. Examples to illustrate:
Code Coverage Refs
Uart8Transmitter: 115, 116, 118
Uart8Receiver: 79, 282
Observations
-
Here the UART is instantiated with parameter
TURBO_FRAMES = 1, and it means the transmitter sends a "stop bit" of the duration of 1 bit rather than duration 2 bits -
Documentation for the
8-N-1,8-N-2modes: SeeUart8Transmitterheader -
This mode
8-N-1provides the maximum bandwidth: It's an effective data rate of 80% over the serial line, because 10 bits are transmitted for each 8-bit packet -
But I gave the Verilog code a default of
8-N-2,TURBO_FRAMES = 0, because it fits the project's purpose, namely: simulation & testing, either for the UART's own sake or to support other projects in development; and also: education, visualization. So by default, the UART might as well be more bullet-proof in use; if you are getting specific about your use case, then you'll set the parameters -
The Verilog that implements the
TURBO_FRAMESfeature (seeUart8Transmitterrefs above), deserves a note for the readerNot 100% transparent Verilog implementation
The code for
STOP_BITstate waits in that state for either1tick or2- but how, and why, is it using thatdonevariable?You need to know the meaning of "
<=", in context, in procedural block code.Specifically,
done <= 1'b1;appears to do something, but remember, its change to the value is not applied till the end of the time slice; consequently, the code after itif (done == 1'b0)is referring to the value at the current time beforedoneis changed at all; so it is not a mistake!The code
done <= 1'b0;in the same block is simply contradicting (overriding) the priordone <= 1'b1;which is (was) pending. ...So you see that that makes perfect sense as well!Those are hints to reveal how the
if-elsecode works to introduce a single-clock-tick delay (that is, an extra one). The logic could present itself more clearly if there was a separate new variable, or another state, but for convenience and economy it uses variabledonethat is boolean and is already at hand.
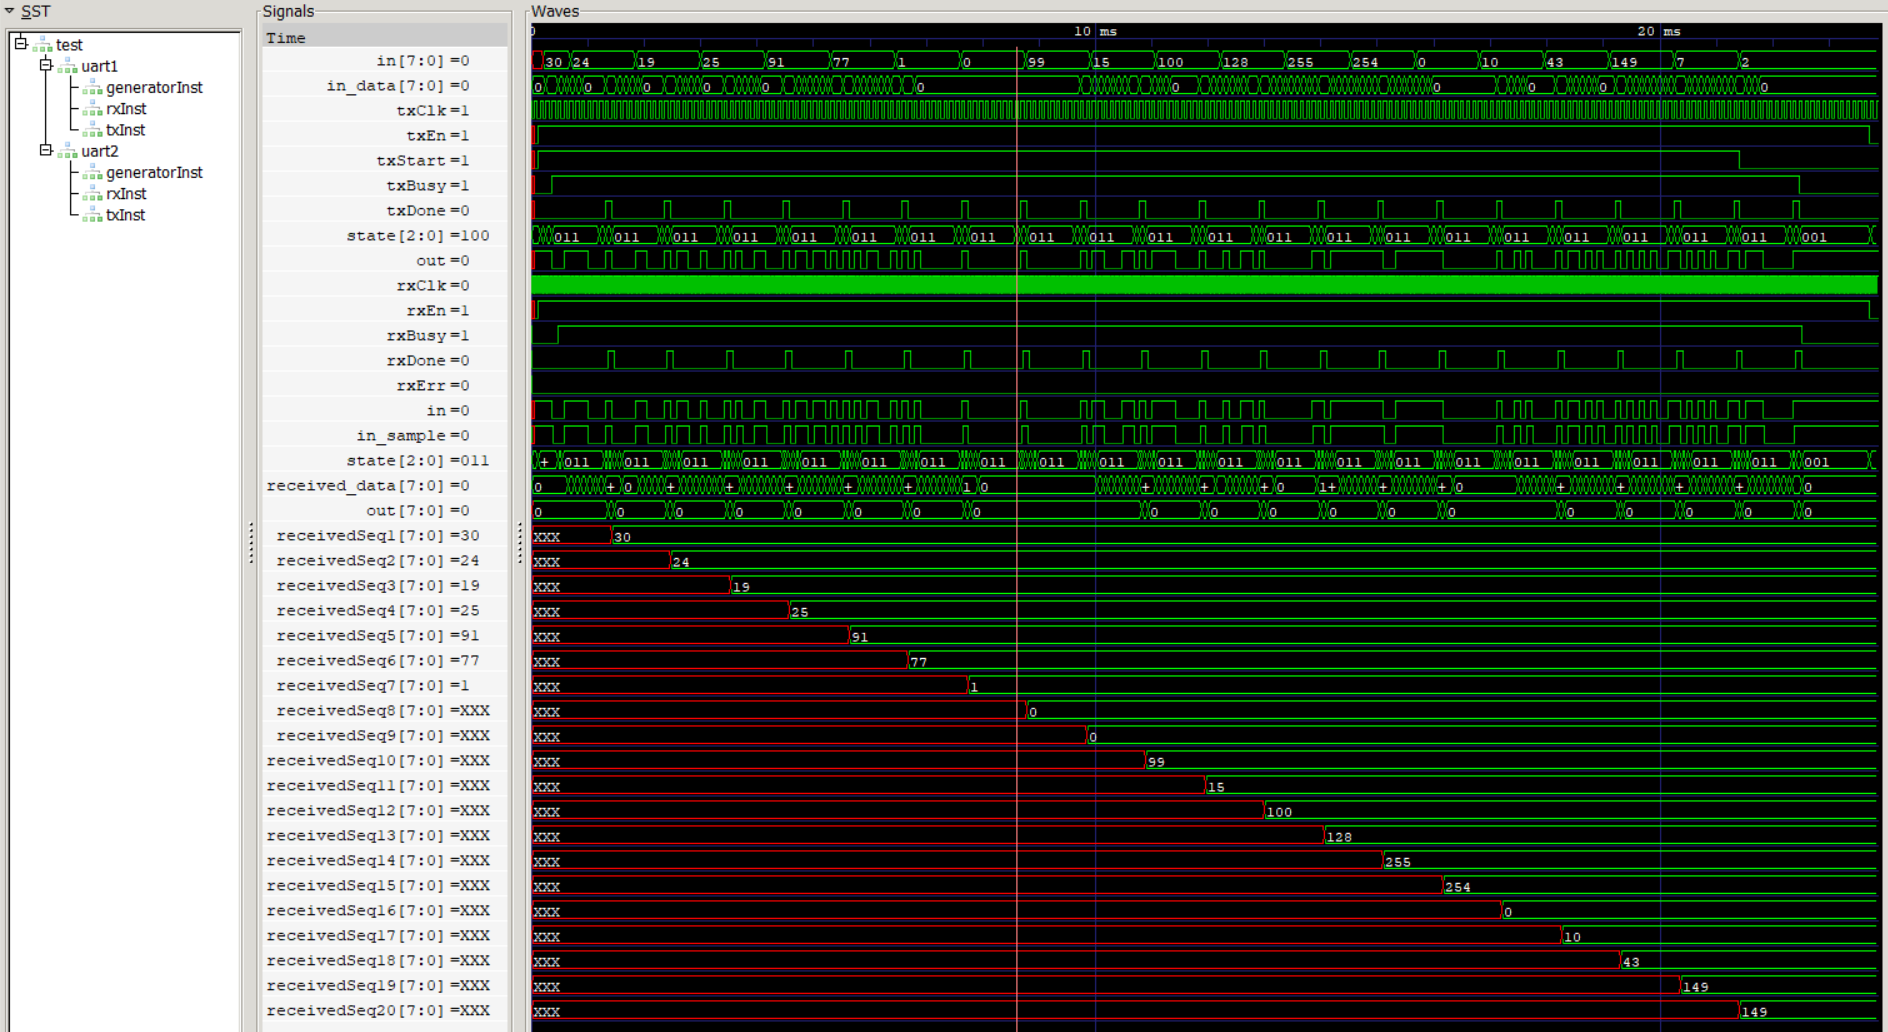
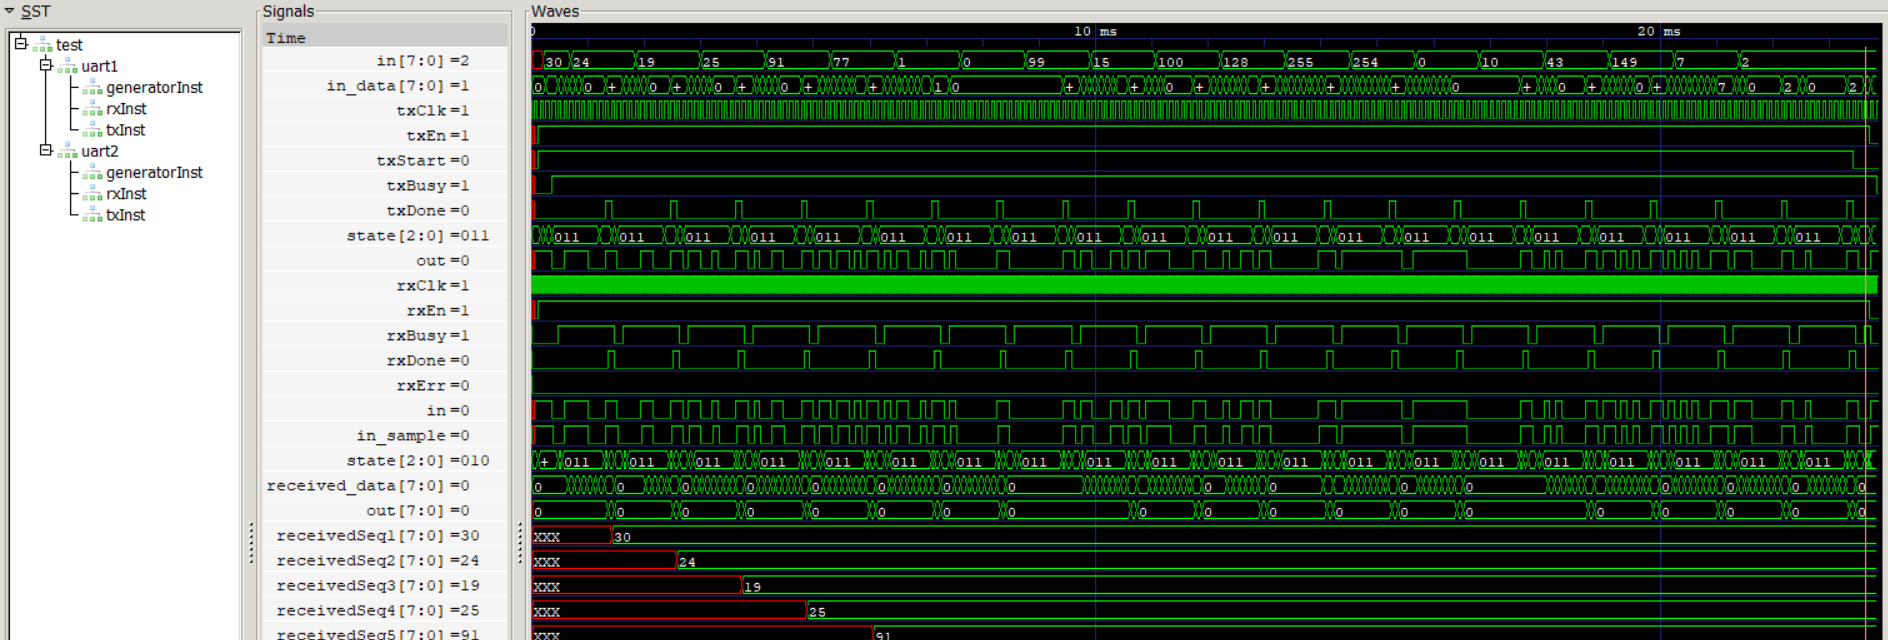
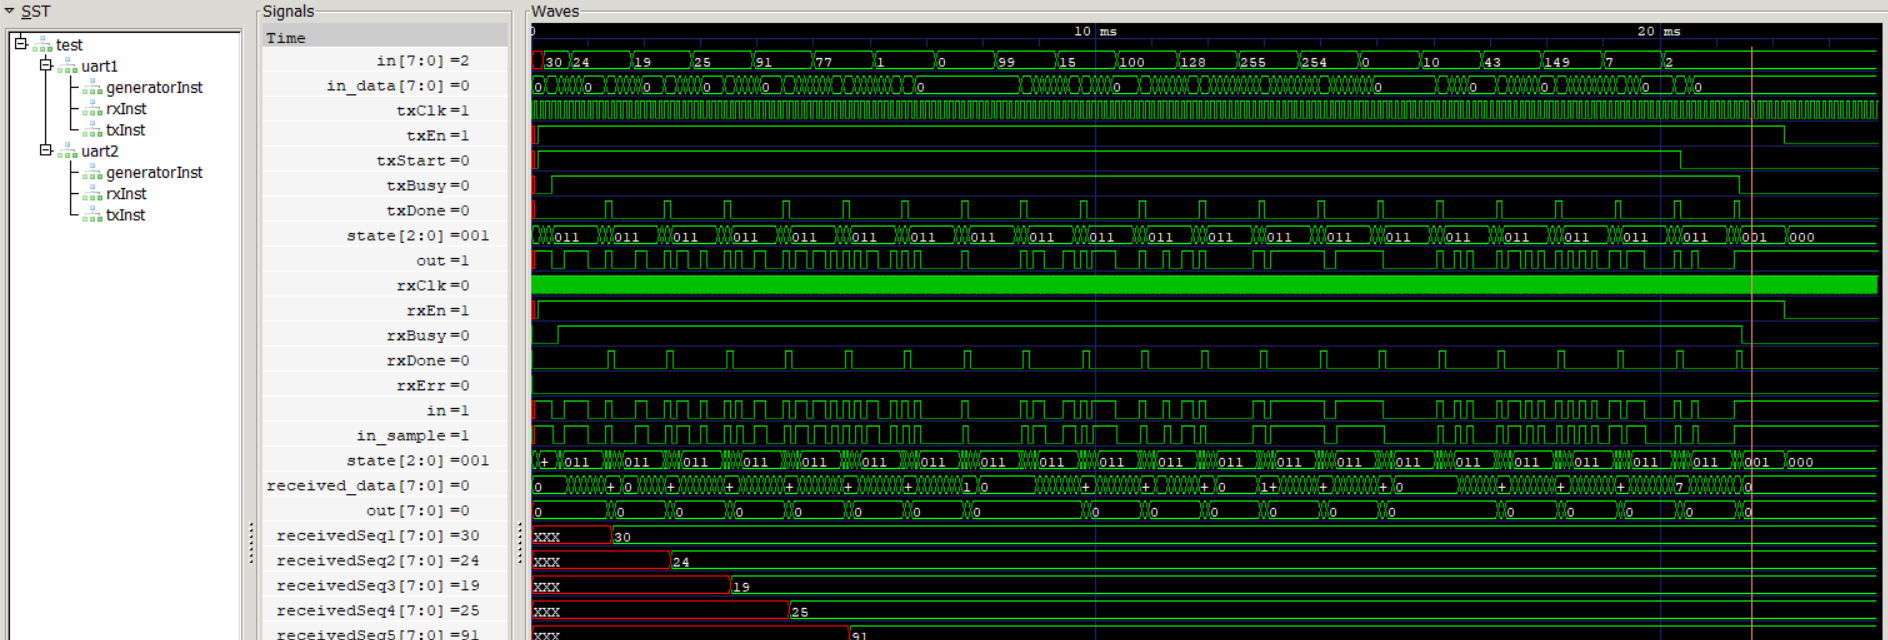
Twenty transmission frames continuous mode: 8-N-1, 8-N-2
Code Coverage Refs
Observations
-
The differences between #13 and #14 are seen in:
outof the transmitter: The narrowing of the high (stop) signal which is the pulse directly below eachtxDonepulserxBusyof the receiver: The disappearance of the one-tx-clock-periodIDLEstate- Completion, at the red marker, about 1.5ms earlier
Observations
-
Input byte "
99" misses its deadline; however, it is still present at the input for next data capture, so it is transmitted -
The bytes after it are all accounted for, synchronously, until byte "
7" misses its deadline -
This shows the virtue of limiting the length of bursts of data sent with this simple protocol; if each burst in this test were 8 bytes (frames), followed by driving the
txStartsignal low to go on to the next burst, then there would have been no data errors (*note this is an extreme example though - 9 bytes for the sync to go off) -
There is no
rxErrsignal for this scenario because there is no breach of the protocol
Group 2 tests are for the receiver RX part of the UART.
The TX module is fairly deterministic, and it's been tested by all the transmits of the Group 1 scenarios.
The RX module has a tougher job, because it receives an arbitrary signal pattern as input and must make sense of it. It must lock on to accept good serial data (a frame), or otherwise must reject a data stream if the data doesn't start cleanly from a baseline signal, or if it doesn't end in the accepted way to certify it's well-formed.
These test signals don't have to come from a well-behaved or realistic TX module. You could consider them from a potentially "malicious" transmitter.
To note: If the protocol requirements are not met, and the output isn't the 8-bit byte expected, then the output can include an error signal or can just be garbled data.
So, these tests are fine-grained in order to nail down the behaviour of the RX device by exploring the range of signal waveforms possible (mainly the variety of timings; and the signal held low when it should revert to high or vice versa; in addition, high-low or low-high glitches). Variants of tests are necessary to do this. I named files with an "a" suffix, like #18a.v, when they were used to explore changed waveforms - over a range related to that test - to keep them separate from the canonical test.
Code Coverage Refs
Uart8Receiver: 134
Observations
-
Look at
in_samplerather thanrx.rxis the external signal to the Device Under Test;in_sampletracks/follows it, but it's in a register. So the latter is the reference: All subsequent or coincident signal changes are tied to it -
clkin these traces isrxClk(16x higher frequency than thetxClkof this communication)
Code Coverage Refs
Uart8Receiver: 141
Observations
-
Here's an example of the
errsignal turning on (errisrxErr) -
The device is in state
001the whole time; aftererrclears, it's ready to go on, to start receiving data -
Look at the
Uart8Receivercode ref to see where and whyerris signaled; at around the same place in the code, you'll see the condition under which it's clearedSome Verilog hints to understand the code
The "
&" operator of "&in_prior_hold_reg" collects all the bits, and the expression is true if they're all1. Secondly,in_prior_hold_regis a vector of size4, and is a shift register. So it provides a connection to time passing:4ticks of the clock for it to fill up (say with1s).Ticks of the clock are implicitly being examined, and waited for, by this section of code:
4ticks,8ticks,12ticks; and16ticks is the nominal duration of an incoming bit being sampled. If you understand line152:sample_count <= 4'b0100;and howsample_countis being used cycling from0toF, then you've understood a lot of the code and the protocol, and how a Finite State Machine is useful.When
in_sampledrops to0, that's the trigger for recovering from the error:in_prior_hold_regis losing its1bits and goes away from theFor "&in_prior_hold_reg" condition;sample_count, if it continues to increase, will allow moving from theIDLEstate toSTART_BITstate.
Code Coverage Refs
Observations
-
Compared to #17, it's a different condition, a different code branch that turns on the
errsignal -
Note below and in some other tests a "variant" test bench is included:
- This was used to plug in different wait-time numbers, basically a range of timings for this specific signal and transition that's being tested; the process can find and go beyond the threshold where the response changes
- The variation can be down to individual clock ticks, because exactitude is needed if there's any doubt or there could be "off-by-one" errors (*there are examples later of single-clock-tick issues & fixes; I'm particularly thinking of #20 and #28, #29, #30)
- (I also made variations to test benches to switch input values,
1to0etc.; for example, when a0is lined up as first bit after the "start" bit or a1is lined up as last bit before the "stop" bit, these are edge cases needing to be tested)
Variant #18a
-
Focuses on the high in
IDLEstate after a false "start" bit (the signal has gone high too early) -
18a.vline63:#230is too short |#250meets the minimum |#300long
Code Coverage Refs
Uart8Receiver: 158
Observations
-
Start is recognized at the time a high signal eventually holds for a full
4ticks; thenerris cleared -
As in #17 and #18, the test ends in
IDLEstate, looking to proceed after the low signal holds for12ticks
Code Coverage Refs
Observations
-
Stop bit recognition and the associated transition to next frame is the most complicated logic, so numerous tests are devoted to it
-
Some of the issues:
-
Allowed detection time of the
1has double requirement: must be half way into the nominal sample period or>= 8clock ticks (seesample_countat red marker); and has had continuous hold time of>= 4ticks (seein_sampleat red marker). -
The stop bit signal doesn't have a defined length. That's because the start bit
0following the stop bit1- "space" following "mark" - defines the start of a next frame. The code has to be able to respond to the drop to0("!in_sample") from multiple locations, and this may lie within any of the 3 states:STOP_BIT,READYorIDLE. -
Raising the "
done" signal plus "out" signal - or alternatively an "err" signal - then sustaining the signal is the purpose of theREADYstate. But this timed functionality is actually decoupled from the state somewhat; that's because of the overlap of handling the start bit while simultaneously signaling (see line282for this - observe the use of a second counter).
-
-
The reader can explore the meaning of splitting
in_current_hold_regfromin_prior_hold_regInteresting Verilog code down to the clock tick
These "current"/"prior" variables are views into the register that stores the most recent
insignal values/changes. Picture a shift register that keeps the 4 most recent values: This information is the look-back that allows for signal hold time checks, up to length 4.Line
238is the only placein_current_hold_regis used.At the red marker on the trace: The logic decision for state transition can and should be made at the fourth tick, and the value seen by
in_current_hold_regisF; comparein_prior_hold_reg.For the other logic (2 locations in the code),
in_prior_hold_regdoes the correct job checking the hold time, when it reachesF.
Variant #20a
Code Coverage Refs
Variant #21a
Code Coverage Refs
Variant #22a
Code Coverage Refs
Uart8Receiver: 228
Code Coverage Refs
Observations
- This test covers an edge case of the
errtests #17, #18 and #19
Transition between two frames: Overlap of done and error signals
Code Coverage Refs
Observations
-
Shows
donesustained for16-tick cycle, and this overlaps with the next frame start -
Passes the condition at line
134, immediately on entry toIDLEstate
Code Coverage Refs
Observations
-
The
donesignal counts out to16as required -
err, caused during the next transmit start, overlaps and actually ends beforedoneends
Code Coverage Refs
Observations
-
Shows going to the
READYstate, but only remaining in that state for a few clock ticks; whereupon the next frame starts -
Despite the transition from
READYtoIDLEstate,doneis sustained for a16-tick cycle; this is implemented by moving the value insample_countover toout_hold_count(line287) -
At line
287, the value assigned toout_hold_counttracks whateversample_counthas gone up to by that time - It does not usesample_count <= 4'b1;from the previous line, for the reason explained above about a value not changing till the end of a time slice, in procedural block code
Variant #27a
Code Coverage Refs
Uart8Receiver: 274
Observations
-
Shows a complete
READYstate of exactly16ticks; whereupon the next frame starts -
At the red marker when
sample_countisE, nothing happens -
In this particular case
in_sampledrops to0betweenEandF -
When
sample_countisF, the assignments after line274are what start the next frame, and they start theIDLEstate, and the "start" bit hold check of counting12ticks -
If you follow further: In the
IDLEstate, the condition at line132holds, the condition at line133does not hold, and so the counting continues in the branch at line146 -
The logic fix for getting #28 working properly impacted some of the traces - the change was non-functional, only to an internal signal: a transit through
RESETstate was eliminated. Which I liked. This delta for test #1 shows this change, atstateat the red marker: 1_cee44e1.png ←→ 1.png. (Nice, right?!)
Code Coverage Refs
Observations
-
Shows a
READYstate of exactly1tick, becausein_sampledrops to0at the same tick thatREADYstate is entered -
The
donesignal counts out to16as required -
err, caused during the next transmit start, overlaps; duration oferris unconstrained and it continues past thedonesignal
Variant #29a
Code Coverage Refs
Uart8Receiver: 290, 293
Observations
-
Shows
errsustained high; we don't want a glitch low-high (RESETstate), since thebusystate signal is continuing high -
Test #30 is the unique test for this glitch low-high behaviour, meaning it wouldn't have been seen and caught in other transitions from
READYtoIDLE -
With that thought, I leave an exercise for the reader: Determine if there should have been, and will be, a test #31
Run Icarus Verilog and GTKWave
The test benches can be run using the open source simulator Icarus Verilog: Installation, Getting Started.
With it installed, you can run a command like the following that specifies the required input files and one output file (.vvp):
> iverilog -g2012 -I.. -osimout.vvp -D"DUMP_FILE_NAME=\"1.vcd\"" 1.v
(This is run in the "tests" directory, and ".." thus references the device .v files or .vh files at root level.)
It then requires a second step: Run the Icarus Verilog simulator/runtime to store all signal and timing data to a .vcd file (viewable signal trace):
> vvp simout.vvp
I combine these:
> iverilog -g2012 -I.. -osimout.vvp -D"DUMP_FILE_NAME=\"1.vcd\"" 1.v && timeout 1 >NUL && vvp simout.vvp
Also, here's the complete batch that runs all tests: RunAllTests.txt.
GTKWave viewer is used to view the trace (waveforms): Installation, Getting Started.
- HDLs · Hardware Description Languages
- EDA · Electronic Design Automation
- FPGAs · Field-Programmable Gate Arrays
IceChips devices of the 7400 TTL family
Icestudio and Apio built on top of IceStorm, Yosys, nextpnr
Yosys synthesis by Claire Wolf
Icarus Verilog simulator by Stephen Williams
GTKWave for viewing waveforms
© 2022-2023 Tim Rudy

