![]()
Flow
The ideal autonomous system is able to react and adapt to its environment without delay. To facilitate this behavior data flow from the moment it's captured from it's environment to the moment of actuation must be as close to instantaneous as possible. The transformation from perception data to execution should be performed without overhead, while being correct. Flow aims to provide this framework.
Quick Start
Docker
Docker image: manuelmeraz/flow:dev
Building
Requires Ubuntu 20.04 for GCC >= 10.2 to install.
# Install GCC >= 10.2 and make it the default
sudo apt install build-essential gcc-10 g++-10
sudo update-alternatives --install /usr/bin/gcc gcc /usr/bin/gcc-10 100 --slave /usr/bin/g++ g++ /usr/bin/g++-10 --slave /usr/bin/gcov gcov /usr/bin/gcov-10

# install conan
sudo apt install python-pip
pip install --user conan

# install Flow
git clone https://github.com/ManuelMeraz/Flow.git && cd Flow
sudo ./scripts/install_libraries.sh
mkdir build && cd build
cmake -DENABLE_TESTING=ON -DENABLE_EXAMPLES=ON -DCMAKE_BUILD_TYPE=Release ..
make -j
ctest -j
sudo make install
Alternatively use the build script:
./scripts/build.py --enable-testing --enable-examplesIf the build script doesn't build the project because of a crash try using the --clear-cache flash.
Use the --help option for more information.
Table of Contents
Core Concepts
Note on the current state of the project: Right now this is an pre-pre-pre-alpha. I've been working on this in my spare time over the last few months. I've had to make a couple of redesigns, but I think this is the one that will work to server as a base.
I have many more additions I want to add, such as support for TCP/IP and UDP, performance optimizations, and ergonomics such as adding in a when_all to subscribe to multiple channels at once with a subscriber or transformer.
Overview
The philosophy behind this framework is dependency management by preventing cyclical dependencies and creating maximum flow in a network and thereby minimizing latency in the system (and probably increase throughput). This is meant to be used for closed feedback systems.
Functions
Each node in this graph represents an function, and the specific type of function is defined by the dependencies it has.
-
Spinner - A spinner is an function with no dependencies and nothing depends on it. it's a closed system.
- Notation:
() - Example: In C++ this is a
()->voidfunction, or any other process that emulates it
- Notation:
-
Publisher - A publisher is an function with no dependencies and some other function must depend on it.
- Notation:
()->R - Example: In C++ this is a
()->Rfunction, or any other process that emulates the behavior
- Notation:
-
Subscriber - A subscriber is an function with at least one dependency and nothing depends on it.
- Notation:
(A) - Example: In C++ this is a
(A&&... a)->voidfunction, or any other process that emulates the behavior
- Notation:
-
Transformer - A transformer is an function with at least one dependency and at least one function depends on it.
- Notation:
(A)->R - Example: In C++ this is a
(A&&... a)->Rfunction, or any other process that emulates the behavior
- Notation:
The flow network is composed of these 4 types of functions, and any functions where the dependencies are not satisfied is an invalid network.
Communication
Each of these functions are connected to each other through a channel. Each channel needs to have
at least one publisher and one subscriber on the other end. A transformer doubles as a publisher and subscriber,
so a path through the network may look something like this
{()->A , (A)->B, (B)->C, (C)} This network contains a publisher, two transformers, and a subscriber. It is complete
and and closed. There will be three channels in between; each with its own channel name. If no channel name is provided,
then an empty string will be used; you can think of this as a global channel.
A global channel is a channel that is available globally for that specific message type. Publishing an
int without a channel name will publish to the global int channel.
Each of the functions in the network will begin and start to process data and eventually reach a frequency.
Looking at the original example: {()->A , (A)->B, (B)->C, (C)}
At t0 the two transformers and subscriber at the end will be waiting for messages and the publisher will begin to publish data. This could be through a network socket that has no local dependencies (e.g. sensor data).
At t1 The first transformer receives the first message and transforms it, and at the same time the publisher begins publishing a second piece of data.
This keeps going until all 4 functions are constantly communicating information to the final subscriber with some frequency.
Cancellation
Cancellation of coroutines is tricky, but there is a logical way to cancel this large network.
The publishers begin the chain of functions, and the way to end the chain is by beginning with the subscriber at the end of the chain. when a cancellation request is performed the subscribers at the end of the network flow will begin by exiting their main loop.
At this point, transformers and publishers down the chain will be awaiting compute time for their coroutine. The subscriber
will then flush out the waiting transformer or publisher that is next in line, once that transformer is free the
subscriber will end. Then the transformer will repeat this until the publisher is reached at the beginning of the chain
and then the publisher coroutines will end and exit their scope.
Examples
example/minimal_publisher_subscriber
#include <flow/flow.hpp>

// This is a publisher
std::string hello_world() { return "Hello World"; }

// This is a subscriber. Values are passed in by rvalue,
// implying that the caller is now the owner of the data.
void subscribe_hello(std::string&& message){  }

int main()
{
  using namespace flow::literals;

  /**
   * The publisher hello_world creates a private channel to
   * subscribe_hello and sends messsages at 10hz
   */
  auto net = flow::network(flow::chain(10_q_hz) | hello_world | subscribe_hello);

  /**
   * Note: cancellation begins in 1 ms, but cancellation
   * is non-deterministic.
   */
  net.cancel_after(1ms);

  flow::spin(std::move(net));
}
Example with transformers and multiple chains
#include <random>

#include <flow/flow.hpp>

static std::random_device m_random_device{};
static std::mt19937 m_random_engine{ m_random_device() };
static std::uniform_int_distribution<int> m_distribution{ 1, 100 };

struct Data {
  int data{};
};

class Sensor {
public:
  Data operator()()
  {
    auto data = m_distribution(m_random_engine);
    return Data{ data };
  }

  std::string publish_to() { return "sensor"; }

private:
};

Data low_pass_filter(Data&& msg)
{
  static int limit = 30;
  msg.data = std::min(msg.data, limit);
  return std::move(msg);
}

Data high_pass_filter(Data&& msg)
{
  static int limit = 70;
  msg.data = std::max(msg.data, limit);
  return std::move(msg);
}

void consume_data(Data&& data) {}


int main()
{
  using namespace flow::literals;

  auto sensor_chain = flow::chain(10_q_Hz) | Sensor{};
  auto low_pass = flow::chain() | flow::transform(low_pass_filter, "sensor") | consume_data;
  auto high_pass = flow::chain() | flow::transform(high_pass_filter, "sensor") | consume_data;

  auto network = flow::network(std::move(sensor, std::move(low_pass), std::move(high_pass));

  network.cancel_after(5s);
  flow::spin(std::move(network));
}
Milestones
| Version | Description | ETA |
|---|---|---|
| 0.1.0 | Ability to create in-memory network, send messages, and shut down reliably. Single publisher single subscribe channels. | Completed 1/25/2021 |
| 0.1.1 | Ability to set frequency of routines using mp-units at compile time. | Completed 6/20/2021 |
| 0.1.2 | DDS communication support using Cyclone DDS (probably) | September 2021 |
| 0.1.3 | Modulating frequncies of system depending on flow of information | December 2021 |
| 0.1.4 | Collect performance metrics and show in documentation | January 2022 |
| 0.1.5 | Create tools to tweak performance | February 2022 |
| 0.1.6 | Optimization of implementation and add memory pool/allocator options | 2022 |
| 0.2 | All Major features complete | 2022 |
| 0.2.1 | Compose functions, when_all, when_any | 2022 |
| 1.0.0 | Embedded support (single-threaded, no heap allocatinons), security | 2022 |
Dependencies
Note: Flow has only been tested on Ubuntu 20.04 with GCC 10.2
Necessary Dependencies
- GCC >= 10.2 (Even the latest clang does not work) See cppreference.com to see which features are supported by each compiler. The following compilers should work:
-
Install command
-
Ubuntu 20.04:
sudo apt install build-essential gcc-10 g++-10
sudo update-alternatives --install /usr/bin/gcc gcc /usr/bin/gcc-10 100 --slave /usr/bin/g++ g++ /usr/bin/g++-10 --slave /usr/bin/gcov gcov /usr/bin/gcov-10
-
-
Install Command
-
Via pip - https://docs.conan.io/en/latest/installation.html#install-with-pip-recommended
pip install --user conan -
Windows:
choco install conan -y
-
MacOS:
brew install conan
-
-
Install Command
-
Debian/Ubuntu:
sudo apt-get install cmake
-
Windows:
choco install cmake -y
-
MacOS:
brew install cmake
-
Library Dependencies
- liburing
Install Command
sudo ./scripts/install_liburing.sh - cppcoro
Install Command
sudo ./scripts/install_libcppcoro.sh
Optional Dependencies
C++ Tools
-
Install Command
-
Debian/Ubuntu:
sudo apt-get install doxygen sudo apt-get install graphviz -
Windows:
choco install doxygen.install -y choco install graphviz -y -
MacOS:
  brew install doxygen
  brew install graphviz
-
-
Install Command
-
Debian/Ubuntu:
sudo apt-get install ccache -
Windows:
choco install ccache -y -
MacOS:
brew install ccache
-
-
Install Command
-
Debian/Ubuntu:
sudo apt-get install cppcheck -
Windows:
choco install cppcheck -y -
MacOS:
brew install cppcheck
-
-
Install Command
Follow instructions here: https://github.com/include-what-you-use/include-what-you-use#how-to-install
Build Instructions
Build directory
Make a build directory:
mkdir buildSpecify the compiler using environment variables
By default (if you don't set environment variables CC and CXX), the system default compiler will be used.
Conan and CMake use the environment variables CC and CXX to decide which compiler to use. So to avoid the conflict issues only specify the compilers using these variables.
CMake will detect which compiler was used to build each of the Conan targets. If you build all of your Conan targets with one compiler, and then build your CMake targets with a different compiler, the project may fail to build.
Commands for setting the compilers
-
Debian/Ubuntu/MacOS:
Set your desired compiler (
clang,gcc, etc):-
Temporarily (only for the current shell)
Run one of the followings in the terminal:
-
clang
CC=clang CXX=clang++ -
gcc
CC=gcc CXX=g++
-
-
Permanent:
Open
~/.bashrcusing your text editor:gedit ~/.bashrcAdd
CCandCXXto point to the compilers:export CC=clang export CXX=clang++Save and close the file.
-
-
Windows:
-
Permanent:
Run one of the followings in PowerShell:
-
Visual Studio generator and compiler (cl)
  [Environment]::SetEnvironmentVariable("CC", "cl.exe", "User")
  [Environment]::SetEnvironmentVariable("CXX", "cl.exe", "User")
  refreshenv
Set the architecture using vsvarsall:
vsvarsall.bat x64 -
clang
[Environment]::SetEnvironmentVariable("CC", "clang.exe", "User") [Environment]::SetEnvironmentVariable("CXX", "clang++.exe", "User") refreshenv -
gcc
  [Environment]::SetEnvironmentVariable("CC", "gcc.exe", "User")
  [Environment]::SetEnvironmentVariable("CXX", "g++.exe", "User")
  refreshenv
-
-
Temporarily (only for the current shell):
    $Env:CC="clang.exe"
    $Env:CXX="clang++.exe"
-
Configure your build
To configure the project and write makefiles, you could use cmake with a bunch of command line options.
The easier option is to run cmake interactively:
Configure via cmake-gui:
- Open cmake-gui from the project directory:
cmake-gui .
- Set the build directory:

- Configure the generator:
In cmake-gui, from the upper menu select Tools/Configure.
Warning: if you have set CC and CXX always choose the use default native compilers option. This picks CC and CXX. Don't change the compiler at this stage!
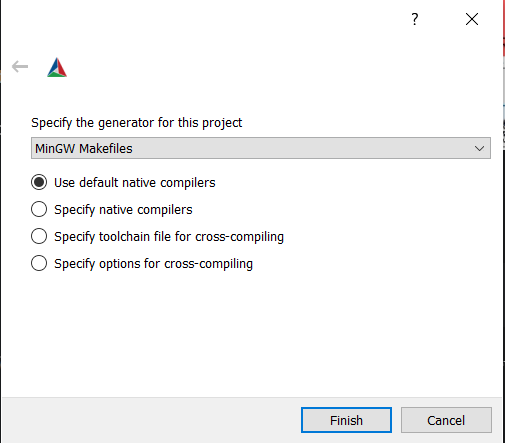
Windows - MinGW Makefiles
Choose MinGW Makefiles as the generator:
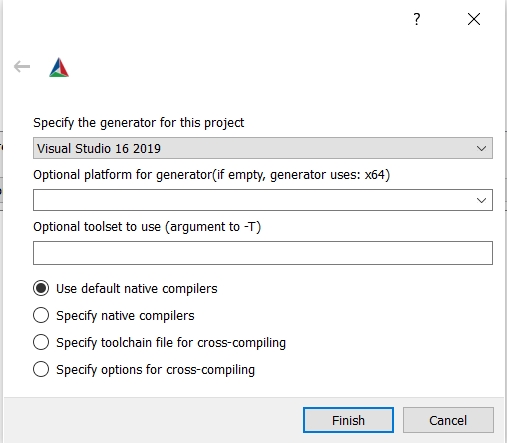
Windows - Visual Studio generator and compiler
You should have already set C and CXX to cl.exe.
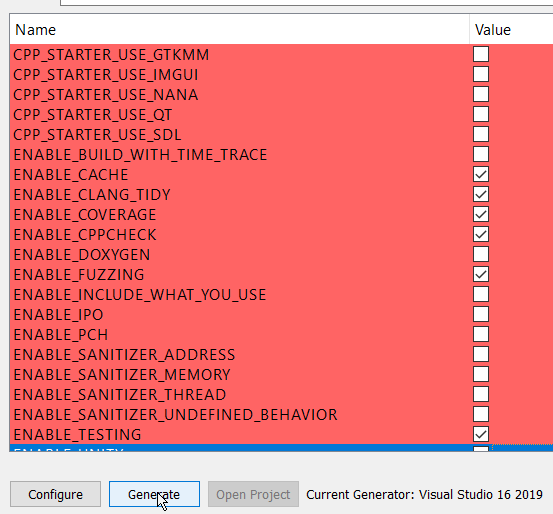
Choose "Visual Studio 16 2019" as the generator:
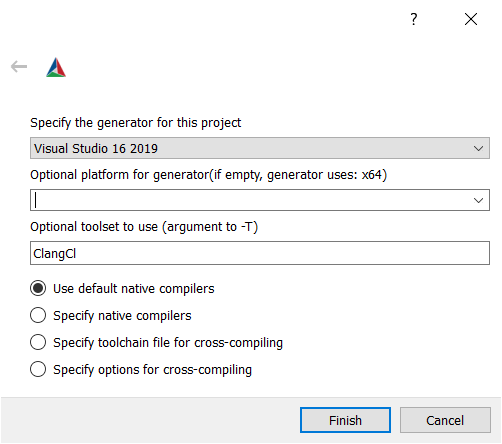
Windows - Visual Studio generator and Clang Compiler
You should have already set C and CXX to clang.exe and clang++.exe.
Choose "Visual Studio 16 2019" as the generator. To tell Visual studio to use clang-cl.exe:
- If you use the LLVM that is shipped with Visual Studio: write
ClangClunder "optional toolset to use".
- If you use an external LLVM: write
LLVM_v142under "optional toolset to use".
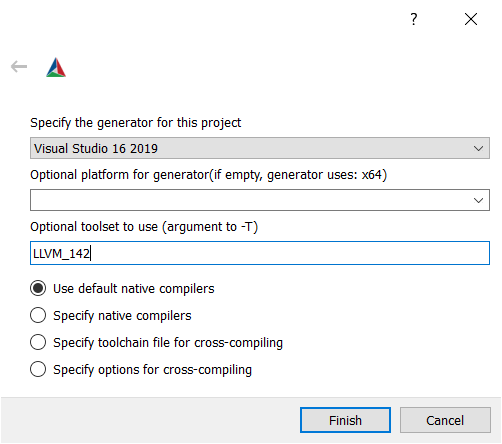
- Choose the Cmake options and then generate:
Configure via ccmake:
with the Cmake Curses Dialog Command Line tool:
ccmake .
Once ccmake has finished setting up, press 'c' to configure the project,
press 'g' to generate, and 'q' to quit.
Build
Once you have selected all the options you would like to use, you can build the project (all targets):
cmake --build ./build
For Visual Studio, give the build configuration (Release, RelWithDeb, Debug, etc) like the following:
cmake --build ./build -- /p:configuration=Release
Troubleshooting
Update Conan
Many problems that users have can be resolved by updating Conan, so if you are having any trouble with this project, you should start by doing that.
To update conan:
$ pip install --user --upgrade conan
You may need to use pip3 instead of pip in this command, depending on your
platform.
Clear Conan cache
If you continue to have trouble with your Conan dependencies, you can try clearing your Conan cache:
$ conan remove -f '*'
The next time you run cmake or cmake --build, your Conan dependencies will
be rebuilt. If you aren't using your system's default compiler, don't forget to
set the CC, CXX, CMAKE_C_COMPILER, and CMAKE_CXX_COMPILER variables, as
described in the 'Build using an alternate compiler' section above.
Identifying misconfiguration of Conan dependencies
If you have a dependency 'A' that requires a specific version of another dependency 'B', and your project is trying to use the wrong version of dependency 'B', Conan will publish warnings about this configuration error when you run CMake. These warnings can easily get lost between a couple hundred or thousand lines of output, depending on the size of your project.
If your project has a Conan configuration error, you can use conan info to
find it. conan info displays information about the dependency graph of your
project, with colorized output in some terminals.
$ cd build
$ conan info .
In my terminal, the first couple lines of conan info's output show all of the
project's configuration warnings in a bright yellow font.
For example, the package spdlog/1.5.0 depends on the package fmt/6.1.2.
If you were to modify the file cmake/Conan.cmake so that it requires an
earlier version of fmt, such as fmt/6.0.0, and then run:
$ conan remove -f '*'       # clear Conan cache
$ rm -rf build              # clear previous CMake build
$ mkdir build && cd build
$ cmake ..                  # rebuild Conan dependencies
$ conan info .
...the first line of output would be a warning that spdlog needs a more recent
version of fmt.
Testing
See Catch2 tutorial
To run the tests execute the ctest command from within the build directory