
By
Roger Biak
Michael Miller
Indiana University-Purdue University Indianapolis
ECE 42100 - Fall 2018
Department of Electrical and Computer Engineering
Dr. Lauren Christopher
lauchris@iupui.edu
November 28, 2018
The goal of the project is to implement a dodgeball game. A single player will move a sprite along a xy-coordinate space within the display. The movements will be controlled by the 4 push-buttons on the ZedBoard. The object of the game will be to avoid collisions with any moving sprites. The progression of difficulty will be determined by a timekeeper at the start of the game. The longer the player avoids colliding with a sprite the more sprites that will be spawned. Possible extended features would be to emulate a game mechanic similar to asteroids where the player would have the ability to shoot projectiles that would remove the sprites.
1.1 Work Statement
There are few strategies that will be used to test the system and designs. The first will be to ensure that all button or control inputs can be registered properly and behave as expected. An example of this could be to read the 5-bit register for pushbuttons and display the binary data to 5 of the 8-bit LEDs. Additional, if it is not too time-consuming, the OLED could be used to write the time elapsed at the start of the game. Most of the hardware will be implemented with a Block Design within the IP integrator. The game mechanic will be implemented with C within the Software Development Kit (SDK). It is expected that the location data of the sprites will be stored on the DRAM and modified by the C code implementation. If time allows it, we hope to implement a detailed bitmap for the sprites instead of simple color specified blocks.
1.2 Resource Requirements
Software Package Xilinx Vivado v2018.2 (64-bit) will be used to design and implement the project. The estimated time needed for this lab is 80 hours considering the unfamiliarity of a lot of factors concerning the Xilinx. For example, multiple moving objects and one object controlled by buttons.
The required materials are as follow:
-
ZedBoard
-
Two USB A-Male to Micro B cables to connect to UART port and PROG (J20) port.
-
Monitor
-
HDMI to any corresponding port that the chosen monitor has (in this lab, DVI-D)
1.3 Project Schedule with Milestones
| 1 | Implement a sprite moving on the screen controlled by the 5 push buttons | Nov 11 – 16 | MM |
|---|---|---|---|
| 2 | Implement a start menu and also a game over screen on the display | Nov 14 – 17 | RB |
| 3 | Implement a timer to display on the screen during game play | Nov 14 – 18 | RB |
| 4 | Implement a sprite to spawn based on the duration of the timer | Nov 14 – 18 | MM |
| 5 | Implement handling multiple sprites moving on the screen | Nov 18 – 24 | RB |
| 6 | Refine Implementations, and add small additional features | Nov 21 – 24 | Both |
| 7 | Finalize Documentation and Final Project | Nov 21 – 24 | Both |
| 8 | Week Long Buffer for Unexpected Delays and Challenges | Nov 25 – Dec 1 | Both |
Table 1: Project Schedule with Milestone
1.4 Previous Works
This project is similar to a Dodgeball game in the link below. In the game below, the user controls a character to move across the x-coordinates to avoid the bouncing sprites. The game starts with a single sprite and increases if the user is able to avoid getting hit for a certain amount of time. In this project, the sprites will be floating straight around the whole screen until they hit a wall and changes directions. The user will control a character to move across the xy-coordinates to avoid the sprites. The level of difficulty will be determined by time. Extended version would be for the user to able to shoot the sprites. At the moment of writing this, there are no similar projects available on the web beside purely C program.
https://www.youtube.com/watch?v=QqBx70wp1Wc&app=desktop
The name of our game is called "Dodge Pokèball." The title pretty much describes the game. In this game, the player controls Pikachu using the ZedBoard push buttons. The task of the player is to avoid getting hit by the Pokèballs.
2.1 Lives
When the game starts, the player has a total of six lives. Each collision with any Pokèball take away a single life and the game is over when the player has lost all lives.
2.2 Difficulty
The difficulty of the game is determined by the length of time the player can survive. The game starts off with one Pokèball and a new ball pops up every two seconds. As the survival time increases, the Pokèballs also increases. In other words, there are more Pokèballs to dodge as the play time gets longer and the game gets more difficult.
2.3 Interface
To make our game fun and livelier, everything in the interface is animated. The game takes place in an arena which has time and lives indicator. The Pokèballs are spinning and the Pikachu is not just a still picture but an alive Pikachu.
3.1 Project Overview
Figure 1 shows the project design and how it works. When we run the code, the game goes to the main menu. The main menu tells the user to press any button to play the game. Once the user hits the button, variables are assigned for a new game and the game starts. The game-play exist inside a while loop to read for button presses, modify data points, and display new sprite positions. Once the player loses all their lives the program exits the while loop and displays a game over message, till the user presses a button to return to the main menu.
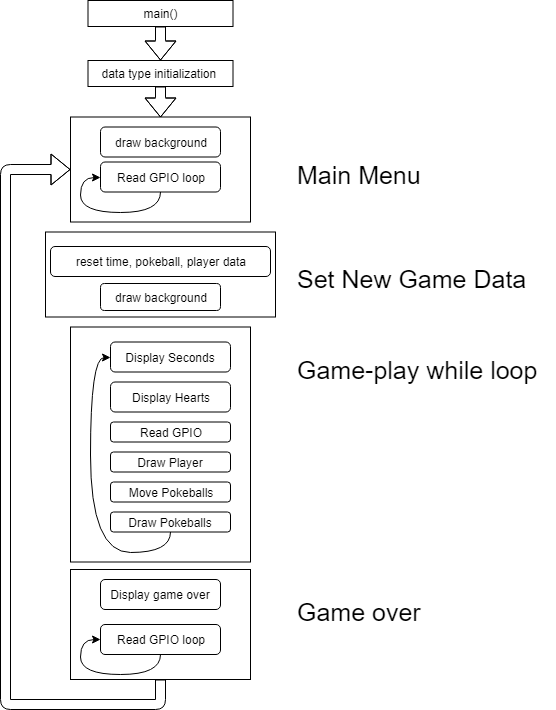
Figure 1: C Program Design Diagram
3.2 Block Diagram and Port Map
First, we create a block diagram (Figure 2) in Vivado to enable push buttons, switches, LEDs, and HDMI port. The next thing we did after creating a block diagram is figuring out the corresponding ports. The lab 7 constraints (.xdc) file was used for the port mapping. The pin that connected to the reset_rtl was originally mapped to the down push button. This is the only constraint that was edited to a different unused push button pin. I main idea behind using a block design allows us to integrate previous labs as an IP block. With this level of abstraction we can easily add a processor core and bus to our IP block. Then in the SDK we can write a program that the Zynq processor will execute and access GPIO and Lab 7 IP block and memory.
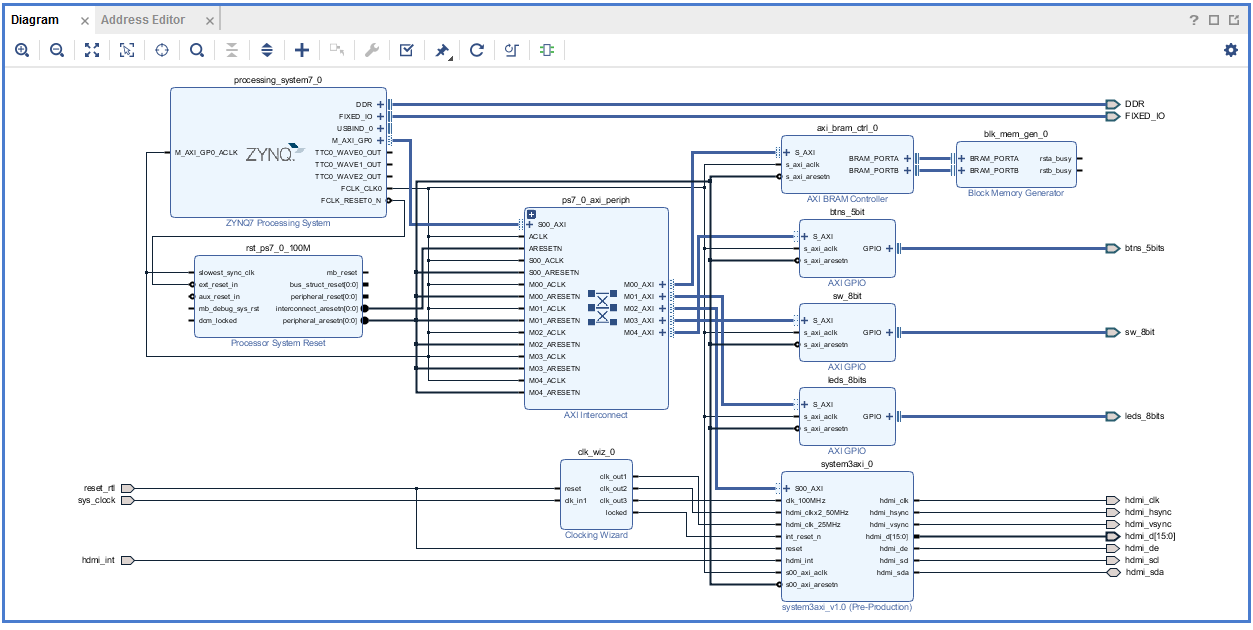
Figure 2: Block Diagram
This code below enables the switches, push buttons, and the LEDs. The push buttons and switches are psb_check and dip_check. The last line of this code syncs the push button and Pikachu's movements.
// Doge Pokeball Game
// Michael Miller and Roger Biak
// 12/5/2018

// note this program seems to be run properly only on a specific board
// on other zebboards the display does not output to screen but
// seems to be running the program (LEDs display pushbutton values)
// this issue has not been resolved, is it assume the problem is due to the
// reset_rtl port mapping in vivado
#include <stdio.h>
#include "xil_io.h"
#include "platform.h"
#include <math.h>

#include "data_table.h"
#include "pikachu.h"
#include "background.h"
// for gpio
#include "xparameters.h"
#include "xgpio.h"

//for time keeping
#include "xtime_l.h"

#define BaseAddress 0x43C00000
#define Reg0_Offset 0x00    // data in for RAM
#define Reg1_Offset 0x04    // address for RAM
#define Reg2_Offset 0x08    // Write enable for RAM
#define Reg3_Offset 0x0C	// data out from RAM

#define WordsPerLine 64 // used by set_pix
#define MaxHor 636
#define MaxVer 477
#define MaxBalls 40
int main (void){
sprite2 ball[MaxBalls];
// Time instantiations
XTime tStart, tEnd;
init_platform();
int sec_count, sec_count_temp;
int digit0, digit1, digit11, digit2;
char time[3];
int life;
// GPIO instantiations
XGpio dip;
XGpio push;
XGpio led;
int psb_check, dip_check;
xil_printf("-- Start of the Program --\r\n");
XGpio_Initialize(&dip, XPAR_SW_8BIT_DEVICE_ID);
XGpio_SetDataDirection(&dip, 1, 0xffffffff);
XGpio_Initialize(&push, XPAR_BTNS_5BIT_DEVICE_ID);
XGpio_SetDataDirection(&push, 1, 0xffffffff);
XGpio_Initialize(&led, XPAR_LEDS_8BITS_DEVICE_ID);
XGpio_SetDataDirection(&led, 1, 0x00);
int erase_color=0;
int menu = 1;// Read GPIO
psb_check = XGpio_DiscreteRead(&push, 1);
dip_check = XGpio_DiscreteRead(&dip, 1);
XGpio_DiscreteWrite(&led, 1, psb_check);
psh_move(psb_check, &pika.xpos,&pika.ypos, pika.step, &pika.xpos_temp, &pika.ypos_temp);3.3 Moving Multiple Blocks and Words on Screen
Moving multiple blocks is fairly simple. The main idea is to use a for-loop and array that contains xy-coordinates, and other parameters. After this basic implementation was accomplished later version where easily adapted to draw sprites instead of blocks. Below is a code snippet of drawing multiple moving sprites.
// Move and Draw pokeballs
		for (int i=0;i<(sec_count/2)%40;i++){
		move_sprite(&ball[i]);
	    draw_ball(ball[i].xpos_next, ball[i].ypos_next, ball[i].frame, &ball[i]);
		}
A few words are used at the beginning and the end of our game. To print out characters, we use the C-code, SomeSimpleBitMapFont.c, provided by the instructor. The code below functions very similar to the way we draw our sprites, in fact, the design of the function, draw_sprite was based on the functions used to draw words on the screen. Although it is structured a little different the principles are still the same. The only difference is that each character has an associated offset in the bitmap table. A table look-up must first occur to determine this offset for a specific character then proceed with printing the bitmap with the selected offset. Only two functions are used to perform these actions as seen below, along with the data_table array that represents the bitmap.
	 char menu_sel[] = "PRESS ANY BUTTON TO BEGIN";
	 for (int i = 0; i < sizeof(menu_sel); ++i) {
	 	 print_pos(data_table, index_table[menu_sel[i]],200+i*10,330,0);
	 };
void print_pos(unsigned char table[], unsigned char index, int xCordinate, int yCordinate, int colour)
{
// used to print characters to the screen
unsigned int offset = index*32;
int i;
for (i=2; i<34; i++) {
print_pixel(table[offset], i, xCordinate, yCordinate, colour);
offset++;
yCordinate++;
}
}unsigned char data_table[] = {
/* Attention: Trial copy can only correctly generates data from 'A' to 'N',
; 'a' to 'g' and '0' to '8'. To get all the correct data,
; please order and register BitFontCreator Pro first! */
/* character 0x0020 (' '): (width=9, offset=0) */
0x00, 0x00, 0x00, 0x00, 0x00, 0x00, 0x00, 0x00,
0x00, 0x00, 0x00, 0x00, 0x00, 0x00, 0x00, 0x00,
0x00, 0x00, 0x00, 0x00, 0x00, 0x00, 0x00, 0x00,
0x00, 0x00, 0x00, 0x00, 0x00, 0x00, 0x00, 0x00,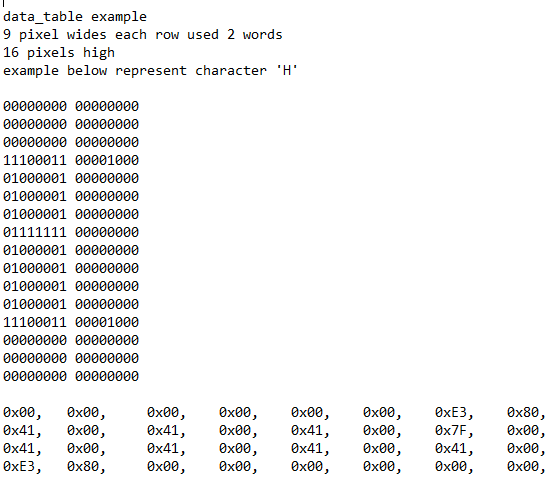
Figure 3: Displaying Text Example
3.4 Displaying Animated Sprites
We have a total of 13 sprites for our game. The purpose of having multiple sprites is to let the player feel livelier in the game. Our pokèballs are spinning while they move, the Pikachu is not just standing like an image, and the live indicators are heart shapes with different colors representing life or death. The background is the battle arena.
We have a separate header (.h) file for our sprite. To get a single sprite, we convert from a (.png) file to hexadecimal using the website below and then we convert from hexadecimal to decimal RGB color. The image files (.png) where created using Microsoft Paint and likeness based on the Gameboy game Pokémon. We are limited to 7 colors since we use 3-bit to control the RGB values from fully on to fully off. Figure 3 is an example of Pikachu sprite when it is facing front. The numbers indicate different colors. In this case, number 7 is white, 6 is yellow, 4 is red, and 0 is black. When the Pikachu is moving left, right, up, or down, we have a different bitmap. Each bitmap has a different width and heights. It is important that we declare the width and height in the header file because we use the same command for every other sprite.
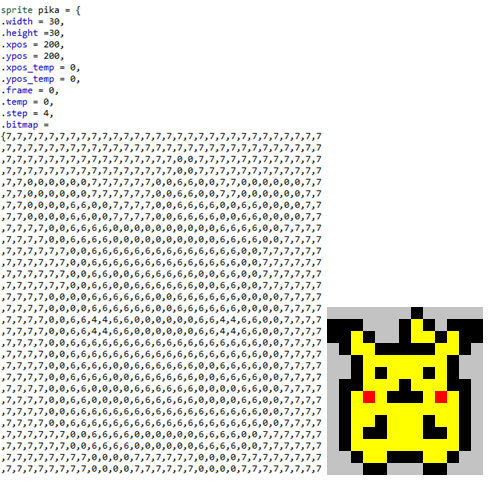
Figure 4: Pikachu Bitmap and the Original Image
http://www.digole.com/tools/PicturetoC_Hex_converter.php
void draw_sprite(int Xpos, int Ypos, uint8_t sprite_table[], int sprite_width, int sprite_height, int size, int flip){

	// prints image on the screen pixel by pixel using set_block
	if (flip == 0) {
		for (int j=0; j<sprite_height; j++){
			for(int i=0; i<sprite_width; i++){
				// 9 signifies transparency
				set_block(1*size,1*size,Xpos+i*size,Ypos+j*size,sprite_table[j*sprite_width+i]);
			}
		}
	}

	// flip image along horizontal axis
	else {
		for (int j=0; j<sprite_height; j++){
			for(int i=0; i<sprite_width; i++){
				// 9 signifies transparency
				set_block(1*size,1*size,Xpos+i*size,Ypos+j*size,sprite_table[j*sprite_width+(sprite_width-i-1)]);
			}
		}
	}
}
The draw_sprite is used to print the bitmap data to the screen. As seen in the above code, we read the sprite_table element-by-element to draw pixel-by-pixel. Below is an example of the draw_sprite function. It has to be in order (x-position, y-position, sprite table, sprite's width, sprite's height, size scale, and flip).
if (pokemon->frame < 12 || (pokemon->frame > 25 && pokemon->frame < 37)  ){
			draw_sprite(pokemon->xpos, pokemon->ypos, pokemon->bitmap+3*(pokemon->width*(pokemon->height)), pokemon->width, pokemon->height,size,0);
		}else{
			draw_sprite(pokemon->xpos, pokemon->ypos, pokemon->bitmap+4*(pokemon->width*(pokemon->height)), pokemon->width, pokemon->height,size,0);
		}
X and y position describe the location of the Pikachu. We use the sprite table to call the correct picture. For example, if we want to get the third picture of the Pikachu, we do 3 x height x width. This equation skips the first two image pixels and jumps to the third image pixel. The width and height also determine how the for-loops function and properly print the sprite to the screen. Size represents how big we want the image to scale. For example, our project is 640x480 big and the background needs to be this size too. Since 640x480 pixels is too much data, we used 320x240 picture and we scaled it up by a factor of 2.
3.5 Moving Sprites
We have two different types of moving sprites. One is the pokèballs which move by themselves and a Pikachu which's movements is controlled through the ZedBoard pushbuttons. The following code is one example of the pokèballs' movement when it hit the border. The if-statement describes what happens to the pokèball when it hits the right side of the border. It is very similar to the original code provided by the instructor but instead of moving a single block we are moving multiple sprites and incrementing a bitmap index offset (ball.frame) to display a different sprite image which allows us to animate the sprites.
void move_sprite(sprite2 *ball){

	ball->ypos_temp=ball->ypos_next;
	ball->xpos_temp=ball->xpos_next;

	// frame to offset bitmap array to animate sprite
	ball->frame++;
	if (ball->frame >= 4){
		ball->frame = 0;
	}


	ball->up=ball->up_next;
	ball->left=ball->left_next;
	ball->xpos=ball->xpos_next;
	ball->ypos=ball->ypos_next;

	if (ball->left==0) {
		// does not hit right border
	  if (ball->xpos<=(MaxHor-ball->width-ball->step)) {
       ball->xpos_next=ball->xpos+ball->step;
       ball->left_next=0;
       }else{
    	   // hits right border
       ball->xpos_next= MaxHor-ball->width;
       ball->left_next=1;
	  }
For the Pikachu, we increment the location data with the push buttons. First, we assign the push buttons to the LED to figure out the value stored in psb_check for each button press combinations. Below is the code for moving Pikachu using push button. We have a total of eight possible directions that Pikachu can move. Up, down, left, right, and the 4 diagonal directions.
//calculate next position
	   if (psb_check == 8){
		  // right
		  *Xpos = *Xpos + step;
	   }
	   else if(psb_check == 4){
		  // left
		   *Xpos = *Xpos - step;
	   }
3.6 Trace Erasing/Replacing
One of the most challenging processes was erasing and replacing the background properly. When the Pikachu and pokèballs are moving, they leave traces behind them. In the in-class labs, we overwrite the traces with the same color of the background which made it look like the block never leaves any traces when moving. In this project, we have a detailed bitmap as our background. So, overwriting the traces with a single color was not an option.
The process that we went through was to remember the previous position of the sprite and replace it with the exact bitmap elements of the background. As mentioned in 2.3, our background picture is 320x240 pixels and the screen resolution is 640x480 pixel. When we enlarge the background, the position the first occluded background bitmap element cannot be directly determined with the original xy-position of the sprite. Figure 4 below describes how we mapped previous screen prints, from sprites on the background so that their traces are replaced properly. The main idea is to offset the array containing the bitmap of the background to the first element (pixel) previously covered by a sprite. This is done by multiplying the width of the background bitmap (w1) with the y-position divided by the scale and adding the x-position divided by the scale. (Y-position and x-position are from the sprite that was previously printed on the screen). The set_block is used to print the pixels of the bitmap back on the screen. Two for loop are used to iterate the pixel positions.
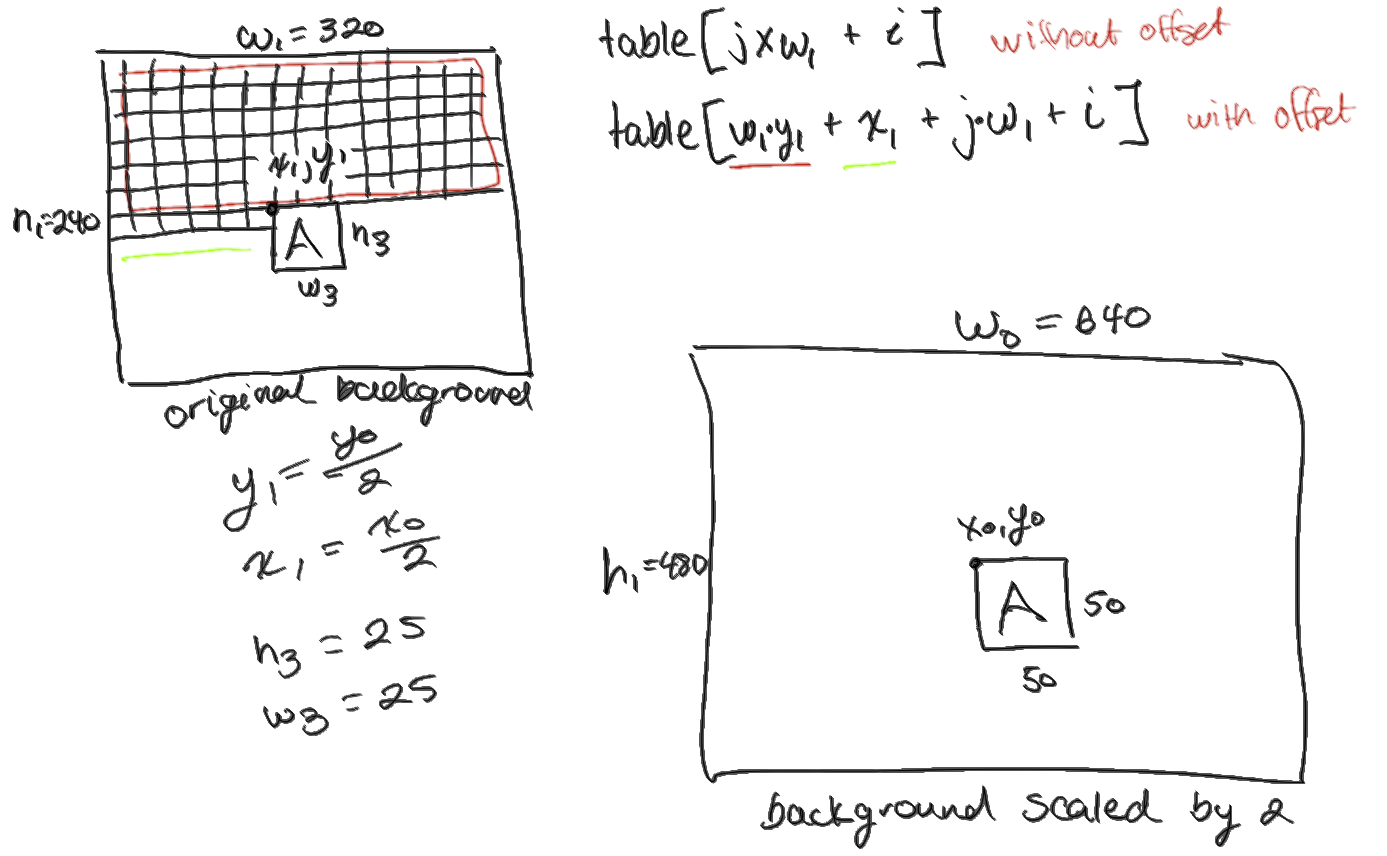
Figure 5: Illustration of replace_bitmap Function
In the code below, replace_bitmap is the function we made to redraw sections of the original background.
void replace_bitmap(int xpos, int ypos, int width, int height, int size, struct background *scene ){
// this functions draws a specified section of the background
// The *.5 and is necessary due to the background only begin 320x240 pixels (for write speed) begin scaled up for 640x480
// the "scale" data is not fully integrated yet but later versions could fix this to support different size bitmaps
// at the moment this function requires a 320X240 pixel background
	int w0 =640;
	int x0 = xpos;
	int y0 = ypos;
	int w1 = w0/scene->scale;
	int y1 = y0/scene->scale;
	int x1 = x0/scene->scale;
	int scale = scene->scale;

	for (int j=0; j<height*.5; j++){
		for(int i=0; i<width*.5; i++){
		set_block(scale,scale,i*2+x0,j*2+y0,scene->bitmap[w1*(y1)+x1+j*w1+i]);
		}
	}
}
This code is used by both Pikachu and pokèballs. The code below is the background being replaced as a pokèball travels.
if ((ball->xpos_next>=ball->xpos)&(ball->ypos_next>=ball->ypos) ) {
		//down right
		replace_bitmap(ball->xpos_temp, ball->ypos_temp, ball->width*size, step, size, &test );//down
		replace_bitmap(ball->xpos_temp, ball->ypos_temp,step, ball->height*size, size, &test );//right
	}
3.7 Pikachu Collision
When the pokèballs hit either the border or the sprite, they bounce 90° from the previous direction. There are conditions when they hit the user-controlled sprite which can be seen in Figure 5. When any of the pokèball hits the Pikachu, the player loses one life. The player has a total of six lives.
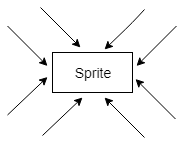
Figure 6: Possible Collision Direction of Sprites Diagram
// pikachu collisions
	if ( (ball->left==0) & (ball->up==0) ){
	// ball moving right down
		if(  (ball->xpos>(pika.xpos-ball->width-ball->step)) & (ball->xpos<pika.xpos+2) & (ball->ypos >= pika.ypos) & (ball->ypos < pika.ypos+pika.height)){
		// if hits left side
			ball->xpos_next= pika.xpos-ball->width;
			ball->left_next=1;
			pika.temp--;
		}
		else if((ball->ypos>(pika.ypos-ball->height-ball->step)) & (ball->ypos<pika.ypos+2) & (ball->xpos >= pika.xpos) & (ball->xpos < pika.xpos+pika.width)){
		// if hits top side
			ball->ypos_next=pika.ypos-ball->height;
			ball->up_next=1;
			pika.temp--;
		}
The above code is an example of Pikachu's collision with the pokèball when the ball moves right and downward. In this specific case, we define two possible outcomes. It either hits the top or the left side of the sprite. The figure below illustrates how we define the full range of ball collisions.

Figure 7: Range of All Ball Collisions
3.8 Words on Screen
A few words are used at the beginning and the end of our game. To print out characters, we use the C-code, SomeSimpleBitMapFont.c, provided by the instructor. The code below functions very similar to the way we draw our sprites, in fact, the design of the function, draw_sprite was based on the functions used to draw words on the screen. Although it structured a little different the principles are still the same. The only difference is that each character has an associated offset in the bitmap table. A table look-up must first occur to determine this offset for a specific character then proceed with printing the bitmap with the selected offset. Only two functions are used to perform these actions as seen below, along with the data_table array that represents the bitmap.
Figure 3: Displaying Text Example
3.9 Time on Screen
We use the clock for determining the difficulty level in our game. Since we have limited time for presentation, the difficulty rate is faster. However, it can easily be changed. For the project presentation, an additional pokèballs appears every two seconds starting from zero. The sec_count in the figure below contains the time elapsed since the start of a new game. To show the time in three digits seconds, we used modulo. This operation allows us to extract the 3 decimal digits from 000 to 999. To show it on the screen, we used print_pos again.
4.1 Results
What we learned from this project is how displaying data on the screen affects the performance of the game. This influence many games design choices to ensure that the game runs smoothly. The main principle was to keep sprite data as small as possible and to use set_block in an efficient way since it was being used to display pixel elements for all our sprites. One way to improve sprite display speed might be storing the sprite data on memory blocks in the FPGA design. This could allow us to right up to 9-pixel elements of a sprite in fewer clock cycles. There are probably some other software functions that could be optimized in hardware, but it since the game appears to be running smoothly we decided it would not be necessary.
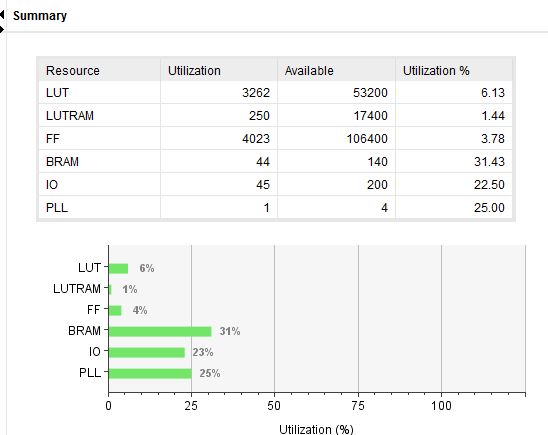
Figure 9: Project Summary
4.2 Time Log
We created a time log to compare our actual work with our milestone. We were able to complete all of the milestones. The only thing different is the orders of milestones completion. Table 2 is our time log with comments on what we did each day.
Table 2: Time Log
After playing sometimes, we realized that this game could be very addicting. However, this can still be improved in a lot of aspects. Since we only had a limited amount of time we focused on completing our original plan.
1. Game Level
With the mechanics that we have already done, creating a game level should not be very difficult anymore. In the current game, the Pokèballs just pop up every two seconds and it can be very tiring for the player. Also, the only skill measurer is the length of time the user survived.
So, there should be game levels. For example, if the player can dodge 10 Pokèballs, he/she will be leveled up and the next challenge will be to avoid 20 Pokèballs and so on.
2. Pikachu's Power
One of the downsides of this game is that all the player can do is run away from the Pokèballs to survive. So, we recommend that the Pikachu can shoot the Pokèballs away.
3. Redeem Lives
There should be a way for the player to redeem the lost lives with the capacity of six lives. This could be done by making the player regain one life every level passed or by picking up an item during the game.
4. High Score
The game could implement a function to save the players initials and high score data.
5. Mobile Version
Since there is no similar game to this on the internet as of this moment, and considering how addicting it can get, we believe that this game can be a popular stress relieving game for mobile phones with appropriate modifications.
List of online resources used for image generation and referencing Pokémon game art likeness
Original Idea: https://www.youtube.com/watch?v=QqBx70wp1Wc&app=desktop
Picture to Hexadecimal converter: http://www.digole.com/tools/PicturetoC_Hex_converter.php
Main menu font: https://www.dafont.com/pokemon.font?text=Dodgepokeball
Original arena: https://www.serebii.net/emerald/arena.shtml