SuperGlue is a CVPR 2020 research project done at Magic Leap. The SuperGlue network is a Graph Neural Network combined with an Optimal Matching layer that is trained to perform matching on two sets of sparse image features. This repo includes PyTorch code and pretrained weights for running the SuperGlue matching network on top of SuperPoint keypoints and descriptors. Given a pair of images, you can use this repo to extract matching features across the image pair.
SuperGlue operates as a "middle-end," performing context aggregation, matching, and filtering in a single end-to-end architecture. For more details, please see:
-
Full paper PDF: SuperGlue: Learning Feature Matching with Graph Neural Networks.
-
Authors: Paul-Edouard Sarlin, Daniel DeTone, Tomasz Malisiewicz, Andrew Rabinovich
-
Website: psarlin.com/superglue for videos, slides, recent updates, and more visualizations.
-
hloc: a new toolbox for visual localization and SfM with SuperGlue, available at cvg/Hierarchical-Localization. Winner of 3 CVPR 2020 competitions on localization and image matching!
We provide two pre-trained weights files: an indoor model trained on ScanNet data, and an outdoor model trained on MegaDepth data. Both models are inside the weights directory. By default, the demo will run the indoor model.
- Python 3 >= 3.5
- PyTorch >= 1.1
- OpenCV >= 3.4 (4.1.2.30 recommended for best GUI keyboard interaction, see this note)
- Matplotlib >= 3.1
- NumPy >= 1.18
Simply run the following command: pip3 install numpy opencv-python torch matplotlib
There are two main top-level scripts in this repo:
demo_superglue.py: runs a live demo on a webcam, IP camera, image directory or movie filematch_pairs.py: reads image pairs from files and dumps matches to disk (also runs evaluation if ground truth relative poses are provided)
This demo runs SuperPoint + SuperGlue feature matching on an anchor image and live image. You can update the anchor image by pressing the n key. The demo can read image streams from a USB or IP camera, a directory containing images, or a video file. You can pass all of these inputs using the --input flag.
Run the demo on the default USB webcam (ID #0), running on a CUDA GPU if one is found:
./demo_superglue.pyKeyboard control:
n: select the current frame as the anchore/r: increase/decrease the keypoint confidence thresholdd/f: increase/decrease the match filtering thresholdk: toggle the visualization of keypointsq: quit
Run the demo on 320x240 images running on the CPU:
./demo_superglue.py --resize 320 240 --force_cpuThe --resize flag can be used to resize the input image in three ways:
--resizewidthheight: will resize to exactwidthxheightdimensions--resizemax_dimension: will resize largest input image dimension tomax_dimension--resize-1: will not resize (i.e. use original image dimensions)
The default will resize images to 640x480.
The --input flag also accepts a path to a directory. We provide a directory of sample images from a sequence. To run the demo on the directory of images in freiburg_sequence/ on a headless server (will not display to the screen) and write the output visualization images to dump_demo_sequence/:
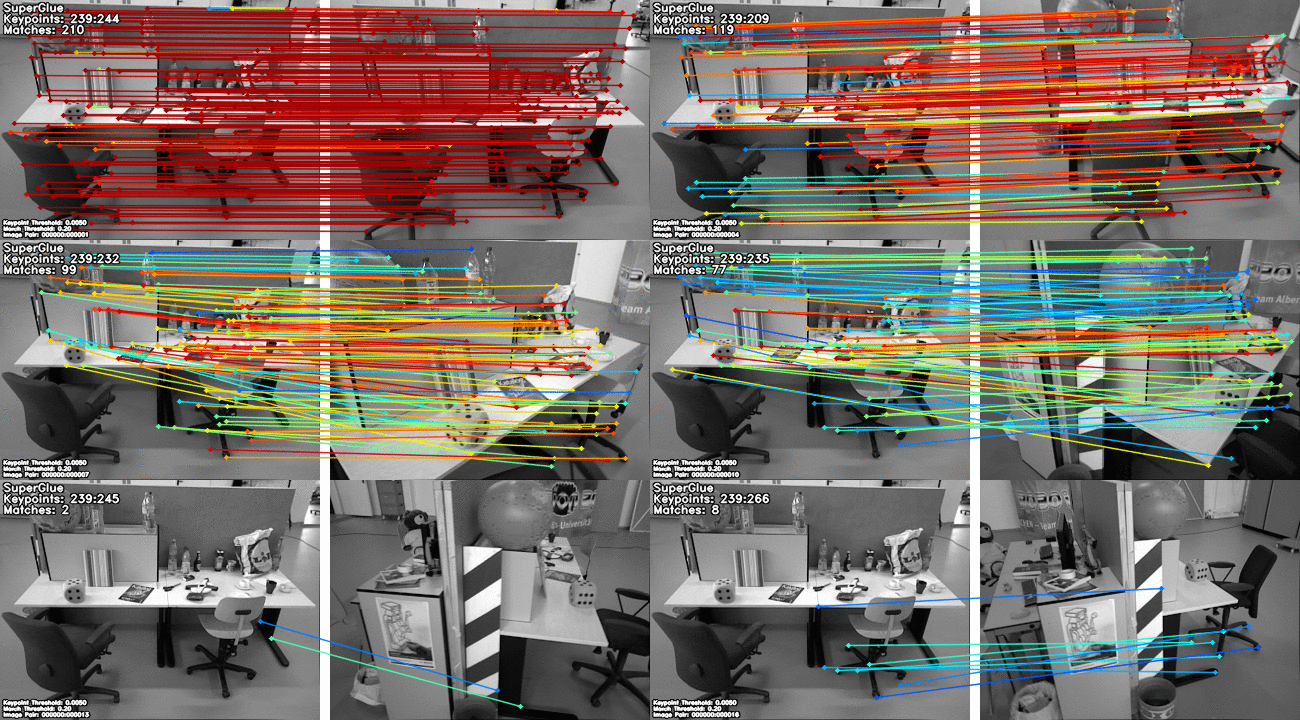
./demo_superglue.py --input assets/freiburg_sequence/ --output_dir dump_demo_sequence --resize 320 240 --no_displayYou should see this output on the sample Freiburg-TUM RGBD sequence:
The matches are colored by their predicted confidence in a jet colormap (Red: more confident, Blue: less confident).
- Use
--image_globto change the image file extension (default:*.png,*.jpg,*.jpeg). - Use
--skipto skip intermediate frames (default:1). - Use
--max_lengthto cap the total number of frames processed (default:1000000). - Use
--show_keypointsto visualize the detected keypoints (default:False).
This repo also contains a script match_pairs.py that runs the matching from a list of image pairs. With this script, you can:
- Run the matcher on a set of image pairs (no ground truth needed)
- Visualize the keypoints and matches, based on their confidence
- Evaluate and visualize the match correctness, if the ground truth relative poses and intrinsics are provided
- Save the keypoints, matches, and evaluation results for further processing
- Collate evaluation results over many pairs and generate result tables
The simplest usage of this script will process the image pairs listed in a given text file and dump the keypoints and matches to compressed numpy npz files. We provide the challenging ScanNet pairs from the main paper in assets/example_indoor_pairs/. Running the following will run SuperPoint + SuperGlue on each image pair, and dump the results to dump_match_pairs/:
./match_pairs.pyThe resulting .npz files can be read from Python as follows:
>>> import numpy as np
>>> path = 'dump_match_pairs/scene0711_00_frame-001680_scene0711_00_frame-001995_matches.npz'
>>> npz = np.load(path)
>>> npz.files
['keypoints0', 'keypoints1', 'matches', 'match_confidence']
>>> npz['keypoints0'].shape
(382, 2)
>>> npz['keypoints1'].shape
(391, 2)
>>> npz['matches'].shape
(382,)
>>> np.sum(npz['matches']>-1)
115
>>> npz['match_confidence'].shape
(382,)
For each keypoint in keypoints0, the matches array indicates the index of the matching keypoint in keypoints1, or -1 if the keypoint is unmatched.
You can add the flag --viz to dump image outputs which visualize the matches:
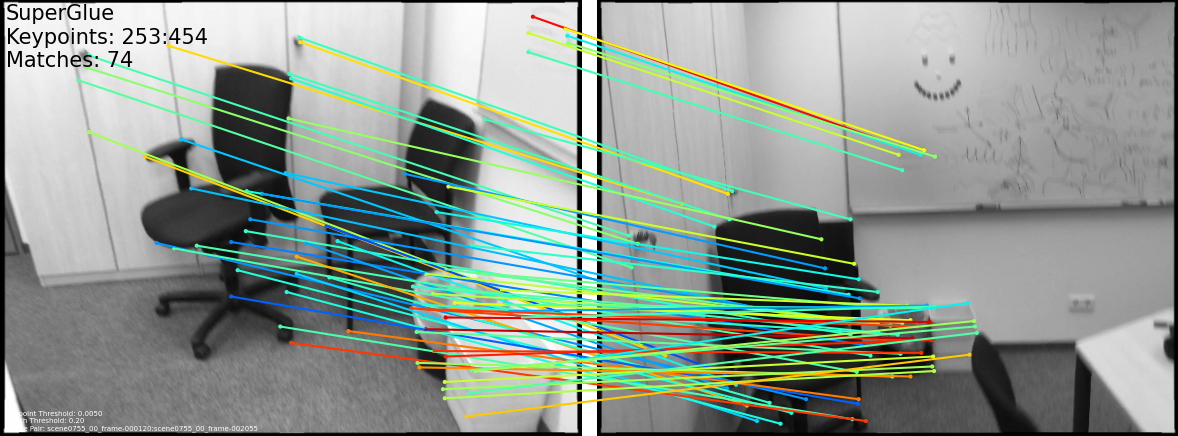
./match_pairs.py --vizYou should see images like this inside of dump_match_pairs/ (or something very close to it, see this note):
The matches are colored by their predicted confidence in a jet colormap (Red: more confident, Blue: less confident).
You can also estimate the pose using RANSAC + Essential Matrix decomposition and evaluate it if the ground truth relative poses and intrinsics are provided in the input .txt files. Each .txt file contains three key ground truth matrices: a 3x3 intrinsics matrix of image0: K0, a 3x3 intrinsics matrix of image1: K1 , and a 4x4 matrix of the relative pose extrinsics T_0to1.
To run the evaluation on the sample set of images (by default reading assets/scannet_sample_pairs_with_gt.txt), you can run:
./match_pairs.py --evalSince you enabled --eval, you should see collated results printed to the terminal. For the example images provided, you should get the following numbers (or something very close to it, see this note):
Evaluation Results (mean over 15 pairs):
AUC@5    AUC@10  AUC@20  Prec    MScore
26.99    48.40   64.47   73.52   19.60
The resulting .npz files in dump_match_pairs/ will now contain scalar values related to the evaluation, computed on the sample images provided. Here is what you should find in one of the generated evaluation files:
>>> import numpy as np
>>> path = 'dump_match_pairs/scene0711_00_frame-001680_scene0711_00_frame-001995_evaluation.npz'
>>> npz = np.load(path)
>>> print(npz.files)
['error_t', 'error_R', 'precision', 'matching_score', 'num_correct', 'epipolar_errors']
You can also visualize the evaluation metrics by running the following command:
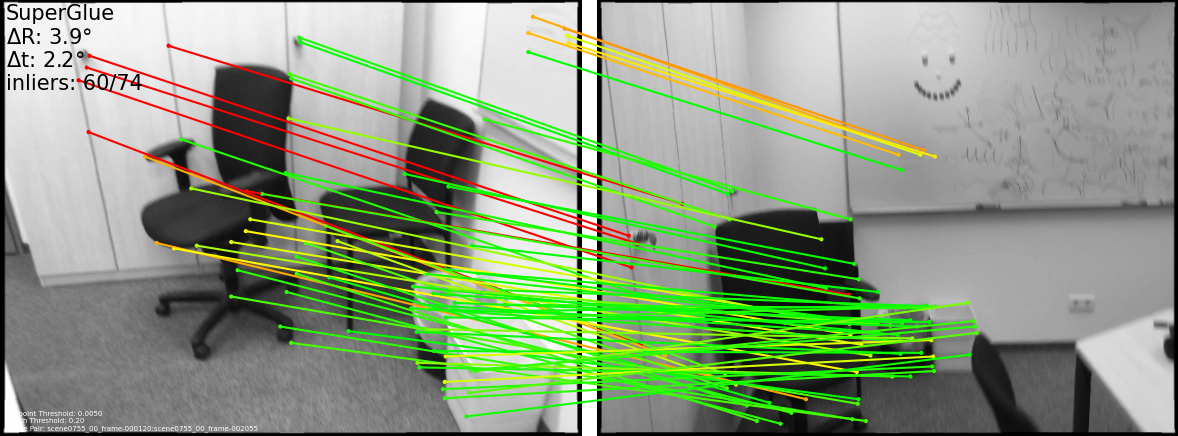
./match_pairs.py --eval --vizYou should also now see additional images in dump_match_pairs/ which visualize the evaluation numbers (or something very close to it, see this note):
The top left corner of the image shows the pose error and number of inliers, while the lines are colored by their epipolar error computed with the ground truth relative pose (red: higher error, green: lower error).
[Click to expand]
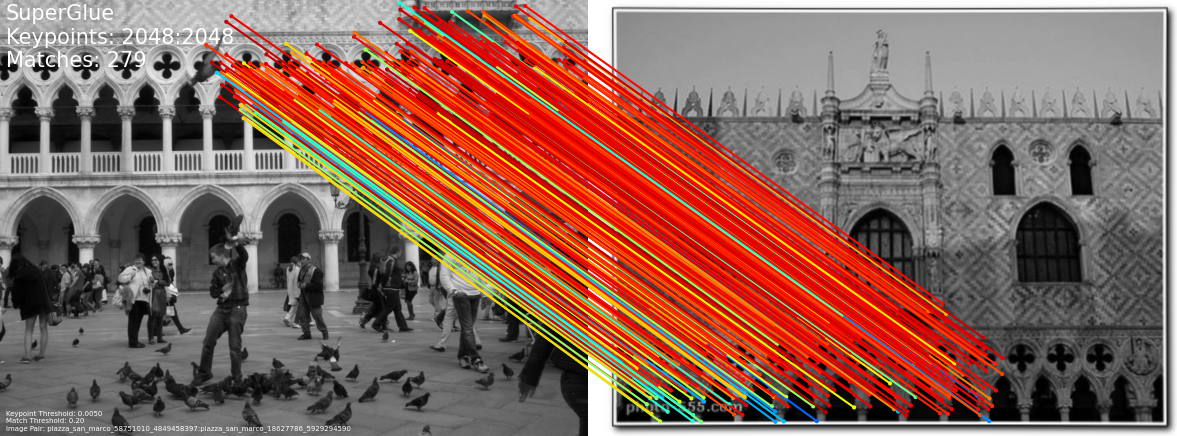
In this repo, we also provide a few challenging Phototourism pairs, so that you can re-create some of the figures from the paper. Run this script to run matching and visualization (no ground truth is provided, see this note) on the provided pairs:
./match_pairs.py --resize 1600 --superglue outdoor --max_keypoints 2048 --nms_radius 3 --resize_float --input_dir assets/phototourism_sample_images/ --input_pairs assets/phototourism_sample_pairs.txt --output_dir dump_match_pairs_outdoor --vizYou should now image pairs such as these in dump_match_pairs_outdoor/ (or something very close to it, see this note):

[Click to expand]
For indoor images, we recommend the following settings (these are the defaults):
./match_pairs.py --resize 640 --superglue indoor --max_keypoints 1024 --nms_radius 4For outdoor images, we recommend the following settings:
./match_pairs.py --resize 1600 --superglue outdoor --max_keypoints 2048 --nms_radius 3 --resize_floatYou can provide your own list of pairs --input_pairs for images contained in --input_dir. Images can be resized before network inference with --resize. If you are re-running the same evaluation many times, you can use the --cache flag to reuse old computation.
[Click to expand]
We provide the list of ScanNet test pairs in assets/scannet_test_pairs_with_gt.txt (with ground truth) and Phototourism test pairs assets/phototourism_test_pairs.txt (without ground truth) used to evaluate the matching from the paper. Each line corresponds to one pair and is structured as follows:
path_image_A path_image_B exif_rotationA exif_rotationB [KA_0 ... KA_8] [KB_0 ... KB_8] [T_AB_0 ... T_AB_15]
The path_image_A and path_image_B entries are paths to image A and B, respectively. The exif_rotation is an integer in the range [0, 3] that comes from the original EXIF metadata associated with the image, where, 0: no rotation, 1: 90 degree clockwise, 2: 180 degree clockwise, 3: 270 degree clockwise. If the EXIF data is not known, you can just provide a zero here and no rotation will be performed. KA and KB are the flattened 3x3 matrices of image A and image B intrinsics. T_AB is a flattened 4x4 matrix of the extrinsics between the pair.
[Click to expand]
We provide the groundtruth for ScanNet in our format in the file assets/scannet_test_pairs_with_gt.txt for convenience. In order to reproduce similar tables to what was in the paper, you will need to download the dataset (we do not provide the raw test images). To download the ScanNet dataset, do the following:
- Head to the ScanNet github repo to download the ScanNet test set (100 scenes).
- You will need to extract the raw sensor data from the 100
.sensfiles in each scene in the test set using the SensReader tool.
Once the ScanNet dataset is downloaded in ~/data/scannet, you can run the following:
./match_pairs.py --input_dir ~/data/scannet --input_pairs assets/scannet_test_pairs_with_gt.txt --output_dir dump_scannet_test_results --evalYou should get the following table for ScanNet (or something very close to it, see this note):
Evaluation Results (mean over 1500 pairs):
AUC@5    AUC@10  AUC@20  Prec    MScore
16.12 33.76 51.79 84.37 31.14[Click to expand]
We provide the groundtruth for YFCC in our format in the file assets/yfcc_test_pairs_with_gt.txt for convenience. In order to reproduce similar tables to what was in the paper, you will need to download the dataset (we do not provide the raw test images). To download the YFCC dataset, you can use the OANet repo:
git clone https://github.com/zjhthu/OANet
cd OANet
bash download_data.sh raw_data raw_data_yfcc.tar.gz 0 8
tar -xvf raw_data_yfcc.tar.gz
mv raw_data/yfcc100m ~/data
Once the YFCC dataset is downloaded in ~/data/yfcc100m, you can run the following:
./match_pairs.py --input_dir ~/data/yfcc100m --input_pairs assets/yfcc_test_pairs_with_gt.txt --output_dir dump_yfcc_test_results --eval --resize 1600 --superglue outdoor --max_keypoints 2048 --nms_radius 3 --resize_floatYou should get the following table for YFCC (or something very close to it, see this note):
Evaluation Results (mean over 4000 pairs):
AUC@5    AUC@10  AUC@20  Prec    MScore
39.02 59.51 75.72 98.72 23.61 [Click to expand]
The Phototourism results shown in the paper were produced using similar data as the test set from the Image Matching Challenge 2020, which holds the ground truth data private for the test set. We list the pairs we used in assets/phototourism_test_pairs.txt. To reproduce similar numbers on this test set, please submit to the challenge benchmark. While the challenge is still live, we cannot share the test set publically since we want to help maintain the integrity of the challenge.
[Click to expand]
In this repo, we provide manually corrected the EXIF rotation data for the outdoor evaluations on YFCC and Phototourism. For the YFCC dataset we found 7 images with incorrect EXIF rotation flags, resulting in 148 pairs out of 4000 being corrected. For Phototourism, we found 36 images with incorrect EXIF rotation flags, resulting in 212 out of 2200 pairs being corrected.
The SuperGlue paper reports the results of SuperGlue without the corrected rotations, while the numbers in this README are reported with the corrected rotations. We found that our final conclusions from the evaluation still hold with or without the corrected rotations. For backwards compatability, we included the original, uncorrected EXIF rotation data in assets/phototourism_test_pairs_original.txt and assets/yfcc_test_pairs_with_gt_original.txt respectively.
[Click to expand]
For training and validation of the outdoor model, we used scenes from the MegaDepth dataset. We provide the list of scenes used to train the outdoor model in the assets/ directory:
- Training set:
assets/megadepth_train_scenes.txt - Validation set:
assets/megadepth_validation_scenes.txt
[Click to expand]
After simplifying the model code and evaluation code and preparing it for release, we made some improvements and tweaks that result in slightly different numbers than what was reported in the paper. The numbers and figures reported in the README were done using Ubuntu 16.04, OpenCV 3.4.5, and PyTorch 1.1.0. Even with matching the library versions, we observed some slight differences across Mac and Ubuntu, which we believe are due to differences in OpenCV's image resize function implementation and randomization of RANSAC.
[Click to expand]
When generating output images with match_pairs.py, the default --viz flag uses a Matplotlib renderer which allows for the generation of camera-ready PDF visualizations if you additionally use --viz_extension pdf instead of the default png extension.
./match_pairs.py --viz --viz_extension pdf
Alternatively, you might want to save visualization images but have the generation be much faster. You can use the --fast_viz flag to use an OpenCV-based image renderer as follows:
./match_pairs.py --viz --fast_viz
If you would also like an OpenCV display window to preview the results (you must use non-pdf output and use fast_fiz), simply run:
./match_pairs.py --viz --fast_viz --opencv_display
If you use any ideas from the paper or code from this repo, please consider citing:
@inproceedings{sarlin20superglue,
  author    = {Paul-Edouard Sarlin and
               Daniel DeTone and
               Tomasz Malisiewicz and
               Andrew Rabinovich},
  title     = {{SuperGlue}: Learning Feature Matching with Graph Neural Networks},
  booktitle = {CVPR},
  year      = {2020},
  url       = {https://arxiv.org/abs/1911.11763}
}- For the demo, we found that the keyboard interaction works well with OpenCV 4.1.2.30, older versions were less responsive and the newest version had a OpenCV bug on Mac
- We generally do not recommend to run SuperPoint+SuperGlue below 160x120 resolution (QQVGA) and above 2000x1500
- We do not intend to release the SuperGlue training code.
- We do not intend to release the SIFT-based or homography SuperGlue models.
Magic Leap is proud to provide its latest samples, toolkits, and research projects on Github to foster development and gather feedback from the spatial computing community. Use of the resources within this repo is subject to (a) the license(s) included herein, or (b) if no license is included, Magic Leap's Developer Agreement, which is available on our Developer Portal. If you need more, just ask on the forums! We're thrilled to be part of a well-meaning, friendly and welcoming community of millions.


