Want to track head or hand movement in your Python application or game? Create your own wireless motion controller?
pymotiontracker is a simple Python 3 library to continuously read values from an MPU6050 Bluetooth device on a non-blocking I/O thread. These values include:
- Acceleration
- Angular velocity
- Angle
- Temperature (yup, these things do record temperature!)
Numerous solutions available on the web provide motion tracking solutions using an MPU6050 module connected to a Bluetooth module via an Arduino or Raspberry Pi. I thought this was a bit overkill having a "computer" as the go between the MPU6050 and Bluetooth modules.
There are numerous MPU6050's with integrated Bluetooth modules available to buy and most of them are rather inexpensive. (Far cheaper than buying an Arduino + Bluetooth module + MPU6050 module.) However the documentation of these integrated modules are hard to find and rather poor.
The following will attempt to address these shortcoming in a series of tutorials/examples.
You can obtain these from virtually any online electronics store. I found mine on Amazon by searching for "mpu6050 bluetooth". This is essentially an MPU6050 module with a Bluetooth module plonked on top of it. These modules cost approximately $20. Just make sure it is listed as a 6-axis accelerometer gyroscope.
From the top, the module looks something like this (notice the rectangular Bluetooth module):

And from the bottom like this:

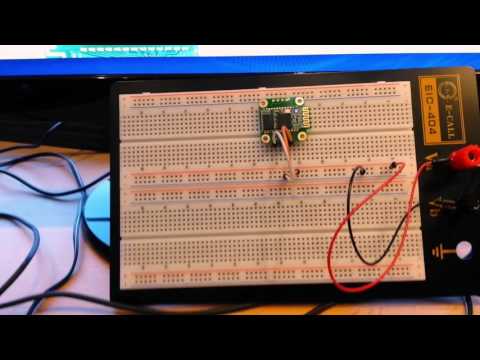
Input voltage is 3V-6V. I have an adjustable transformer set to 3V and is perfect for prototyping on a breadboard. Check the image below for such a setup.

Powering the module is simple, connect your power source and the + terminal to the pin labelled VCC and the - terminal to the pin labelled GND. Be sure not to go above 6V to avoid damaging the module. If all goes well, you should see a small blue light flashing on the module.
Next you need to pair the module to your PC via Bluetooth. In your Bluetooth setting search for MPU6050, it should be called HC-06, and pair with it. Enter 1234 as the password. Take note of the BD Address once successfully paired with the module.
Since we are working with a Bluetooth module, we do require a Bluetooth stack library which is offered to us via PyBluez https://github.com/karulis/pybluez
Use pip to install:
pip install pybluez
Currently PyBluez only supports Linux and Windows.
To get quickly up and running with a short example, modify src/motiontracker.py and modify the line:
session = MotionTracker(bd_addr="20:16:09:21:48:81")so that bd_addr is the DB Address that you noted earlier when pairing the module to your PC. Next run the test stub in the src directory:
python motiontracker.py
Now take your module and move it around. You should see the X,Y,Z angles (in degrees) displaying to console.
Check out this short movie clip on YouTube:
I managed to find some documentation floating around on the web, checkout doc/MPU6050 User manual.pdf for more details on the module and example C code.
Examining src/motiontracker.py you will notice that reading from the module happens via a non blocking I/O thread. Upon starting the module, give a second or two for values to "settle in".
The MPU6050 Bluetooth module supports RFCOMM protocol making reading from the module relatively simple.
The bulk of the work comes from the __read_device_data method. There are 3x 9 byte blocks for reading Acceleration, Angular velocity and Angle. We read a single byte at a time via self.sock.recv(1), for some reason I started running in to blocking issues when reading more than 1 byte from sock.recv(). I stuck to reading a single byte at a time as the Python code follows the C example in the PDF document and makes the code explicitly clear when reading the high and low bytes for the various attributes.
Converting the high and low byte in to a real number was rather tricky. In C one can write with the help of bit shift operations:
double value;
value = ((HighByte<<8)|LowByte)/32768.0;
I did not have much luck using equivalent bit manipulations in Python, but I did come across struct.unpack:
struct.unpack("<h", LowByte+HighByte)[0]/32768.0Stick together the LowByte and HighByte, in little endian and formatted as a short, which in reality is an integer Python type. Get the first element in the resulting tuple and perform the division to obtain a float.
I will however further experiment with the more tradition bit manipulations and compare with the struct.unpack solution at a later stage.
Yay! Finally we do away with the boring console app with scrolling numbers and move on to an OpenGL example.

In this example, the OpenGL cube will track, in a rotational sense, the movement of the Bluetooth module.
For this you will require Pygame https://www.pygame.org and the Python bindings for OpenGL with PyOpenGL http://pyopengl.sourceforge.net and NumPy http://www.numpy.org for statistics required for module calibration.
Installation instruction are contained in the links.
To run, go to the examples directory and enter:
python gl_cube.py
The application will take a few seconds to calibrate (that is zero centre itself) before drawing the cube to screen. It is important not to move the Bluetooth module while the application is calibrating. It is safe to move the module once the cube is rendered to screen and the console is updating the rotational angles in X,Y,Z.
It is also important to align the Bluetooth module as shown in the image in section 2, Power it up! otherwise you may experience inverted rotations. That is, rotating the module to the left is rendered to screen as a rotation to the right.
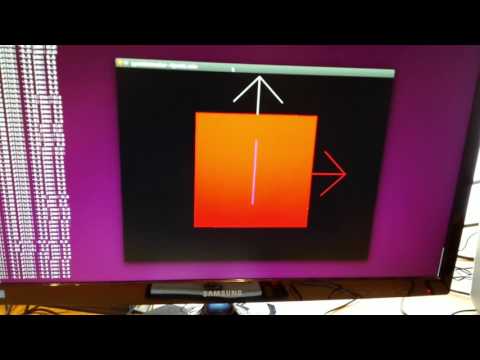
After calibration, a zero centred cube is drawn to screen to screen with arrows pointing in positive directions - red for X, white for Y and blue for Z.
Now go ahead and move the module, you will see it is very sensitive to movement.
Check out this short movie clip on YouTube to see OpenGL cube in action:
Examining examples/gl_cube.py and following after PyOpenGL and pymotiontracker initialisation:
print("Calibrating, do not move Bluetooth module!")
# Allow read values to "settle in"
time.sleep(2)
(median_ang_x, median_ang_y, median_ang_z) = get_median_roll_pitch_yaw(motion_session)
A two second delay to allow the module values to "settle in", followed by a call to get_median_roll_pitch_yaw to obtain the median roll, pitch and yaw values for the Bluetooth module at rest. These median values will be used by the calibration routine below:
roll_offset = median_ang_x
pitch_offset = median_ang_y
yaw_offset = median_ang_z
...
...
# Zero centre the roll, pitch and yaw - i.e. calibrate device
# May need to change signs from - to +, and + to - depending on mounted
# orientation of Bluetooth device.
roll = round(-(ang_x - roll_offset), 2)
pitch = round(-(ang_y - pitch_offset), 2)
yaw = round(+(ang_z - yaw_offset), 2)
In this case, calibration is zero centering the Bluetooth module using the median values as offsets and then rounding to two decimal places. Note, you may need to change the signs depending on your orientation of the Bluetooth module. Best align your module to the image in section 2, Power it up!
Also take note of the comment below when rotating the cube in OpenGL:
# This is not strictly correct as roll should be on the X axis,
# pitch on the Y axis and yaw on the Z axis. But since OpenGL is a
# right handed coordinate system, I inverted the axes to suit our purpose
# for a motion (head) tracking application
glRotated(yaw, 0, 1, 0)
glRotated(pitch, 1, 0, 0)
glRotated(roll, 0, 0, 1)
Have fun!
-
Setup a virtual port to bypass Bluetooth library/solutionErr... No. - Further investigate traditional bit manipulations and benchmark against struct.unpack
- Provide an OpenGL example to track (rotational) movement
- Extend OpenGL example to track translational movement
- Downscale i.e. move away from the breadboard!
- A simple Pygame based game!
- Scale down and go wireless