日本語ドキュメント(Japanese Documents Available)
Library for screen transitions, transition animations, transition history stacking, and screen lifecycle management in Unity's uGUI.

Details
- Overview
- Setup
- Basic Screen Transition
- Screen Transition Animation
- Setting common transition animations
- Setting transition animation for each screen
- Change transition animation according to partner screen
- Screen transition animation and drawing order
- Create simple transition animations easily
- Implement interactive animation with partner screen
- Create animation with Timeline
- Lifecycle Events
- Loading Screen Resources
- Other Features
- License
- You can create pages, modals, tabs and their transitions easily and flexibly.
- Manage screen lifecycle and memory from load to destroy.
- Separated workflow with animators for complex screen transition animations.
- Well-separated library with no extra functions (ex. GUI library, state machine).
- And standard features such as history stacking and click prevention during transitions.
You can play the demo scene with the following steps.
- Clone this repository.
- Open and play the following scene.
Please note that some of the images used in this demo are from the following free contents.
For more information, including copyright, please refer to the following website.
- Unity 2019.4 or higher
- uGUI (UIElements not supported)
- Open the Package Manager from Window > Package Manager
- "+" button > Add package from git URL
- Enter the following to install

Or, open Packages/manifest.json and add the following to the dependencies block.
{
    "dependencies": {
        "com.harumak.unityscreennavigator": "https://github.com/Haruma-K/UnityScreenNavigator.git?path=/Assets/UnityScreenNavigator"
    }
}
If you want to set the target version, specify it like follow.
Unity Screen Navigator classifies screens into three types: "Page", "Modal" and "Sheet".
"Page" is a screen that transitions in sequence.
For example, when you transition from the Page A to Page B, Page A will be stacked in the history.
And when you return from Page B, Page A will be redisplayed with its states intact.

"Modal" is a screen that is stacked in a window.
When it is displayed, all interactions except for the foreground modal will be blocked.

And "Sheet" is used for tab-like GUI.
History is not managed, and only one active screen is displayed.
These screens can be nested.
And, the area of each screen can be freely specified (not necessarily the entire window).
To create the page transition, first attach the "Page Container" component to an GameObject under the Canvas.
The pages will be displayed to fit it, so adjust the size.
Next, attach the Page component to the root GameObject of the page view.
Place this GameObject under the Resources folder with an arbitrary name.
And call PageContainer.Push() with the Resources path to display the page.
The following is an example of pushing the page placed in Assets/Resources/ExamplePage.prefab.
PageContainer pageContainer;

// Push the page named "ExamplePage".
var handle = pageContainer.Push("ExamplePage", true);

// Wait for the transition to finish.
yield return handle;
//await handle.Task; // You can also use await.
//handle.OnTerminate += () => { }; // You can also use callback.
Also, use PageContainer.Pop() to discard the active page and display the previous page.
PageContainer pageContainer;

// Pop the active page.
var handle = pageContainer.Pop(true);

// Wait for the transition to finish.
yield return handle;
If you want to skip a certain page when call Pop(), you can disable stacking to history by using the optional argument.
To create the modal transition, first attach the "Modal Container" component to an GameObject under the Canvas.
In general, modals are designed to cover the entire window with their backdrop and block clicks.
Therefore, the size of the RectTransform of the GameObject should basically be set to match the window size.
Next, attach the Modal component to the root GameObject of the modal view.
This root GameObject will be adjusted to fit the size of the Modal Container.
So if you want to create the modal with margins, create a child GameObject with a smaller size and create the content inside it.

Place this GameObject under the Resources folder with an arbitrary name.
And call ModalContainer.Push() with the Resources path to display the page.
The following is an example of pushing the modal placed in Assets/Resources/ExampleModal.prefab.
ModalContainer modalContainer;

// Push the modal named "ExampleModal".
var handle = modalContainer.Push("ExampleModal", true);

// Wait for the transition to finish.
yield return handle;
//await handle.Task; // You can also use await.
//handle.OnTerminate += () => { }; // You can also use callback.
Also, use ModalContainer.Pop() to discard the active modal and display the previous modal.
ModalContainer modalContainer;

// Pop the active modal.
var handle = modalContainer.Pop(true);

// Wait for the transition to finish.
yield return handle;
Note that you can change the modal backdrop as you like.
To create the sheet transition, first attach the "Sheet Container" component to an GameObject under the Canvas.
The sheets will be displayed to fit it, so adjust the size.
Next, attach the Sheet component to the root GameObject of the sheet view.
Place this GameObject under the Resources folder with an arbitrary name.
Call SheetContainer.Register() with the Resources path to create the sheet.
After it is created, you can change the active sheet by calling SheetContainer.Show().
At this time, if there is already an active sheet, it will be deactivated.
The following is an example of displaying the sheet placed in Assets/Resources/ExampleSheet.prefab.
SheetContainer sheetContainer;

// Instantiate the sheet named "ExampleSheet"
var registerHandle = sheetContainer.Register("ExampleSheet");
yield return registerHandle;

// Show the sheet named "ExampleSheet"
var showHandle = sheetContainer.Show("ExampleSheet", false);
yield return showHandle;
Note that when multiple sheets with same resource keys are instantiated by the Register() method, the identity of the sheet instance cannot guaranteed by the resource key.
In such case, use the sheet ID instead of the resource key, as shown below.
SheetContainer sheetContainer;

// Instantiate the sheet named "ExampleSheet" and get the sheet id.
var sheetId = 0;
var registerHandle = sheetContainer.Register("ExampleSheet", x =>
{
    sheetId = x.sheetId;
});
yield return registerHandle;

// Show the sheet with sheetId.
var showHandle = sheetContainer.Show(sheetId, false);
yield return showHandle;
Also, to hide the active sheet instead of switching it, use the Hide() method.
SheetContainer sheetContainer;

// Hide the active sheet.
var handle = sheetContainer.Hide(true);

// Wait for the transition to finish.
yield return handle;Each method for transition returns AsyncProcessHandle as the return value.
Using this object, you can wait for the transition process to finish.
You can use coroutines, asynchronous methods, and callbacks to do this.
To wait in a coroutine, use yield return as shown below.
yield return pageContainer.Push("ExamplePage", true);To wait in an asynchronous method, use await for AsyncProcessHandle.Task as follows.
await pageContainer.Push("ExamplePage", true).Task;And use AsyncProcessHandle.OnTerminate if you want to use a callback.
pageContainer.Push("ExamplePage", true).OnTerminate += () => { };Each container (PageContainer/ModalContainer/SheetContainer) has static methods to get the instance.
Using the Container.Of() as follows, you can get the container that is attached to the nearest parent from the given Transform or RectTransform.
var pageContainer = PageContainer.Of(transform);
var modalContainer = ModalContainer.Of(transform);
var sheetContainer = SheetContainer.Of(transform);
Also, you can set the Name property in the container's Inspector to get the container by its name.
In this case, use the Container.Find() method as follows.
var pageContainer = PageContainer.Find("SomePageContainer");
var modalContainer = ModalContainer.Find("SomeModalContainer");
var sheetContainer = SheetContainer.Find("SomeSheetContainer");In default, a standard transition animation is set for each screen type.
You can create a class derived from TransitionAnimationObject to create custom transition animation.
This class has a property and methods to define the animation behavior.
// Duration (sec).
public abstract float Duration { get; }

// Initialize.
public abstract void Setup();

// Define the state at this time.
public abstract void SetTime(float time);
Please refer to SimpleTransitionAnimationObject for the practical implementation.
Then, instantiate this Scriptable Object, and assign it to UnityScreenNavigatorSettings.
You can create UnityScreenNavigatorSettings from Assets > Create > Screen Navigator Settings.

You can also set up different animation for each screen.
Each Page, Modal, and Sheet component has the Animation Container property.
You can set the transition animation to it.

You can change the transition animation of this screen by setting the Asset Type to Scriptable Object and assigning the TransitionAnimationObject described in the previous section to Animation Object.
Also, you can use the MonoBehaviour instead of the ScriptableObject.
In this case, first create a class that extends TransitionAnimationBehaviour .
Please refer to SimpleTransitionAnimationBehaviour for the practical implementation.
Then, attach this component and set the Asset Type to Mono Behaviour and assign the reference to Animation Behaviour.
For example, when screen A enters and screen B exits, screen B is called the "Partner Screen" of screen A.
If you enter the name of the partner screen in the property shown below, the transition animation will be applied only when this name matches the partner screen name.

In default, the prefab name is used as the screen name.
If you want to name it explicitly, uncheck Use Prefab Name As Identifier and enter a name in the Identifier property.

In addition, regular expressions can be used for the Partner Page Identifier Regex.
And if multiple animations are set, they will be evaluated in order from top.
In the transition animation of a screen with a partner screen, the drawing order can be important.
For example, an animation where the screen covers the partner screen.
If you want to control the drawing order, use the Rendering Order property.

During screen transitions, the screen is drawn in the order of decreasing this value.
Note that modals do not have a Rendering Order property, since the newest one is always displayed in front.
You can use SimpleTransitionAnimationObject as a simple transition animation implementation.
This can be created from Assets > Create > Screen Navigator > Simple Transition Animation.
Then, a ScriptableObject as shown below will be generated, and you can set up the animation from the Inspector.

You can also use SimpleTransitionAnimationBehaviour as a MonoBehaviour implementation of this.
This is used by attaching it directly to a GameObject.
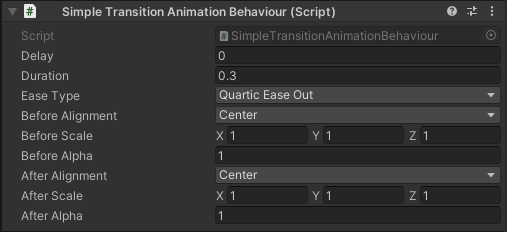
Description of each property is as follows.
| Property Name | Description |
|---|---|
| Delay | Delay time before the animation starts (seconds). |
| Duration | Animation duration (seconds). |
| Ease Type | Type of the easing functions. |
| Before Alignment | Relative position from the container before transition. |
| Before Scale | Scale before transition. |
| Before Alpha | Transparency before transition. |
| After Alignment | Relative position from the container after transition. |
| After Scale | Scale after transition. |
| After Alpha | Transparency after transition. |
You can also create animations that refer to the state of the partner screen.
In the following example, the image of the previous modal is enlarged while seamlessly transitioning to the next modal.

To implement this, first create a class that derived from TransitionAnimationObject or TransitionAnimationBehaviour.
Then, refer to the PartnerRectTransform property to get the partner screen.
If the partner screen does not exist, PartnerRectTransform will be null.
Please refer to CharacterImageModalTransitionAnimation in demo for the practical implementation.
You can use Timeline to create transition animation.
It is recommended to use Timeline for complex transition animation.

To implement this, first attach the Timeline Transition Animation Behaviour to a GameObject.
And assign Playable Director and Timeline Asset to properties.

Play On Awake property of Playable Director need to be unchecked.
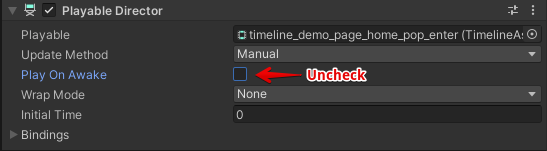
Finally, assign this Timeline Transition Animation Behaviour to the Animation Container.

In addition, I recommend UnityUIPlayables to create uGUI animations with Timeline.

By overriding following methods in the class derived from the Page class,
you can write the processes associated with the lifecycle of the page.
using System.Collections;
using UnityScreenNavigator.Runtime.Core.Page;

public class SomePage : Page
{
    // Called just after this page is loaded.
    public override IEnumerator Initialize() { yield break; }
    // Called just before this page is released.
    public override IEnumerator Cleanup() { yield break; }
    // Called just before this page is displayed by the Push transition.
    public override IEnumerator WillPushEnter() { yield break; }
    // Called just after this page is displayed by the Push transition.
    public override void DidPushEnter() { }
    // Called just before this page is hidden by the Push transition.
    public override IEnumerator WillPushExit() { yield break; }
    // Called just after this page is hidden by the Push transition.
    public override void DidPushExit() { }
    // Called just before this page is displayed by the Pop transition.
    public override IEnumerator WillPopEnter() { yield break; }
    // Called just after this page is displayed by the Pop transition.
    public override void DidPopEnter() { }
    // Called just before this page is hidden by the Pop transition.
    public override IEnumerator WillPopExit() { yield break; }
    // Called just after this page is hidden by the Pop transition.
    public override void DidPopExit() { }
}
You can also register lifecycle events externally by registering an object that implements IPageLifecycleEvent to Page as shown below.
IPageLifecycleEvent is an interface where the above methods are defined.
IPageLifecycleEvent lifecycleEventImpl;
Page page;
// You can specify the execution priority with the second argument.
// Less than 0: executed before Page lifecycle event.
// Greater than 1: executed after Page lifecycle event.
page.AddLifecycleEvent(lifecycleEventImpl, -1);
And you can also hook transition events from the container by passing object that implements IPageContainerCallbackReceiver to PageContainer.AddCallbackReceiver().
public interface IPageContainerCallbackReceiver
{
    // Called just before the Push transition is executed.
    void BeforePush(Page enterPage, Page exitPage);
    // Called just after the Push transition is executed.
    void AfterPush(Page enterPage, Page exitPage);
    // Called just before the Pop transition is executed.
    void BeforePop(Page enterPage, Page exitPage);
    // Called just after the Pop transition is executed.
    void AfterPop(Page enterPage, Page exitPage);
}
Note that if you implement IPageContainerCallbackReceiver to MonoBehaviour and attach it to GameObject of the page,
it will be registered to PageContainer without calling PageContainer.AddCallbackReceiver().
By overriding following methods in the class derived from the Modal class,
you can write the processes associated with the lifecycle of the modal.
using System.Collections;
using UnityScreenNavigator.Runtime.Core.Modal;

public class SomeModal : Modal
{
    // Called just after this modal is loaded.
    public override IEnumerator Initialize() { yield break; }
    // Called just before this modal is released.
    public override IEnumerator Cleanup() { yield break; }
    // Called just before this model is displayed by the Push transition.
    public override IEnumerator WillPushEnter() { yield break; }
    // Called just after this modal is displayed by the Push transition.
    public override void DidPushEnter() { }
    // Called just before this modal is hidden by the Push transition.
    public override IEnumerator WillPushExit() { yield break; }
    // Called just after this modal is hidden by the Push transition.
    public override void DidPushExit() { }
    // Called just before this modal is displayed by the Pop transition.
    public override IEnumerator WillPopEnter() { yield break; }
    // Called just after this modal is displayed by the Pop transition.
    public override void DidPopEnter() { }
    // Called just before this modal is hidden by the Pop transition.
    public override IEnumerator WillPopExit() { yield break; }
    // Called just after this modal is hidden by the Pop transition.
    public override void DidPopExit() { }
}
You can also register lifecycle events externally by registering an object that implements IModalLifecycleEvent to ModalContainer as shown below.
IModalLifecycleEvent is an interface where the above methods are defined.
IModalLifecycleEvent lifecycleEventImpl;
Modal modal;
// You can specify the execution priority with the second argument.
// Less than 0: executed before Modal lifecycle event.
// Greater than 1: executed after Modal lifecycle event.
modal.AddLifecycleEvent(lifecycleEventImpl, -1);
And you can also hook transition events from the container by passing object that implements IModalContainerCallbackReceiver to ModalContainer.AddCallbackReceiver().
public interface IModalContainerCallbackReceiver
{
    // Called just before the Push transition is executed.
    void BeforePush(Modal enterModal, Modal exitModal);
    // Called just after the Push transition is executed.
    void AfterPush(Modal enterModal, Modal exitModal);
    // Called just before the Pop transition is executed.
    void BeforePop(Modal enterModal, Modal exitModal);
    // Called just after the Pop transition is executed.
    void AfterPop(Modal enterModal, Modal exitModal);
}
Note that if you implement IModalContainerCallbackReceiver to MonoBehaviour and attach it to GameObject of the page,
it will be registered to ModalContainer without calling ModalContainer.AddCallbackReceiver().
By overriding following methods in the class derived from the Sheet class,
you can write the processes associated with the lifecycle of the sheet.
using System.Collections;
using UnityScreenNavigator.Runtime.Core.Sheet;

public class SomeSheet : Sheet
{
    // Called just after this sheet is loaded.
    public override IEnumerator Initialize() { yield break; }
    // Called just before this sheet is released.
    public override IEnumerator Cleanup() { yield break; }
    // Called just before this sheet is displayed.
    public override IEnumerator WillEnter() { yield break; }
    // Called just after this sheet is displayed.
    public override void DidEnter() { }
    // Called just before this sheet is hidden.
    public override IEnumerator WillExit() { yield break; }
    // Called just after this sheet is hidden.
    public override void DidExit() { }
}
You can also register lifecycle events externally by registering an object that implements ISheetLifecycleEvent to SheetContainer as shown below.
ISheetLifecycleEvent is an interface where the above methods are defined.
ISheetLifecycleEvent lifecycleEventImpl;
Sheet sheet;
// You can specify the execution priority with the second argument.
// Less than 0: executed before Sheet lifecycle event.
// Greater than 1: executed after Sheet lifecycle event.
sheet.AddLifecycleEvent(lifecycleEventImpl, -1);
And you can also hook transition events from the container by passing object that implements ISheetContainerCallbackReceiver to SheetContainer.AddCallbackReceiver().
public interface ISheetContainerCallbackReceiver
{
    // Called just before the Show transition is executed.
    void BeforeShow(Sheet enterSheet, Sheet exitSheet);
    // Called just after the Show transition is executed.
    void AfterShow(Sheet enterSheet, Sheet exitSheet);
    // Called just before the Hide transition is executed.
    void BeforeHide(Sheet exitSheet);
    // Called just after the Hide transition is executed.
    void AfterHide(Sheet exitSheet);
}
Note that if you implement ISheetContainerCallbackReceiver to MonoBehaviour and attach it to GameObject of the page,
it will be registered to SheetContainer without calling SheetContainer.AddCallbackReceiver().
You can also use asynchronous methods instead of coroutines to define lifecycle events, as shown below.
using System.Threading.Tasks;
using UnityScreenNavigator.Runtime.Core.Page;

public class SomePage : Page
{
    // Using asynchronous methods to define lifecycle events
    public override async Task Initialize()
    {
        await Task.Delay(100);
    }
}
To use asynchronous methods, add Scripting Define Symbols in the following steps.
- Player Settings > Other Settings
- Add
USN_USE_ASYNC_METHODStoScripting Define Symbols.
Note that Scripting Define Symbols needs to be set for all platforms.
As mentioned above, by default, the resources of each screen are placed in the Resources folder as Prefab.
If you want to change the loading method, first create the Scriptable Object derived from AssetLoaderObject.
AssetLoaderObject is an implementation of IAssetLoader, and has the following methods.
// Load the resource indicated by the key.
public abstract AssetLoadHandle<T> Load<T>(string key) where T : Object;

// Asynchronously load the resource indicated by the key.
public abstract AssetLoadHandle<T>

// Release the resource indicated by the handle.
public abstract void Release(AssetLoadHandle handle);
Please refer to ResourcesAssetLoader for the practical implementation.
After create it, assign it's instance to AssetLoader property of UnityScreenNavigatorSettings.

You can create UnityScreenNavigatorSettings from Assets > Create > Screen Navigator Settings.
An implementation of IAssetLoader for the Addressable Asset System is provided by default.
If you want to load each screen with an address, follow the steps below to set it up.
- Select
Assets > Create > Resource Loader > Addressable Asset Loader - Assign the ScriptableObject created in step 1 to the
AssetLoaderproperty ofUnityScreenNavigatorSettings.
You can pass false as the loadAsync argument of each container's transition method to load the screen synchronously.
For example, PageContainer.Push() should be written as follows.
PageContainer container;

// Load synchronously.
var handle = container.Push("FooPage", true, loadAsync: false);

// Wait for the end of the transition animation.
yield return handle;
In addition, you can initialize it in same frame as the transition method call by using onLoad callback together.
PageContainer container;

// Load synchronously and receive the callback after loading.
var handle = container.Push("FooPage", true, loadAsync: false, onLoad: page =>
{
    // Initialize page. (Called in the same frame as Push)
    page.Setup();
});

// Wait for the end of the transition animation.
yield return handle;
Note that if you use AddressableAssetLoader and load synchronously, Addressables 1.17.4 or higher is required.
In addition, there are performance cautions due to Addressable's specifications.
The pages and the modals are loaded only after a screen transition is requested.
When loading a large resource, it may take a long time to load and prevent smooth transitions.
In such a case, it is useful to preload resources in advance.
The following is an example of preloading with PageContainer.
const string pageName = "FooPage";
PageContainer container;

// Preload FooPage.
var preloadHandle = container.Preload(pageName);

// Wait for the end of the preloading.
yield return preloadHandle;

// Transition smoothly because FooPage has been preloaded.
container.Push(pageName, true);

// Release the preloaded FooPage.
container.ReleasePreloaded(pageName);
Please refer to HomePage in demo for the practical implementation.
When the Home page is initialized, the Shop page is also loaded and destroyed at the same time.
There are some pages that you want to skip on transition back, such as loading screen.
In such a case, you can prevent the page from being stacked in the history by setting the optional argument stack to false in the PageContainer.Push().
The instance of this page will be disposed when transitioning to the next page, and thus skipped when backing.
PageContainer container;

// Transition to FooPage without stacking it in the history.
yield return container.Push("FooPage", true, stack: false);

// Transition to BarPage, and FooPage is disposed.
// BarPageに遷移し、FooPageは破棄される
yield return container.Push("BarPage", true);

// When Pop, it does not back to FooPage, but to the page before it.
yield return container.Pop(true);
Please refer to TopPage in demo for the practical implementation.
Transition to the loading page without stacking.
In default, a black semi-transparent screen is set as the modal backdrop.
You can change this in the settings.
To do this, first attach the Modal Backdrop component to the modal backdrop view, and make it a prefab.
Next, assign this prefab as the modal backdrop.
To change the modal backdrop of the whole application, assign it to Modal Backdrop Prefab in UnityScreenNavigatorSettings.

You can create UnityScreenNavigatorSettings from Assets > Create > Screen Navigator Settings.
You can also set the backdrop for each Modal Container by assigning the prefab to the Override Backdrop Prefab of the Modal Container.
From the start of transition to the end, all interactions such as clicking on the screen are disabled.
You can change the settings to enable interaction during the transition.
To do this, set Enable Interaction In Transition in UnityScreenNavigatorSettings to true.

You can create UnityScreenNavigatorSettings from Assets > Create > Screen Navigator Settings.
However, it is not possible to transition to other screen while transitioning in one container.
So you need to control the transition timing appropriately if you enable interaction.
By default, the part of the screen under the container that is outside the container is masked.
If you want to show the screen outside the container, uncheck the Rect Mask 2D component attached to the container's GameObject.

This software is released under the MIT License.
You are free to use it within the scope of the license.
However, the following copyright and license notices are required for use.