More information on the sample application with ROS2 and AWS IoT use cases is present in this blog
Learn how to send telemetry from a ROS2-based robot to AWS IoT Core over MQTT and via IoT Shadow. This code was tested on an Ubuntu 22.04 system on ROS2 Humble.
You need to setup certificates on your device to connect to AWS IoT Core, which is setup via AWS Command Line Interface (AWS CLI) with appropriate privileges and assumes you have AWS Console access.
Install AWS CLI using the following commands:
curl "https://awscli.amazonaws.com/awscli-exe-linux-x86_64.zip" -o "awscliv2.zip"
unzip awscliv2.zip
sudo ./aws/install
Set up appropriate credentials to run AWS CLI commands. This blog assumes you are an admin user and recommend to limit permissions only required AWS IoT services commands. To learn more about methods to set up credentials and permissions, please see configuring AWS CLI and AWS Identity and Access Management.
export AWS_ACCESS_KEY_ID=AKIAIOSFODNN7EXAMPLE
export AWS_SECRET_ACCESS_KEY=wJalrXUtnFEMI/K7MDENG/bPxRfiCYEXAMPLEKEY
export AWS_DEFAULT_REGION=us-west-2
export AWS_REGION=$AWS_DEFAULT_REGION
Install AWS IoT device SDK Python by running the following command
python3 -m pip install awsiotsdk
Next, clone the following repository to run this sample
cd ~
git clone https://github.com/aws-samples/aws-iot-robot-connectivity-samples-ros2.git
Install the dependencies and build the code with the following command:
cd ~/aws-iot-robot-connectivity-samples-ros2/workspace
colcon build
source ~/aws-iot-robot-connectivity-samples-ros2/workspace/install/setup.bash
Your ROS2 code is built! However, before you run the code, you will need to setup certificates to communicate with AWS IoT Core. The certificates are used for Authentication and Authorization of the AWS IoT thing associated with your robot and provide encryption in transit for the data sent and received.
Each robot must have a credential to interact with AWS IoT. All traffic to and from AWS IoT is sent securely over Transport Layer Security (TLS). AWS cloud security mechanisms protect data as it moves between AWS IoT and other AWS services.
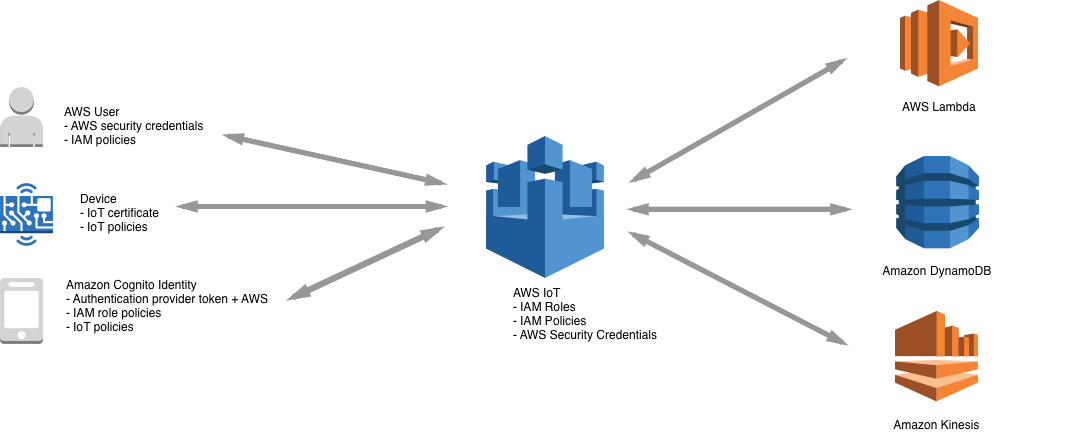 You are responsible for managing device credentials X.509 certificates, as well as managing policies and permissions in AWS IoT. X.509 certificates provide AWS IoT with the ability to authenticate client and device connections. Client certificates must be registered with AWS IoT before a client can communicate with AWS IoT. X.509 certificates authenticate client and device connections to AWS IoT. X.509 certificates provide several benefits over other identification and authentication mechanisms. X.509 certificates enable asymmetric keys to be used with devices. For example, you could burn private keys into secure storage on a device so that sensitive cryptographic material never leaves the device. X.509 certificates provide stronger client authentication over other schemes, such as username and password or bearer tokens, because the private key never leaves the device.
In production at scale, AWS IoT Device Defender tools can be used to audit and get alerts for the security posture of IoT resources and add mitigation through build in actions such as updating a device certificate, quarantining a group of devices, or replacing default policies.
You will need to set several environment variables that are required for running the IoT API calls. These are the location of where to download the certs, and example names of what to call your devices.
export CERT_FOLDER_LOCATION=~/aws-iot-robot-connectivity-samples-ros2/iot_certs_and_config/
export THING_NAME=my_ros2_robot_thing
export IOT_CONFIG_TEMPLATE=~/aws-iot-robot-connectivity-samples-ros2/templates/iot_config_template.json
export IOT_POLICY_TEMPLATE=~/aws-iot-robot-connectivity-samples-ros2/templates/iot_policy_template.json
export IOT_POLICY_NAME=ros2_robot_iot_policy
Next, create an AWS IoT Thing, and attach corresponding certificates.
export THING_ARN=$(aws iot create-thing --thing-name $THING_NAME --query thingArn --output text)
export CERT_ARN=$(aws iot create-keys-and-certificate --set-as-active \
--certificate-pem-outfile ${CERT_FOLDER_LOCATION}${THING_NAME}.cert.pem  \
--public-key-outfile ${CERT_FOLDER_LOCATION}${THING_NAME}.public.key \
--private-key-outfile ${CERT_FOLDER_LOCATION}${THING_NAME}.private.key \
--query certificateArn --output text)
The above command will download certificates in the $CERT_FOLDER_LOCATION on your robot.
Next, download a root certificate to connect our AWS IoT thing to AWS IoT Core, and and attach the certs created to the thing. AWS IoT provides client certificates that are signed by the Amazon Root certificate authority (CA). The root cert is used to verify the authenticity of the certificates created.
ROOT_CERT_FILE=$CERT_FOLDER_LOCATION"rootCA".crt
curl https://www.amazontrust.com/repository/AmazonRootCA1.pem > $ROOT_CERT_FILE
export CERT_ID=${CERT_ARN#*cert/}
aws iot attach-thing-principal --principal $CERT_ARN --thing-name $THING_NAME
You now have authentication to connect to AWS IoT Core but need a policy to define permissions and boundaries for your AWS IoT thing. A sample policy is provided in the repository purely for testing purposes, and you should modify it to suit your needs.
Create a copy of the iot_config_template.json file with the endpoint and certificate locations for your robot.
export ACCOUNT_ID=$(aws sts get-caller-identity --query Account --output text)
export ENDPOINT_ADDRESS=$(aws iot describe-endpoint --endpoint-type iot:Data-ATS --query endpointAddress  --output text)

export PORT=8883
export IOT_CONFIG_FILE=~/aws-iot-robot-connectivity-samples-ros2/iot_certs_and_config/iot_config.json
cat $IOT_CONFIG_TEMPLATE >> $IOT_CONFIG_FILE
export PRIV_KEY_LOCATION=$CERT_FOLDER_LOCATION$THING_NAME.private.key
export CERT_FILE=$CERT_FOLDER_LOCATION$THING_NAME.cert.pem
sed -i -e "s/ENDPOINT/$ENDPOINT_ADDRESS/g" $IOT_CONFIG_FILE
sed -i -e "s/ROOTCA/$(echo $ROOT_CERT_FILE | sed 's_/_\\/_g')/g" $IOT_CONFIG_FILE
sed -i -e "s/PRIVATEKEY/$(echo $PRIV_KEY_LOCATION | sed 's_/_\\/_g')/g" $IOT_CONFIG_FILE
sed -i -e "s/CERTPATH/$(echo $CERT_FILE | sed 's_/_\\/_g')/g" $IOT_CONFIG_FILE
sed -i -e "s/CLIENT/$THING_NAME/g" $IOT_CONFIG_FILE
sed -i -e "s/PORT/$PORT/g" $IOT_CONFIG_FILE
sed -i -e "s/REGION/$AWS_REGION/g" $IOT_CONFIG_FILE
cat $IOT_CONFIG_FILE
Next we create a policy file from a template file provided. This policy defines the permissions boundary for our AWS IoT Thing. Notice that this template only allows subscription and reception to ros2_mock_telemetry_topic. Modify the policy per your needs as you expand your use cases.
{
  "Version": "2012-10-17",
  "Statement": [
    {
      "Effect": "Allow",
      "Action": [
        "iot:Publish",
        "iot:Receive",
        "iot:RetainPublish"
      ],
      "Resource": [
        "arn:aws:iot:REGION:ACCOUNT_ID:topic/ros2_mock_telemetry_topic"
      ]
    },
    {
      "Effect": "Allow",
      "Action": [
        "iot:Subscribe"
      ],
      "Resource": [
        "arn:aws:iot:REGION:ACCOUNT_ID:topicfilter/ros2_mock_telemetry_topic"
      ]
    },
    {
      "Effect": "Allow",
      "Action": [
        "iot:Connect"
      ],
      "Resource": [
        "arn:aws:iot:REGION:ACCOUNT_ID:client/CLIENT"
      ]
    }
  ]
}
Create a policy from the template with the appropriate information using the following commands
export IOT_POLICY_FILE=~/aws-iot-robot-connectivity-samples-ros2/iot_certs_and_config/iot_policy.json
cat $IOT_POLICY_TEMPLATE >> $IOT_POLICY_FILE
sed -i -e "s/ACCOUNT_ID/$ACCOUNT_ID/g" $IOT_POLICY_FILE
sed -i -e "s/CLIENT/$THING_NAME/g" $IOT_POLICY_FILE
sed -i -e "s/REGION/$AWS_REGION/g" $IOT_POLICY_FILE
cat $IOT_POLICY_FILE
aws iot create-policy --policy-name $IOT_POLICY_NAME --policy-document file://$IOT_POLICY_FILE
aws iot attach-policy --policy-name $IOT_POLICY_NAME --target $CERT_ARN
You should see a response like the following:
You have completed all the setup needed to send data to AWS IoT Core! You may now remove the AWS CLI specific credentials from the robot since you now have the IoT Certificates setup for the robot to communicate with AWS IoT Core.
This node can be used to send messages directly to AWS IoT Core using MQTT. Launch the rosnode with the following command:
source ~/aws-iot-robot-connectivity-samples-ros2/workspace/install/setup.bash
ros2 run telemetry_mqtt mock_telemetry_pub
This ROS2 node publishes mock telemetry data on topic mock_telemetry and can be verified by the following command, in a new terminal
source ~/aws-iot-robot-connectivity-samples-ros2/workspace/install/setup.bash
ros2 topic echo mock_telemetry
Next run the node, that subscribes to the mock telemetry data and publishes to AWS IoT over MQTT topic ros2_mock_telemetry_topic
export IOT_CONFIG_FILE=~/aws-iot-robot-connectivity-samples-ros2/iot_certs_and_config/iot_config.json
source ~/aws-iot-robot-connectivity-samples-ros2/workspace/install/setup.bash
ros2 run telemetry_mqtt mqtt_telemetry_pub --ros-args --param path_for_config:=$IOT_CONFIG_FILE
Endpoint discovery: this node also allows the use of cloud discovery, which allows the automatic discovery of AWS Greengrass core devices to connect to instead of a cloud endpoint. For more information on this option, please see the developer guide.
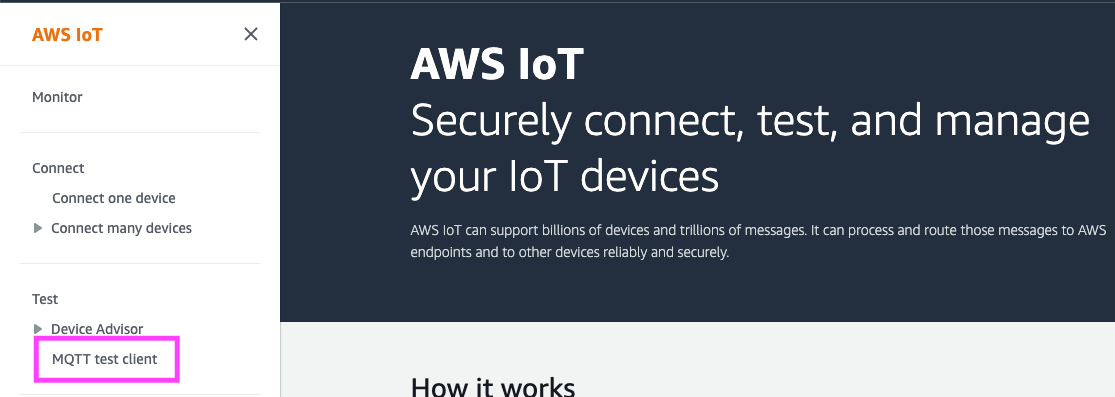
To view the data being published, login to your AWS console to the MQTT test client page on the browser by searching for IoT Core in the search bar and selecting MQTT test client as shown below.
 Connect to the MQTT test client on the console as shown below
 Subscribe to the topic published by the AWS IoT thing in the client, to see mocked data being published by the ROS2 node.
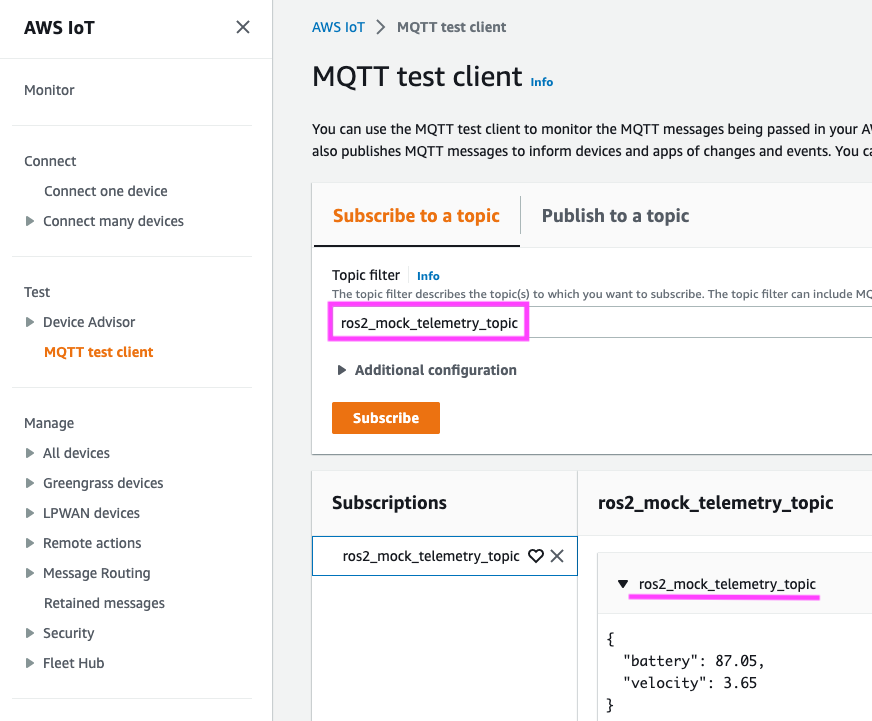 You can now convert any ROS2 topic data and send it over as an MQTT topic over AWS IoT Core, with a thing transformation layer from ROS2 topic to JSON-formatted messages sent over an MQTT topic.
This section shows how to create and interact with an IoT Core Named Shadow. The example node within subscribes to shadow changes and publishes them on a ROS topic, as well as exposing service calls for other ROS nodes to update the shadow.
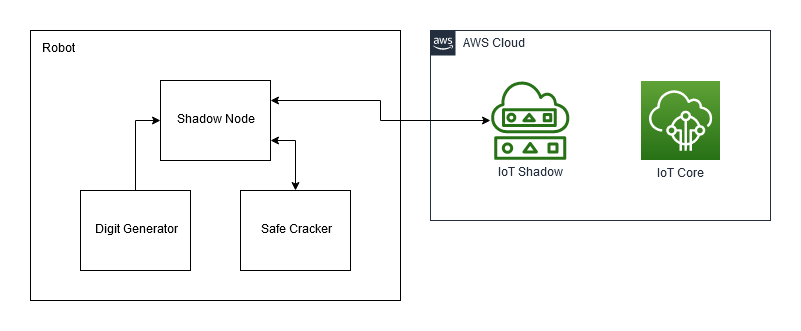
This node is demonstrated using a safe cracker robot, as shown above. The robot is turning a dial on a safe, swapping between clockwise and counter-clockwise. A random number generator updates the shadow with the digit to turn the dial to, and the safe cracker robot listens for shadow updates and turns the dial to that digit.
The digit generator uses a service call to set the desired state. The shadow node listens to any shadow updates and publishes them on a ROS2 topic. The safe cracker robot subscribes to these updates, and uses a service call to set the reported state. More information on shadow use is available later in this file.
To set up this application, you first need to create a named shadow for the Thing. As environment variables are reused from the previous setup, it is recommended to reuse the terminal from the setup steps. Creating the shadow can be done as follows:
export SHADOW_NAME=my_ros2_shadow
aws iot-data update-thing-shadow --thing-name $THING_NAME --shadow-name $SHADOW_NAME --payload "{\"state\":{\"reported\":{}}}" --cli-binary-format raw-in-base64-out /dev/null
Once the shadow is created, a policy is needed to allow interaction with the shadow. The template is as follows:
{
  "Version": "2012-10-17",
  "Statement": [
    {
      "Effect": "Allow",
      "Action": [
        "iot:Subscribe"
      ],
      "Resource": [
        "arn:aws:iot:REGION:ACCOUNT_ID:topicfilter/$aws/things/THING_NAME/shadow/name/SHADOW_NAME/update/documents"
      ]
    },
    {
      "Effect": "Allow",
      "Action": [
        "iot:Receive"
      ],
      "Resource": [
        "arn:aws:iot:REGION:ACCOUNT_ID:topic/$aws/things/THING_NAME/shadow/name/SHADOW_NAME/update/documents"
      ]
    },
    {
      "Effect": "Allow",
      "Action": [
        "iot:Publish"
      ],
      "Resource": [
        "arn:aws:iot:REGION:ACCOUNT_ID:topic/$aws/things/THING_NAME/shadow/name/SHADOW_NAME/update"
      ]
    }
  ]
}
This policy allows the IoT Thing to connect to the named shadow, publish to it, and subscribe to its update. The policy must be created and attached to the certificate used for the Thing. This can be done by copying the template and replacing the REGION, ACCOUNT_ID, THING_NAME, and SHADOW_NAME fields, then creating and attaching the policy. The commands are as follows:
export SHADOW_POLICY_TEMPLATE=~/aws-iot-robot-connectivity-samples-ros2/templates/shadow_policy_template.json
export SHADOW_POLICY_FILE=~/aws-iot-robot-connectivity-samples-ros2/iot_certs_and_config/shadow_policy.json
cat $SHADOW_POLICY_TEMPLATE > $SHADOW_POLICY_FILE
sed -i -e "s/REGION/$AWS_REGION/g" $SHADOW_POLICY_FILE
sed -i -e "s/ACCOUNT_ID/$ACCOUNT_ID/g" $SHADOW_POLICY_FILE
sed -i -e "s/THING_NAME/$THING_NAME/g" $SHADOW_POLICY_FILE
sed -i -e "s/SHADOW_NAME/$SHADOW_NAME/g" $SHADOW_POLICY_FILE
export SHADOW_POLICY_NAME=ros2_shadow_policy
aws iot create-policy --policy-name $SHADOW_POLICY_NAME --policy-document file://$SHADOW_POLICY_FILE
aws iot attach-policy --policy-name $SHADOW_POLICY_NAME --target $CERT_ARN
This is sufficient permission to interact with the shadow. The sample application can now be run as follows:
source ~/aws-iot-robot-connectivity-samples-ros2/workspace/install/setup.bash
# Replace tilde with home directory
export FULL_CONFIG_PATH="${IOT_CONFIG_FILE/#\~/$HOME}"
ros2 launch iot_shadow_service crack_safe.yaml shadow_name:=$SHADOW_NAME path_for_config:=$FULL_CONFIG_PATH
You can now see the topics being published on ROS2 by opening a new terminal and executing:
source ~/aws-iot-robot-connectivity-samples-ros2/workspace/install/setup.bash
ros2 topic echo /shadow_update_snapshot
This will show a set of messages where the desired and reported digits are changing based on updates to the shadow. An example set of messages is as follows:
---
desired: '{"digit": 61}'
reported: '{"digit": 68}'
delta: ''
---
desired: '{"digit": 61}'
reported: '{"digit": 65}'
delta: ''
---
desired: '{"digit": 61}'
reported: '{"digit": 62}'
delta: ''
---
desired: '{"digit": 61}'
reported: '{"digit": 61}'
delta: ''
---
To view the named shadow changing in the AWS console, navigate to the IoT Core page, as shown below:

Select the Things page from All Devices on the navigation bar on the left:

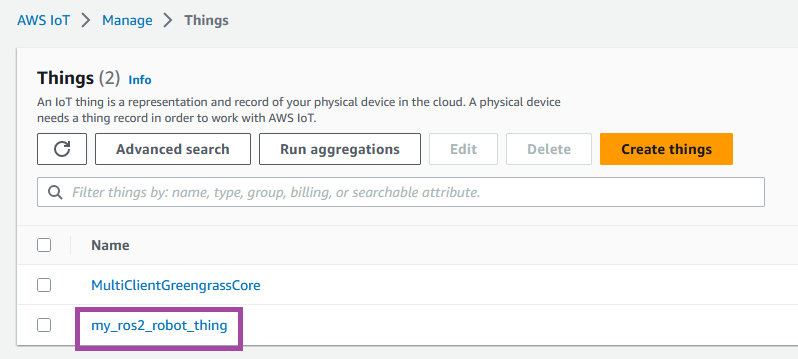
Select the Thing from the list of Things that is presented:
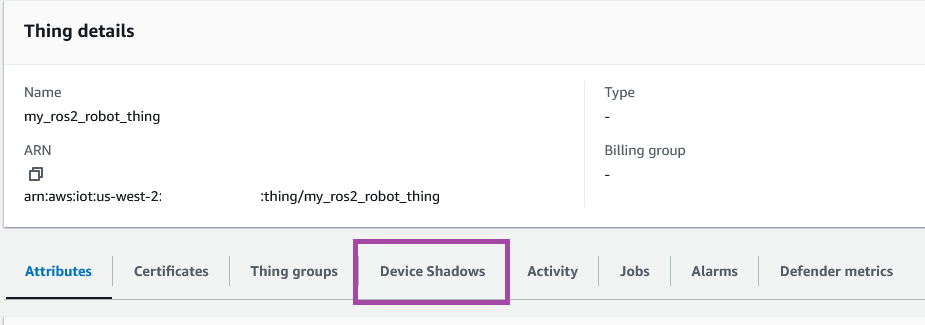
From the details page, select the Device Shadow tab:
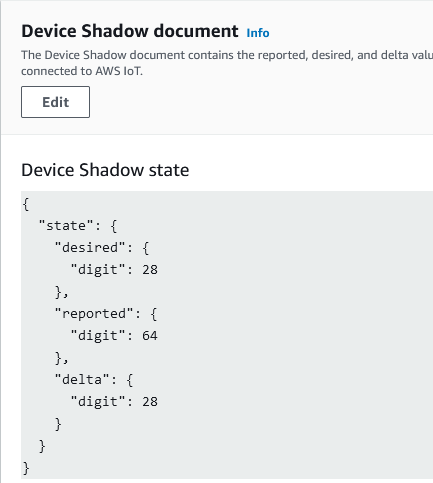
Scroll down a little to the Shadow document. The numbers in this state should be updating with the sample application updating them. The document looks like this:
You can now write updates to your IoT Core Named Shadow from a ROS2 service call, and publish any updates to the Shadow published to a ROS2 topic, allowing connected ROS2 nodes to benefit from a human-readable JSON format document synchronized with AWS.
IoT Core Shadows are human-readable JSON documents structured into desired and reported sections. The desired section has the fields that the cloud desires the Thing to match. The reported section is for the Thing to update the cloud with its actual state. In addition, IoT Core calculates the difference between the desired and reported sections, and if any fields are different, writes those fields into a delta section.
For the sample application, one node generates data, updating the desired section. The other node listens for updates to the desired section for its next target. Whenever it changes its state, it updates the reported state. The delta field is not used. The result is that the shadow shows an update to the desired digit every four seconds, with the reported digit moving towards the desired digit, alternating between upwards and downwards.
See CONTRIBUTING for more information.
This library is licensed under the MIT-0 License. See the LICENSE file.

