An unofficial PyTorch reimplementation of SqueezeDet, with better performance on KITTI benchmark than the official Tensorflow version (and cleaner codes!)
A lot of the code has been borrowed from https://github.com/QiuJueqin/SqueezeDet-PyTorch The purpose was to understand Squeeze Det and see how it performs on KITTI For my case I trained the model for 223 epochs approximately due to limited resources(even colab pro has its limitations) Then I used the model trained by QiuJuqin to evaluate the model's performance on KITTI Special thanks to QiuJueqin for open sourcing his work
| Classes | Car (E/M/H) | Pedestrian (E/M/H) | Cyclist (E/M/H) | mAP |
|---|---|---|---|---|
| This repo | 92.8 / 88.7 / 79.0 | 82.1 / 75.4 / 72.5 | 82.3 / 76.9 / 73.8 | 80.4 |
| Paper | 90.2 / 84.7 / 73.9 | 82.9 / 75.4 / 72.1 | 77.1 / 68.3 / 65.8 | 76.7 |
This project was developed and tested on Colab.
-
Clone this repository:
git clone https://github.com/sparshgarg23/SqueezeDet-PyTorch-1
Here ROOT_DIR is simply content/SqueezeDet-Pytorch-1
Simply run:
cd $ROOT_DIR/src
python main.py demo
That's it. All pre-trained model and sample images have been included in the repo. If everything goes well you will see detection results like this:

-
Download KITTI object detection dataset (images and labels) to your disk, unzip them and you will get two directories:
training/andtesting/. Create a symbolic link todata/kittiof the working directory:mkdir $ROOT_DIR/data/kitti ln -s training/ testing/ $ROOT_DIR/data/kitti
-
Then read all samples' ID into a
trainval.txtfile:cd $ROOT_DIR/data/kitti mkdir image_sets cd ./image_sets ls ../training/image_2/ | grep ".png" | sed s/.png// > trainval.txt
-
Use the script to randomly split the KITTI's training data into a training set and a vlidation set half-and-half:
cd $ROOT_DIR/src/utils
python random_split_train_val.py
A
train.txtand aval.txtfiles will be generated that record the sample IDs for training and validation sets. Now the structure of your data folder should look like:$ROOT_DIT/data/kitti/ |--training/ | |-- image_2/00****.png | L-- label_2/00****.txt |--testing/ | L-- image_2/00****.png L--image_sets/ |-- trainval.txt |-- train.txt L-- val.txt -
Before using KITTI's development kit to evaluate models, we need to compile it first:
cd $ROOT_DIR/src/utils/kitti-eval
make
-
To evaluate trained model on the validation set, run:
cd $ROOT_DIR/src
python main.py eval --load_model ../models/squeezedet_kitti_epoch280.pth --exp_id my_eval
and you will get results like this:
Your evaluation results are available in /home/qiujueqin/squeezedet/exp/my_eval/results Car_easy 0.922 Car_moderate 0.877 Car_hard 0.784 Pedestrian_easy 0.814 Pedestrian_moderate 0.743 Pedestrian_hard 0.718 Cyclist_easy 0.816 Cyclist_moderate 0.762 Cyclist_hard 0.737 mAP 0.797 -
To train the model, run:
python main.py train --load_model ../models/imagenet/squeezenet1_1-f364aa15.pth --exp_id my_train
where
squeezenet1_1-f364aa15.pthis a PyTorch official SqueezeNet model pre-trained on ImageNet. We do not recommend to train SqueezeDet from scratch. All logs will be saved to$ROOT_DIR/exp/my_traindirectory.By default we use
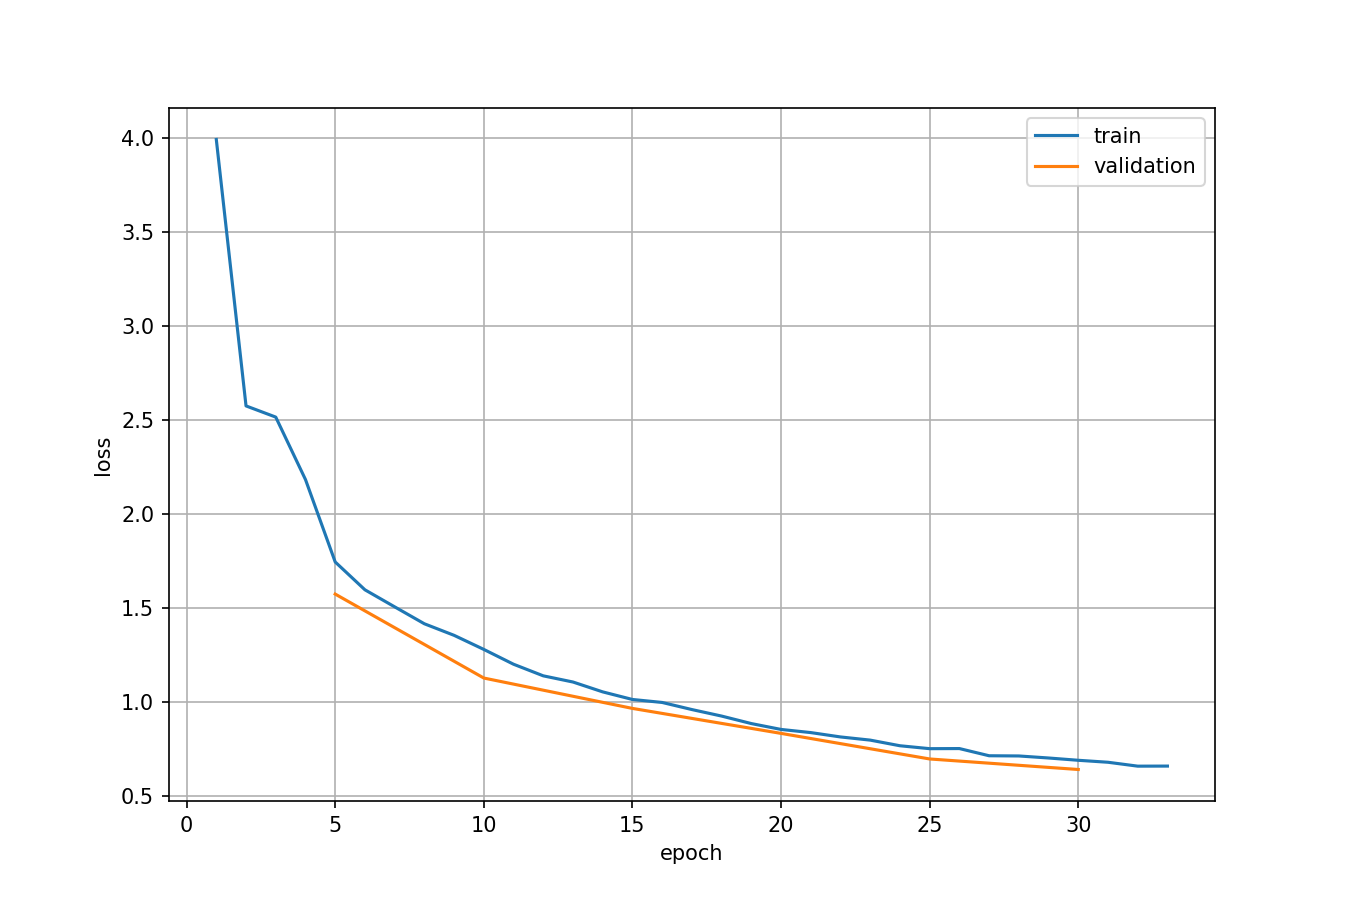
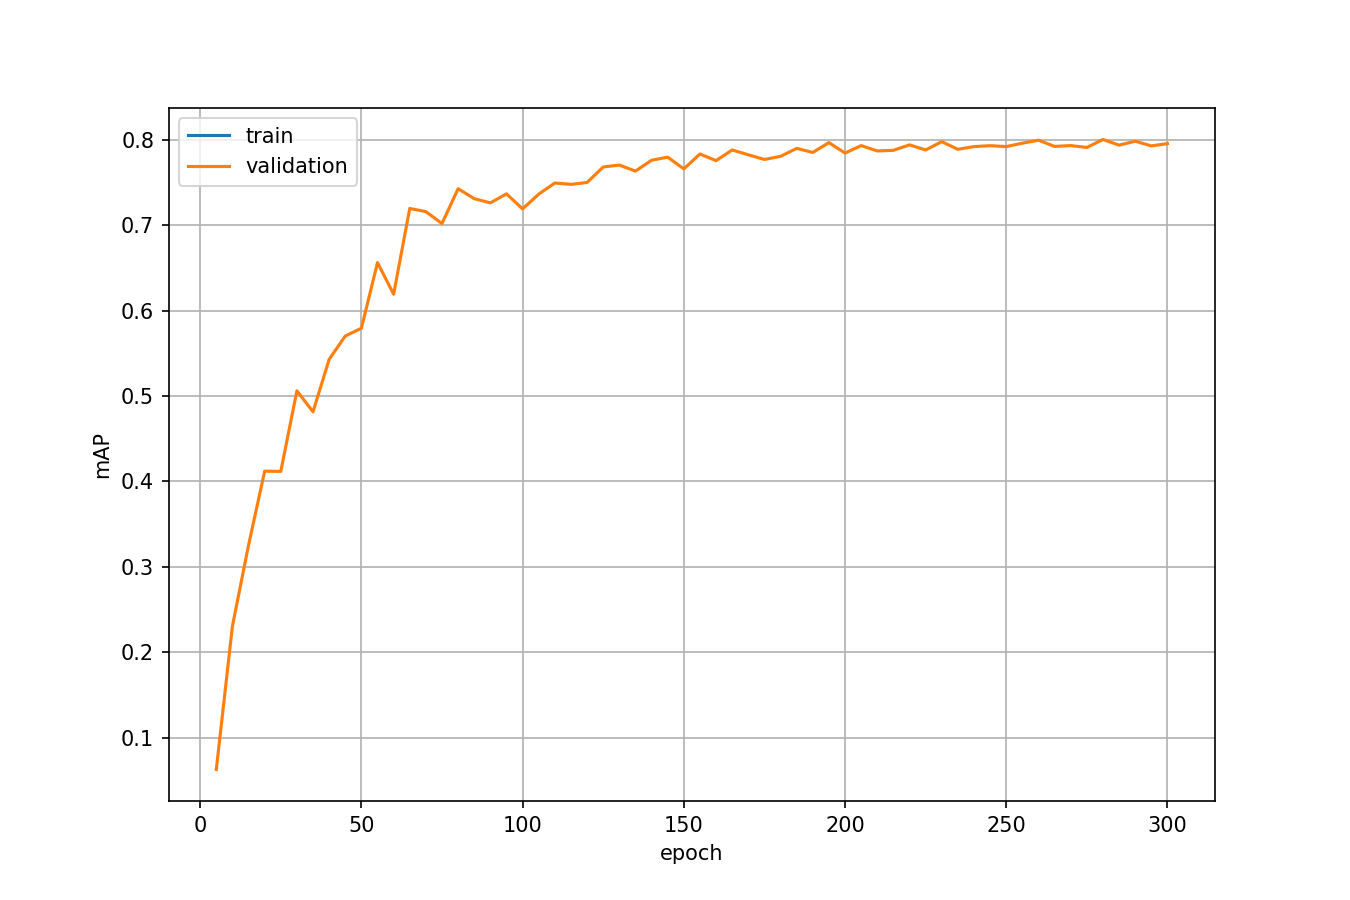
batch_size=20andnum_workers=4. You can find more parameter options by runningpython main.py --help:usage: main.py [-h] [--dataset DATASET] [--load_model LOAD_MODEL] [--debug DEBUG] [--exp_id EXP_ID] [--arch ARCH] [--dropout_prob DROPOUT_PROB] [--lr LR] [--momentum MOMENTUM] [--weight_decay WEIGHT_DECAY] [--grad_norm GRAD_NORM] [--num_epochs NUM_EPOCHS] [--num_iters NUM_ITERS] [--batch_size BATCH_SIZE] [--master_batch_size MASTER_BATCH_SIZE] [--save_intervals SAVE_INTERVALS] [--val_intervals VAL_INTERVALS] [--no_eval] [--print_interval PRINT_INTERVAL] [--flip_prob FLIP_PROB] [--drift_prob DRIFT_PROB] [--forbid_resize] [--class_loss_weight CLASS_LOSS_WEIGHT] [--positive_score_loss_weight POSITIVE_SCORE_LOSS_WEIGHT] [--negative_score_loss_weight NEGATIVE_SCORE_LOSS_WEIGHT] [--bbox_loss_weight BBOX_LOSS_WEIGHT] [--nms_thresh NMS_THRESH] [--score_thresh SCORE_THRESH] [--keep_top_k KEEP_TOP_K] [--gpus GPUS] [--num_workers NUM_WORKERS] [--not_cuda_benchmark] [--seed SEED] mode ...Here are loss curve and mAP curve from one training process:


Licensed under MIT.