Quickstart 👇 Coding in the browser; Web-based flash-tool is included.
This repository holds a sample code and a corresponding platformIO project using the Arduino Framework to connect an esp8266 dev board to a mqtt broker.
The code is for demonstration purposes and directly uses hardcoded connection settings and credentials. So you have to customize at least the following lines in main.cpp, lines 11-18 and (re)build the firmware with pio run :
//#define MQTT_TLS // uncomment this define to enable TLS transport
//#define MQTT_TLS_VERIFY // uncomment this define to enable broker certificate verification
const char* ssid = "YOUR-WIFI";
const char* password = "YOUR-WIFI-PSK";
const char* mqtt_server = "BROKER"; // eg. your-demo.cedalo.cloud or 192.168.1.11
const uint16_t mqtt_server_port = 1883; // or 8883 most common for tls transport
const char* mqttUser = "user";
const char* mqttPassword = "pass";
const char* mqttTopicIn = "esp-8266-in";
const char* mqttTopicOut = "esp-8266-out";
For the variable mqtt_server use either an ipv4 address or a domain name. Only tcp transport is supported (no WebSocket).
A detailed tutorial is available here
Various ESP8266 development boards exist and can be used to realize for example small and smart IoT applications (like this). The microcontroller needs to be flashed with a corresponding firmware to realize the application. Principal steps
- Write and compile c/c++ code
- Create the flashable firmware
- Flash the firmware and test the application
For the steps sketched above you will need a IDE like Micorosft VSCode, the needed software frameworks, and libraries. The setup of all this is already prepared here in this repository using gitpod. The only thing you need is a github account.
Click here 👇 to start your development environment.
If you dislike using gitpod, follow the instructions to install and use the platformIO project within VSCode and clone this repository. (see as reference: link)
After starting the instance it takes a minute to be ready
If the environment is ready it will look like the following image.
During the startup, the code is automatically compiled and the firmware is created. In the output area marked by 1️⃣ below, you will find the information about the build process and a link to a webpage where you can flash the firmware to your esp8266 development board.
Open the main source file main.cpp from folder src 2️⃣ do your edits and save the file 3️⃣. Then type in terminal 4️⃣ the command pio run. This shall start the compilation and the creation of the firmware. If successful you can go to the next section Flash the firmware to upload your modified firmware to your device.
The successfully built firmware file will be in the folder esp-web-flash and is named firmware.bin.
You can use the gitpod environment where a browser-based flash tool is integrated. Just follow the link marked by 1️⃣ (see above) and another tab will open:
Steps to flash the firmware:
- Connect your esp8266 module via USB to the PC where the browser runs
- Click connect
- Choose the corresponding com port from the list and click connect (this functionality is provided by your browser)
- Click install ESP8266-MQTT-NODE or Logs&Console (see below)
The installation of the firmware starts with eraseing the flash storage of the device (!).
- Make sure that the device is connected to this computer (the one that runs the browser that shows the website "ESP-BROWSER-FLASH-TOOL")
- Most devices have a tiny light when it is powered on. If yours has one, make sure it is on.
- Make sure that the USB cable you use can be used for data and is not a power-only cable.
- Make sure you have the right drivers installed. Below are the drivers for common chips used in ESP devices:
- CP2102 drivers: Windows & Mac (download)
- CH342, CH343, CH9102 drivers: Windows, Mac
- CH340, CH341 drivers: Windows, Mac
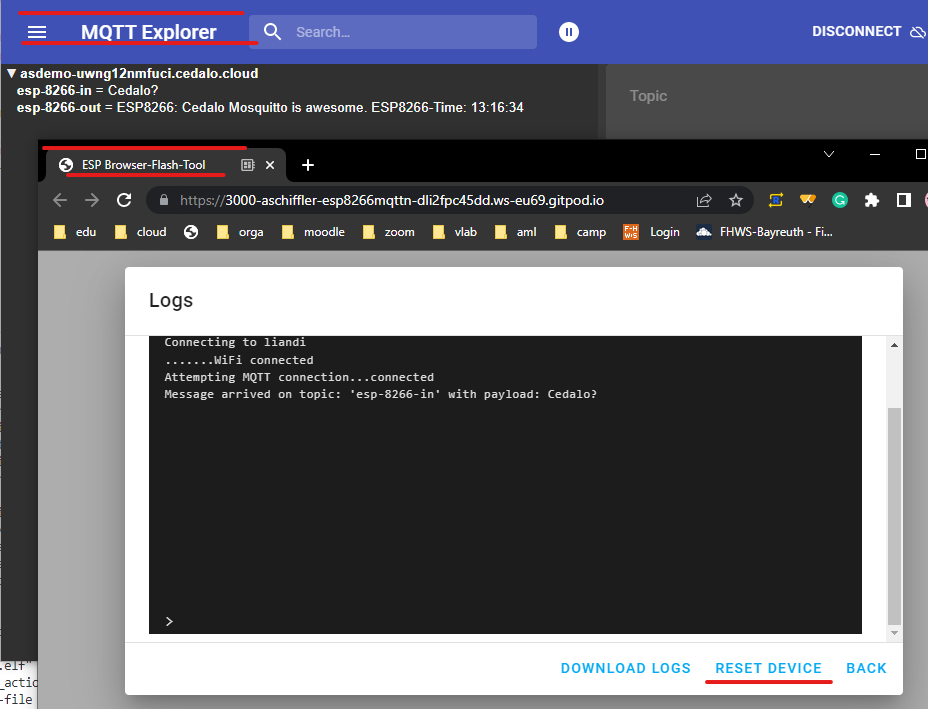
If you use the browser-based development environment you can use the ESP-Web-Flash-Tool also to monitor the serial output. A sample out put is shown below.
Connect to the device via the ESP-Browser-Flash-Tool and click on "Log&Console". Then click reset device so that the start of the console output can be capture in the opened window.
In the following screenshot you see the functionality of the sample application demonstrated. Therefore a pc-based mqtt-client-tool is connected to the mqtt broker. A message is published on "esp-8266-in" (default name) and your esp8266 device will respond to that with a message on the topic "esp-8266-out". The serial console output of the esp8266 can be seen on the window from the ESP-Browser-Flash-Tool.


