Fusing Semantic Segmentation and Monocular Depth Estimation for Enabling Autonomous Driving in Roads without Lane Lines
 |
 |
 |
 |
Click on the image below to watch a VIDEO demonstrating the system on Cityscapes:
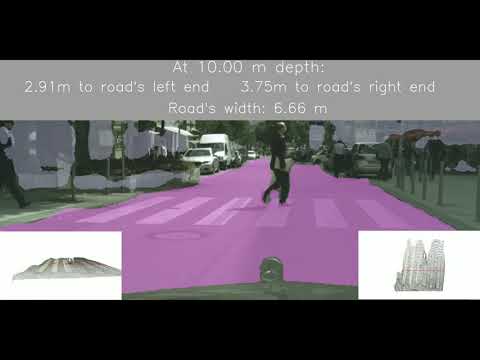
SemanticDepth is a deep learning-based computer vision pipeline that computes the width of the road at a certain depth in front of a car.
It does so by fusing together two deep learning-based architectures, namely a semantic segmentation network (fcn8-s) and a monocular depth estimation network (monodepth).
We have two ways of computing the width of the road at a certain depth:
-
The road's width (rw) itself. This measure is obtained like so. We obtain the point cloud corresponding to the road in front of the camera. Then we compute the distance between the furthest point to the left and the furthest point to the right of this road point cloud at a certain depth. Here, depth means the direction in front of the camera.
-
The fence-to-fence distance (f2f). In this approach we additionally extract the point clouds corresponding to left and right fences/walls to each side of the road (assuming they exist). Then we fit planes to the point clouds of the road and to those of the left and right fences. We compute the intersection between the road's plane with the left fence's plane, and the intersection between the road's plane and the right fence's plane. We end up with two intersected lines. We can now decide on a depth at which we wish to compute the width of the road, here meaning the distance between these two intersection lines.

If you find our work useful in your research, please consider citing:
@article{palafox2019semanticdepth,
  title={Semanticdepth: Fusing semantic segmentation and monocular depth estimation for enabling autonomous driving in roads without lane lines},
  author={Palafox, Pablo R and Betz, Johannes and Nobis, Felix and Riedl, Konstantin and Lienkamp, Markus},
  journal={Sensors},
  volume={19},
  number={14},
  pages={3224},
  year={2019},
  publisher={Multidisciplinary Digital Publishing Institute}
}
This code was tested with Tensorflow 1.0, CUDA 8.0 and Ubuntu 16.04.
First of, install python3-tk.
$ sudo apt-get install python3-tk
Git clone this repo and change to the cloned dir:
$ git clone
$ cd semantic_depth
Using virtual environments is always a good idea. We will need to have pip and virtualenv installed.
Install pip and virtualenv:
$ sudo apt-get install python3-pip python3.5-dev python-virtualenv
To create a new virtualenv, being inside the root directory of the cloned repository, run the following:
$ virtualenv --no-site-packages -p python3.5 .venv
We now have a python3.5 virtual environment (with all packages that you already had installed for your python3.5 installation). Activate the virtualenv like so:
$ source .venv/bin/activate
Inside the virtualenv, you can run:
$ pip install -r requirements.txt
to get the dependencies needed.
For the semantic segmentation task, we labeled 750 Roborace images with the classes fence, road and background. For the task of labelling our own images, we used the cityscapesScripts.
We cannot make the whole dataset public, as the original images are property of the Roborace competition. A mockup of this dataset can be found here. It follows the same structure as the Cityscapes dataset. If you would like to get more images, join the Roborace competition and you'll get tons of data from the racetracks.
Another option is training on Cityscapes on the classes fence and road (and background). If your goal is participating in the Roborace competition, doing this can get you decent results when running inference on Roborace images.
MonoDepth, an unsupervised single image depth prediction network that we make use of in our work, can be trained on Kitti or Cityscapes.
We directly use a model pre-trained on Cityscapes, which you can get at the monodepth repo, at the Models section. Alternatively, follow the instructions in section Monodepth model.
This is a set of 5 images of the streets of Munich on which you can test the whole pipeline. You can find it here. In section Test SemanticDepth on our Munich test set you can find the commands on how to test our whole pipeline on these images.
SemanticDepth merges together semantic segmentation and monocular depth estimation to compute the distance from the left fence to the right fence in a Formula E-like circuit (where the Roborace competition takes place). We have also found that by using a semantic segmentation model trained on Roborace images for fence and road classification plus a monodepth model pre-trained on Cityscapes our pipeline generalizes to city environments, like those featured in our Munich test set.
By running the command below, SemanticDepth will be applied on the Munich test set using different focal lengths. By default, the list of focal lengths to try is [380, 580]. The reason behind trying different focal lengths is that we are using a monodepth model trained on the Cityscapes dataset, and Cityscapes comprises images with a certain focal lenght. As the author (Godard) puts it in this discussion, the behaviour of monodepth is undefined when applied on images which have different aspect ratio and focal length as those on which the model was trained, since the network really only saw one type of images. Applying the same model on our own images requires that we tune the focal length so that computing depth from disparity outputs reasonable numbers (again, see discussion on the topic).
$ python semantic_depth.py --save_data
Results will be stored inside a newly created folder called results. Inside this folder, two more directories, namely 380 and 580, will have been created, each containing the results relative to each of the 5 test images on which we have applied SemanticDepth. Also, a file data.txt will have been generated, where every line refers to a test image except the last line. For every line (every test image), we save the following:
real_distance|road_width|fence2fence|abs(real_distance-road_width)|abs(real_distance-fence2fence)
The last line of this data.txt contains the Mean Absolute Error for the absolute differences between the estimated distance and the real distance at a depth of x meters -- in our experiments, we set x = 10 m. We compute the MAE both for the road's width and the fence-to-fence distance (see the Introduction for an explanation on these two approaches).
After having ran the previous python script with the --save_data argument set, we can now find the following inside the folders 380 and 580:
-
*_output.ply contains the reconstructed 3D scene, featuring only the road, the walls and the road's width and fence-to-fence distance (red and green lines, respectively). You can use MeshLab to open a PLY file.
-
*_output.png features the segmented scene with the computed distances at the top.
-
*_output_dips.png is the disparity map that monodepth predicts for the given input image.
-
*_output_distances.txt is a plain text file containing the road's width and the fence-to-fence distance.
-
*_output_times.txt is a plain text file containing the inference times for each task of the pipeline.
The rest of the files can be disregarded. They are only generated for sanity checks.
Note that you can set the --verbose option when running the previous command to get more info during execution, like so:
$ python semantic_depth.py --save_data --verbose
Note as well that running the python script without any arguments
$ python semantic_depth.py
will just generate the following files:
-
*_output_distances.txt is a plain text file containing the road's width and fence-to-fence distance.
-
*_output_times.txt is a plain text file containing the inference times for each task of the pipeline.
So no backend info (i.e., no 3D point clouds, which are just used in the backend to compute distances).
Also, by running the following, SemanticDepth will be applied using the focal length provided as argument:
$ python semantic_depth.py --f=360
Other params:
--input_frame=<pathToImage>: If set, the pipeline will only be applied to the indicated image--aproach=both: If set to both, the road's width (rw) and the fence-to-fence distance (f2f) are computed. By setting it to rw only the road's width will be computed.--is_city: Must be set when we want to process an image from Cityscapes. It helps set the correct intrinsic camera parameters).
Simply run:
python semantic_depth.py --input_frame=media/images/bielefeld_018644.png --save_data --is_city --f=580
The --is_city flag indicates the system that we are processing a Cityscapes frame.
Download the Stuttgart sequence from Cityscapes. Extract all the png images from the sequence (or just a subset of the sequence) into data/stuttgart_video_test. Then run:
$ python semantic_depth_cityscapes_sequence.py --verbose
By default, the road's width will be computed, given that the Stuttgart sequence does not have walls/fences at each side of the road, as a Formula-E-like racetrack would, on which to compute our fence-to-fence distance.
In the results folder (which will have been created in the root if you didn't have one yet) you will find a new folder named stuttgart_video containing two other directories, namely result_sequence_imgs and result_sequence_ply. The former contains the output images with the computed distances written on the frame; the latter contains the masked 3D point cloud on which we compute the road's width at a certain depth.
You can then use the script create_video_from_frames.py inside utils to convert the list of images that have been just created (result_sequence_imgs) into mp4 format.
The source files for the semantic segmentation network are under the folder fcn8s. There you can find an implementation of an FCN-8s semantic segmenatation architecture.
-
Make sure that your virtulenv is activated. Otherwise, run the following inside the root directory of your project (or wherever you have your virtual environment):
source .venv/bin/activate -
Then, change directories to fcn8s and execute the fcn.py file to train our FCN-8s implementation on a specified dataset (e.g., roborace750_mockup or Cityscapes) like so:
$ cd fcn8s $ python fcn.py --dataset=roborace750_mockup --epochs=100 -
After training is done, the following folders will have been created:
-
../models/sem_seg: contains the model which has been just trained
-
log (inside fcn8s): contains logging info about training:
- loss vs epochs for training and validation sets
- IoU vs epochs for training and validation sets
-
Under request at pablo.rodriguez-palafox@tum.de. See models/get_sem_seg_models.md for further details on how to get them.
Check that you are inside the fcn8s directory.
Within the virtual environment, execute the following to run inference on the test set of the dataset indicated in the --dataset argument by using a previously trained model, which will be asked automatically after running the following command:
$ python fcn.py --mode=test --dataset=roborace750_mockup
Enter the name of the model you want to use in the format <epochs>-Epochs-<dataset>, e.g., 100-Epochs-roborace750
After testing is done, the following folder and files will have appeared in the same folder as the fcn.py file:
- runs: contains the segmented images
- log//iou/test_set_iou_.txt: contains the IoU metric for each image of the test set
- times.txt: inference times for each image of the test set
We use the network developed by Godard et al., called MonoDepth (Copyright © Niantic, Inc. 2018. Patent Pending. All rights reserved.).
Monodepth model (monocular depth estimation model trained on Cityscapes by Godard)
To download the monodepth model trained on cityscapes by Godard, go to the monodepth repo or run the following:
$ cd models
$ sudo chmod +x get_monodepth_model.sh
$ ./get_monodepth_model.sh model_cityscapes ./monodepth/model_cityscapesFiles fcn8s/fcn.py and fcn8s/helper.py are based on the FCN-8s implementation by Udacity, released under the MIT License.
The rest of the files in this project are released under a GPLv3 License.
Check the LICENSE for a detailed explanation on the licenses under which this work is released.