Post memes to any of your Slack channels with a slash command.
/meme success; we have; a meme bot;

/meme templates shows you the available built-in templates:

Use your own image by passing its URL as the template:
/meme https://nicolewhite.github.io/images/me.jpg hello; my name is nicole;
NOTE: There's no semicolon at the end of the URL when using a custom template

Hone your meme skills privately by practicing in the slackbot channel.
The memes are posted under a bot in the same channel where /meme was called, where the bot's picture and username are replaced with your own. Because a bot is posting the meme and not you, you will not be able to delete memes once they are sent.
-
Create a new Slack App at the App creation page.
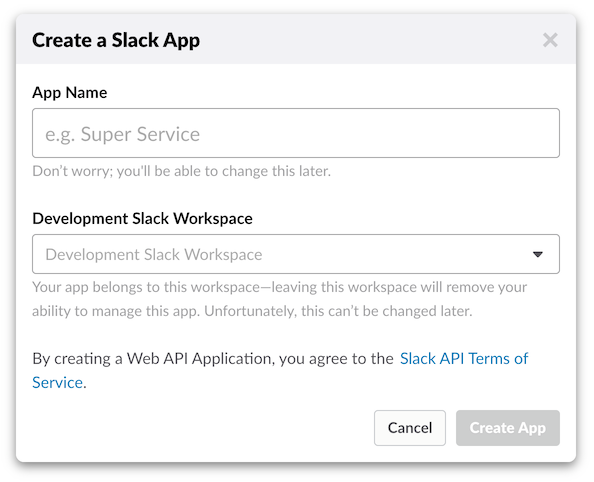
Name your app with something easy to recognize, for example "Meme". If you are logged into more than one workspace, select one of them as the Development Slack Workspace.
-
Find your verification token and store it in an environment variable. On the Basic Information page, scroll down to find the "App Credentials" section.

Copy the value in the "Verification Token" field, and store this value in the environment variable named
SLACK_VERIFICATION_TOKEN. If you are going to run this app on the command line, its easy to do in your shell:$ export SLACK_VERIFICATION_TOKEN="replace with your token" -
Add the necessary scopes to your app. On the OAuth & Permissions page, scroll down to find the "Scopes" section. Input
users:readinto the selection box. Confirm that the scope is listed in the table below, and click "Save Changes". -
Create an Incoming Webhook and store its URL in an environment variable. On the Incoming Webhooks page (under Features), slide the toggle to activate incoming webhooks. Click the button to add a new webhook.
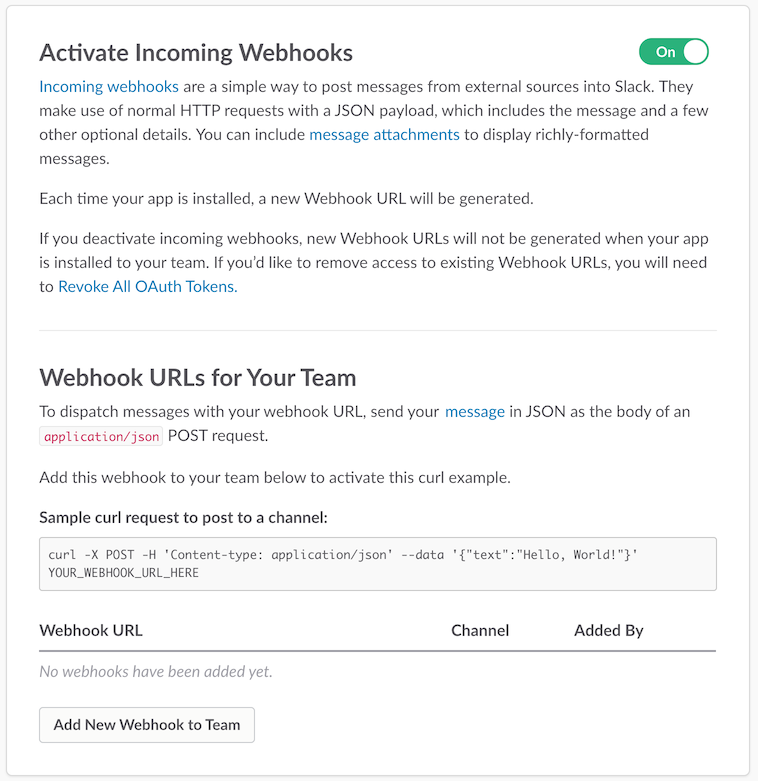
You'll be taken to a page to install your app in your workspace with the permissions required for the incoming webhook. Select a channel (it doesn't matter which one) and click Authorize.

When you return to the Incoming Webhooks page, you'll find a new item in the table. Copy the Webhook URL and store it in another environment variable called
SLACK_WEBHOOK_URL. -
Find your API token and store it in an enviornment variable. On the Install App page you'll find an Oauth Access Token. This value is used as your API token. Copy it and store it in another environment variable called
SLACK_API_TOKEN. Leave the Slack App configuration open, you need to finish by adding the slash command below.


Heroku is the simplest platform to deploy your application onto. If you have your own hosting you can move onto the next section. If you're developing and running the application locally, at the very least you'll need a public URL where Slack can send requests and ngrok can be very useful for that.
If you don't aleady have an account with Heroku, sign up for free, then click the button:

Paste your SLACK_API_TOKEN, SLACK_WEBHOOK_URL, and SLACK_VERIFICATION_TOKEN values into the appropriate config variables.

Click Deploy app. Once finished, the App name field will now be populated if you didn't choose a name upfront.
Go to the Slash Command configuration page (under Features). Create a new command and fill in the details.

The Request URL is the root URL for where you deployed the application. If you deployed to Heroku, the is https://you-app-name.herokuapp.com (replace with your own app name).
Save the Slash Command integration.
To update your deployment with changes from this repository, visit your app's homepage on Heroku and navigate to the section on deploying with Heroku git at https://dashboard.heroku.com/apps/your-app-name/deploy/heroku-git, replacing your-app-name with the name of your app. Follow the instructions there to get the Heroku toolbelt set up. Then:
$ heroku login
$ heroku git:clone -a your-app-name
$ cd your-app-name
Replace your-app-name with the name of your app. Once you have this set up, you can update your app with changes from this repository with the following:
$ git remote add slack-meme https://github.com/nicolewhite/slack-meme
$ git pull --rebase slack-meme master
$ git push heroku master
We've already got a Dockerfile ready to go. The quickest path would be to download this repo, replace the environment
variable values in docker-compose.yml, and run docker-compose up.
In order to run this project locally for development, you should first install Pipenv.
Once you have the pipenv command line tool available, you don't need to worry about setting up in a virtualenv or
managing the dependencies yourself.
Create a .env file in the top level directory of this project. Pipenv will automatically load the values defined into
your environment for you. Use the following template and fill in the values with the ones you're using.
SLACK_WEBHOOK_URL=replace_me
SLACK_API_TOKEN=replace_me
SLACK_VERIFICATION_TOKEN=replace_me
Next, use Pipenv to install the project dependencies
$ pipenv install
Lastly, launch the project with the following command. Notice that we've passed the --log-level=debug flag, which
will output useful information for development purposes. This shouldn't be used in production.
$ pipenv run gunicorn -b 0.0.0.0:8080 wsgi --log-level=debug
This uses memegen. Thanks memegen!