Chat SDK Web
Introduction
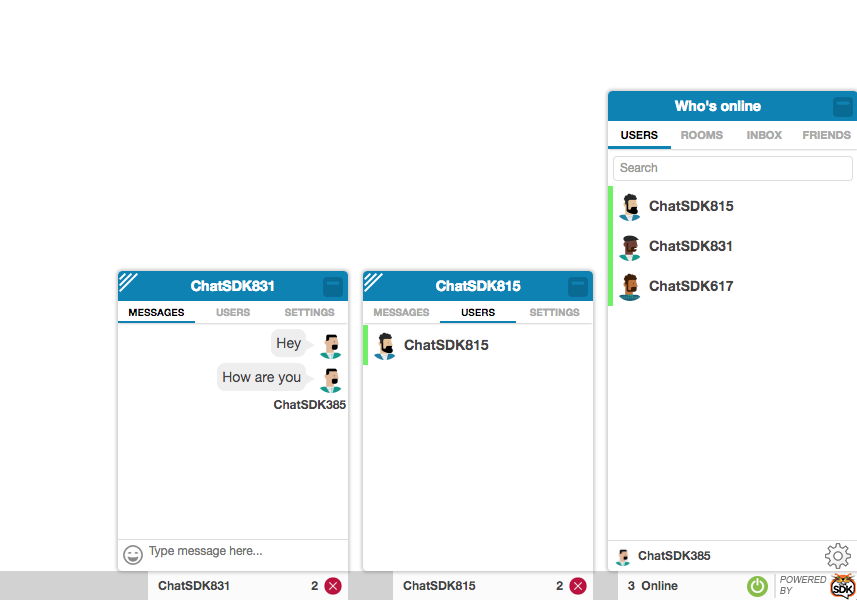
Chat SDK is a web version of the Chat SDK messenger written using AngularJS and powered by Firebase.
A few years ago I was approaced by James Tamplin, co-founder of Firebase, to build a web messenger. The founders of Firebase had previously worked on a web messenger startup called Envolve. As Firebase took off, they wanted to focus full time on the new venture so they decided to shut down Envolve. He didn't want to just abandon their previous customers so they asked me to build a new service using Firebase which would be available for the Envolve customers to move onto.
We were running the messenger as a subscription service but after several years, we thought it would be better to make it open source to run alongside our other popular Chat SDK products.
Features:
- Tested with over 300k monthly users
- Cheap to run around < $0.5 per 1k monthly users
- Text and video messages
- Compatible with the mobile Chat SDK (iOS, Android)
- Social and anonymous login
- Typing indicator
If you're interested in trying out the Chat SDK, you can see the live demo which is hosted on Firebase Hosting.
Live Demo
Project Setup (Important)
The project uses several build tools:
- NPM: Used to manage dependencies
- Gulp: Used to build library
Install the dependencies:
sudo npm install
Next you need to run gulp in the terminal. This will start the gulp daemon which will combine all the JavaScript source files into one single output file. It will also copy other assets like images and CSS files to the relevant ouput directories.
All the files are combined into the dist directory. This directory contains everything that's needed to run the Chat SDK Web.
You will see the following directories:
- audio: Contains the new message recieved sound effect
- css: Contains all the style sheets
- images: Flag image assets
- img: App specific image assets
- index.html: An test page which launches the Chat SDK Web
- js: JavaScript source files
- libs: Third party JavaScript libraries
- partials: AngularJS partials (HTML files that are rendered by AngularJS)
It's important to have some understanding of the file structure so you can understand how to add the Chat SDK to your site.
To do this, lets look at the index.html file in more detail:
<div ng-app="myApp" ><div data-ng-include src=" partialsURL + 'chatcat.html'" data-ng-controller="AppController"></div></div>
This is a placeholder used by AngularJS. It loads up the base HTML for the Chat SDK and the JavaScript controller.
<script type="text/javascript">

    // Set options here
    var ChatSDKOptions = {

		firebaseConfig: {
			apiKey: "AIzaSyASm9RYrr3u_Bc22eglk0OtsC2GnnTQp_c",
			authDomain: "chat-sdk-v4.firebaseapp.com",
			databaseURL: "https://chat-sdk-v4.firebaseio.com",
			projectId: "chat-sdk-v4",
			storageBucket: "chat-sdk-v4.appspot.com",
			messagingSenderId: "1088435112418"
		},

		// This is the namespace of this instance of the chat. Multiple
		// sandboxed instances of the Chat SDK can be run on one Firebase
		// database by using different root paths
		rootPath: 'firebase_v4_web_new_4',

		// Facebook ID for Facebook login
		facebookAppID: '735373466519297',

		// The cloud image token is used to load resources from the
		// cloud image CDN. You can make your own account at cloudimage.io
		cloudImageToken: 'cag084en',

      	// This variable is used where a page has a number of sub-domains
		// If you had registered the domain yourdomain.com with chatcat.io
		// you may also want to have chat on a sub-domain forums.yourdomain.com
		// for this to work, when you add this code to your sub-domain's footer
		// you'd need to set primaryDomain: 'yourdomain.com'
       primaryDomain: '',

       // This defaults to 5 minutes min 2 minutes, max 15 minutes
       inactivityTimeout: 5,

       // Show time in 24 hour format - 24hour, 12hour
       clockType: '24hour',

		// Users can create public chat rooms?
		// If this is true users will be able to setup new
		// public rooms
       usersCanCreatePublicRooms: true,

		// Allow anonymous login?
       anonymousLoginEnabled: false,

		// Enable social login - please email us to get your domain whitelisted
       socialLoginEnabled: true,

		// The URL to contact for single sign on
       singleSignOnURL: '',

       // Can be set to 'test' or 'production'. When it is set to test the
       // Chat SDK will be loaded from the current domain. Otherwise it will
       // be loaded from the domain defined in the firebase configuration
       environment: 'test'
    }

</script>
The above are settings used by the Chat SDK. You can see a full list of the available settings by looking at config.js. The most important settings are the Firebase config settings. These should be taken from the Google-Services.json file that is created when you register your app in the Firebase Dashboard Dashboard -> Project Overview -> Project Settings -> Add App -> Add Firebase to your web app. These settings tell Firebase which realtime database to connect to.
    <script src="js/all.js" type="text/javascript"></script>
	<link rel="stylesheet" href="css/_/cc_styles.min.css"></link>
This part loads the main Chat SDK Web JavaScript file and CSS.
To recap:
- We need placeholder HTML code to start the AngularJS app
- We need to configure the Chat SDK settings
- We need to load the JavaScript and CSS files
Running on a local server
- Check out the Chat SDK Web
- Navigate to the folder containing the Chat SDK in the terminal
- Run
bower install - Run
gulp - Open the
dist/index.htmlfile in a text editor and update thefirebaseConfig - Assuming you have a local LAMP server, create a new virtual host which has it's root directory pointing at the dist folder. If you are using MAMP, you would do this by clicking Hosts -> +. Choose a host name and set the document root to be the
distfolder. Save and restart the server. - Add the security rules to your Firebase account.
- Enable Firebase file hosting: Firebase Dashboard -> Storage -> Enable Storage
- Then open a web browser and enter the domain of the host you created. Check that the Chat SDK is working as expected
Running on a remote server
When we want to make the Chat SDK publically available, we need to upload the contents of the dist directory to a host server. Our recommendation would be to use Firebase Hosting to do this. You should only complete these steps after you have tested the Chat SDK locally.
- Setup the Firebase CLI
- Navigate to the
appdirectory in the terminal - Run
firebase init. You may be prompted to log in usingfirebase login - You will be prompted to choose which features you want to use. Choose
Hosting - Choose your project
- Set public directory as
dist - Configure as single-page app: N
- Don't overrwrite the
index.htmlfile - Run
firebase deploy --only hosting - Visit the URL that is displayed in the console. You will see the Chat SDK is live
Adding the Chat SDK to your website
Now that you've deployed the Chat SDK, you can easily add it to your website. Just copy the Chat SDK setup code from the index.html file to any page on your website, change the environment to prod and the chat will appear on that page.