
Chat SDK is a fully featured open source instant messaging framework for iOS. Chat SDK is backend agnostic and supports Firebase and XMPP. Chat SDK is fully featured, scalable and flexible and follows the following key principles:
- Free.
- Open Source.
- Full control of the data. You have full and exclusive access to the user's chat data
- Quick integration. Chat SDK is fully featured out of the box
- Scalable. Supports millons of daily users [1, 2]
- Backend agnostic. Supports Firebase and XMPP (ejabberd, Prosody, MongooseIM, Tigase, OpenFire)
- Powered by Firebase or XMPP
- Private and group messages
- Public chat rooms
- Username / password, Social, Anonymous and custom login
- Phone number authentication
- Free Push notifications (using FCM)
- Text, Image and Location messages
- Reply / forward / copy / delete message
- Add contact with QR Code
- Multiple image send
- User profile, status
- User search
- Scalable - Supports over 400k monthly users
- Powered by Google Firebase or XMPP
- Firebase UI support
- Native Android Version
- Powerful flexible API
Sponsor us on either Github sponsors or Paetron and get these features. For full details visit our Modules page.
- End-To-End Encryption
- File Messages
- Typing indicator
- Read receipts
- Location based chat
- Last Online Indicator
- Audio messages
- Video messages
- Sticker messages
- Contact book integration
- User Blocking
- Keyboard overlay
- Giphy messages
- Push Notifications (free)
- File Storage (free)
- Firebase UI (free)
Full breakdown is available on the features page.
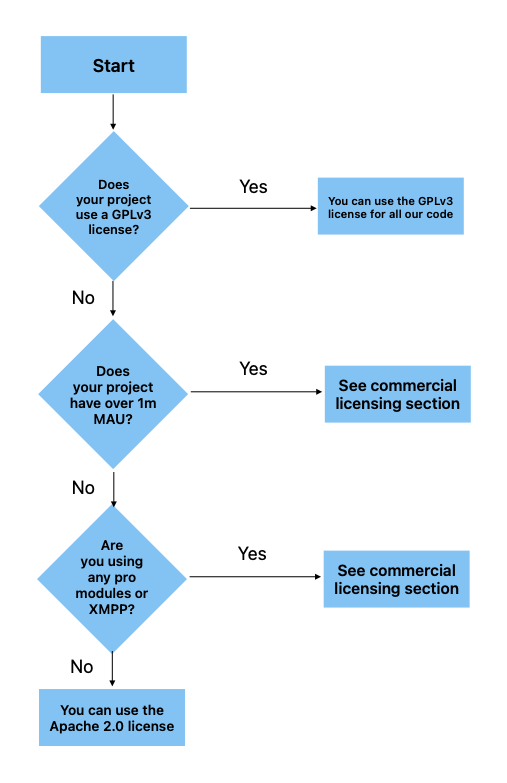
This project is covered by multiple different licenses. Use the flowchart to determine which license you can use.
- ChatK!t
- ChatSDKCore
- ChatSDKCoreData
- ChatSDKExtras
- ChatSDKFirebase
- ChatSDKUI
- DemoChatKit
- DemoObjC
- DemoSwift
| Monthly Active Users | |
|---|---|
| Less than 1 million | Apache 2.0 |
| More than 1 million | GPLv3 or Commercial License |
- DemoXMPP
- ChatSDKProXMPP
- ChatSDKProModules
| Monthly Active Users | |
|---|---|
| Any | GPLv3 or Commercial License |
For commercial licensing, you have several options:
- Pay monthly: Patreon or Github Sponsors
- Buy a one-off license
- If your project has over 1m MAU or XMPP contact [team@chatsdk.co](mailto: team@chatsdk.co)
- Standard Documentation (For experienced developers)
- API Documentation
- Code Examples
- Wiki
Learn about the history of Chat SDK and our future plans in this post.
People always ask about how much Chat SDK costs to run. And will it scale to millions of users? So I wrote an article talking about just that.
- Discord: If you need support, join our Server
- Support the project: Patreon or Github Sponsors 🙏 and get access to premium modules
- Upvote: our advert on StackOverflow
- Contribute by writing code: Email the Contributing Document to team@sdk.chat
- Give us a star on Github ⭐
- Upvoting us: Product Hunt
- Tweet: about your Chat SDK project using @chat_sdk
- Live Stream Join us every Saturday 18:00 CEST for a live stream where I answer questions about Chat SDK. For more details please join the Discord Server
You can also help us by:
- Providing feedback and feature requests
- Reporting bugs
- Fixing bugs
- Writing documentation
Email us at: team@sdk.chat
We also offer development services we are a team of full stack developers who are Firebase experts. For more information check out our consulting site.
This repository contains a fully functional version of the Chat SDK which is configured using our Firebase account. This is great way to test the features of the Chat SDK before you start itegrating it with your app.
- Clone Chat SDK
- Run
pod installin the Xcode directory - Open the
Chat SDK Firebase.xcworkspacefile in Xcode - Compile and run
We are currently updating the Chat SDK to use Swift, this will happen gradually. In the meantime, the Chat SDK API is fully compatible with Swift projects.
The Chat SDK is fully compatible with Swift projects and contains a Swift demo project.
- Clone Chat SDK
- Run
pod installin the XcodeSwift directory - Open the
ChatSDKSwift.xcworkspacefile in Xcode - Compile and run
- Add the Chat SDK development pods to your Podfile
use_frameworks!
pod "ChatSDK"
pod "ChatSDKFirebase/Adapter"
pod "ChatSDKFirebase/Upload"
pod "ChatSDKFirebase/Push"
Optional
pod "ChatSDK/ModAddContactWithQRCode"
-
Run
pod updateto get the latest version of the code. -
Open the App Delegate add the following code to initialise the chat
Swift
AppDelegate.swift
import ChatSDK
Add the following code to the start of your didFinishLaunchingWithOptions function:
let config = BConfiguration.init();
config.rootPath = "test"
// Configure other options here...
config.allowUsersToCreatePublicChats = true

// Define the modules you want to use.
var modules = [
    FirebaseNetworkAdapterModule.shared(),
    FirebasePushModule.shared(),
    FirebaseUploadModule.shared(),
    // Optional...
    AddContactWithQRCodeModule.init(),
]

BChatSDK.initialize(config, app: application, options: launchOptions, modules: modules)


self.window = UIWindow.init(frame: UIScreen.main.bounds)
self.window?.rootViewController = BChatSDK.ui().splashScreenNavigationController()
self.window?.makeKeyAndVisible();
Then add the following methods:
  func application(_ application: UIApplication, didRegisterForRemoteNotificationsWithDeviceToken deviceToken: Data) {
      BChatSDK.application(application, didRegisterForRemoteNotificationsWithDeviceToken: deviceToken)
  }

  func application(_ application: UIApplication, didReceiveRemoteNotification userInfo: [AnyHashable : Any], fetchCompletionHandler completionHandler: @escaping (UIBackgroundFetchResult) -> Void) {
      BChatSDK.application(application, didReceiveRemoteNotification: userInfo)
  }

  func application(_ application: UIApplication, open url: URL, sourceApplication: String?, annotation: Any) -> Bool {
      return BChatSDK.application(application, open: url, sourceApplication: sourceApplication, annotation: annotation)
  }

  func application(_ app: UIApplication, open url: URL, options: [UIApplication.OpenURLOptionsKey : Any] = [:]) -> Bool {
      return BChatSDK.application(app, open: url, options: options)
  }
Objective C
Check the demo project.
The root path variable allows you to run multiple Chat SDK instances on one Firebase account. Each different root path will represent a completely separate set of Firebase data. This can be useful for testing because you could have separate test and prod root paths.
- The Chat SDK is now added to your project
- Go to the Firebase website and sign up
- Go to the Firebase console and make a new project
- Click Add project
- Choose a name and a location
- Click Settings (the gear icon). On the General tab, click Add Firebase to your iOS app
- Enter your bundle ID
- Download the GoogleServices file and add it to the root of your Xcode project
Note:
It is worth opening your downloadedGoogleService-Info.plistand checking there is anAPI_KEYfield included. Sometimes Firebase's automatic download doesn’t include this in the plist. To rectify, just re-download the plist from the project settings menu.
-
Copy the following rows from the demo ChatSDK Info.plist file to your project's Info.plist
-
App Transport Security Settings -
URL types -
Make sure that the URL types are all set correctly. The URL type for your app should be set to your bundle
id -
All the privacy rows. These will allow the app to access the camera, location and address book
-
In the Firebase dashboard click Authentication -> Sign-in method and enable all the appropriate methods
-
Add the security rules. The rules also enable optimized user search so this step is very important!
-
Enable file storage - Click Storage -> Get Started
-
Enable push notifications
-
Enable location messages. Get a Google Maps API key. Then add it during the Chat SDK configuration
Objective C
config.googleMapsApiKey = @"YOUR API KEY";
Swift
config.googleMapsApiKey = "YOUR API KEY"
The Push Notification module allows you to send free push notifications using Firebase Cloud Messaging.
- Setup an APN key.
- Inside your project in the Firebase console, select the gear icon, select Project Settings, and then select the Cloud Messaging tab.
- In APNs authentication key under iOS app configuration, click the Upload button.
- Browse to the location where you saved your key, select it, and click Open. Add the key ID for the key (available in Certificates, Identifiers & Profiles in the Apple Developer Member Center) and click Upload.
- Enable the push notifications Capability in your Xcode project Project -> Capabilities -> Push Notifications
- In Xcode open the Capabilities tab. Enable Push Notifications and the following Background Modes: Location updates, Background fetch, Remote notifications.
Follow the instructions on our Chat SDK Firebase repository
Firebase secures your data by allowing you to write rules to govern who can access the database and what can be written. The rules are also needed to enable user search. To enable the rules see the guide Enabling Security Rules.
Congratulations! 🎉🎉 You've just turned your app into a fully featured instant messenger! Keep reading below to learn how to further customize the Chat SDK.
- Interacting with the Firebase server
- Creating and updating entities
- Custom authentication
- Common code examples
- Customizing the user interface
View the API documentation here.
- Docs Home
- iOS Docs
- Firebase Schema
- Custom Token Authentication
- API Quick Start
- Custom File Upload Handler
- XMPP Setup Guide
There are a number of configuration options available. Check out the BConfiguration class. Using this class you can do things like:
- Changing the chat bubble colors
- Changing the default user name
- Enable or disable different types of login
- Show or hide empty chats
- etc...
To customize the UI, you can register subclasses for different views. You can do that using the UI service BChatSDK.ui. For example, to register a new login view controller you would use:
BChatSDK.ui.loginViewController = [[YourViewController alloc] initWithNibName:Nil bundle: Nil];
To modify the chat view you would register a provider:
[BChatSDK.ui setChatViewController:^BChatViewController *(id<PThread> thread) {
        return [[YourChatViewController alloc] initWithThread:thread];
}];
Every view controller in the app can be customized this way.
Any of the Chat SDK views can be added into your app. Checkout the PInterfaceFacade for options. You can add a any view using the following pattern. Here we are using the interface service to get the particular view.
Objective-C
UIViewController * privateThreadsViewController = [BChatSDK.ui privateThreadsViewController];
Swift
let privateThreadsViewController = BChatSDK.ui().a.privateThreadsViewController()
To do that, you can take advantage of the BIntegrationHelper class. This makes provides some helper methods to make it easier to integrate the Chat SDK with your app.
At the most basic level, you need to do the following:
- Authenticate the Chat SDK when your app authenticates. The best way to do this is to generate a custom token on your server following this guide. Then use this method to initialize the Chat SDK:
Objective-C
[BIntegrationHelper authenticateWithToken:@"your token"];
Swift
BIntegrationHelper.authenticate(withToken: "your token")
- Update the Chat SDK user's name and image whenever your user's name or image changes. You can do this using the following method:
Objective-C
[BIntegrationHelper updateUserWithName:@"Name" image: image url: imageURL];
Swift
BIntegrationHelper.updateUser(withName: "Name", image: image, url: imageURL)
- Logout of the Chat SDK whenever your app logs out. A good place to do this is whenever your login screen is displayed:
Objective-C
[BIntegrationHelper logout];
Swift
BIntegrationHelper.logout()
- Now the Chat SDK is integrated with your app.
There are a number of free and premium extensions that can be added to the Chat SDK.
For the following modules:
- Firebase UI (free)
- User Blocking
- Typing indicator
- Read receipts
- Location based chat
- Audio messages
- Video messages
- Contact book integration
The free modules are located in the chat-sdk-ios/ChatSDKFirebase folder. The premium modules can be purchased and downloaded from the links provided above.
To install a module you should use the following steps:
- Copy the module code into your Xcode source code folder and add the files to your project from inside Xcode. If you are using a symlink you can use the symlink script (mentioned above) and then just add a link to the ChatSDKFirebase folder to Xcode.
- Add any necessary dependencies to your Podfile
- Add the modules to the array of modules during configuration.
The File UI module allows you to use the native Firebase user interface for authentication.
After adding the files to your Xcode project, add the following to the App Delegate to enable the module.
Objective C
AppDelegate.m -> application: didFinishLaunchingWithOptions:
 #import "BFirebaseUIModule.h"

[[[BFirebaseUIModule alloc] init] activateWithProviders: @[]];
Swift
[YourProject]-Bridging-Header.h
#import "BFirebaseUIModule.h"
AppDelegate.swift
BFirebaseUIModule.init().activate(withProviders: []);
You should pass in array of the FUIAuthProvider objects you want to support.
Also add the following to your Podfile depending on which authentication methods you want to support:
pod 'FirebaseUI/Facebook', '~> 4.0'
pod 'FirebaseUI/Google', '~> 4.0'
pod 'FirebaseUI/Twitter', '~> 4.0'
pod 'FirebaseUI/Phone', '~> 4.0'
Then run pod install.
Note If you want to Firebase Auth UI make sure you comment out the following line:
BNetworkManager.shared().a.auth().setChallenge(BLoginViewController.init(nibName: nil, bundle: nil));
For the following modules:
These modules are distributed as development pods. After you've downloaded the module, unzip it and add it to the ChatSDKModules folder. Then:
- Open your Podfile
- Add the line:
pod "ChatSDKModules/[ModuleName]", :path => "[Path to ChatSDKModules folder]"
- Run
pod install - The module is now active
The Chat SDK API is based around the network manager and a series of handlers. A good place to start is by looking at the handlers Pods/Development Pods/ChatSDK/Core/Core/Classes/Interfaces. Here you can review the handler interfaces which are well documented. To use a handler you would use the following code:
Objective C
[[BChatSDK.handler_name function: to: call:]
Swift
BNetworkManager.shared().a.handler_name() function: to: call:]
For example, to search for a user you could use the search handler:
-(RXPromise *) usersForIndexes: (NSArray *) indexes withValue: (NSString *) value limit: (int) limit userAdded: (void(^)(id<PUser> user)) userAdded;
Here you pass in a series of indexes to be used in the search i.e. name, email etc... and a value. It will then return a series of user objects.
You can also see example implementations of these handlers by looking at the BFirebaseSearchHandler class. And also seeing how the method is used in the Chat SDK.
To start a chat you can use the core handler.
-(RXPromise *) createThreadWithUsers: (NSArray *) users
                       threadCreated: (void(^)(NSError * error, id<PThread> thread)) thread;
When this method completes, the thread will have been created on Firebase and all the users will have been added. You could then open the thread using the interface adapter.
UIViewController * chatViewController = [BChatSDK.ui chatViewControllerWithThread:thread];
So a more complete example would look like this:
-(void) startChatWithUser {
    MBProgressHUD * hud = [MBProgressHUD showHUDAddedTo:self.view animated:YES];
    hud.label.text = [NSBundle t:bCreatingThread];

    [[BChatSDK.core createThreadWithUsers:@[_user] threadCreated:^(NSError * error, id<PThread> thread) {
        if (!error) {
            [self pushChatViewControllerWithThread:thread];
        }
        else {
            [UIView alertWithTitle:[NSBundle t:bErrorTitle] withMessage:[NSBundle t:bThreadCreationError]];
        }
        [MBProgressHUD hideHUDForView:self.view animated:YES];
    }];
}

-(void) pushChatViewControllerWithThread: (id<PThread>) thread {
    if (thread) {
        UIViewController * chatViewController = [BChatSDK.ui chatViewControllerWithThread:thread];
        [self.navigationController pushViewController:chatViewController animated:YES];
    }
}
- Always open the .xcworkspace file rather than .xcodeproj
- Check CocoaPod warnings - make sure to fix any warnings before proceeding
- Make sure that your base configuration isn’t set: Project -> project name -> Info -> Configuration
- Make sure that the “Build Active Architecture Only” setting is the same for both the main project and the pods project.
- Check the build settings in the Xcode project and check which fields are in bold (this means that their value has been overridden and CocoaPods can't access them). If you press backspace while selecting those fields, their values will be set to the default value.
We offer a choice of two license for this app. You can either use the Chat SDK license or the GPLv3 license.
Most Chat SDK users either want to add the Chat SDK to an app that will be released to the App Store or they want to use the Chat SDK in a project for their client. The Chat SDK license gives you complete flexibility to do this for free.
Chat SDK License Summary
- License does not expire.
- Can be used for creating unlimited applications
- Can be distributed in binary or object form only
- Commercial use allowed
- Can modify source-code but cannot distribute modifications (derivative works)
If a user wants to distribute the Chat SDK source code, we feel that any additions or modifications they make to the code should be contributed back to the project. The GPLv3 license ensures that if source code is distributed, it must remain open source and available to the community.
GPLv3 License Summary
- Can modify and distribute source code
- Commerical use allowed
- Cannot sublicense or hold liable
- Must include original license
- Must disclose source
What does this mean?
Please check out the Licensing FAQ for more information.