LedCoA_ESP32 - LED Strips Control Automation via 2x ESP32 D1Mini WeMos DevBoards
This application controls up to 4 LED strips from 2 synchronized ESP32 D1Mini WeMos DevBoards using 2 DACs on each board. In addition, it senses photodiodes corresponding to each of the LED strips and synchronizes LED strips blinking with the Euresys Coaxlink Grabber (Coaxlink Quad G3, KQG13496) that captures frames from the cameras, whose lighting is provisioned by the LED strips.
Table of Contents
Hardware documentation and drivers:
Build
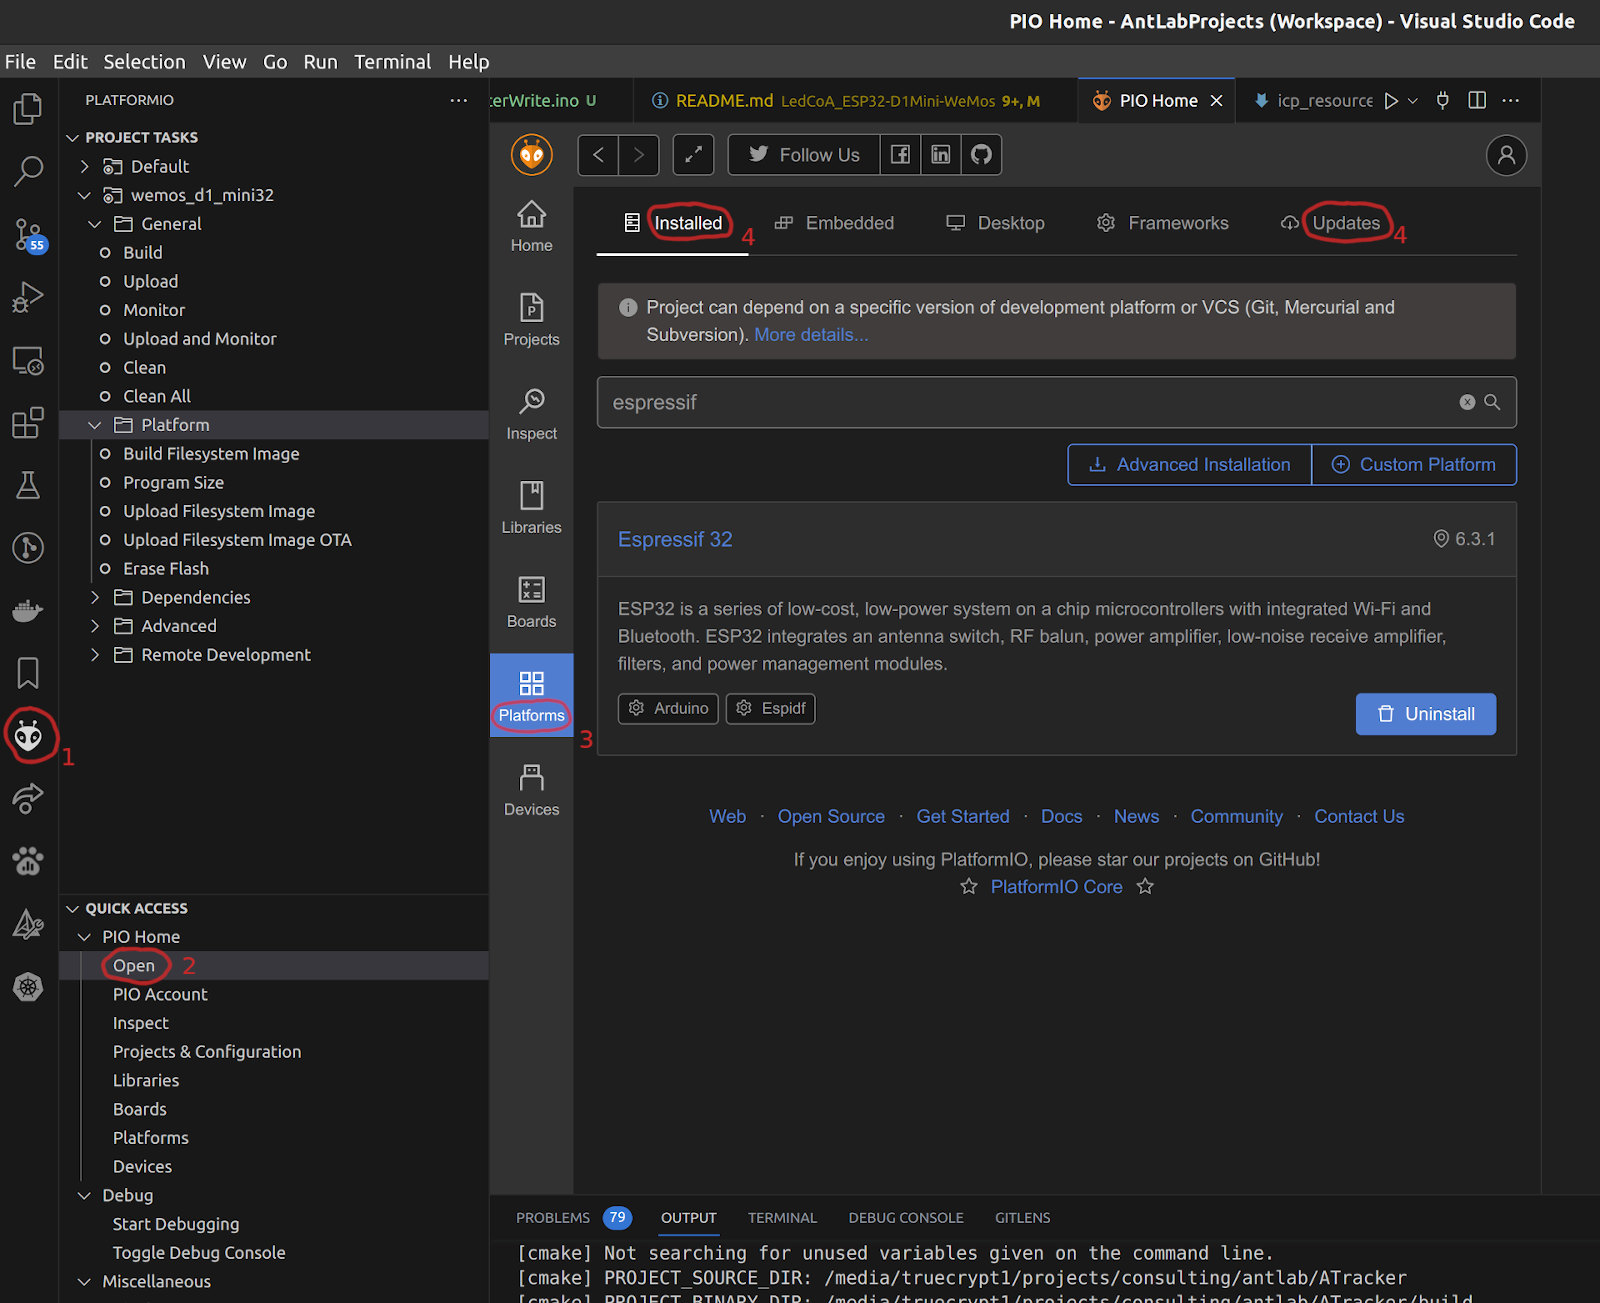
Use the PlatformIO IDE (PIO) extension of the Visual Studio Code IDE to build and flash the firmware to ESP32 D1Mini WeMos DevBoards. espressif32 platform should be installed or updated (the original build is performed in espressif32@6.3) in the PIO as shown in the following image.

If several
espressif32versions are installed, then it might be necessary to uninstall them or even remove them manually:sh $ rm -rf /home/lav/.platformio/packages/framework-arduinoespressif32
Depending on whether you build the firmware for the master or slave board, it is necessary to (un)comment the respective macro definition at the top of main.cpp:
#define BOARD_MASTER // Should be specified only for the master board buildThat approach of the explicit macro definition is necessary to explicitly and permanently define a master/slave board rather than defining the board role in the run-time (e.g., the first board attached to the I2C becomes slave and the other one becomes master). A user expects permanent role of the board rather than the one defined by the booting order.
Use the PlatformIO: Build command (Ctrl + Alt + B) to build the firmware.
Use the PlatformIO: Upload command ( Ctrl + Alt + U) to flash the target board connected via USB data cable, specifying the target USB port in the platformio.ini if necessary.
The available USB ports having active devices (serial connections) can be listed as follows.
$ ls /dev/ttyUSB*
/dev/ttyUSB0  /dev/ttyUSB1
Usage
ESP32 Boards are controllable via the UART (Serial port) from the host PC using the commands specified in this section. Those commands allow ESP32 boards to manage our custom ligting box (manage LED strips and interact with photodiodes) and emit triggering signal to the Euresys Coaxlink Camera Grabber (trigger connected cameras). Those edge devices (LED strips, photodiodes, and grabber) should be wired to the ESP32 boards as specified in the ESP32 Port Mapping section.
Inspection and Manual Control via the Terminal
Use minicom (see its configuration below) or another application to read from the UART output of the master (or slave) board.
Connect to the master board (you can list available USB devices by $ ls /dev/ttyUSB*; we assume that the master board on ttyUSB0):
$ minicom -D /dev/ttyUSB0
Input the control command (<ctl: uint8_t> <value: uint8_t>)
Open another terminal to send control signals (see Control commands) to the master board:
echo -ne "\x7\xAA" > /dev/ttyUSB0
This signal immediately sets brightness of 3 LED strips (0x07) to the intensity value 67% (0xAA = 170 of 255 = 61.6% = ~2.03V of 0.08..3.3V). The binary representation of this command is
  1st byte 0x07     2nd byte 0xAA
|0|0|0|0|0|1|1|1| |1|0|1|0|1|0|1|0|
 7 6 5 4 3 2 1 0   7 6 5 4 3 2 1 0
see the Command Specification section for details.
Then you should see in the first terminal via the minicom that
- 01=0x1 mask (0x07 >> 2 = 0x01 = 01b) with 0xAA value is transferred to the Slave and
- 0x03 (0x07 & 0x3 = 0x3 = 011b) with 0xAA value is applied on the Master ESP32 board:
Transferring to wire (idMask2, intensity): 0X1 0XAA
LED strips id (mask): 0X3
Set intensity: 0XAA
To exit from the minicom (which is mandatory before the reflashing), press Ctrl+A X and select Yes by pressing Enter.
Control Commands
Control commands are sent to the ESP32 master board from the host PC via a serial port (USB UART), which automatically propagates them to the slave board.
The slave board also accepts commands via UART, but it cannot propagate them to the master board or initiate communication with the master.
Each command is represented by 2 bytes as follows.
Command bits: |7|6|5|4|3|2|1|0| |7|6|5|4|3|2|1|0|Command Specification
<style> .def td { text-align: center; } .def td:first-child { text-align: left; font-weight: bold; } </style>| 1st byte | 2nd byte | |||||||||||||||
|---|---|---|---|---|---|---|---|---|---|---|---|---|---|---|---|---|
| Bit | 7 | 6 | 5 | 4 | 3 | 2 | 1 | 0 | 7 | 6 | 5 | 4 | 3 | 2 | 1 | 0 |
| Notation | - | mask | value | |||||||||||||
Description:
mask (1.0-3):  required operation
  0001  - Master Board DAC1 (Top IR LED strip)
  0010  - Master Board DAC2 (Middle IR LED strip)
  0100  - Slave Board DAC2 (Middle Fluo LED strip)
  1000  - Slave Board DAC1 (Bottom Fluo LED strip)
value (2.0-7):  brightness intensity of the respective LED strip (0..0xFF -> 0.08..3.3V = 0..100%)
Minicom for UART Reading
Minicom can be installed by the following command:
$ sudo apt install minicomThen, select the target USB port and listen to it using minicom:
$ minicom -D /dev/ttyUSB0Configure the opened connection and save it as a default configuration: press Ctrl+A O, select Serial port setup and ensure the following values:
	E - "115200 8N1"
	F - No
ESP32 Port Mapping
#1 D1 Mini is powered by USB (and, hence, can be externally controlled and re-flashed at any time).
#2 D1 Mini can be powered either from your dedicated power supply (3.3V DC) or from 3.3V pin of #1 D1 Mini connected to 3.3V pin (note that VCC pin accepts 5V rather than 3.3V). The ground supply of #2 D1 Mini is GND pin located near its VCC pin.
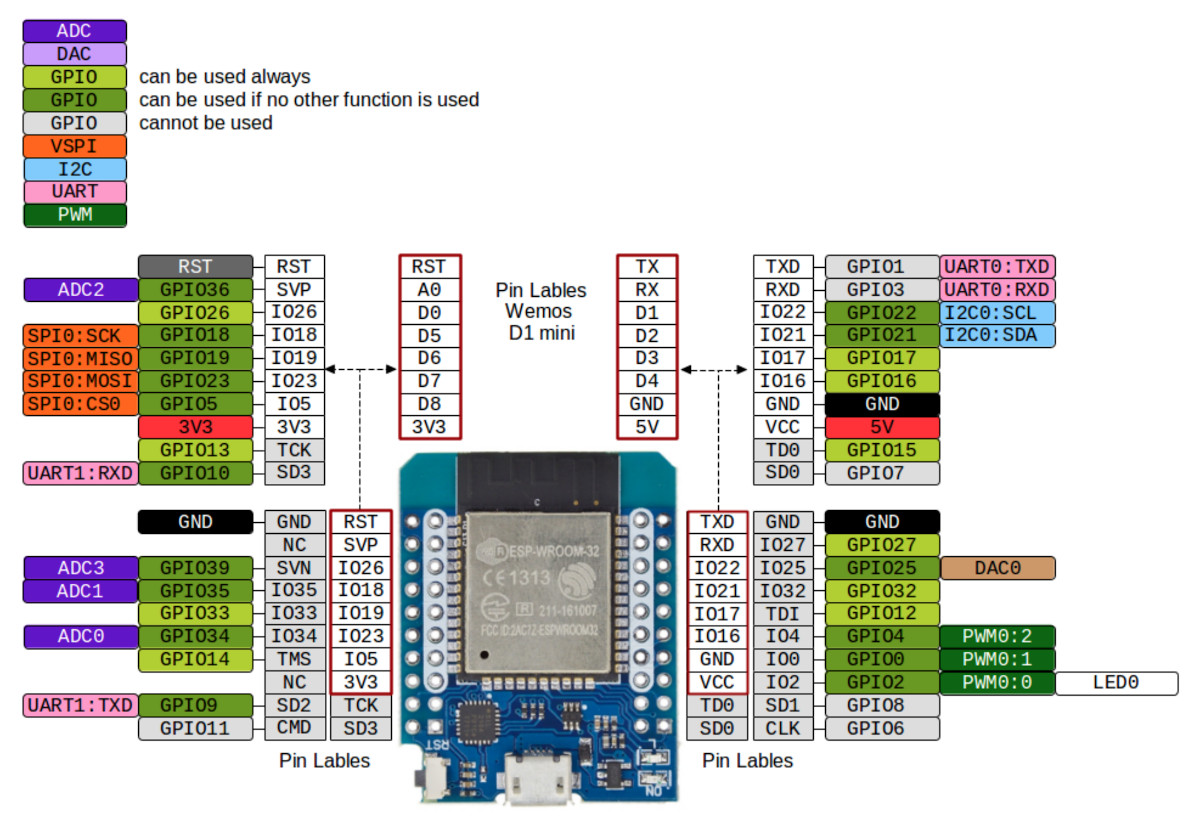
D1 Mini boards synchronization can be performed either by I2C (which are IO22=SCL0 and IO21=SDA0 by default; it might be necessary to wire also the grounds of the boards to get I2C work), or by one of the available UARTs (Serial ports), or by any custom 3 pins (e.g., IO33, IO27, IO32).
#1 D1 Mini ESP32 WeMos (Master)
2 internal DACs (IO25, IO26) for Analog O/P:
IO25 (Master DAC1) <- 1. O/P (Output) Analog 0…3.3V (0.08 .. 3.3 V) Channel Top IR Strip (L1)
IO26 (Master DAC2) <- 2. O/P Analog 0…3.3V (0.08 .. 3.3 V) Channel Middle IR Strip (L2S)
O/P Digital Trigger Pulse OFF is performed from GPIO:
IO16 (might be updated to IO32) <- 5. O/P Digital Trigger Pulse OFF: 0V Pulse ON: 3.3V Channel Top IR Strip (L1)
IO17 (might be updated to IO27) <- 8. O/P Digital Trigger Pulse OFF: 0V Pulse ON: 3.3V Channel Middle IR Strip (L2S)
I/P Analog 0…3.3V:
IO34 (PSD1 = VDET_1 = ADC1_6 = Arduino's ADC0) <- 9. I/P (Input) Analog 0…3.3V FB Photo diode Channel Top IR Strip (L1)
IO35 (VDET_2 = ADC1_7 = Arduino's ADC1) <- 11. I/P Analog 0…3.3V FB Photo diode Channel Middle IR Strip (L2S)
Alternatively, IO27 (ADC2_7) can be used to read data from 2 distinct ADCs in parallel (ADC1_6 and ADC2_7 ). However, it will load CPU because only ADC1 supports DMA.
Internal communication:
IO21 - I2C_SDA IO/P (Input-Output) Data
IO22 - I2C_SCL IO/P Clock
GND - Mutual ground wiring for all I2C devices is required
IO1 - UART0 TXD Serial Port Transmit Data
IO3 - UART0 RXD Serial Port Receive Data
GND - Ground wiring is required for each serial device
VCC - Power (5V) wiring is required for each serial device
IO33 - GTL2 O/P firmware-yielding camera's grabber trigger pulse (0..5V, where 2.5..5V is HIGH)
#2 D1 Mini ESP32 WeMos (Slave)
2 internal DACs (IO25, IO26) for Analog O/P:
IO25 (Slave DAC1) <- 3. O/P Analog 0…3.3V (0.08 .. 3.3 V) Channel Bottom Fluo Strip (L3U)
IO26 (Slave DAC2) <- 4. O/P Analog 0…3.3V (0.08 .. 3.3 V) Channel Middle Fluo Strip (L3S)
O/P Digital Trigger Pulse OFF is performed from GPIO:
IO16 (updating to IO32) <- 6. O/P Digital Trigger Pulse OFF: 0V Pulse ON: 3.3V Channel Bottom Fluo Strip (L3U)
IO17 (updating to IO27) <- 7. O/P Digital Trigger Pulse OFF: 0V Pulse ON: 3.3V Channel Middle Fluo Strip (L3S)
I/P Analog 0…3.3V:
IO34 (PSD1 = VDET_1 = ADC1_6 = Arduino's ADC0) <- 9. I/P (Input) Analog 0…3.3V FB Photo diode Channel Bottom Fluo Strip (L3U)
IO35 (VDET_2 = ADC1_7 = Arduino's ADC1) <- 11. I/P Analog 0…3.3V FB Photo diode Channel Middle Fluo Strip (L3S)
Alternatively, IO27 (ADC2_7) can be used to read data from 2 distinct ADCs in parallel (ADC1_6 and ADC2_7 ). However, it will load CPU because only ADC1 supports DMA.
Internal communication:
IO21 - I2C_SDA IO/P (Input-Output) Data
IO22 - I2C_SCL IO/P Clock
GND - Mutual ground wiring for all I2C devices is required
IO1 - UART0 TXD Serial Port Transmit Data
IO3 - UART0 RXD Serial Port Receive Data
GND - Ground wiring is required for each serial device
VCC - Power (5V) wiring is required for each serial device
IO33 - GTL1 O/P firmware-yielding camera's grabber trigger pulse (0..5V, where 2.5..5V is HIGH).
GTL1 is shared with the Lighting Box, being disabled for the firmware by default.
