![]()


Extremely Fast views layouting without auto layout. No magic, pure code, full control and blazing fast. Concise syntax, intuitive, readable & chainable.
"No Auto layout constraints attached"
- iOS 8.0+ / tvOS 9.0+
- Xcode 8.0+ / Xcode 9.0
- Swift 3.2+ / Swift 4.0 / Objective-C
-
⭐ PinLayout expose the
safeAreaInsetsthroughUIView.pin.safeArea, this property support not only iOS 11, but is also backward compatible for earlier iOS releases (7/8/9/10). See safeAreaInsets support for more information.
- Introduction examples
- PinLayout principles and philosophy
- Performance
- Documentation
- Examples App
- PinLayout in Xcode Playgrounds
- PinLayout using Objective-C
- Installation
- FAQ
- Comments, ideas, suggestions, issues, ...
📌 PinLayout is actively updated. So please come often to see latest changes. You can also Star it to be able to retrieve it easily later.
PinLayout is a companion of FlexLayout. They share a similar syntax and method names. FlexLayout is a flexbox implementation. A view can layouts its subviews using PinLayout, FlexLayout, or both! FlexLayout it is particularly useful in situations where you need to layouts many views but don't require the PinLayout's finest control nor complex animations.
You don't need to choose, you can layout some views using PinLayout and some other with autolayout. Your views just to need to implement the autolayout intrinsicContentSize properties.
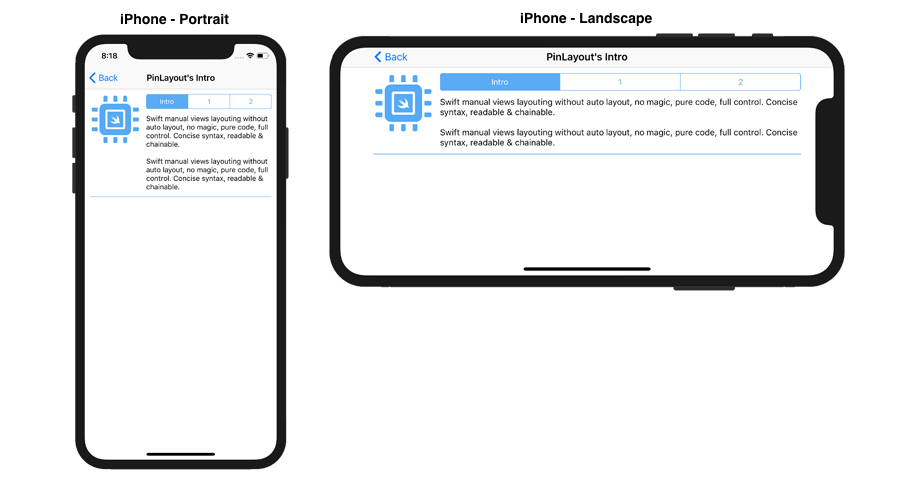
This example layout an image, a UISegmentedControl, a label and a line separator. This example adjusts its content to match the device's size and orientation changes.
- UIImageView's size is 100x100 and layouted below the UINavigationBar with a margin of 10 pixels all around.
- UISegmentedControl is at the right of the logo image, use the remaining horizontal space with a left and right margin of 20 pixels.
- UILabel is below the UISegmentedControl with a top margin of 10 pixels. Its width matched the UISegmentedControl's width. The label is multiline, so its height must be adjusted to fit its width.
- Separator is below the UIImageView and the UILabel, i.e. below the tallest one. The separator has a top margin of 10 pixels, left-aligned to the UIImageView and right-aligned to the UISegmentedControl.
override func layoutSubviews() {
   super.layoutSubviews()
   let padding: CGFloat = 10

   logo.pin.top(pin.safeArea).left(pin.safeArea).width(100).aspectRatio().margin(padding)
   segmented.pin.after(of: logo, aligned: .top).right(pin.safeArea).marginHorizontal(padding)
   textLabel.pin.below(of: segmented, aligned: .left).width(of: segmented).pinEdges().marginTop(10).sizeToFit(.width)
   separatorView.pin.below(of: [logo, textLabel], aligned: .left).right(to: segmented.edge.right).marginTop(10)
}- 4 views, 4 lines
- PinLayout expose the
safeAreaInsetsthroughUIView.pin.safeArea, this property support not only iOS 11, but is also backward compatible for earlier iOS releases (7/8/9/10). See safeAreaInsets support for more information. - PinLayout doesn't use auto layout constraints, it is a framework that manually layout views. For that reason you need to update the layout inside either
UIView.layoutSubviews()orUIViewController.viewDidLayoutSubviews()to handle container size's changes, including device rotation. You'll also need to handle UITraitCollection changes for app's that support multitasking. In the example above PinLayout's commands are inside UIView'slayoutSubviews()method. - This example is available in the Examples App. See example complete source code
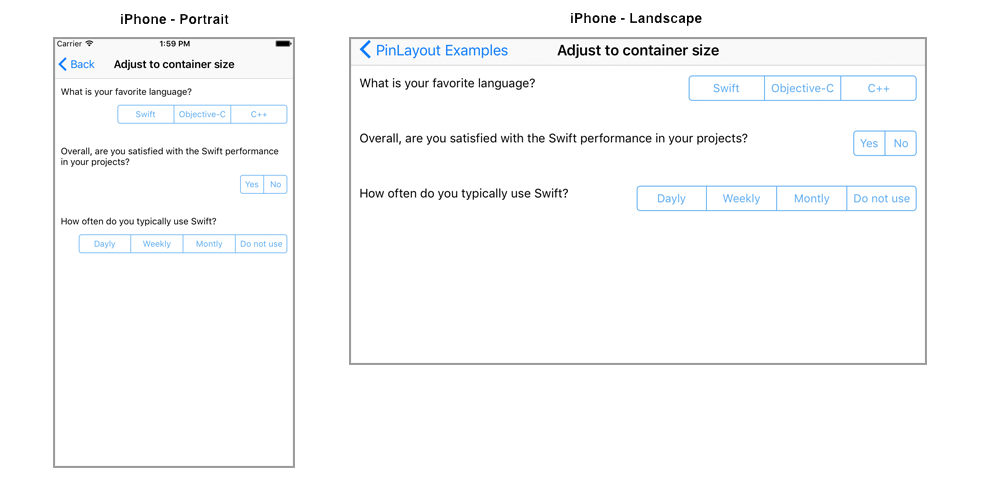
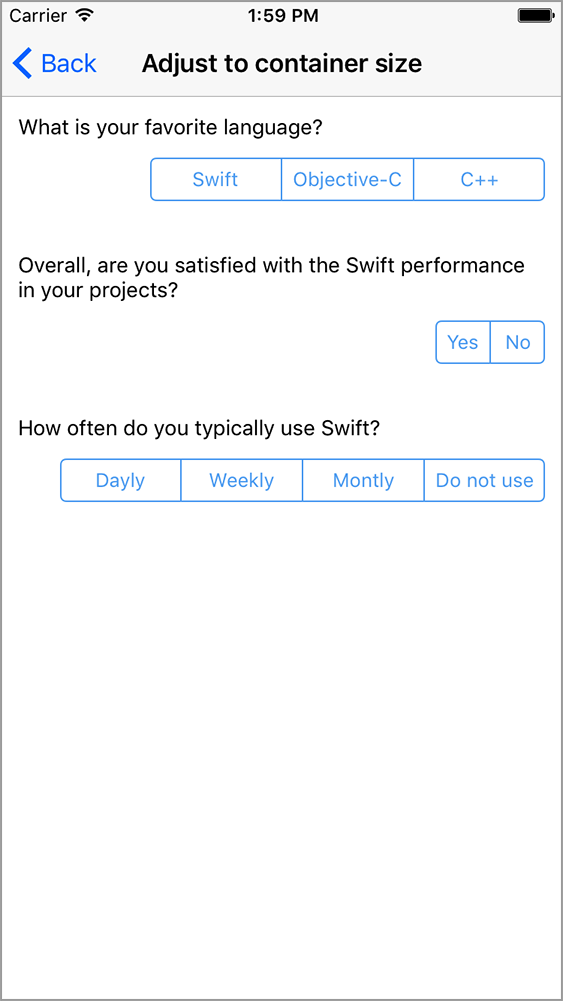
This example shows how easily PinLayout can adjust its layout based on the view's container size.
- If the container's width is smaller than 500 pixels, the label takes the full width and the UISegmentedControl is placed below it.
- If the container's width is greater or equal to 500 pixels, the UISegmentedControl is at the top-right corner and the label takes the remaining horizontal space.
  let margin: CGFloat = 12

  if frame.width < 500 {
      textLabel.pin.top().left().right().margin(margin).sizeToFit(.width)
      segmentedControl.pin.below(of: textLabel).right().margin(margin)
  } else {
      segmentedControl.pin.top().right().margin(margin)
      textLabel.pin.top().left().before(of: segmentedControl).margin(margin).sizeToFit(.width)
  }
📌 This example is available in the Examples App. See example complete source code
- Manual layouting (doesn't rely on auto layout).
- PinLayout exist to be simple and fast as possible! In fact, it is fast as manual layouting. See performance results below.
- Full control: You're in the middle of the layout process, no magic black box.
- Layout one view at a time. Make it simple to code and debug.
- Concise syntax. Layout most views using a single line.
- See the complete list here....
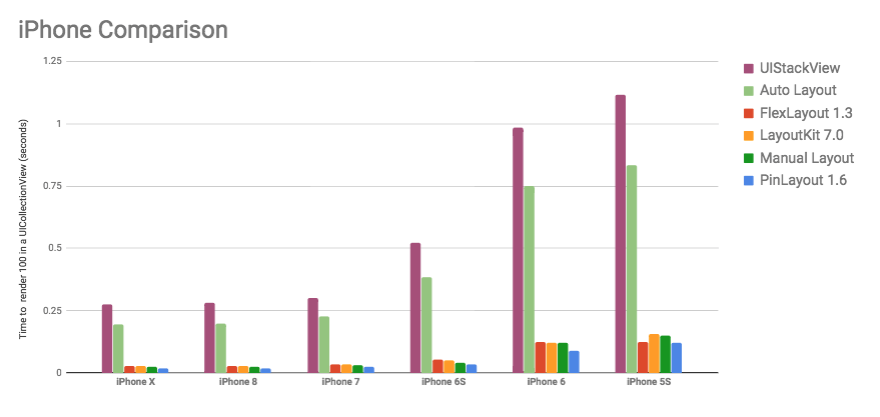
PinLayout's performance has been measured using the Layout Framework Benchmark.
As you can see in the following chart, PinLayout are faster or equal to manual layouting, and between 8x and 12x faster than auto layout, and this for all types of iPhone (5S/6/6S/7/8/X)
See here for more details, results and explanation of the benchmark.
PinLayout supports left-to-right (LTR) and right-to-left (RTL) languages.
See here for more details.
PinLayout can handle easily iOS 11 UIView.safeAreaInsets, but it goes even further by supporting safeAreaInsets for previous iOS releases (including iOS 7/8/9/10) by adding a property UIView.pin.safeArea.
PinLayout can position a view’s edge relative to its superview edges.
Methods:
-
top(:CGFloat)/top(:Percent)/top()/top(:UIEdgeInsets)
The value specifies the top edge distance from the superview's top edge in pixels (or in percentage of its superview's height).top()is similar to callingtop(0), it position the view top edge directly on its superview top edge.top(:UIEdgeInsets)use theUIEdgeInsets.topproperty, is particularly useful withUIView.pin.safeAreaorUIView.safeAreaInsets. -
bottom(:CGFloat)/bottom(:Percent)/bottom()/bottom(:UIEdgeInsets)
The value specifies the bottom edge distance from the superview's bottom edge in pixels (or in percentage of its superview's height).bottom()is similar to callingbottom(0), it position the view bottom edge directly on its superview top edge.bottom(:UIEdgeInsets)use theUIEdgeInsets.bottomproperty, it is is particularly useful withUIView.pin.safeAreaorUIView.safeAreaInsets. -
left(:CGFloat)/left(:Percent)/left()/left(:UIEdgeInsets)
The value specifies the left edge distance from the superview's left edge in pixels (or in percentage of its superview's width).left()is similar to callingleft(0), it position the view left edge directly on its superview left edge.left(:UIEdgeInsets)use theUIEdgeInsets.leftproperty, it is particularly useful withUIView.pin.safeAreaorUIView.safeAreaInsets. -
right(:CGFloat)/right(:Percent)/right()/right(:UIEdgeInsets)
The value specifies the right edge distance from the superview's right edge in pixels (or in percentage of its superview's width).right()is similar to callingright(0), it position the view right edge directly on its superview right edge.right(:UIEdgeInsets)use theUIEdgeInsets. rightproperty, it is particularly useful withUIView.pin.safeAreaorUIView.safeAreaInsets. -
vCenter(:CGFloat)/vCenter(:Percent)/vCenter()
The value specifies the distance vertically of the view's center related to the superview's center in pixels (or in percentage of its superview's height). A positive value move the view down and a negative value move it up relative to the superview's center.vCenter()is similar to callingvCenter(0), it position vertically the view's center directly on its superview vertical center. -
hCenter(:CGFloat)/hCenter(:Percent)/hCenter()
The value specifies the distance horizontally of the view's center related to the superview's center in pixels (or in percentage of its superview's width). A positive value move the view to the right and a negative value move it to the left relative to the superview's center.hCenter()is similar to callinghCenter(0), it position horizontally the view's center directly on its superview horizontal center. -
start(:CGFloat)/start(:Percent)/start()/start(:UIEdgeInsets)↔️
In LTR direction the value specifies the left edge distance from the superview's left edge in pixels (or in percentage of its superview's width).
In RTL direction the value specifies the right edge distance from the superview's right edge in pixels (or in percentage of its superview's width).
start()is similar to callingstart(0).start(:UIEdgeInsets)use theUIEdgeInsets.leftproperty in LTR direction andUIEdgeInsets.rightin RTL direction, it is particularly useful withUIView.pin.safeAreaorUIView.safeAreaInsets. -
end(:CGFloat)/end(:Percent)/end()/end(:UIEdgeInsets)↔️
In LTR direction the value specifies the right edge distance from the superview's right edge in pixels (or in percentage of its superview's width).
In RTL direction the value specifies the left edge distance from the superview's left edge in pixels (or in percentage of its superview's width).end()is similar to callingend(0).end(:UIEdgeInsets)use theUIEdgeInsets.rightproperty in LTR direction andUIEdgeInsets.leftin RTL direction, it is particularly useful withUIView.pin.safeAreaorUIView.safeAreaInsets.
Methods pinning multiple edges:
-
all(:CGFloat)/all(:UIEdgeInsets)/all()
The value/insets specifies the top, bottom, left and right edges distance from the superview's corresponding edge in pixels. Similar to callingview.top(value).bottom(value).left(value).right(value).
all()is similar to callingall(0).
all(:UIEdgeInsets)is particularly useful withUIView.pin.safeAreaorUIView.safeAreaInsets. -
horizontally(:CGFloat)/horizontally(:Percent)/
horizontally(:UIEdgeInsets)/horizontally()
The value specifies the left and right edges on its superview's corresponding edges in pixels (or in percentage of its superview's width).
horizontally()is similar to callinghorizontally(0).
horizontally(:UIEdgeInsets)use the UIEdgeInsets's left and right value to pin left and right edges. -
vertically(:CGFloat)/vertically(:Percent)
vertically(:UIEdgeInsets)/vertically()
The value specifies the top and bottom edges on its superview's corresponding edges in pixels (or in percentage of its superview's height).
vertically()is similar to callingvertically(0).
vertically(:UIEdgeInsets)use the UIEdgeInsets's top and bottom value to pin top and bottom edges.
   view.pin.top(20).bottom(20)   // The view has a top margin and a bottom margin of 20 pixels
   view.pin.top().left()         // The view is pinned directly on its parent top and left edge
   view.pin.all()                // The view fill completely its parent (horizontally and vertically)
   view.pin.all(pin.safeArea)    // The view fill completely its parent safeArea
   view.pin.top(25%).hCenter()   // The view is centered horizontally with a top margin of 25%
   view.pin.left(12).vCenter()   // The view is centered vertically
   view.pin.start(20).end(20)    // Support right-to-left languages.
   view.pin.horizontally(20)     // The view is filling its parent width with a left and right margin.
view.pin.top().horizontally() // The view is pinned at the top edge of its parent and fill it horizontally.This example layout the view A to fit its superview frame with a margin of 10 pixels. It pins the top, left, bottom and right edges.

viewA.pin.top(10).bottom(10).left(10).right(10)Another shorter possible solution using all():
view.pin.all(10)PinLayout adds edges properties to UIViews. These properties are used to reference other view’s edges.
PinLayout UIView’s edges:
UIView.edge.topUIView.edge.vCenterUIView.edge.bottomUIView.edge.leftUIView.edge.hCenterUIView.edge.rightUIView.edge.start↔️ UIView.edge.end↔️

PinLayout has methods to attach a UIView's edge (top, left, bottom, right, start or end edge) to another view’s edge.
Methods:
-
top(to edge: ViewEdge):
Position the view's top edge directly on another view’s edge (top/vCenter/bottom). -
vCenter(to edge: ViewEdge):
Position vertically the view's center directly on another view’s edge (top/vCenter/bottom). -
bottom(to edge: ViewEdge):
Position the view's bottom edge directly on another view’s edge (top/vCenter/bottom). -
left(to: edge: ViewEdge):
Position the view's left edge directly on another view’s edge (left/hCenter/right). -
hCenter(to: edge: ViewEdge):
Position horizontally the view's center directly on another view’s edge (left/hCenter/right). -
right(to: edge: ViewEdge):
Position the view's right edge directly on another view’s edge (left/hCenter/right). -
start(to: edge: ViewEdge)↔️ In LTR direction it position the view's left edge directly on another view’s edge.
In RTL direction it position the view's right edge directly on another view’s edge. -
end(to: edge: ViewEdge)↔️
In LTR direction it position the view's top edge directly on another view’s edge.
In RTL direction it position the view's bottom edge directly on another view’s edge.
📌 These methods can pin a view’s edge to any other view's edge, even if don't have the same direct superview! It works with any views that have at some point the same ancestor.
	view.pin.left(to: view1.edge.right)
view.pin.left(to: view1.edge.right).top(to: view2.edge.right)This example layout the view B left edge on the view A right edge. It only changes the view B left coordinate.

viewB.pin.left(to: viewA.edge.right)This example center horizontally the view B inside the view A with a top margin of 10 from the same view.

aView.pin.top(to: bView.edge.top).hCenter(to: bView.edge.hCenter).marginTop(10)PinLayout adds anchors properties to UIViews. These properties are used to reference other view’s anchors.
PinLayout UIView’s anchors:
UIView.anchor.topLeft/UIView.anchor.topCenter/UIView.anchor.topRightUIView.anchor.topStart/UIView.anchor.topEnd↔️ UIView.anchor.centerLeft/UIView.anchor.centers/UIView.anchor.centerRightUIView.anchor.centerStart/UIView.anchor.centerEnd↔️ UIView.anchor.bottomLeft/UIView.anchor.bottomCenter/UIView.anchor.bottomRightUIView.anchor.bottomStart/UIView.anchor.bottomEnd↔️

PinLayout can use anchors to position view’s related to other views.
Following methods position the corresponding view anchor on another view’s anchor.
Methods:
topLeft(to anchor: Anchor)topCenter(to anchor: Anchor)topRight(to anchor: Anchor)topStart(to anchor: Anchor)↔️ topEnd(to anchor: Anchor)↔️ centerLeft(to anchor: Anchor)center(to anchor: Anchor)centerRight(to anchor: Anchor)centerStart(to anchor: Anchor)↔️ centerEnd(to anchor: Anchor)↔️ bottomLeft(to anchor: Anchor)bottomCenter(to anchor: Anchor)bottomRight(to anchor: Anchor)bottomStart(to anchor: Anchor)↔️ bottomEnd(to anchor: Anchor)↔️
📌 These methods can pin a view’s anchor to any other view's anchor, even if don't have the same direct superview! It works with any views that have at some point the same ancestor.
    view.pin.topCenter(to: view1.anchor.bottomCenter)
view.pin.topLeft(to: view1.anchor.topLeft).bottomRight(to: view1.anchor.center)Layout using an anchor. This example pins the view B topLeft anchor on the view A topRight anchor.

viewB.pin.topLeft(to: viewA.anchor.topRight)Layout using multiple anchors.
It is also possible to combine two anchors to pin the position and the size of a view. The following example will position the view C between the view A and B with horizontal margins of 10px.

	viewC.pin.topLeft(to: viewA.anchor.topRight)
.bottomRight(to: viewB.anchor.bottomLeft).marginHorizontal(10)PinLayout also has a shorter version that pins a view's anchor directly on it's corresponding superview’s anchor.
The following methods position the corresponding view's anchor on another view’s anchor.
Methods:
topLeft()/topCenter()/topRight()topStart()/topEnd()↔️ centerLeft()/center()/centerRight()centerStart()/centerEnd()↔️ bottomLeft()/bottomCenter()/bottomRight()bottomStart()/bottomEnd()↔️
For example .topRight() will pin the view’s topRight anchor on its superview’s topRight anchor.

viewA.pin.topRight()This is equivalent to:
	viewA.pin.topRight(to: superview.anchor.topRight)
	// OR
viewA.pin.top().right()PinLayout also has methods to position relative to other views. The view can be layouted relative to one or many relative views.
Methods:
above(of: UIView)/above(of: [UIView])
Position the view above the specified view(s). One or many relative views can be specified. This method position the view’s bottom edge.below(of: UIView)/below(of: [UIView])
Position the view below the specified view(s). One or many relative views can be specified. This method position the view’s top edge.before(of: UIView)/before(of: [UIView])↔️
In LTR direction the view is positioned at the left of the specified view(s). In RTL direction the view is positioned at the right. One or many relative views can be specified.after(of: UIView)/after(of: [UIView])↔️
In LTR direction the view is positioned at the right of the specified view(s). In RTL direction the view is positioned at the left. One or many relative views can be specified.left(of: UIView)/left(of: [UIView])
Position the view left of the specified view(s). Similar tobefore(of:). One or many relative views can be specified. This method position the view’s right edge.right(of: UIView)/right(of: [UIView])
Position the view right of the specified view(s). Similar toafter(of:). One or many relative views can be specified. This method position the view’s left edge.
📌 Multiple relative views: If for example a call to `below(of: [...]) specify multiple relative views, the view will be layouted below ALL these views.
📌 These methods set the position of a view's edge: top, left, bottom or right. For example below(of ...) set the view's top edge, `right(of ...) set the view's left edge, ...
📌 These methods can pin a view’s relative to any views, even if don't have the same direct superview! It works with any views that have at some point the same ancestor.
	view.pin.after(of: view4).before(of: view1).below(of: view3)
	view.pin.after(of: view2)
view.pin.below(of: [view2, view3, view4])The following example will position the view C between the view A and B with margins of 10px using relative positioning methods.

viewC.pin.top().after(of: viewA).before(of: viewB).margin(10)This is an equivalent solution using edges:
viewC.pin.top().left(to: viewA.edge.right).right(to: viewB.edge.left).margin(10)This is also an equivalent solution using relative positioning and alignment explained in the next section:
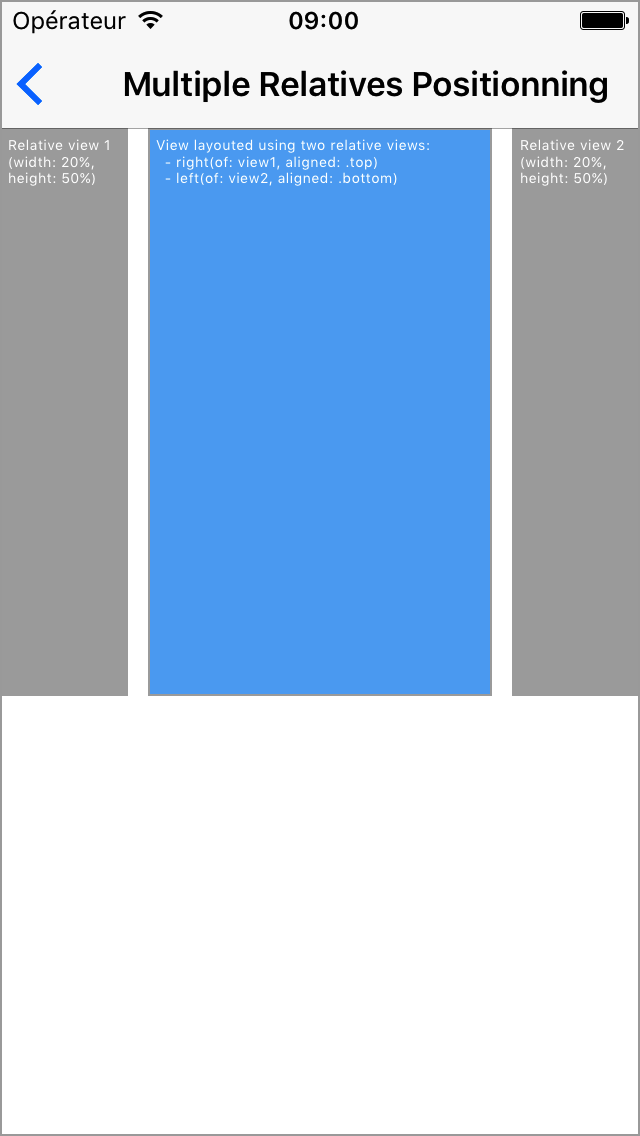
viewC.pin.after(of: viewA, aligned: .top).before(of: viewB, aligned: top).marginHorizontal(10)PinLayout also has methods to position relative to other views but with also the ability to specify the alignment. The view can be layouted relative to one or many relative views.
Methods:
-
above(of: UIView, aligned: HorizontalAlignment)
above(of: [UIView], aligned: HorizontalAlignment)
Position the view above the specified view(s) and aligned it using the specified HorizontalAlignment. One or many relative views can be specified. This method is similar to pinning one view’s anchor: bottomLeft, bottomCenter or bottomRight. -
below(of: UIView, aligned: HorizontalAlignment)
below(of: [UIView], aligned: HorizontalAlignment)
Position the view below the specified view(s) and aligned it using the specified HorizontalAlignment. One or many relative views can be specified. This method is similar to pinning one view’s anchor: topLeft, topCenter or topRight. -
before(of: UIView, aligned: HorizontalAlignment)↔️
before(of: [UIView], aligned: HorizontalAlignment)↔️
In LTR direction the view is positioned at the left of the specified view(s). In RTL direction the view is positioned at the right. One or many relative views can be specified. -
after(of: UIView, aligned: HorizontalAlignment)↔️
after(of: [UIView], aligned: HorizontalAlignment)↔️
In LTR direction the view is positioned at the right of the specified view(s). In RTL direction the view is positioned at the left. One or many relative views can be specified. -
left(of: UIView, aligned: VerticalAlignment)
left(of: [UIView], aligned: HorizontalAlignment)
Position the view left of the specified view(s) and aligned it using the specified VerticalAlignment. Similar tobefore(of:). One or many relative views can be specified. This method is similar to pinning one view’s anchor: topRight, centerRight or bottomRight. -
right(of: UIView, aligned: VerticalAlignment)
right(of: [UIView], aligned: HorizontalAlignment)
Position the view right of the specified view(s) and aligned it using the specified VerticalAlignment. Similar toafter(of:). One or many relative views can be specified. This method is similar to pinning one view’s anchor: topLeft, centerLeft or bottomLeft.
How alignment is applied:
HorizontalAlignment.left: The view's left edge will be aligned to the left most relative view.HorizontalAlignment.center: The view's hCenter edge will be aligned with the average hCenter of all relative views.HorizontalAlignment.right: The view's right edge will be aligned to the right most relative view.HorizontalAlignment.start↔️ :
In LTR direction the view's left edge will be aligned to the left most relative view.
In RTL direction the view's right edge will be aligned to the right most relative view.HorizontalAlignment.end↔️ :
In LTR direction the view's right edge will be aligned to the right most relative view.
In RTL direction the view's left edge will be aligned to the right most relative view.VerticalAlignment.top: The view's top edge will be aligned to the top most relative view.VerticalAlignment.center: The view's vCenter edge will be aligned with the average vCenter of all relative views.VerticalAlignment.bottom: The view's bottom edge will be aligned to the bottom most relative view.
📌 Multiple relative views: If for example a call to `below(of: [...], aligned:) specify multiple relative views, the view will be layouted below ALL these views. The alignment will be applied using all relative view
📌 These methods set the position of a view's anchor: topLeft, topCenter, topRight, centerLeft, .... For example below(of ..., aligned: .right) set the view's topRight anchor, `right(of ..., aligned: .center) set the view's centerLeft anchor, ...
📌 These methods set the position of a view's edge: top, left, bottom or right. For example below(of ...) set the view's top edge, `right(of ...) set the view's left edge, ...
	view.pin.above(of: view2, aligned: .left)
	view.pin.below(of: [view2, view3, view4], aligned: .left)
view.pin.after(of: view2, aligned: .top).before(of: view3, aligned: .bottom)The following example layout the view B below the view A aligned on its center.

viewB.pin.below(of: viewA, aligned: .center)This is an equivalent solution using anchors:
viewB.pin.topCenter(to: viewA.anchor.bottomCenter)The following example layout the view A below the UIImageView and the UILabel. View A should be left aligned to the UIImageView and right aligned to the UILabel, with a top margin of 10 pixels.

a.pin.below(of: [imageView, label], aligned: .left).right(to: label.edge.right).marginTop(10)This is an equivalent solutions using other methods:
   let maxY = max(imageView.frame.maxY, label.frame.maxY)  // Not so nice
a.pin.top(maxY).left(to: imageView.edge.left).right(to: label.edge.right).marginTop(10)All PinLayout's relative methods can accept an array of UIViews (ex: below(of: [UIView])). Using these methods its possible to filter the list of relative UIViews before the list is used by PinLayout.
PinLayout has a filter method called visible that can be used to layout a view related to only visible views. This can be really useful when some views may be visible or hidden depending on the situation.
The following example contains a UISwitch. Below a UITextField that is visible only when the UISwitch is set to ON. And then follow another UITextField. This example use the visible(views: [UIView]) -> [UIView] filter method that returns only views with UIView.isHidden set to false or UIView.alpha greater than 0.

   formTitleLabel.pin.topCenter().marginTop(margin)
   nameField.pin.below(of: formTitleLabel).horizontally().height(40).margin(margin)

   ageSwitch.pin.below(of: nameField).horizontally().height(40).margin(margin)
   ageField.pin.below(of: ageSwitch).horizontally().height(40).margin(margin)

   // Layout the Address UITextField below the last visible view, either ageSwitch or ageField.
   addressField.pin.below(of: visibles([ageSwitch, ageField])).horizontally().height(40).margin(margin)
Note that this example is extracted from the Form example, see Examples App
PinLayout has methods to set the view’s height and width.
Methods:
-
width(:CGFloat)/width(:Percent)
The value specifies the view's width in pixels (or in percentage of its superview). The value must be non-negative. -
width(of: UIView)
Set the view’s width to match the referenced view’s width. -
height(:CGFloat)/height(:Percent)
The value specifies the view's height in pixels (or in percentage of its superview). The value must be non-negative. -
height(of: UIView)
Set the view’s height to match the referenced view’s height -
size(:CGSize)/size(:Percent)
The value specifies view's width and the height in pixels (or in percentage of its superview). Values must be non-negative. -
size(_ sideLength: CGFloat)
The value specifies the width and the height of the view in pixels, creating a square view. Values must be non-negative. -
size(of: UIView)
Set the view’s size to match the referenced view’s size
📌 width/height/size have a higher priority than edges and anchors positioning.
	view.pin.width(100)
	view.pin.width(50%)
	view.pin.width(of: view1)

	view.pin.height(200)
	view.pin.height(100%).maxHeight(240)

	view.pin.size(of: view1)
	view.pin.size(50%)
view.pin.size(250)Method:
-
sizeToFit(_ fitType: FitType)
The method adjust the view's size based on the view'ssizeThatFits()method result.
PinLayout will adjust either the view's width or height based on thefitTypeparameter value.Notes:
- If margin rules apply, margins will be applied when determining the reference dimension (width/height).
- The resulting size will always respect
minWidth/maxWidth/minHeight/maxHeight.
Parameter
fitType: Identify the reference dimension (width / height) that will be used to adjust the view's size. -
.width: The method adjust the view's size based on the reference width.- If properties related to the width have been pinned (e.g: width, left & right, margins, ...), the reference width will be determined by these properties, if not the current view's width will be used.
- The resulting width will always match the reference width.
-
.height: The method adjust the view's size based on the reference height.- If properties related to the height have been pinned (e.g: height, top & bottom, margins, ...), the reference height will be determined by these properties, if not the current view's height will be used.
- The resulting height will always match the reference height.
-
.widthFlexible: Similar to.width, except that PinLayout won't constrain the resulting width to match the reference width. The resulting width may be smaller of bigger depending on the view's sizeThatFits(..) method result. For example a single line UILabel may returns a smaller width if it's string is smaller than the reference width. -
.heightFlexible: Similar to.height, except that PinLayout won't constrain the resulting height to match the reference height. The resulting height may be smaller of bigger depending on the view's sizeThatFits(..) method result.
     // Adjust the view's size based on a width of 100 pixels.
     // The resulting width will always match the pinned property `width(100)`.
     view.pin.width(100).sizeToFit(.width)

     // Adjust the view's size based on view's current width.
     // The resulting width will always match the view's original width.
     // The resulting height will never be bigger than the specified `maxHeight`.
     view.pin.sizeToFit(.width).maxHeight(100)

     // Adjust the view's size based on 100% of the superview's height.
     // The resulting height will always match the pinned property `height(100%)`.
     view.pin.height(100%).sizeToFit(.height)

    // Adjust the view's size based on view's current height.
    // The resulting width will always match the view's original height.
    view.pin.sizeToFit(.height)

    // Since `.widthFlexible` has been specified, its possible that the resulting
    // width will be smaller or bigger than 100 pixels, based of the label's sizeThatFits()
    // method result.
label.pin.width(100).sizeToFit(.widthFlexible)The following example layout the UILabel on the right side of the UIImageView with a margin of 10px all around and also adjust the UILabel’t height to fit the text size. Note that the UILabel’s height has changed to fit its content.

label.pin.after(of: image, aligned: .top).right().marginHorizontal(10).sizeToFit(.width)PinLayout has methods to set the view’s minimum and maximum width, and minimum and maximum height.
📌 minWidth/maxWidth & minHeight/maxHeight have the highest priority. Higher than sizes (width/height/size, sizeToFit, aspectRatio) and edges positioning (top/left/bottom/right). Their values are always fulfilled.
Methods:
-
minWidth(:CGFloat)
minWidth(:Percent)
The value specifies the view's minimum width of the view in pixels (or in percentage of its superview). The value must be non-negative. -
maxWidth(:CGFloat)
maxWidth(:Percent)
The value specifies the view's maximum width of the view in pixels (or in percentage of its superview). The value must be non-negative. -
minHeight(:CGFloat)
minHeight(:Percent)
The value specifies the view's minimum height of the view in pixels (or in percentage of its superview). The value must be non-negative. -
maxHeight(:CGFloat)
maxHeight(:Percent)
The value specifies the view's maximum height of the view in pixels (or in percentage of its superview). The value must be non-negative.
	view.pin.left(10).right(10).maxWidth(200)
	view.pin.width(100%).maxWidth(250)

	view.pin.top().bottom().maxHeight(100)
view.pin.top().height(50%).maxHeight(200)This example layout a view 20 pixels from the top, and horizontally from left to right with a maximum width of 200 pixels. If the superview is smaller than 200 pixels, the view will take the full horizontal space, but for a larger superview, the view will be centered.

viewA.pin.top(20).hCenter().width(100%).maxWidth(200)This is an equivalent solutions using the justify() method. This method is explained in the next section:
viewA.pin.top(20).horizontally().maxWidth(200).justify(.center)Set the view aspect ratio. AspectRatio solves the problem of knowing one dimension of an element and an aspect ratio, this is particularly useful for images.
AspectRatio is applied only if a single dimension (either width or height) can be determined, in that case the aspect ratio will be used to compute the other dimension.
- AspectRatio is defined as the ratio between the width and the height (width / height).
- An aspect ratio of 2 means the width is twice the size of the height.
- AspectRatio respects the min (minWidth/minHeight) and the max (maxWidth/maxHeight) dimensions of an item.
Methods:
-
aspectRatio(_ ratio: CGFloat):
Set the view aspect ratio using a CGFloat. AspectRatio is defined as the ratio between the width and the height (width / height). -
aspectRatio(of view: UIView):
Set the view aspect ratio using another UIView's aspect ratio. -
aspectRatio():
If the layouted view is an UIImageView, this method will set the aspectRatio using the UIImageView's image dimension. For other types of views, this method as no impact.
	aView.pin.left().width(100%).aspectRatio(2)
imageView.pin.left().width(200).aspectRatio()This example layout an UIImageView at the top and center it horizontally, it also adjust its width to 50%. The view’s height will be adjusted automatically using the image aspect ratio.

imageView.pin.top().hCenter().width(50%).aspectRatio()PinLayout has methods to apply margins. PinLayout applies margins similar to CSS.
Methods:
marginTop(:CGFloat)/marginTop(: Percent)
Set the top margin in pixels or in percentage of its superview's height.marginLeft(:CGFloat)/marginLeft(: Percent)
Set the left margin in pixels or in percentage of its superview's width.marginBottom(:CGFloat)/marginBottom(: Percent)
Set the bottom margin in pixels or in percentage of its superview's heightmarginRight(:CGFloat)/marginRight(: Percent)
Set the right margin in pixels or in percentage of its superview's width.marginStart(:CGFloat)/marginStart(: Percent)↔️
Set the start margin. Depends on the value ofPin.layoutDirection(...). In LTR direction, start margin specify the left margin. In RTL direction, start margin specify the right margin.marginEnd(:CGFloat)/marginEnd(: Percent)↔️
Set the end margin. Depends on the value ofPin.layoutDirection(...). In LTR direction, end margin specify the right margin. In RTL direction, end margin specify the left margin.marginHorizontal(:CGFloat)/marginHorizontal(: Percent)
Set the left, right, start and end margins to the specified valuemarginVertical(:CGFloat)/marginVertical(: Percent)
Set the top and bottom margins to the specified value.margin(:CGFloat)/margin(: Percent)
Apply the value to all margins (top, left, bottom, right), in pixels or in percentage of its superview's width/height.margin(:UIEdgeInsets)
Set all margins using an UIEdgeInsets. This method is particularly useful to set all margins using iOS 11 withUIView.safeAreaInsetsorUIView.pin.safeArea.margin(_ insets: NSDirectionalEdgeInsets)
Set all margins using an NSDirectionalEdgeInsets. This method is useful to set all margins using iOS 11UIView. directionalLayoutMarginswhen layouting a view supporting RTL/LTR languages.margin(_ vertical: CGFloat, _ horizontal: CGFloat)
margin(_ vertical: Percent, _ horizontal: Percent)
Set the individually vertical margins (top, bottom) and horizontal margins (left, right, start, end)margin(_ top: CGFloat, _ horizontal: CGFloat, _ bottom: CGFloat)
margin(_ top: Percent, _ horizontal: Percent, _ bottom: Percent)
Set individually top, horizontal margins and bottom marginmargin(_ top: CGFloat, _ left: CGFloat, _ bottom: CGFloat, _ right: CGFloat)
margin(_ top: Percent, _ left: Percent, _ bottom: Percent, _ right: Percent)
	view.pin.top().left().margin(20)
	view.pin.bottom().marginBottom(20)
	view.pin.horizontally().marginHorizontal(20)
view.pin.all().margin(10, 12, 0, 12)The following section explains how CSS/PinLayout margin rules are applied.
This table explains how and when left and right margins are applied depending on which view’s attribute has been pinned.
| View’s pinned attributes | Left Margin | Right Margin |
|---|---|---|
| Left | Move view right | - |
| Left and Width | Move view right | - |
| Right | - | Move view left |
| Right and Width | - | Move view left |
| Left and Right | Reduce the width to apply the left margin | Reduce the width to apply the right margin |
| hCenter | Move view right | Movie view left |
NOTE: - indicates that the margin is not applied.
This table explains how and when top and bottom margins are applied depending on which view’s attribute has been pinned.
| View’s pinned attributes | Top Margin | Bottom Margin |
|---|---|---|
| Top | Move view down | - |
| Top and Height | Move view down | - |
| Bottom | - | Move view up |
| Bottom and Height | - | Move view up |
| Top and Bottom | Reduce the height to apply the top margin | Reduce the height to apply the bottom margin |
| vCenter | Move view down | Movie view up |
In this example, only the left margin is applied

view.pin.left().margin(10)In this example, only the right margin is applied

view.pin.right().width(100).marginHorizontal(10)In this example, the left and right margins are applied

view.pin.left().right().margin(10)In this example, left, right and top margins are applied. Note that the view’s width has been reduced to apply left and right margins.

view.pin.top().left().right().height(100).margin(10)In this example, left, right, top and bottom margins are applied.

view.pin.top().bottom().left().right().margin(10)The pinEdges() method pins the four edges (top, left, bottom and right edges) before applying margins.
This method is useful in situations where the width and/or the height attributes have been pinned. This method is an add-on, there is no equivalent in CSS.
Without pinEdges() margins rules would be applied and the view would be moved to the left.

view.pin.left().width(100%).marginHorizontal(20)With pinEdges() the left and right margins are applied even if only the left and width has been set. The reason is the call to pinEdges() has pinned the two horizontal edges at their position before applying margins.

view.pin.left().width(100%).pinEdges().marginHorizontal(20)NOTE: In that in that particular situation, the same results could have been achieved differently too:

view.pin.left().right().marginHorizontal(20)PinLayout can handle easily iOS 11 UIView.safeAreaInsets, but it goes further by supporting safeAreaInsets for previous iOS releases (including iOS 7/8/9/10) by adding a property UIView.pin.safeArea. PinLayout also extend the support of UIView.safeAreaInsetsDidChange() callback on iOS 7/8/9/10.
-
UIView.pin.safeArea
The safe area of a view represent the area not covered by navigation bars, tab bars, toolbars, and other ancestors that obscure a view controller's view.PinLayout expose the view's safeAreaInsets through
UIView.pin.safeArea, this property is available on iOS 11, but also on iOS 7/8/9/10! This gives you immediately the opportunity to use this property for any iOS releases.UIView.pin.safeAreais available even if you don't use PinLayout to layout your views.While running on a iOS 11 devices, this property simply expose the UIKit
UIView.safeAreaInsets. But on previous iOS releases, PinLayout use the information from theUIViewController's topLayoutGuide and bottomLayoutGuide to compute the safeArea.
   // Layout from a UIView
	view.pin.all(pin.safeArea)             // Fill the parent safeArea
	view.pin.top(pin.safeArea)             // Use safeArea.top to position the view
	view.pin.left(pin.safeArea.left + 10)  // Use safeArea.left plus offset of 10 px
	view.pin.horizontally(pin.safeArea)    // Fill horizontally the parent safeArea

	// Layout from a UIViewController(), you access
	// its view safeArea using 'view.pin.safeArea'.
button.pin.top(view.pin.safeArea)-
iOS 11 has also introduced the method
UIView.safeAreaInsetsDidChange()which is called when the safe area of the view changes. This method is called only when your app runs on a iOS 11 device. PinLayout's extend that and support this method also on older iOS releases including iOS 7/8/9/10. -
Note that if you handle the layout from
UIView.layoutSubviews()orUIViewController.viewDidLayoutSubviews(), you probably won't need to implementsafeAreaInsetsDidChange(). By default layout are invalidated and these methods are called when the safeAreaInsets changes. -
Controlling PinLayout UIView.safeAreaInsetsDidChange() calls:
You can control how PinLayout callsUIView.safeAreaInsetsDidChange()for iOS 7/8/9/10 (by default iOS 11 always calls this method).The property
Pin.safeAreaInsetsDidChangeModesupports two modes:-
optIn: (Default mode) In this mode PinLayout will call your view's
safeAreaInsetsDidChange()method only if the view implements thePinSafeAreaInsetsUpdateprotocol. This ensure that PinLayout doesn't interfere with any source code that expect thatsafeAreaInsetsDidChange()is called only on iOS 11.class CustomerView: UIView, PinSafeAreaInsetsUpdate { override func safeAreaInsetsDidChange() { // This method will be called on iOS 11, but also on iOS 7/8/9/10 // because the view implements the protocol PinSafeAreaInsetsUpdate } }
-
always: In this mode, PinLayout will call your views
safeAreaInsetsDidChange()method automatically for iOS releases 7/8/9/10.Pin.safeAreaInsetsDidChangeMode = .always ... class CustomerView: UIView { override func safeAreaInsetsDidChange() { // This method will be called on iOS 11, but also on iOS 7/8/9/10 // because "Pin.safeAreaInsetsDidChangeMode" has been set to ".always". } }
-
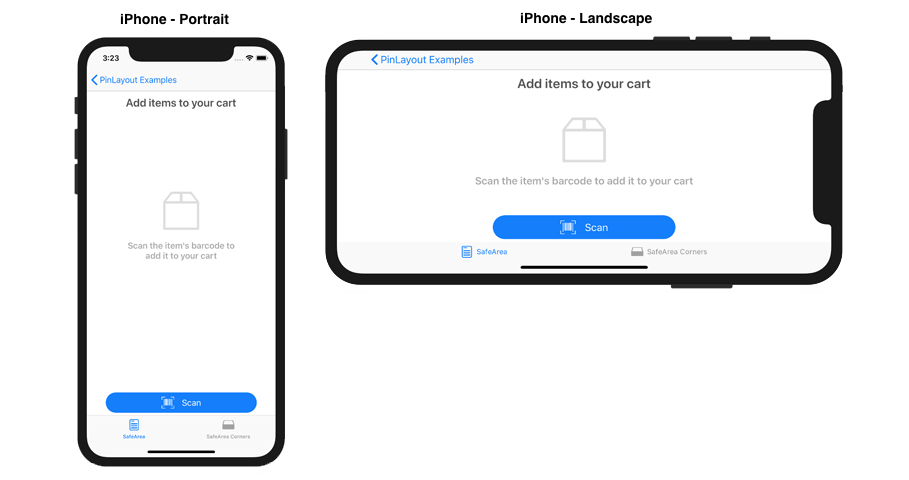
This example layout 4 subviews inside the safeArea. The UINavigationBar and UITabBar are translucent, so even if the container UIView goes under both, we can use its UIView.pin.safeArea to keeps its subviews within the safeArea.

   topTextLabel.pin.top(pin.safeArea.top + 10).hCenter()
   iconImageView.pin.hCenter().vCenter(-10%)
   textLabel.pin.below(of: iconImageView).hCenter().width(60%).maxWidth(400).sizeToFit(.width).marginTop(20)
   scanButton.pin.bottom(pin.safeArea).hCenter().width(80%).maxWidth(300).height(40)
This example runs perfectly on a iPhone X (iOS 11), but it also runs on any devices with iOS 7, 8, 9 and 10.
📌 This example is available in the Examples App. See example complete source code
Methods:
-
justify(_ : HorizontalAlign)
Justify the view horizontally. This method justifies horizontally a view in situations where the left, right and the width has been set (using either width/minWidth/maxWidth). In this situation, the view may be smaller than the space available between the left and the right edges. A view can be justified left, center, right, start*, end*. -
align(_ : VerticalAlign)
Align the view vertically. This method aligns vertically a view in situations where the top, bottom and the height has been set (using either height/minHeight/maxHeight). In this situation, the view may be smaller than the space available between the top and the bottom edges. A view can be aligned top, center or bottom.
	view.pin.horizontally().marginHorizontal(20).maxWidth(200).justify(.center)
view.pin.below(of: A).above(of: B).width(40).align(.center)This example layout a view between its superview left and right edges with a maximum size of 200 pixels. Without the usage of the justify(:HorizontalAlign) method, the view will be justified on the left:

viewA.pin.horizontally().maxWidth(200)The same example, but using justify(.center):

viewA.pin.horizontally().maxWidth(200).justify(.center)And finally using justify(.right):

viewA.pin.left().right().maxWidth(200).justify(.right)This example centered horizontally the view B in the space remaining at the right of the view A. The view B has a width of 100 pixels.

viewB.pin.after(of: viewA, aligned: .top).right().width(100).justify(.center)Until now UIView.pin was used to layout views, but there's also another property called UIView.pinFrame that does something slightly different in situations where the view has a transform (UIView.transform, scaling, rotation, ...).
-
pin: Set the position and the size of the non-transformed view. The layout is applied before the transform. This is particularly useful when you want to animate a view using a transform without modifying its layout. -
pinFrame: Set the position and the size on the transformed view. The layout is applied after the transform.
The following examples use this view initial size and position:
![]()
Using pin:
  view.transform = .init(rotationAngle: CGFloat.pi / 2)
  view.pin.center().width(100).height(50)
Using pinFrame:
  view.transform = .init(rotationAngle: CGFloat.pi / 2)
  view.pinFrame.center().width(100).height(50)
Result using pin |
result using pinFrame |
|
|---|---|---|
| Rotation transform |
- Using
pinthe view is layouted and after the rotation transform is applied. - Using
pinFramethe rotation transform is applied and after the view is layouted.
When layouting a view relative to a view with a transform (ex: below(of:UIView), top(to edge: ViewEdge), ...), pin and pinFrame react also differently.
pin: PinLayout will use the untransformed size and the position of the relative view.pinFrame: PinLayout will use the transformed size and the position of the relative view.
In the following example the View A have a scale transform of 1.5x1.5. The view B is layouted below the view A.
Using pin:
  aView.transform = .init(scaleX: 1.5, y: 1.5)
  aView.pin.width(100).height(50)
  bView.pin.below(of: aView, aligned: .left)
Using pinFrame:
aView.transform = .init(scaleX: 1.5, y: 1.5)
aView.pin.width(100).height(50)
bView.pinFrame.below(of: aView, aligned: .left)
Result using pin |
result using pinFrame |
|
|---|---|---|
| Scale transform |
- Using
pinthe view B is layouted below the untransformed view A (shown in dotted lines). - Using
pinFrameview B is layouted below the transformed view A.
In debug, PinLayout will display warnings when pin rules cannot be applied.
Warning reasons
-
The newly pinned attributes conflict with other already pinned attributes.
Example:
view.pin.left(10).right(10).width(200)
👉 Layout Conflict:width(200) won't be applied since it conflicts with the following already set properties: left: 0, right: 10. -
The newly pinned attributes have already been set to another value.
Example:
view.pin.width(100).width(200)
👉 Layout Conflict:width(200) won't be applied since it value has already been set to 100. -
The view being layout hasn’t been added yet into a superview
Example:
view.pin.width(100)
👉 Layout Warning:width(100) won't be applied, the view must be added as a sub-view before being layouted using this method. -
A view is used as a reference, either directly or using its anchors or its edges, but hasn’t been added yet to a superview.
Example:
view.pin.left(of: view2)
👉 Layout Warning:left(of: view2) won't be applied, the view must be added as a sub-view before being used as a reference. -
The width and the height must be positive values.
Example:
view.pin.width(-100)
👉 Layout Warning:The width (-100) must be greater or equal to 0. -
justify(.left|.center|.right)is used without having set the left and the right coordinates.
Example:
view.pin.left().width(250).justify(.center)
👉 PinLayout Warning: justify(center) won't be applied, the left and right coordinates must be set to justify the view. -
Layout must be executed from the Main thread.
👉 PinLayout Warning: Layout must be executed from the Main Thread!
Warnings can be disabled also in debug mode by setting the boolean Pin.logWarnings to false.
-
You should always specifies methods in the same order, it makes layout lines easier to understand. Here is our preferred ordering:
view.pin.[EDGE|ANCHOR|RELATIVE].[WIDTH|HEIGHT|SIZE].[pinEdges()].[MARGINS].[sizeToFit()]This order reflect the logic inside PinLayout.
pinEdges()is applied before margins and margins are applied beforesizeToFit().view.pin.top().left(10%).margin(10, 12, 10, 12) view.pin.left().width(100%).pinEdges().marginHorizontal(12) view.pin.horizontally().margin(0, 12).sizeToFit(.width) view.pin.width(100).height(100%)
-
You should specify edges always in the same order, this is our proposed order:
TOP, BOTTOM, LEFT, RIGHTview.pin.top().bottom().left(10%).right(10%)
-
If the layout line is too long, you can split into multiple lines:
 textLabel.pin.below(of: titleLabel)
    .before(of: statusIcon).after(of: accessoryView)
    .above(of: button).marginHorizontal(10)
📌 PinLayout's method call order is irrelevant, the layout result will always be the same.
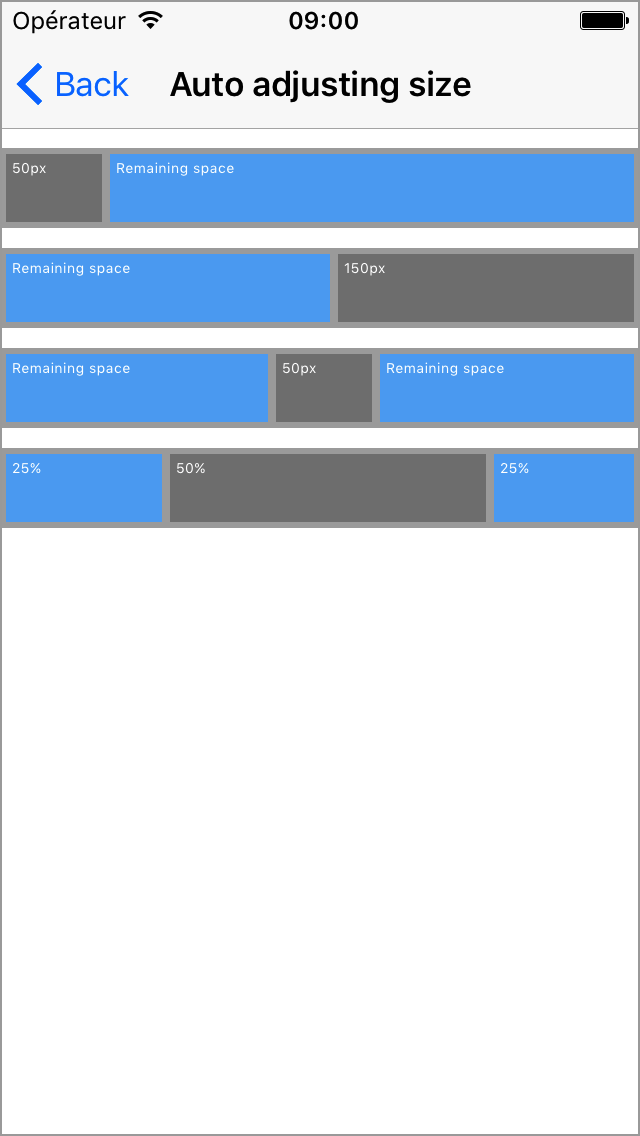
The following examples show how PinLayout can be used to adjust views size and position to the size of their container. In this case containers are cells.

Cell A:
- A1 is left aligned with a width of 50px
- A2 fills the remaining space
	a1.pin.top().bottom().left().width(50)
	a2.pin.after(of: a1, aligned: .top).bottom().right().marginLeft(10)
Cell B:
- B2 is right aligned with a fixed width of 50px
- B1 fills the remaining space
	b2.pin.top().bottom().right().width(50)
	b1.pin.before(of: b2, aligned: .top).bottom().left().marginRight(10)
Cell C:
- C2 is centered with a fixed width of 50px
- C1 fills the remaining left space
- C3 fills the remaining right space
	c2.pin.topCenter().width(50).bottom()
	c1.pin.before(of: c2, aligned: .top).bottom().left().marginRight(10)
	c3.pin.after(of: c2, aligned: .top).bottom().right().marginLeft(10)
Cell D:
- D1 takes 25% of its container width
- D2 takes 50% of its container width
- D3 fills the remaining space
	d1.pin.topLeft().bottom().width(25%)
	d2.pin.after(of: d1, aligned: .top).bottom().width(50%).marginLeft(10)
d3.pin.after(of: d2, aligned: .top).bottom().right().marginLeft(10)To integrate PinLayout into your Xcode project using CocoaPods, specify it in your Podfile:
pod 'PinLayout'Then, run pod install.
To integrate PinLayout into your Xcode project using Carthage, specify it in your Cartfile:
github "mirego/PinLayout"
Then, run carthage update to build the framework and drag the built PinLayout.framework into your Xcode project.
Once you have your Swift package set up, you only need to add PinLayout as a dependency of your Package.swift.
dependencies: [
    .Package(url: "https://github.com/mirego/PinLayout.git", majorVersion: 1)
]There is an Example app that expose some usage example on PinLayout, including:
- The introduction example presented previously in this README.
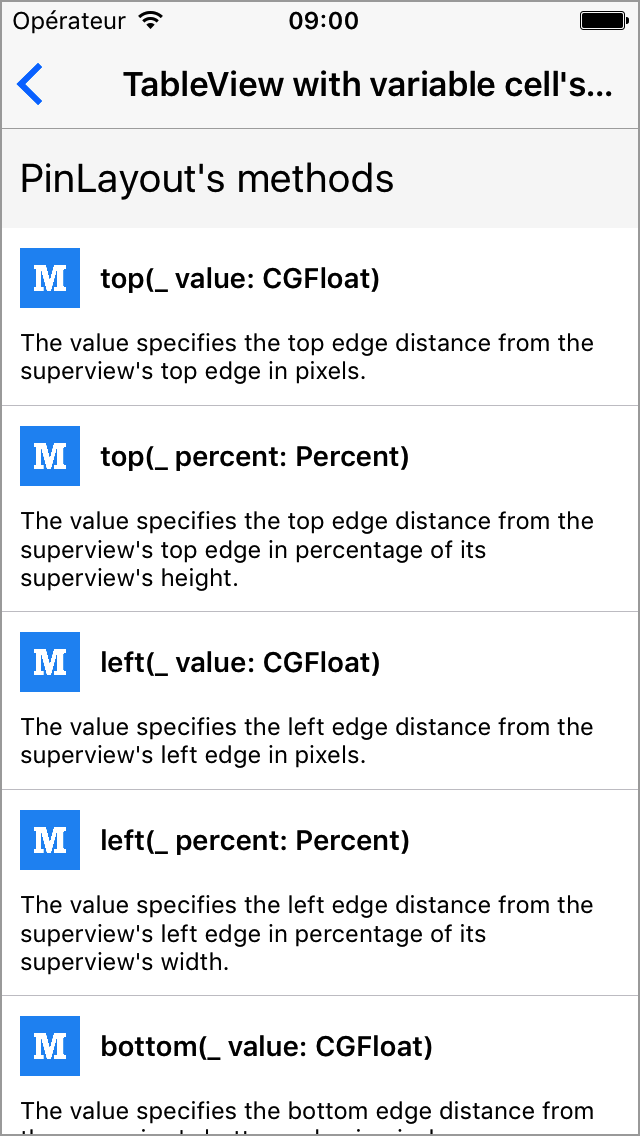
- UITableView example with variable height cells.
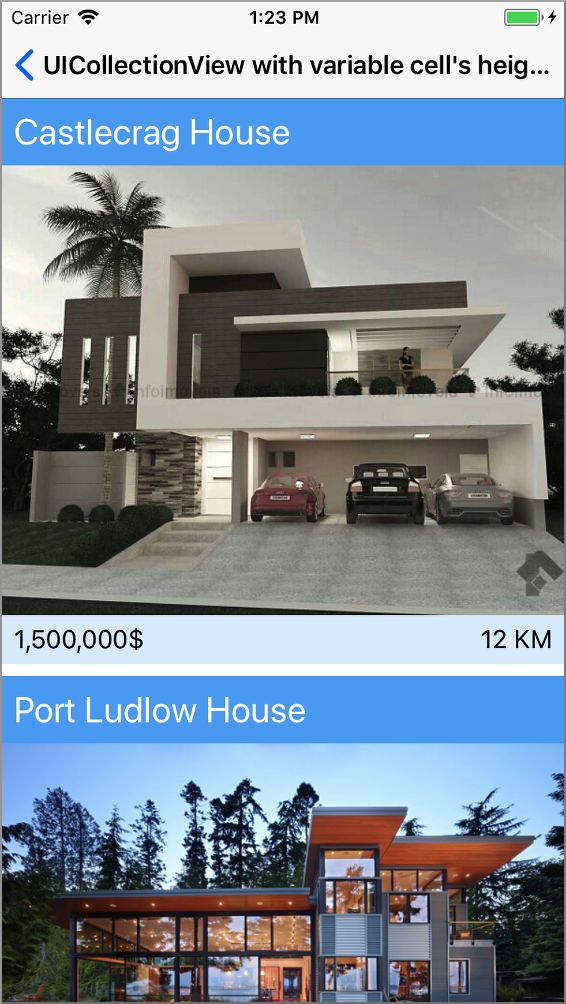
- UICollectionView example.
- An example using PinLayout's
UIView.pin.safeArea - An RTL enabled version of the introduction example
- An example showing of the right-to-left (RTL) language support. Similar to the Intro example.
- Example showing a form
- Example showing relative positioning.
- Example using Objective-C
- ...
📌 Tap on images to see the example's source code.


This app is available in the Example folder. Note that you must do a pod install before running the example project.
PinLayout layouts views immediately after the line containing .pin has been fully executed, thanks to ARC (Automatic Reference Counting) this works perfectly on iOS/tvOS/macOS simulators and devices. But in Xcode Playgrounds, ARC doesn't work as expected, object references are kept much longer. This is a well documented issue and have a little impact on the PinLayout behaviour.
See here for more details about using PinLayout in Xcode playgrounds
PinLayout also expose an Objective-C interface slightly different than the Swift interface.
-
Q: When the device rotation change, the layout is not updated.
R: PinLayout doesn't use auto layout constraints, it is a framework that manually layout views. For that reason you need to update the layout inside eitherUIView.layoutSubviews()orUIViewController.viewDidLayoutSubviews()to handle container size's changes, including device rotation. You'll also need to handle UITraitCollection changes for app's that support multitasking. -
Q: How to handle new iOS 11
UIView.safeAreaInsetsand the iPhone X .
R: iOS 11 has introducedUIView.safeAreaInsetsto particularly support the iPhone X landscape mode. In this modeUIView.safeAreaInsetshas a left and right insets. The easiest way the handle this situation with PinLayout is to add a contentView that will contains all your view's child, and simply adjust this contentView view to match thesafeAreaInsetsor PinLayout'sUIView.pin.safeArea.
All example in the Examples App handle correctly the safeAreaInsets and works on iPhone X in landscape mode. Many PinLayout's method accept an UIEdgeInsets as parameter.
Note that only the UIViewController's main view must handle the safeAreaInsets, sub-views don't have to handle it.
-
Q: How can we adjust a UIView container to match all its children?
R: The proposed solution is used by the Form example for its rounded corner background. Suppose you want to adjust a container height to match all its child (subviews).- First set the container width and its position:
containerView.pin.topCenter().width(100%).marginTop(10) - Layout all its children.
- Finally, set the container height to match its last child Y position:
containerView.pin.height(child6.frame.maxY + 10)
- First set the container width and its position:
-
Q: How to apply percentage from a CGFloat, a Float or an Int value?
R: Many PinLayout's method has a parameter of typePercent. You can easily specify this type of parameter simply by adding the%operator to your value (eg:view.pin.left(10%).width(50%). It is similar if you have a value of type CGFloat, Float or Int, simply adds the%operator:let percentageValue: CGFloat = 50 view.pin.width(percentageValue%)
If you have questions, you can checks already answered questions here.
For any comments, ideas, suggestions, issues, simply open an issue.
If you find PinLayout interesting, thanks to Star it. You'll be able to retrieve it easily later.
If you'd like to contribute, you're welcome!
PinLayout was inspired by other great layout frameworks, including:
- HTML's CSS: Management of margins in absolute positioning and bottom/right position coordinates.
- MCUIViewLayout: Nice absolute and relative positioning.
- Qt: Anchors and edges management.
- SnapKit: Clean interface for anchors.
PinLayout recent history is available in the CHANGELOG also in GitHub Releases.
BSD 3-Clause License