This repository contains an ESPHome BLE client for interfacing with the Powerdale Nexxtender EV Charger. The client allows you to seamlessly integrate the Nexxtender charger with your ESPHome projects, enabling you to monitor and control the charger remotely via Bluetooth Low Energy (BLE). Additionally, it integrates smoothly with Home Assistant, providing a convenient interface for managing your Nexxtender charger within your home automation setup.


![]()
-
BLE Connectivity: Establish a BLE connection between your ESPHome device and the Powerdale Nexxtender EV Charger for data exchange and control.
-
Real-time Monitoring: Retrieve real-time data from the Nexxtender charger, including charging status, voltage, current, and power consumption.
-
Remote Control: Control the Nexxtender charger remotely from your ESPHome device, enabling features such as starting, stopping, change charge mode, set the charger to Open/Private, set the maximum car charging speed and scheduling charging sessions.
-
Toggle open/private mode: Toggle the open/private mode of the charger by pressing the "boot" button on the ESP board.
-
Integrated webserver: Access the integrated
web_servercomponent of ESPHome, providing a simple API that lets your monitor and control the Nexxtender. -
Home Assistant Integration: Seamlessly integrate the ESPHome BLE client with Home Assistant, allowing you to monitor and control the Nexxtender charger through the Home Assistant interface.


- ESPHome BLE Client for Powerdale Nexxtender EV Charger
To integrate the ESPHome BLE client with your Powerdale Nexxtender EV Charger and Home Assistant, follow these steps:
Before integrating your Nexxtender EV Charger with the ESPHome BLE client, you'll need to find its Bluetooth MAC address. You can do this using the NRF Connect app, available for both Android and iOS devices. Follow these steps:
-
Download and Install NRF Connect: Go to the Google Play Store (for Android) or the Apple App Store (for iOS) and search for "NRF Connect." Download and install the app on your mobile device.
-
Open NRF Connect: Launch the NRF Connect app on your mobile device.
-
Scan for BLE Devices: In the NRF Connect app, navigate to the "Scanner" tab and start scanning for nearby Bluetooth devices.
-
Locate Nexxtender EV Charger ("HOME"): The charger's Bluetooth module should broadcast its presence with the name "HOME," allowing NRF Connect to detect it.
-
View Device Details: Once NRF Connect detects the Nexxtender EV Charger, tap on it to view its details. Among the information displayed, you'll find the Bluetooth MAC address (also known as the BD_ADDR) of the charger.
-
Note MAC Address: Make a note of the Bluetooth MAC address of your Nexxtender EV Charger. You'll need this MAC address when configuring the ESPHome BLE client.
By following these steps, you can easily find the Bluetooth MAC address of your Nexxtender EV Charger named "HOME" using the NRF Connect app.
The Nexxtender passkey is the PIN code that is used to pair your BLE device with the charger. (6 digit number) If you don't have the PIN code (or you have lost it), you can always reach out to me and I can calculate it if you provide me the serial number of the box (format XXXXX-XX-XXXX-XXXXX-XX). The serial number can be found on the sticker, located at the bottom of the Nexxtender device. The PN and the SN numbers are the numbers needed to calculate the PIN code. PN: XXXXX-XX SN: XXXX-XXXXX-XX

-
Install ESPHome: If you haven't already, install ESPHome by following the instructions here or here in combination with HA.
You then need to create a new YAML configuration for you nexxtender charger, compile it (this will create the corresponding C++ code and resulting binary), and upload it to your esp32.
Note: as from ESPHome version 2024.5.x make sure you add the following sdkconfig option
to the framework config if you override the repository code for the esp32
as some changes were made to the esp-idf framework (v4.4.7)

framework:
  type: esp-idf
  version: recommended
  sdkconfig_options:
    CONFIG_BT_GATTC_NOTIF_REG_MAX: "32"
There are several ways to do this, for example using command line or your favorite IDE, or directly via the ESPHome dashboard add-on proposed by Home Assistant.
-
Create a new ESPHome Configuration: Create a new file named
nexxtender.yamlin your local directory.If you followed the proposed HomeAssistant ESPHome wizard, you already ended up with a yaml file. If needed, first rename this file in
nexxtender.yamlusing theRename hostnameoption. Note that this will also trigger the compilation and can take some time. Alternatively, delete the configuration created by the wizard and create a new one.Edit and copy/paste the content of the provided
nexxtender.yamlinto or at the end of this file (or copy/paste the below yaml).packages: nexxtender: url: https://github.com/geertmeersman/nexxtender file: config/nexxtender.yaml refresh: 0s substitutions: ## Uncomment and modify when you want to use a different device name. # device_name: nexxtender # friendly_name: Nexxtender ## Uncomment and modify when you want to use a different threshold. # charging_mode_eco_threshold: "8" # Single phase (6A + 2 margin) # charging_mode_eco_bi_threshold: "14" # Bi-phase (12A + 2 margin) # charging_mode_eco_tri_threshold: "20" # Tri-phase (18A + 2 margin) # slider_max_car_charging_speed: "32" # The max value of the slider for the maximum car charging speed slider, default set to 32 # slider_max_available_capacity: "40" # The max value of the slider for the maximum available capacity slider, default set to 40
- The charging power mode is estimated based on the number of phases used during the charge.
- The substitution
charging_mode_eco_thresholdand the others are optional, and you can set it to whatever Amp you want to be used as a threshold for the ECO/MAX sensor. Default values are the ones set in the example. Attention, it does not influence your charger; it is just a way of indicating which speed the charger is delivering. - The substitution
slider_max_car_charging_speedlets you override the maximum value for the configuration slider of the maximum car charging speed. This is usually set to the value of the circuit breaker A. Default value is the ones set in the example. - The substitution
slider_max_available_capacitylets you override the maximum value for the configuration slider of the maximum available capacity of the grid. This is usually set to the value of the circuit breaker A. Default value is the ones set in the example.
-
Update the secrets.yaml:
Ensure that your
secrets.yamlfile contains the following entries:esphome_admin_password: "YOUR_ESPHOME_ADMIN_PASSWORD" wifi_ssid: "YOUR_WIFI_SSID" wifi_password: "YOUR_WIFI_PASSWORD" esphome_api_key: "YOUR_ESPHOME_API_KEY" nexxtender_mac: "YOUR_NEXXTENDER_MAC_ADDRESS" nexxtender_passkey: "YOUR_NEXXTENDER_PASSKEY"
In the HomeAssistant ESPHome dashboard, this is done using the top righ shortcut
SECRETS.Replace
"YOUR_ESPHOME_ADMIN_PASSWORD","YOUR_WIFI_SSID","YOUR_WIFI_PASSWORD","YOUR_ESPHOME_API_KEY","YOUR_NEXXTENDER_MAC_ADDRESS", and"YOUR_NEXXTENDER_PASSKEY"with your actual values.The
nexxtender_macis the bluetooth mac address you found in the previous step.The
nexxtender_passkeyis the PIN code you use to pair your Nexxtender. Explanations on how to find it can be found here.The
esphome_admin_passwordis the password that is used for the Wi-Fi fallback hotspot and OTA.If you don't know how to define the
esphome_api_key, you can obtain one as described here in the section Configuration variables > encryption > key. -
Compile Firmware: Compile the ESPHome firmware using the
nexxtender.yamlconfiguration file. Run the following command in your terminal, pointing to the location of yournexxtender.yamlfile:esphome compile nexxtender.yaml
Using the Home Assistant ESPHome dashboard, the firmware compilation, upload and flashing of your esp32 is done in one step by using the
Installoption. Optionally, you can first run theValidatecommand that will check all the code and links before compiling it. Considering the compilation can take some time, this is a recommended step.Note: if the compilation fails due to missing
nexxtender_packages/nexxtender.hfile. You can copy nexxtender_packages/nexxtender.h in your configuration folder. In HomeAssistant, the configuration files for ESPHome can be found and edited under<HOME_ASSISTANT_CONFIG>/esphome/. For example the configuration for the nexxtender node can be found in/config/esphome/nexxtender.yaml. You'll then need to use a terminal or IDE to create the directory<HOME_ASSISTANT_CONFIG>/esphome/nexxtender_packagesand the filenexxtender.h. -
Flash Firmware: Flash the compiled firmware to your ESPHome device using the following command:
esphome upload nexxtender.yaml
This step is thus normally already done when using the HomeAssistant ESPHome dashboard.
Note: If you’re just seeing Connecting....____.... on the screen and the flashing fails, please double-check the UART wires are connected correctly if flashing using a USB to UART bridge.
For some devices you need to keep pressing the BOOT button until flashing has begun (i.e. Geekcreit DOIT ESP32 DEVKIT V1).
-
Integrate with Home Assistant: In your Home Assistant configuration, add the ESPHome device as a new integration. Follow the instructions provided by Home Assistant to discover and integrate the Nexxtender charger with your Home Assistant setup.
-
Monitor Logs: Monitor the ESPHome device logs to ensure that the BLE client establishes a connection with the Powerdale Nexxtender EV Charger successfully.
-
Test Functionality: Test the functionality of the ESPHome BLE client by monitoring real-time data from the Nexxtender charger and controlling its operation remotely from your ESPHome device or through the Home Assistant interface.
The standard configuration utilises the az-delivery-devkit-v4 board. If you would have another ESP32 board, feel free to customize it.
If you want to customize the ESP32 section in your nexxtender.yaml file for your specific board type, you can add the following section at the end of the nexxtender.yaml:
esp32:
  board: YOUR_ESP32_BOARD_TYPE
Replace YOUR_ESP32_BOARD_TYPE with the specific board type you're using, such as az-delivery-devkit-v4 or any other compatible board.
Example for the ESP32-S3-N16R8, buy here: Aliexpress
esp32:
  board: esp32-s3-devkitc-1

esphome:
  platformio_options:
    board_build.flash_mode: dio
For this specific board, I have created a specific yaml that manages the RGB LED that is integrated on the board.
The complete configuration file would look like:
packages:
  nexxtender:
    url: https://github.com/geertmeersman/nexxtender
    files: [config/nexxtender.yaml, config/nexxtender_packages/esp.s3.yaml]
    refresh: 0s
substitutions:
  device_name: nexxtender
  friendly_name: Nexxtender
This flexibility allows users to tailor the configuration to their hardware requirements while still benefiting from the overall structure and functionality provided in the nexxtender.yaml file.
The Nexxtender comes equipped with an integrated ESPHome webserver and graphical user interface (GUI) to provide an intuitive way to manage and configure your device if you don't plan to use Home Assistant. Follow the steps below to activate and access this feature:
-
Activate the webserver package:
There is a webserver configuration that you can activate by using the yaml below.
packages:
  nexxtender:
    url: https://github.com/geertmeersman/nexxtender
    files:
      [config/nexxtender.yaml, config/nexxtender_packages/webserver.yaml]
    refresh: 0s
The content of the included webserver.yaml configuration file is the following:
web_server:
  auth:
    username: admin
    password: !secret esphome_admin_password
If you don't need authentication, you can just add this to your nexxtender.yaml configuration:
web_server:It will then activate the webserver on the standard port and without authentication.
-
Access the Web Interface: Open a web browser on a device connected to the same network as your Nexxtender.
-
Enter the IP Address/mDNS: In the address bar of your web browser, enter the IP address assigned to your Nexxtender. You can usually find this information in your router's administration interface or by using a network scanning tool. You could also use the mDNS http://nexxtender.local
-
Login: If prompted, enter any necessary login credentials to access the ESPHome webserver.
-
Explore and Configure: Once logged in, you'll have access to the ESPHome GUI, where you can explore various settings, configure parameters, and monitor the status of your Nexxtender.
-
Save Changes: Remember to save any changes you make within the ESPHome interface to ensure they are applied to your Nexxtender.
More details can be found here: https://esphome.io/components/web_server.html
To integrate ESPHome devices with Home Assistant, follow these steps:
-
Prerequisites: Ensure you have the ESPHome integration enabled in Home Assistant. You can do this by navigating to Configuration -> Integrations, clicking the "+" button to add an integration, searching for "ESPHome," and following the instructions to set it up.
-
Discover ESPHome Devices: After enabling the integration, Home Assistant will automatically discover ESPHome devices on your network. If your devices don't show up automatically, you can add them manually by providing their IP address and API key.
-
Configuration YAML: You can also configure ESPHome devices manually by adding them to your Home Assistant configuration YAML file. This allows for more advanced configuration options and customization.
-
View Devices: Once your ESPHome devices are discovered or added manually, you can view and manage them in the Home Assistant UI. This includes monitoring their status, viewing sensor data, and controlling their actions.
-
Integrate with Automations: You can use ESPHome devices in your Home Assistant automations to trigger actions based on sensor readings, device status changes, or other events.
-
Customization: Home Assistant allows for extensive customization of ESPHome devices, including renaming, grouping, and organizing them to fit your home automation setup.
-
Updates and Maintenance: Keep your ESPHome devices up to date by regularly checking for firmware updates and configuring automatic OTA updates if desired.
-
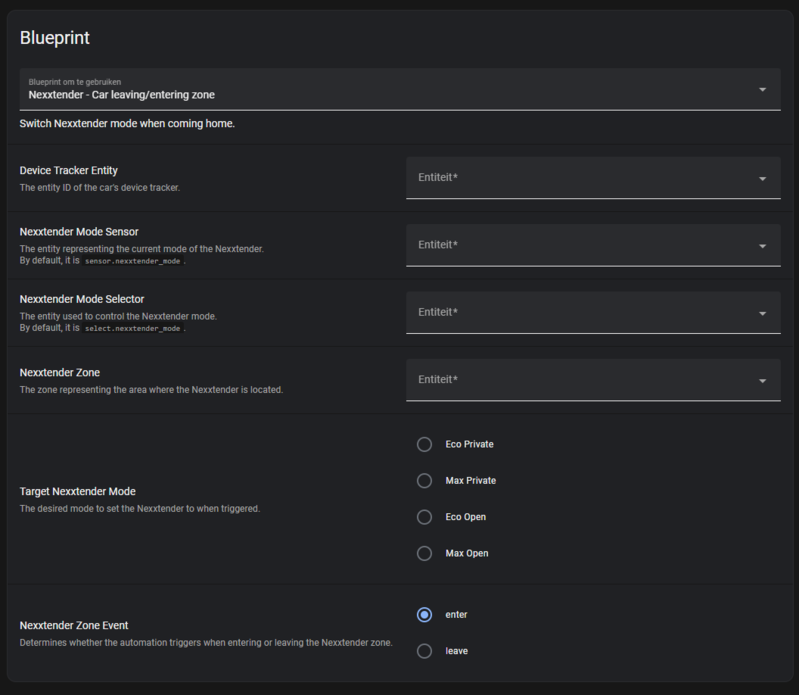
Blueprint for zone automation: Automate the switching of Nexxtender mode based on car entry or exit from a specified zone.
This blueprint allows you to configure the device tracker for your car, the Nexxtender mode sensor, the mode selector, the zone where the Nexxtender is located, the desired Nexxtender mode, and the trigger event for zone entry or exit.
-
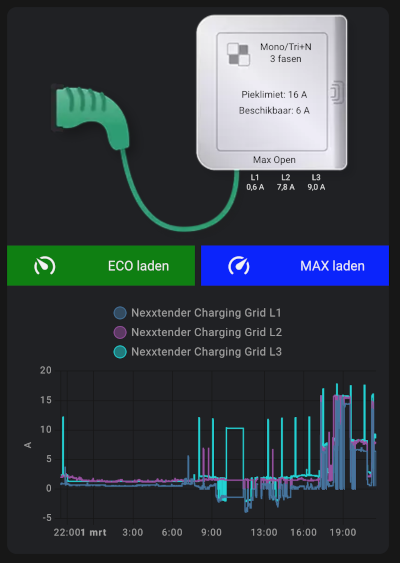
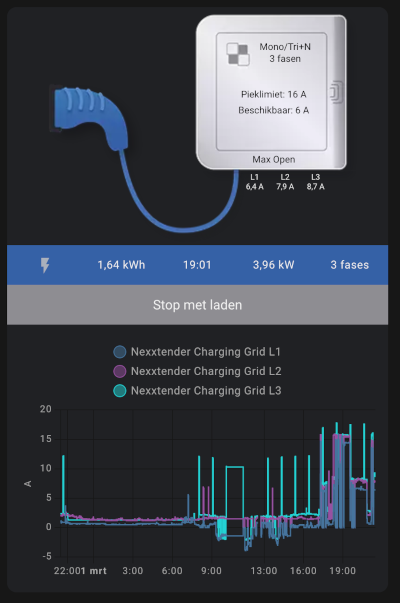
Lovelace dashboard card:
Show markdown code
The example uses the following custom lovelace cards:
The images used are available in the images folder of this repository.
In the example below they are located in your HA /config/www/images/auto/ folder.
type: custom:vertical-stack-in-card
cards:
  - type: picture-elements
    aspect_ratio: 2
    elements:
      - style:
          top: 50px
          left: 73%
        show_name: false
        show_icon: false
        type: custom:button-card
        entity: sensor.nexxtender_connection_type
        show_state: true
        styles:
          card:
            - background: none
            - border-radius: 0
            - border: 0
            - font-size: 12px
            - color: black
      - style:
          top: 65px
          left: 73%
        show_name: true
        name: |
          [[[ return entity.state+" fasen"; ]]]
        show_icon: false
        type: custom:button-card
        entity: sensor.nexxtender_charging_phases
        show_state: false
        styles:
          card:
            - background: none
            - border-radius: 0
            - border: 0
            - font-size: 12px
            - color: black
      - style:
          top: 110px
          left: 70%
        show_name: true
        name: Pieklimiet
        layout: name_state
        show_icon: false
        type: custom:button-card
        entity: sensor.nexxtender_peak_consumption_limit
        show_state: true
        styles:
          card:
            - background: none
            - border-radius: 0
            - border: 0
            - font-size: 12px
            - color: black
      - style:
          top: 130px
          left: 70%
        show_name: true
        name: Beschikbaar
        layout: name_state
        show_icon: false
        type: custom:button-card
        entity: sensor.nexxtender_available_capacity
        show_state: true
        styles:
          card:
            - background: none
            - border-radius: 0
            - border: 0
            - font-size: 12px
            - color: black
      - style:
          top: 192px
          left: 70%
        show_name: false
        show_icon: false
        type: custom:button-card
        entity: sensor.nexxtender_mode
        show_state: true
        styles:
          card:
            - background: none
            - border-radius: 0
            - border: 0
            - font-size: 12px
            - color: black
      - name: L1
        style:
          top: 220px
          left: 65%
        show_name: true
        show_icon: false
        type: custom:button-card
        entity: sensor.nexxtender_grid_l1
        show_state: true
        styles:
          card:
            - background: none
            - border-radius: 0
            - border: 0
            - font-size: 10px
      - name: L2
        style:
          top: 220px
          left: 73%
        show_name: true
        show_icon: false
        type: custom:button-card
        entity: sensor.nexxtender_grid_l2
        show_state: true
        styles:
          card:
            - background: none
            - border-radius: 0
            - border: 0
            - font-size: 10px
      - name: L3
        style:
          top: 220px
          left: 81%
        show_name: true
        show_icon: false
        type: custom:button-card
        entity: sensor.nexxtender_grid_l3
        show_state: true
        styles:
          card:
            - background: none
            - border-radius: 0
            - border: 0
            - font-size: 10px
    image: /local/images/1x1.png
    card_mod:
      style: |
        ha-card {
          {%- set nexxtender_state = states["sensor.nexxtender_status"].state -%}
          {% if nexxtender_state == "Unplugged" %}
            {% set image = 'unplugged' %}
          {% elif  nexxtender_state == "Plugged" %}
            {% set image = 'plugged' %}
          {% elif  nexxtender_state == "Charging" %}
            {% set image = 'charging' %}
          {% else %}
            {% set image = 'offline' %}
          {% endif %}
          background-size: 100% 100%;
          background-image: url(/local/images/auto/device_home_{{image}}.png);
          height: 300px !important;
          border-radius: 0;
          margin: 0;
        }
  - type: conditional
    conditions:
      - condition: numeric_state
        entity: sensor.nexxtender_charging_phase_count
        above: 0
    card:
      type: picture-elements
      elements:
        - type: state-icon
          entity: sensor.nexxtender_energy
          style:
            top: 25px
            left: 10%
        - type: state-label
          entity: sensor.nexxtender_energy
          style:
            top: 25px
            left: 30%
        - type: state-label
          entity: sensor.nexxtender_charging_seconds
          style:
            top: 25px
            left: 50%
        - type: state-label
          entity: sensor.nexxtender_car_power
          style:
            top: 25px
            left: 70%
        - type: state-label
          entity: sensor.nexxtender_charging_phase_count
          suffix: " fases"
          style:
            top: 25px
            left: 90%
      image: /local/images/1x1.png
      card_mod:
        style: |
          ha-card {
            height: 50px !important;
            background-color: #325FA8;
          }
  - type: conditional
    conditions:
      - condition: state
        entity: sensor.nexxtender_status
        state: Plugged
    card:
      type: horizontal-stack
      cards:
        - show_name: true
          show_icon: true
          icon: mdi:speedometer-slow
          type: custom:button-card
          layout: icon_name
          tap_action:
            action: toggle
          entity: button.nexxtender_start_charge_eco
          name: ECO laden
          styles:
            card:
              - background: green
              - border-radius: 0
              - height: 50px
        - show_name: true
          show_icon: true
          icon: mdi:speedometer
          type: custom:button-card
          layout: icon_name
          tap_action:
            action: toggle
          entity: button.nexxtender_start_charge_max
          name: MAX laden
          styles:
            card:
              - background: blue
              - border-radius: 0
              - height: 50px
  - type: conditional
    conditions:
      - condition: state
        entity: sensor.nexxtender_status
        state: Charging
    card:
      show_name: true
      show_icon: false
      type: custom:button-card
      icon: mdi:stop
      tap_action:
        action: toggle
      entity: button.nexxtender_stop_charging
      name: Stop met laden
      styles:
        card:
          - background: "#8E8D92"
          - border-radius: 0
          - height: 50px
  - type: conditional
    conditions:
      - condition: state
        entity: sensor.nexxtender_status
        state: Unplugged
    card:
      type: markdown
      content: <center>Sluit de kabel aan om te kunnen starten met laden</center>
  - type: history-graph
    entities:
      - entity: sensor.nexxtender_grid_l1
      - entity: sensor.nexxtender_grid_l2
      - entity: sensor.nexxtender_grid_l3
    logarithmic_scale: false


Contributions to the ESPHome BLE client for Powerdale Nexxtender EV Charger are welcome! Whether you want to report a bug, request a feature, or contribute code, your input is valuable to the community. Please refer to the Contribution Guidelines for more information.
This project is licensed under the MIT License. See the LICENSE file for details.
For support, questions, or feedback, please open an issue on the GitHub repository.