Docker images with Libgpiod library for control GPIO Developer boards such as Raspberry Pi, Banana Pi, Orange Pi, and etc. And bash scripts to install the library for Armbian/Ubuntu.
- Docker Registry @ devdotnetorg/libgpiod
- GitHub @ devdotnetorg/docker-libgpiod
Tags are defined by the mask: devdotnetorg/libgpiod:<Lib_version>-<OS_name>-<OS_version>. For example, the image devdotnetorg/libgpiod:2.1.2-ubuntu-24.04 is built based on Ubuntu version 24.04.
Libgpiod library versions: 1.6.4, 2.1.2.
Images for the following OS versions are builded:
- Ubuntu: 24.04;
- Alpine: 3.20.
:latest,:2.1.2,:2.1.2-alpine,:2.1.2-alpine-3.20- Alpine 3.20, libgpiod ver. 2.1.2;:2.1.2-ubuntu,:2.1.2-ubuntu-24.04- Ubuntu 24.04, libgpiod ver. 2.1.2.
:riscv64,:2.1.2-riscv64- Alpine edge, libgpiod ver. 2.1.2;:2.1.2-ubuntu-riscv64,:2.1.2-ubuntu-22.04-riscv64- Ubuntu 22.04;:2.1.2-alpine-riscv64,:2.1.2-alpine-edge-riscv64- Alpine edge.
GPIO stands for General-Purpose Input/Output and is one of the most commonly used peripherals in an embedded Linux system.
Internally, the Linux kernel implements the access to GPIOs via a producer/consumer model. There are drivers that produce GPIO lines (GPIO controllers drivers) and drivers that consume GPIO lines (keyboard, touchscreen, sensors, etc).
To manage the GPIO registration and allocation there is a framework inside the Linux kernel called gpiolib. This framework provides an API to both device drivers running in kernel space and user space applications.
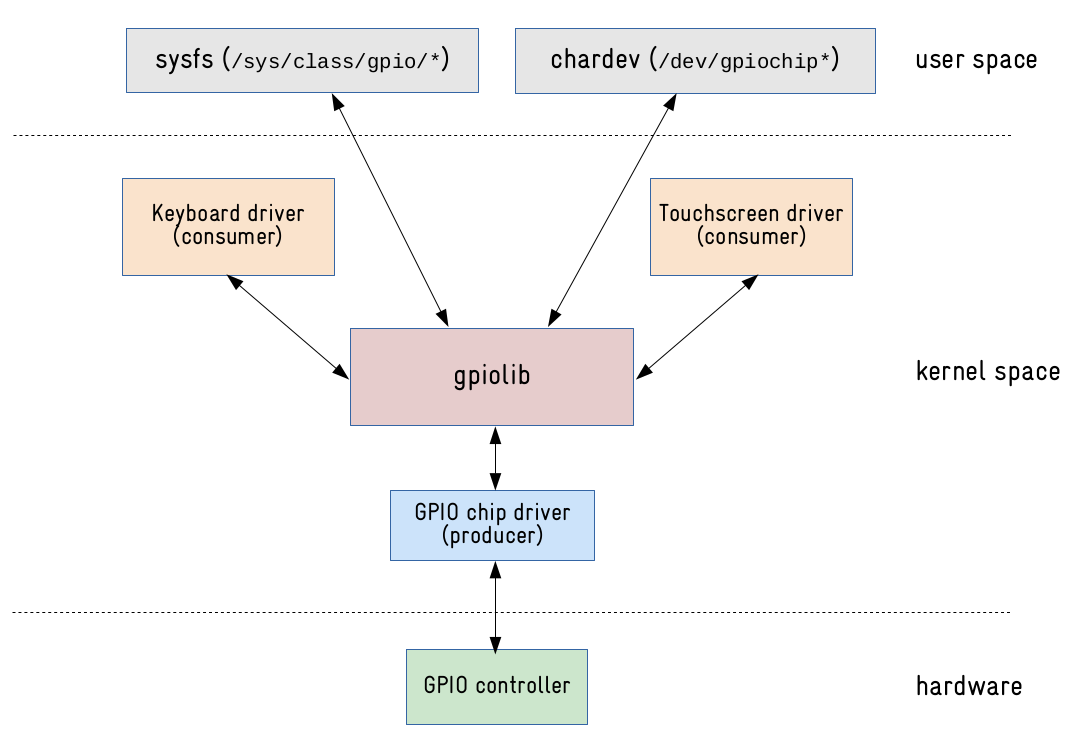
Since linux 4.8 the GPIO sysfs interface is deprecated. User space should use the character device instead. Version 2 of libgpiod requires GPIO character device uAPI v2 which was first released in linux 5.10. This library encapsulates the ioctl calls and data structures behind a straightforward API.
Every GPIO controller (gpiochip) will have a character device in /dev and we can use file operations (open(), read(), write(), ioctl(), poll(), close()) to manage and interact with GPIO lines:
root@bananapim64:~# ls /dev/gpiochip*
/dev/gpiochip0  /dev/gpiochip1  /dev/gpiochip2
Although this new char device interface prevents manipulating GPIO with standard command-line tools like echo and cat, it has some advantages when compared to the sysfs interface, including:
The allocation of the GPIO is tied to the process that it is using it, improving control over which GPIO lines are been used by user space processes. It is possible to read or write to multiple GPIO lines at once. It is possible to find GPIO controllers and GPIO lines by name. It is possible to configure the state of the pin (open-source, open-drain, etc). The polling process to catch events (interrupts from GPIO lines) is reliable.
Libgpiod (Library General Purpose Input/Output device) provides both API calls for use in your own programs and the following six user-mode applications to manipulate GPIO lines:
- gpiodetect - list all gpiochips present on the system, their names, labels and number of GPIO lines
- gpioinfo - list lines, their gpiochip, offset, name, and direction, and if in use then the consumer name and any other configured attributes, such as active state, bias, drive, edge detection and debounce period
- gpioget - read values of specified GPIO lines
- gpioset - set values of specified GPIO lines, holding the lines until the process is killed or otherwise exits
- gpiomon - wait for edge events on GPIO lines, specify which edges to watch for, how many events to process before exiting, or if the events should be reported to the console
- gpionotify - wait for changed to the info for GPIO lines, specify which changes to watch for, how many events to process before exiting, or if the events should be reported to the console
gpiodetect
root@bananapim64:~# gpiodetect
gpiochip0 [1f02c00.pinctrl] (32 lines)
gpiochip1 [1c20800.pinctrl] (256 lines)
gpiochip2 [axp20x-gpio] (2 lines)
gpioinfo
root@bananapim64:~#  gpioinfo --chip 1
gpiochip1 - 256 lines:
        line   0:      unnamed       unused   input  active-high
...
        line  64:      unnamed         "dc"  output  active-high [used]
...
        line  68:      unnamed "backlightlcdtft" output active-high [used]
...
        line  96:      unnamed   "spi0 CS0"  output   active-low [used]
        line  97:      unnamed       unused   input  active-high
        line  98:      unnamed       unused   input  active-high
        line  99:      unnamed       unused   input  active-high
        line 100:      unnamed      "reset"  output   active-low [used]
...
        line 120:      unnamed "bananapi-m64:red:pwr" output active-high [used]
...
        line 254:      unnamed       unused   input  active-high
        line 255:      unnamed       unused   input  active-high
gpiomon
root@bananapim64:~# gpiomon --chip 1 38
631.682345039   rising  gpiochip1 38
632.836326153   falling gpiochip1 38
634.400444509   rising  gpiochip1 38
635.585806741   falling gpiochip1 38
The container needs to be run on a development board such as Raspberry Pi, Banana Pi, Orange Pi, and etc. You must give access to /dev/gpiochipX. If the pin you are using is in gpiochip1, then there is no need to give access to gpiochip0.
Running gpiodetect on Banana Pi M64 (ARM64):
docker run --rm --name test-libgpiod --device /dev/gpiochip1 devdotnetorg/libgpiod gpiodetect
Output:
gpiochip1 [1c20800.pinctrl] (256 lines)
docker run --rm --name test-libgpiod --device /dev/gpiochip0 --device /dev/gpiochip1 --device /dev/gpiochip2 devdotnetorg/libgpiod gpiodetect
output:
gpiochip0 [1f02c00.pinctrl] (32 lines)
gpiochip1 [1c20800.pinctrl] (256 lines)
gpiochip2 [axp20x-gpio] (2 lines)
docker run --rm --name test-libgpiod --device /dev/gpiochip1 devdotnetorg/libgpiod gpiodetect -v
output:
gpiodetect (libgpiod) v2.1.2
Copyright (C) 2017-2023 Bartosz Golaszewski
License: GPL-2.0-or-later
This is free software: you are free to change and redistribute it.
There is NO WARRANTY, to the extent permitted by law.
Running gpioset. Turning on LED on Banana Pi M64 (ARM64), hold it for 200ms, then exit:
docker run --rm --name test-libgpiod --device /dev/gpiochip1 devdotnetorg/libgpiod gpioset --banner --hold-period 200ms -t0 --chip 1 36=1
To control GPIO from .NET code, the LibGpiodDriver class is used, the System.Device.Gpio.Drivers namespace. The LibGpiodDriver class is a wrapper around the Libgpiod library.
Sample C # source code:
GpioController controller;
var drvGpio = new LibGpiodDriver(int_gpiochip.Value);
controller = new GpioController(PinNumberingScheme.Logical, drvGpio);
For the LibGpiodDriver class to function, the * .so library files must be added to the container.
You must install the Libgpiod library in a container using a script or simply unpack the archive with the binary files.
An example Dockerfile for Ubuntu 22.04 with a Libgpiod library:
...
# Add Libgpiod
RUN apt-get update \
	&& apt-get install -y --install-recommends curl \
	&& curl -SL --output setup-libgpiod.sh https://raw.githubusercontent.com/devdotnetorg/docker-libgpiod/HEAD/setup-libgpiod.sh \
	&& chmod +x setup-libgpiod.sh \
	&& ./setup-libgpiod.sh --type binary --version 1.6.4 --canselect no \
	&& rm setup-libgpiod.sh \
	&& apt-get -y --purge remove curl unzip
...
An example Dockerfile for Alpine 3.19 ARM64 with a Libgpiod library:
...
# Add Libgpiod
RUN apk update \
	&& export FILENAME_BIN=libgpiod-bin-1.6.4-alpine-3.19-aarch64 \
	&& apk add --no-cache wget unzip \
	&& wget -O libgpiod-bin.zip "https://raw.githubusercontent.com/devdotnetorg/docker-libgpiod/dev/out/${FILENAME_BIN}.zip" \
	&& unzip -o libgpiod-bin.zip -d /usr/ \
	&& rm libgpiod-bin.zip \
	&& apk del wget unzip
...
Installation script of libgpiod library and utilities for x86/ARM32/ARM64/RISC-V:
sudo apt-get update
sudo apt-get install -y curl
curl -SL --output setup-libgpiod.sh https://raw.githubusercontent.com/devdotnetorg/docker-libgpiod/HEAD/setup-libgpiod.sh
chmod +x setup-libgpiod.sh
sudo ./setup-libgpiod.sh
To remove the library, execute the script: remove-libgpiod.sh.
If, as a result of the script execution, the inscription "Successfully" appears, then the library and utilities have been successfully installed.
-
Managing GPIO pins in Linux from a Docker container using the Libgpiod library (RU)
-
Weather station on Banana Pi M64 (Linux, C#, Docker, RabbitMQ, AvaloniaUI)(RU)
-
Linux kernel GPIO user space interface — Sergio Prado sergioprado.blog
-
An Introduction to chardev GPIO and Libgpiod on the Raspberry PI — Craig Peacock BeyondLogic
-
Manage GPIO lines with gpiod — Sergio Tanzilli acmesystems.it