Building a Cross-Chain ETH Payment and E-Commerce Platform on the Internet Computer: A Step-by-Step Tutorial
This comprehensive tutorial guides you through the process of building a decentralized e-commerce platform on the Internet Computer that can accept Ethereum (ETH) payments, handle withdrawals, and manage a digital storefront. Starting from a basic template, we'll incrementally add features to create a robust, cross-chain solution.
This tutorial is a hands-on guide designed for developers new to the Internet Computer blockchain. I've created a set of libraries to make development easier and more enjoyable, and this tutorial walks you through the process of building a decentralized ETH payment system using these libraries.
We'll explore key features like HTTP outcalls and stable memory, providing a solid foundation for anyone looking to bring their dream project to life on the Internet Computer. Although this tutorial uses my specific set of methods and libraries, there are many other tools and techniques you could use.
For example, you could integrate the ic-eth-rpc package for Ethereum RPC calls or accept ckETH as a payment method. The main goal here is to demonstrate the Internet Computer's flexibility and ease of use, especially when it comes to confirming transactions on-chain.
The goal of this tutorial is to create a fully functional decentralized e-commerce platform that:
- Accepts ETH as payment for digital items
- Integrates with Ethereum smart contracts for payment processing.
- Verifies transactions on-chain for added security
- Allows for the withdrawal of ETH to an Ethereum address
- Utilizes stable memory to keep track of transactions and items.
- Manages a digital storefront with items for sale
- Implements access control to secure sensitive operations
- DFINITY Canister SDK
- Node.js
- Rust
- Basic understanding of Ethereum and smart contracts
We'll begin by cloning the ic-rust-nextjs repository, which serves as our starter template.
README.md: Provides an overview and setup instructions.Cargo.toml: The manifest file for the Rust workspace.dfx.json: Configuration file for the DFINITY Canister SDK.backend/hello/src/lib.rs: The Rust code for the backend logic.src/pages/index.tsx: The main page of the Next.js app.src/service/hello.ts: Service file to interact with the Rust backend.
To clone the repository, open your terminal and run:
git clone https://github.com/b3hr4d/ic-rust-nextjs.gitAfter cloning the repository, the next step is to run the project locally to ensure everything is set up correctly. Follow the commands below based on your package manager (Yarn or npm).
First, let's install all the required dependencies:
yarn install:all
# or
npm run install:allTo start the local Internet Computer environment, run:
yarn dfx:start
# or
npm run dfx:startDeploy your the backend canister to the local Internet Computer by running:
yarn deploy hello
# or
npm run deploy helloFinally, to run the Next.js(frontend) app, execute:
yarn dev
# or
npm run dev
Open your browser and navigate to http://localhost:3000 to see your app running.

In this step, we'll modify the backend to include a function that generates a deposit principal from a canister ID. This is essential for converting SepoliaETH into ckSepoliaETH, as per the ckEth documentation.
First, we need to install the b3_utils Rust crate. Open your Cargo.toml file and add the following line under [dependencies]:
b3_utils = "0.8.0"or run this command:
cargo add b3_utilsReplace the existing greet function with the new deposit_principal function:
use b3_utils::{vec_to_hex_string_with_0x, Subaccount};
use candid::Principal;

#[ic_cdk::query]
fn deposit_principal(principal: String) -> String {
    let principal = Principal::from_text(principal).unwrap();
    let subaccount = Subaccount::from_principal(principal);

    let bytes32 = subaccount.to_bytes32().unwrap();

    vec_to_hex_string_with_0x(bytes32)
}-
Function Annotation: We use
#[ic_cdk::query]to indicate that this is a query method, meaning it's read-only and doesn't modify the state. -
Principal Conversion: We convert the passed string into a
Principalobject, which is essential for generating a subaccount. -
Subaccount Generation: We generate a
Subaccountfrom thePrincipal, which is a necessary step for depositing ETH. -
Bytes32 Conversion: We convert the subaccount into a bytes32 array, which is the required format for the smart contract on the Sepolia Ethereum testnet.
-
Hex String: Finally, we convert the bytes32 array into a hex string with a "0x" prefix, which can be used as an argument for the smart contract.
After making the changes to the backend, open another terminal and deploy the canister to your local Internet Computer environment using the following command:
yarn deploy helloNote: confirm the consent with yes to the change on the terminal.
This will deploy only the hello canister, which now includes the deposit_principal function.
Navigate to the frontend code where the useActorMethod hook is used. This is typically found in a component file. Change the method from "greet" to "deposit_principal":
const { call, data, error, loading } = useActorMethod("deposit_principal")-
Pass the Canister ID: Update the frontend to include an input field where you can enter the canister ID.
-
Check the Output: The output should be a hexadecimal string that represents the deposit principal, which can be used for depositing ETH.

In this step, we'll integrate MetaMask using the wagmi library and set up the frontend to call the minter helper contract's deposit function.
- Make sure you have the MetaMask extension installed in your browser.
- Create a new free account on Alchemy. After signing up, you have to create a new app with the Ethereum chain - Sepolia network then you’ll be provided with an API key.
-
Create a
.envFile: If you haven't already, create a.envfile in the root directory of your project. -
Add Alchemy API Key: Add the following line to your
.envfile:NEXT_PUBLIC_ALCHEMY_KEY=your_alchemy_api_key_here
Replace
your_alchemy_api_key_herewith the API key you got from Alchemy.
First, install the wagmi and viem packages:
yarn add wagmi viemCreate a new file config.ts inside the src/service directory and add the following code:
import { createPublicClient, http } from "viem"
import { createConfig, sepolia } from "wagmi"

export const config = createConfig({
  autoConnect: true,
  publicClient: createPublicClient({
    chain: sepolia,
    transport: http(
      `https://eth-sepolia.g.alchemy.com/v2/${process.env.NEXT_PUBLIC_ALCHEMY_KEY}`
    )
  })
})
Create a new file named Wallet.tsx inside the src/components folder and add the following code:
import { useAccount, useConnect, useDisconnect } from "wagmi"
import { MetaMaskConnector } from "wagmi/connectors/metaMask"

interface WalletProps {}

const Wallet: React.FC<WalletProps> = ({}) => {
  const { address } = useAccount()

  const { connect } = useConnect({
    connector: new MetaMaskConnector()
  })

  const { disconnect } = useDisconnect()

  if (address)
    return (
      <main>
        Connected to: {address}
        <br />
        <button onClick={() => disconnect()}>Disconnect</button>
      </main>
    )
  return <button onClick={() => connect()}>Connect Wallet</button>
}

export default WalletFinally, update your src/pages/index.tsx file and replace <Greeting /> with the following code`:
// ...existing imports
import Wallet from "../components/Wallet"
import { config } from "service/config"
import { WagmiConfig } from "wagmi"

function HomePage() {
  return (
    {/* ...existing components */}
    {/* <Greeting /> */}
    <WagmiConfig config={config}>
      <Wallet />
    </WagmiConfig>
    {/* ...existing components */}
  )
}You should see a "Connect Wallet" button on your browser, similar to the screenshot below.
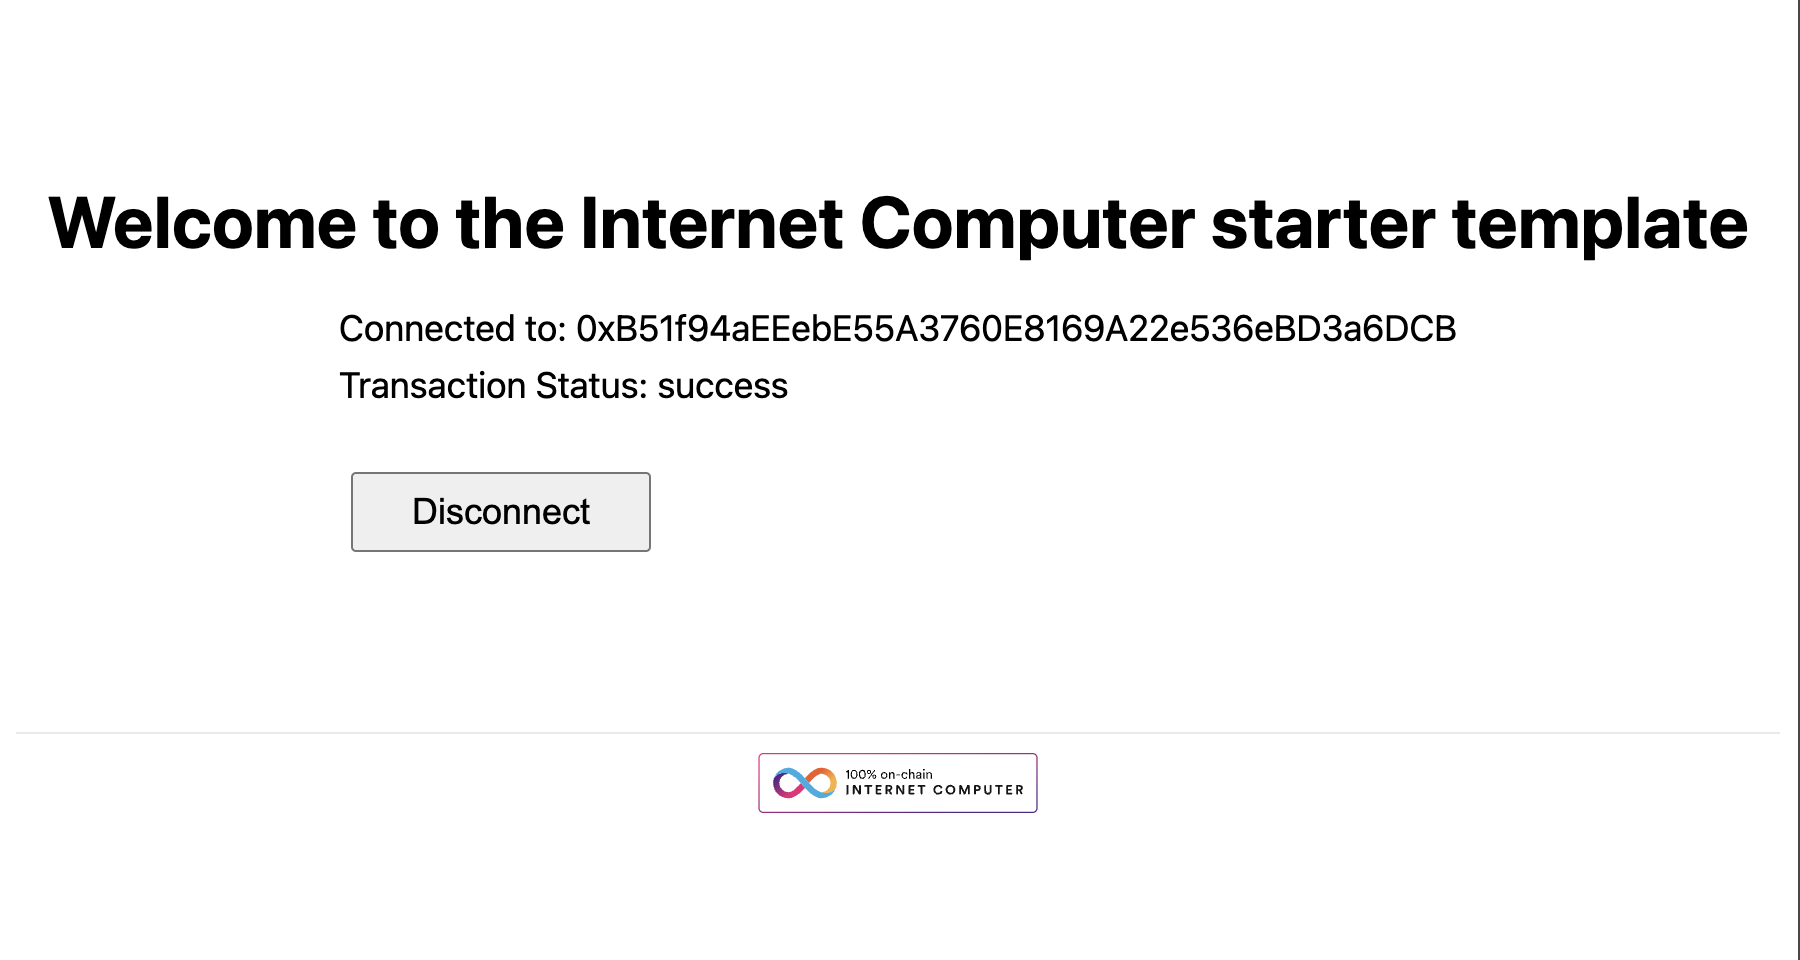
 Clicking on the button should open a MetaMask popup asking for permission to connect. After connecting, you should see your wallet address on the screen.
In this step, we'll prepare the minter helper contract for calls and enable ETH deposits through the frontend.
-
Navigate to Etherscan: Open the contract page on Sepolia Etherscan.
-
Copy Contract ABI: Copy the Contract ABI from the "Contract" tab.

-
Create
abi.json: Inside thesrc/servicedirectory, create a new file namedabi.jsonand paste the copied ABI.

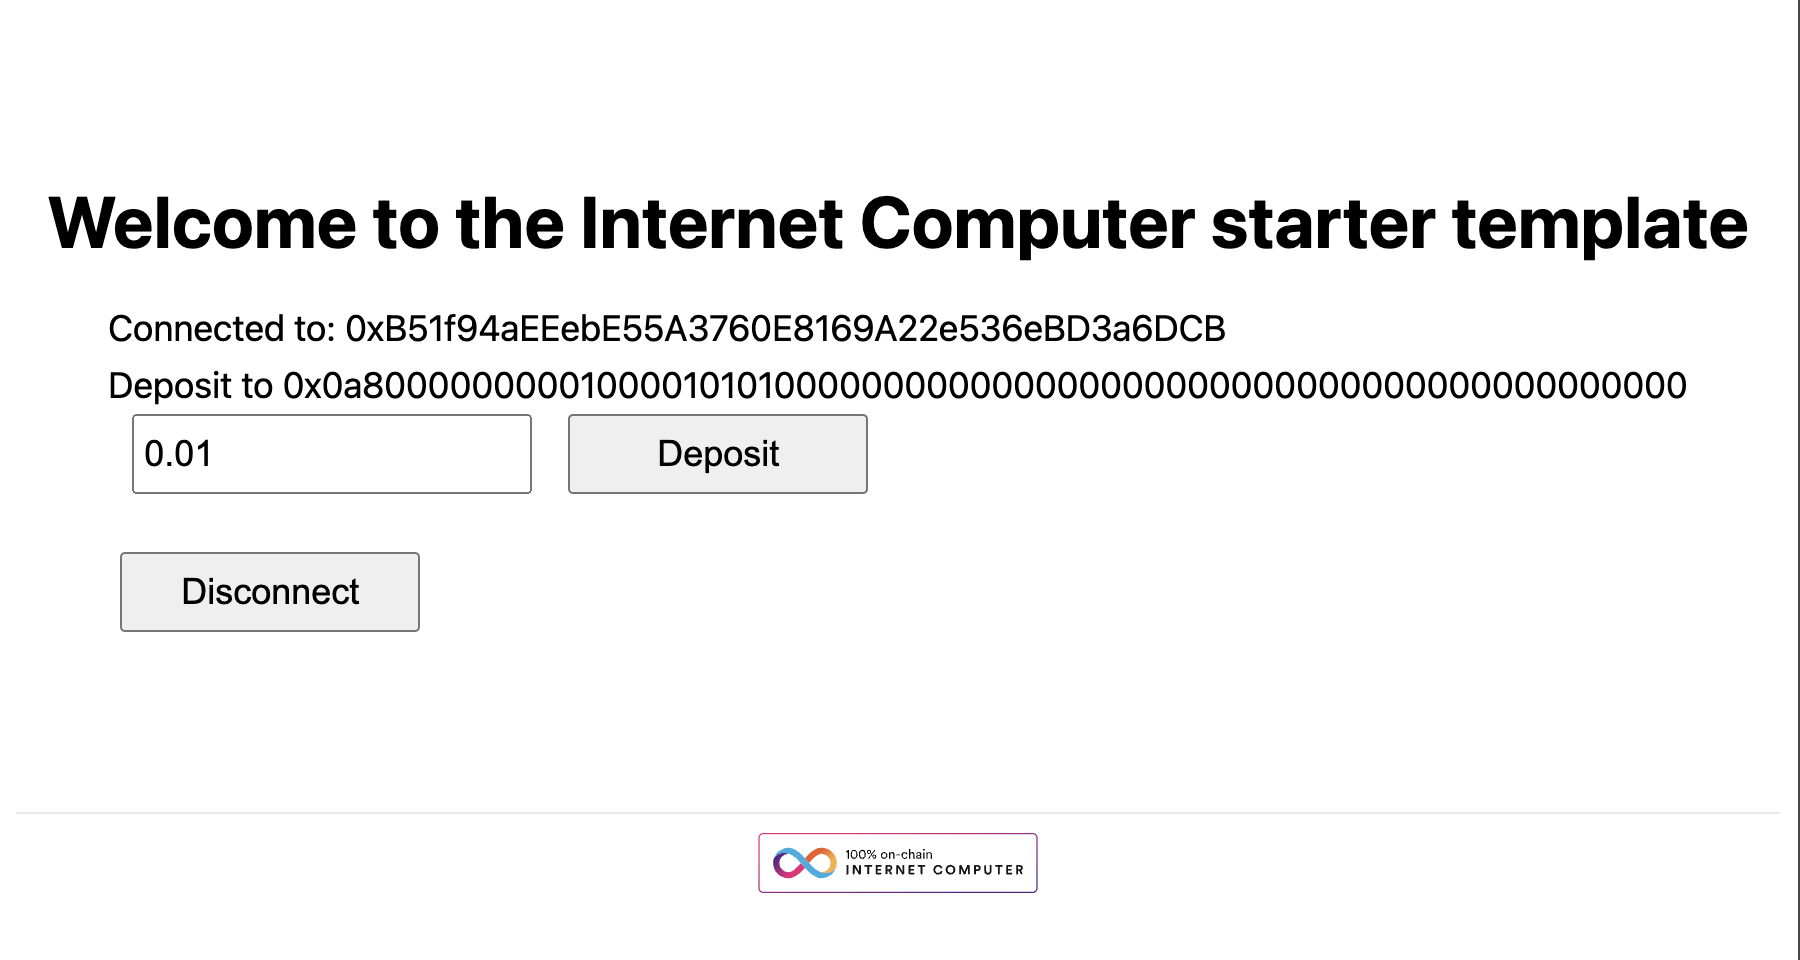
Create a new file named Deposit.tsx inside the src/components directory and add the following code:
import { canisterId } from "declarations/hello"
import { useEffect, useState } from "react"
import helperAbi from "service/abi.json"
import { useActorMethod } from "service/hello"
import { parseEther } from "viem"
import { useContractWrite } from "wagmi"
interface DepositProps {}
const Deposit: React.FC<DepositProps> = ({}) => {
const [amount, setAmount] = useState(0)
const { data: canisterDepositAddress, call } =
useActorMethod("deposit_principal")
useEffect(() => {
call(canisterId)
}, [])
const { data, isLoading, write } = useContractWrite({
address: "0xb44B5e756A894775FC32EDdf3314Bb1B1944dC34",
abi: helperAbi,
functionName: "deposit",
value: parseEther(amount.toString()),
args: [canisterDepositAddress]
})
const changeHandler = (e: React.ChangeEvent<HTMLInputElement>) => {
let amount = e.target.valueAsNumber
if (Number.isNaN(amount) || amount < 0) amount = 0
setAmount(amount)
}
if (isLoading) {
return <div>Loading...</div>
} else if (data?.hash) {
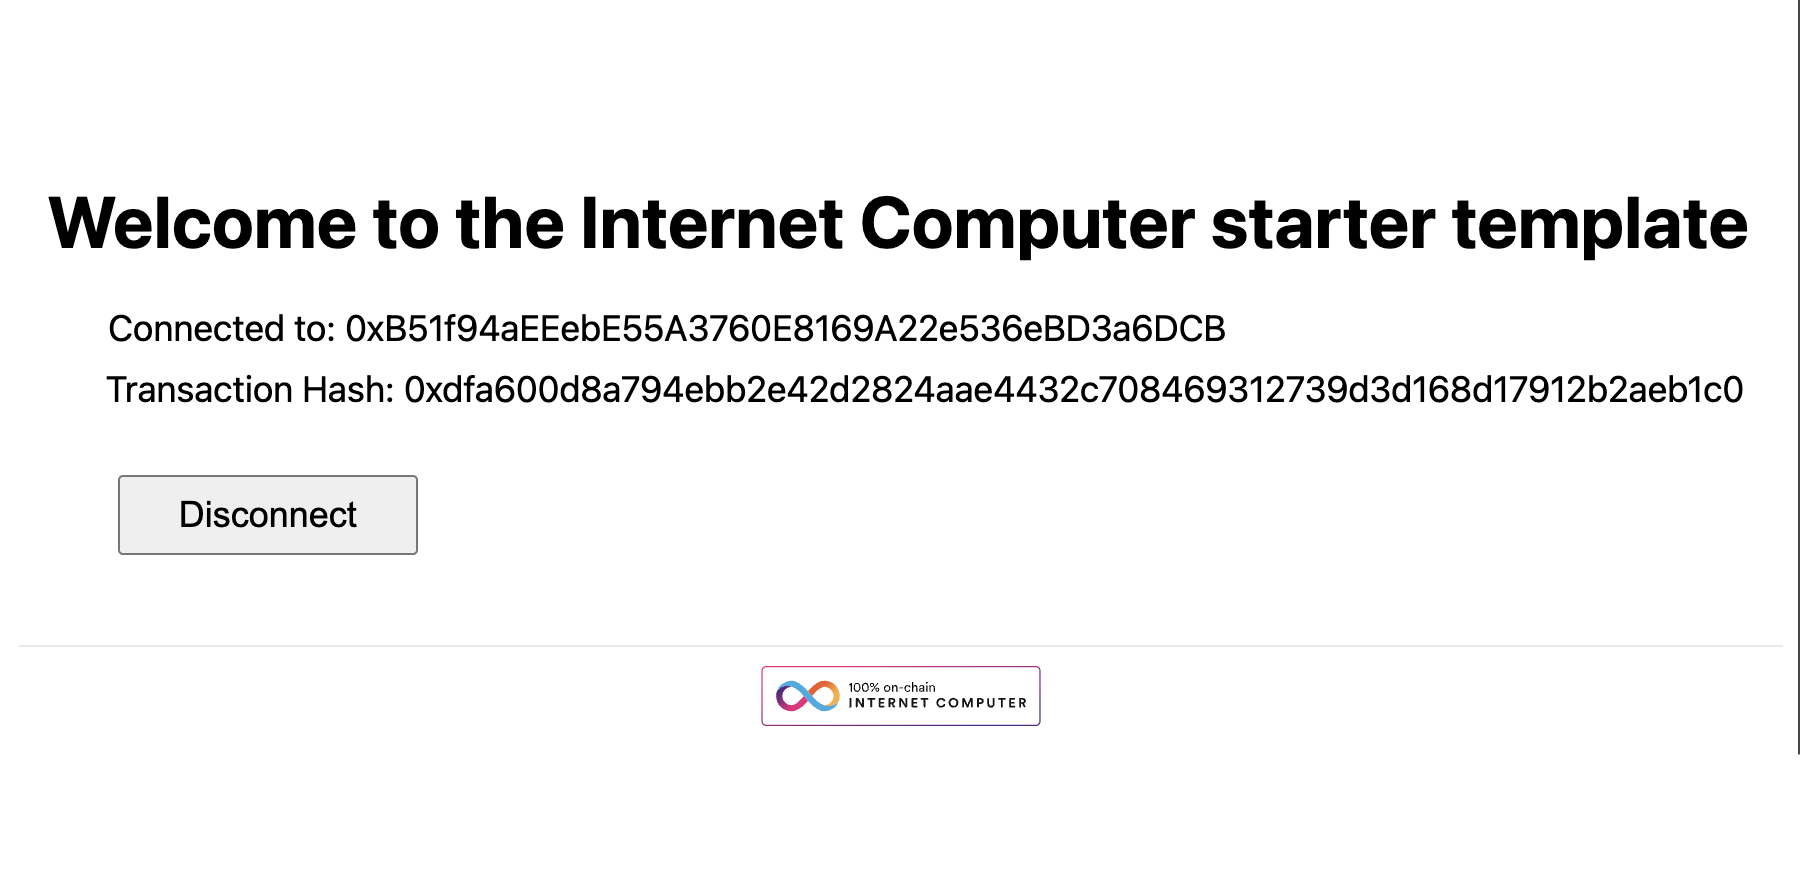
return <div>Transaction Hash: {data.hash}</div>
} else {
return (
<div>
<input type="number" value={amount} onChange={changeHandler} />
<button onClick={() => write()}>Deposit</button>
</div>
)
}
}
export default DepositThe useContractWrite hook is used to interact with Ethereum smart contracts. Here's what each parameter does:
address: The Ethereum address of the contract you want to interact with.abi: The ABI (Application Binary Interface) of the contract, which is a JSON representation of the contract's methods and structures.functionName: The name of the function in the contract that you want to call.value: The amount of ETH to send along with the function call, converted to its smallest unit (wei) usingparseEther.args: An array of arguments that the function takes. In this case, it's the deposit address generated by the canister.
Add the <Deposit /> component to the Wallet.tsx file, right above the "Disconnect" button:
// ...existing code
return (
  <main>
    Connected to: {address}
    <br />
    <Deposit />
    <br />
    <button onClick={() => disconnect()}>Disconnect</button>
  </main>
)You should have small amount of Sepolia ETH in your wallet. you can get some using this faucet.
- Call the Deposit Function: Please make sure you are on the Sepolia network on the metamask then Use the new deposit input and button to initiate a deposit.
- Confirm with MetaMask: A MetaMask popup should appear asking for confirmation to proceed with the transaction.
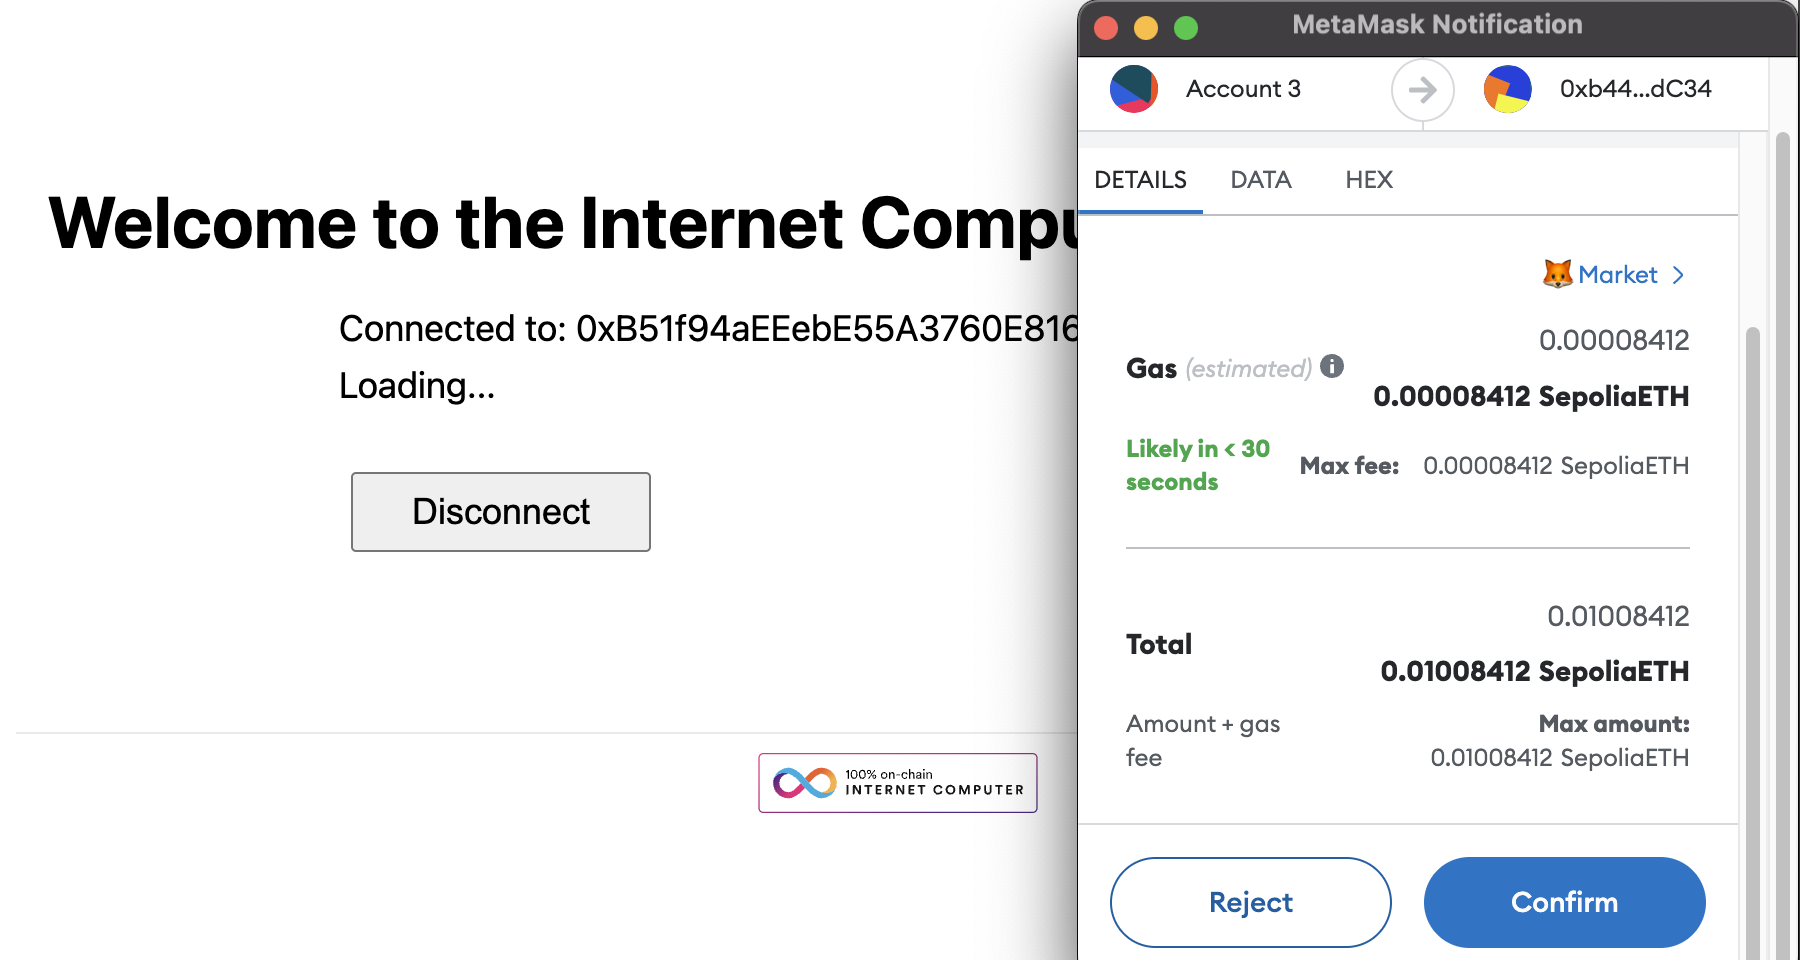
- Check the Output: After confirming, you should see a transaction hash.


In this step, we'll implement a mechanism to wait for transaction confirmations before verifying the payment inside the canister.
Create a new file named Confirmation.tsx inside the src/components directory and add the following code:
import { Hash } from "viem"
import { useWaitForTransaction } from "wagmi"

interface ConfirmationProps {
  hash: Hash;
}

const Confirmation: React.FC<ConfirmationProps> = ({ hash }) => {
  const { data, isError, error, isLoading } = useWaitForTransaction({
    hash,
    confirmations: 6 // 6 confirmations for be sure that the transaction is confirmed
  })

  if (isError && error) {
    return <div>Transaction error {error.toString()}</div>
  } else if (isLoading) {
    return <div>Waiting for confirmation…</div>
  } else if (data) {
    return <div>Transaction Status: {data.status}</div>
  } else {
    return null
  }
}

export default ConfirmationThe useWaitForTransaction hook is used to wait for a specified number of confirmations for a given Ethereum transaction hash. Here's what each parameter does:
-
hash: The transaction hash for which you are waiting for confirmations. -
confirmations: The number of confirmations to wait for before considering the transaction as confirmed. The default is 1, but in this example, we set it to 6 for added security.
Replace the line that shows the transaction hash with the Confirmation component:
Change this:
return <div>Transaction Hash: {data.hash}</div>To this:
return <Confirmation hash={data.hash} />-
Send Another Transaction: Initiate another deposit transaction.
-
Check the Output: You should see the confirmation process in action. Once the specified number of confirmations is reached, the transaction status will be displayed.

In this step, we'll verify the Ethereum transaction on-chain by calling the Ethereum JSON-RPC API from within the canister.
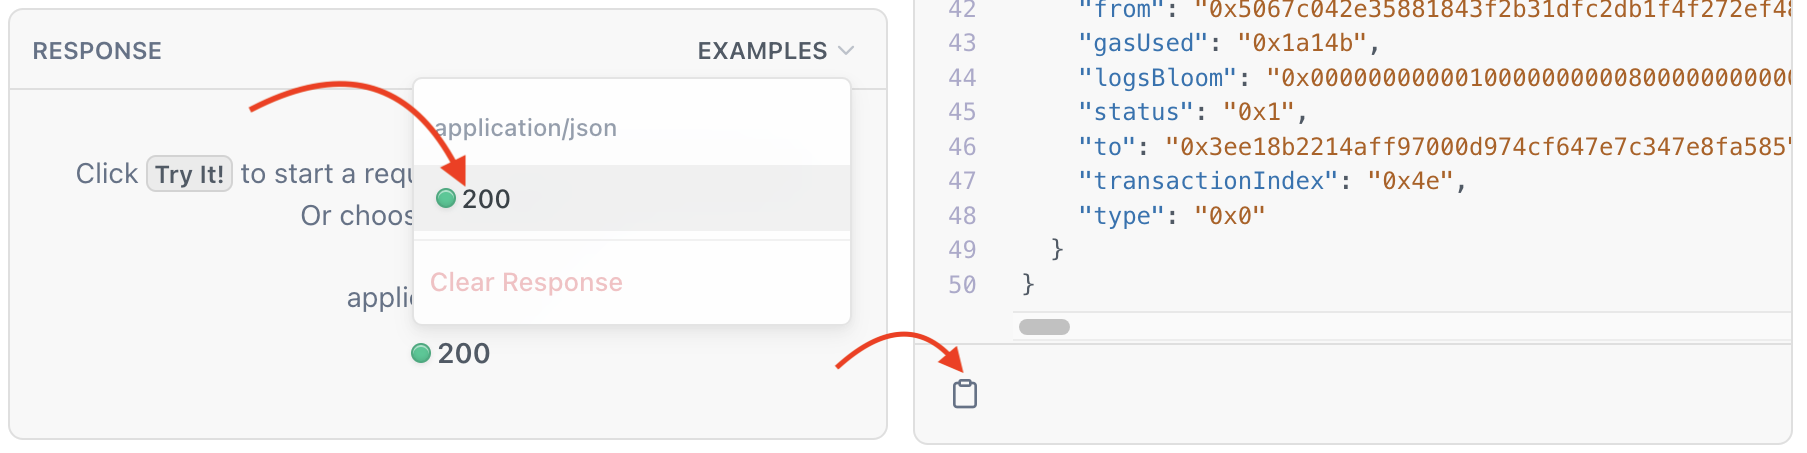
- Copy API Response: Copy the API response from the eth_getTransactionReceipt documentation.
- Generate Rust Structs: Paste the copied response into this online converter to generate Rust structs.
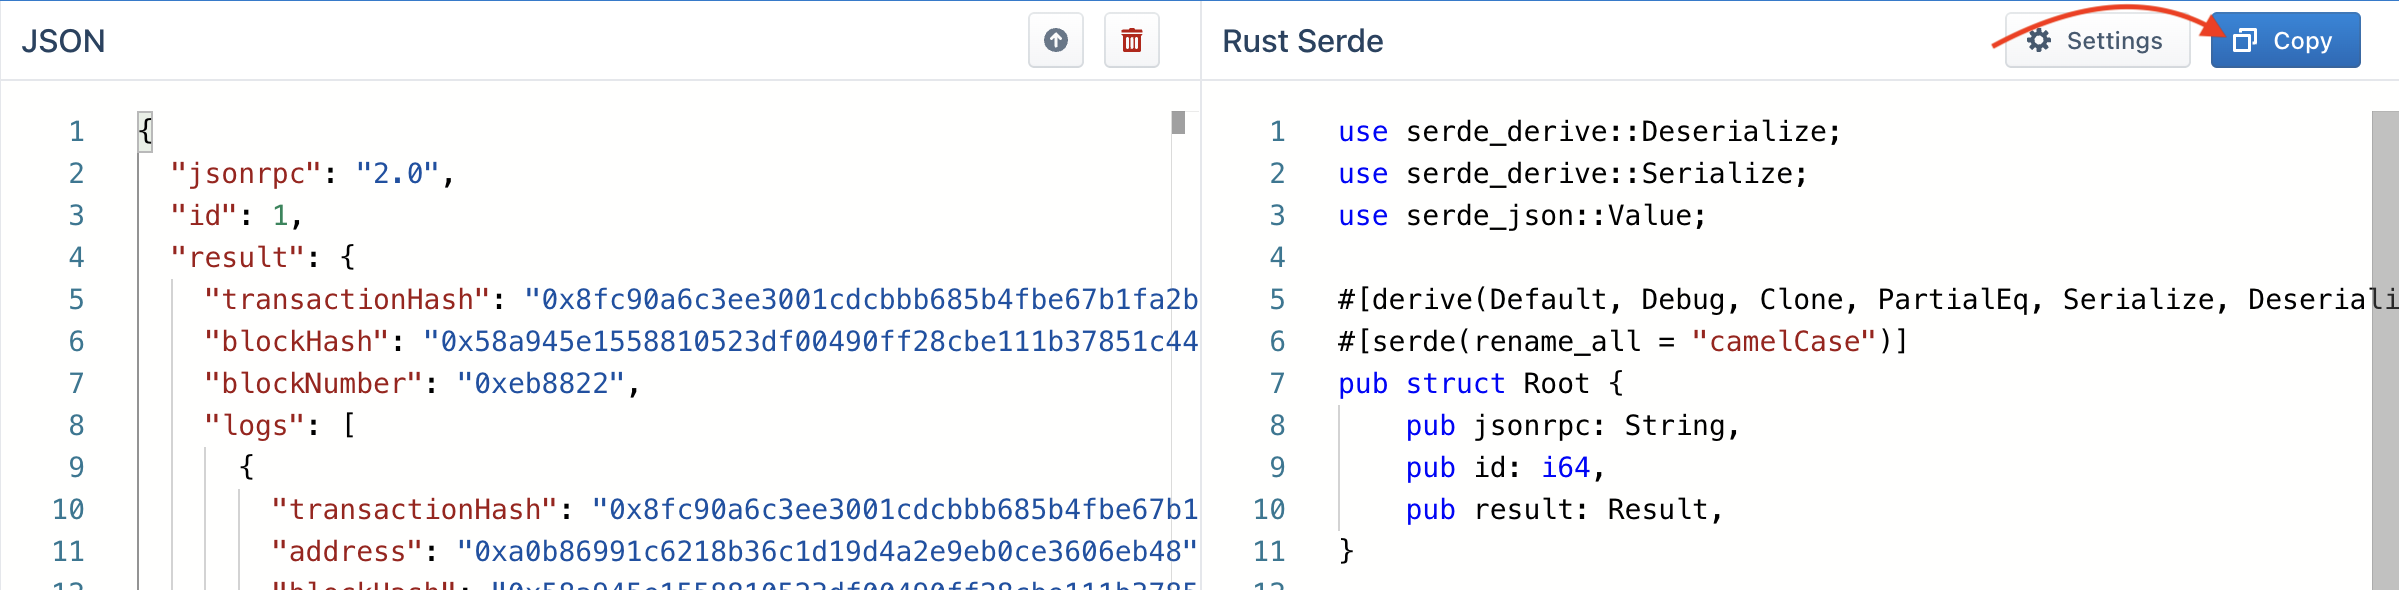
- Save the File: Save the generated code in a new file named
receipt.rsinside thebackend/hello/srcdirectory.


Add the following dependencies to your Cargo.toml:
serde = "1.0"
serde_json = "1.0"
serde_derive = "1.0"The function eth_get_transaction_receipt performs the following tasks:
-
Prepare the JSON-RPC Payload: It prepares the JSON-RPC payload using the
serde_json::json!macro. -
Make the HTTP Outcall: It uses the
HttpOutcallstruct fromb3_utilsto make an HTTP POST request to the Ethereum JSON-RPC API. -
Handle the Response: It handles the API response, deserializes it into the
receipt::Rootstruct, and returns it.
Here's the code snippet for the function:
mod receipt;
use serde_json::json;
use b3_utils::outcall::{HttpOutcall, HttpOutcallResponse};

const RPC_URL: &str = "https://eth-sepolia.g.alchemy.com/v2/YOUR_API_KEY"; // replace with you alchemy API key

async fn eth_get_transaction_receipt(hash: String) -> Result<receipt::Root, String> {
    let rpc = json!({
        "jsonrpc": "2.0",
        "id": 0,
        "method": "eth_getTransactionReceipt",
        "params": [hash]
    });

    let request = HttpOutcall::new(RPC_URL)
        .post(&rpc.to_string(), Some(2048))
        .send_with_closure(|response: HttpOutcallResponse| HttpOutcallResponse {
            status: response.status,
            body: response.body,
            ..Default::default()
        });

    match request.await {
        Ok(response) => {
            if response.status != 200 {
                return Err(format!("Error: {}", response.status));
            }

            let trasnaction = serde_json::from_slice::<receipt::Root>(&response.body)
                .map_err(|e| format!("Error: {}", e.to_string()))?;

            Ok(trasnaction)
        }
        Err(m) => Err(format!("Error: {}", m)),
    }
}
Note: Please always keep ic_cdk::export_candid!(); at the very end of the lib.rs file.
For testing the function, we'll use the Candid UI, which is a web-based interface for interacting with canisters. It's automatically generated when you deploy a canister using the DFINITY Canister SDK.
Add this function to your lib.rs file:
#[ic_cdk::update]
async fn get_receipt(hash: String) -> String {
    let receipt = eth_get_transaction_receipt(hash).await.unwrap();

    serde_json::to_string(&receipt).unwrap()
}-
Deploy the Canister: Deploy the updated canister using the command
yarn deploy hello. -
Navigate to Candid UI: After successful deployment, navigate to the Candid UI using the link provided in the terminal. Somthing like this
http://127.0.0.1:4943/?canisterId=bd3sg-teaaa-aaaaa-qaaba-cai&id=bkyz2-fmaaa-aaaaa-qaaaq-cai -
Test the Function: Inside the Candid UI, you should see the
get_receiptfunction. Test it by passing a transaction hash and observing the response.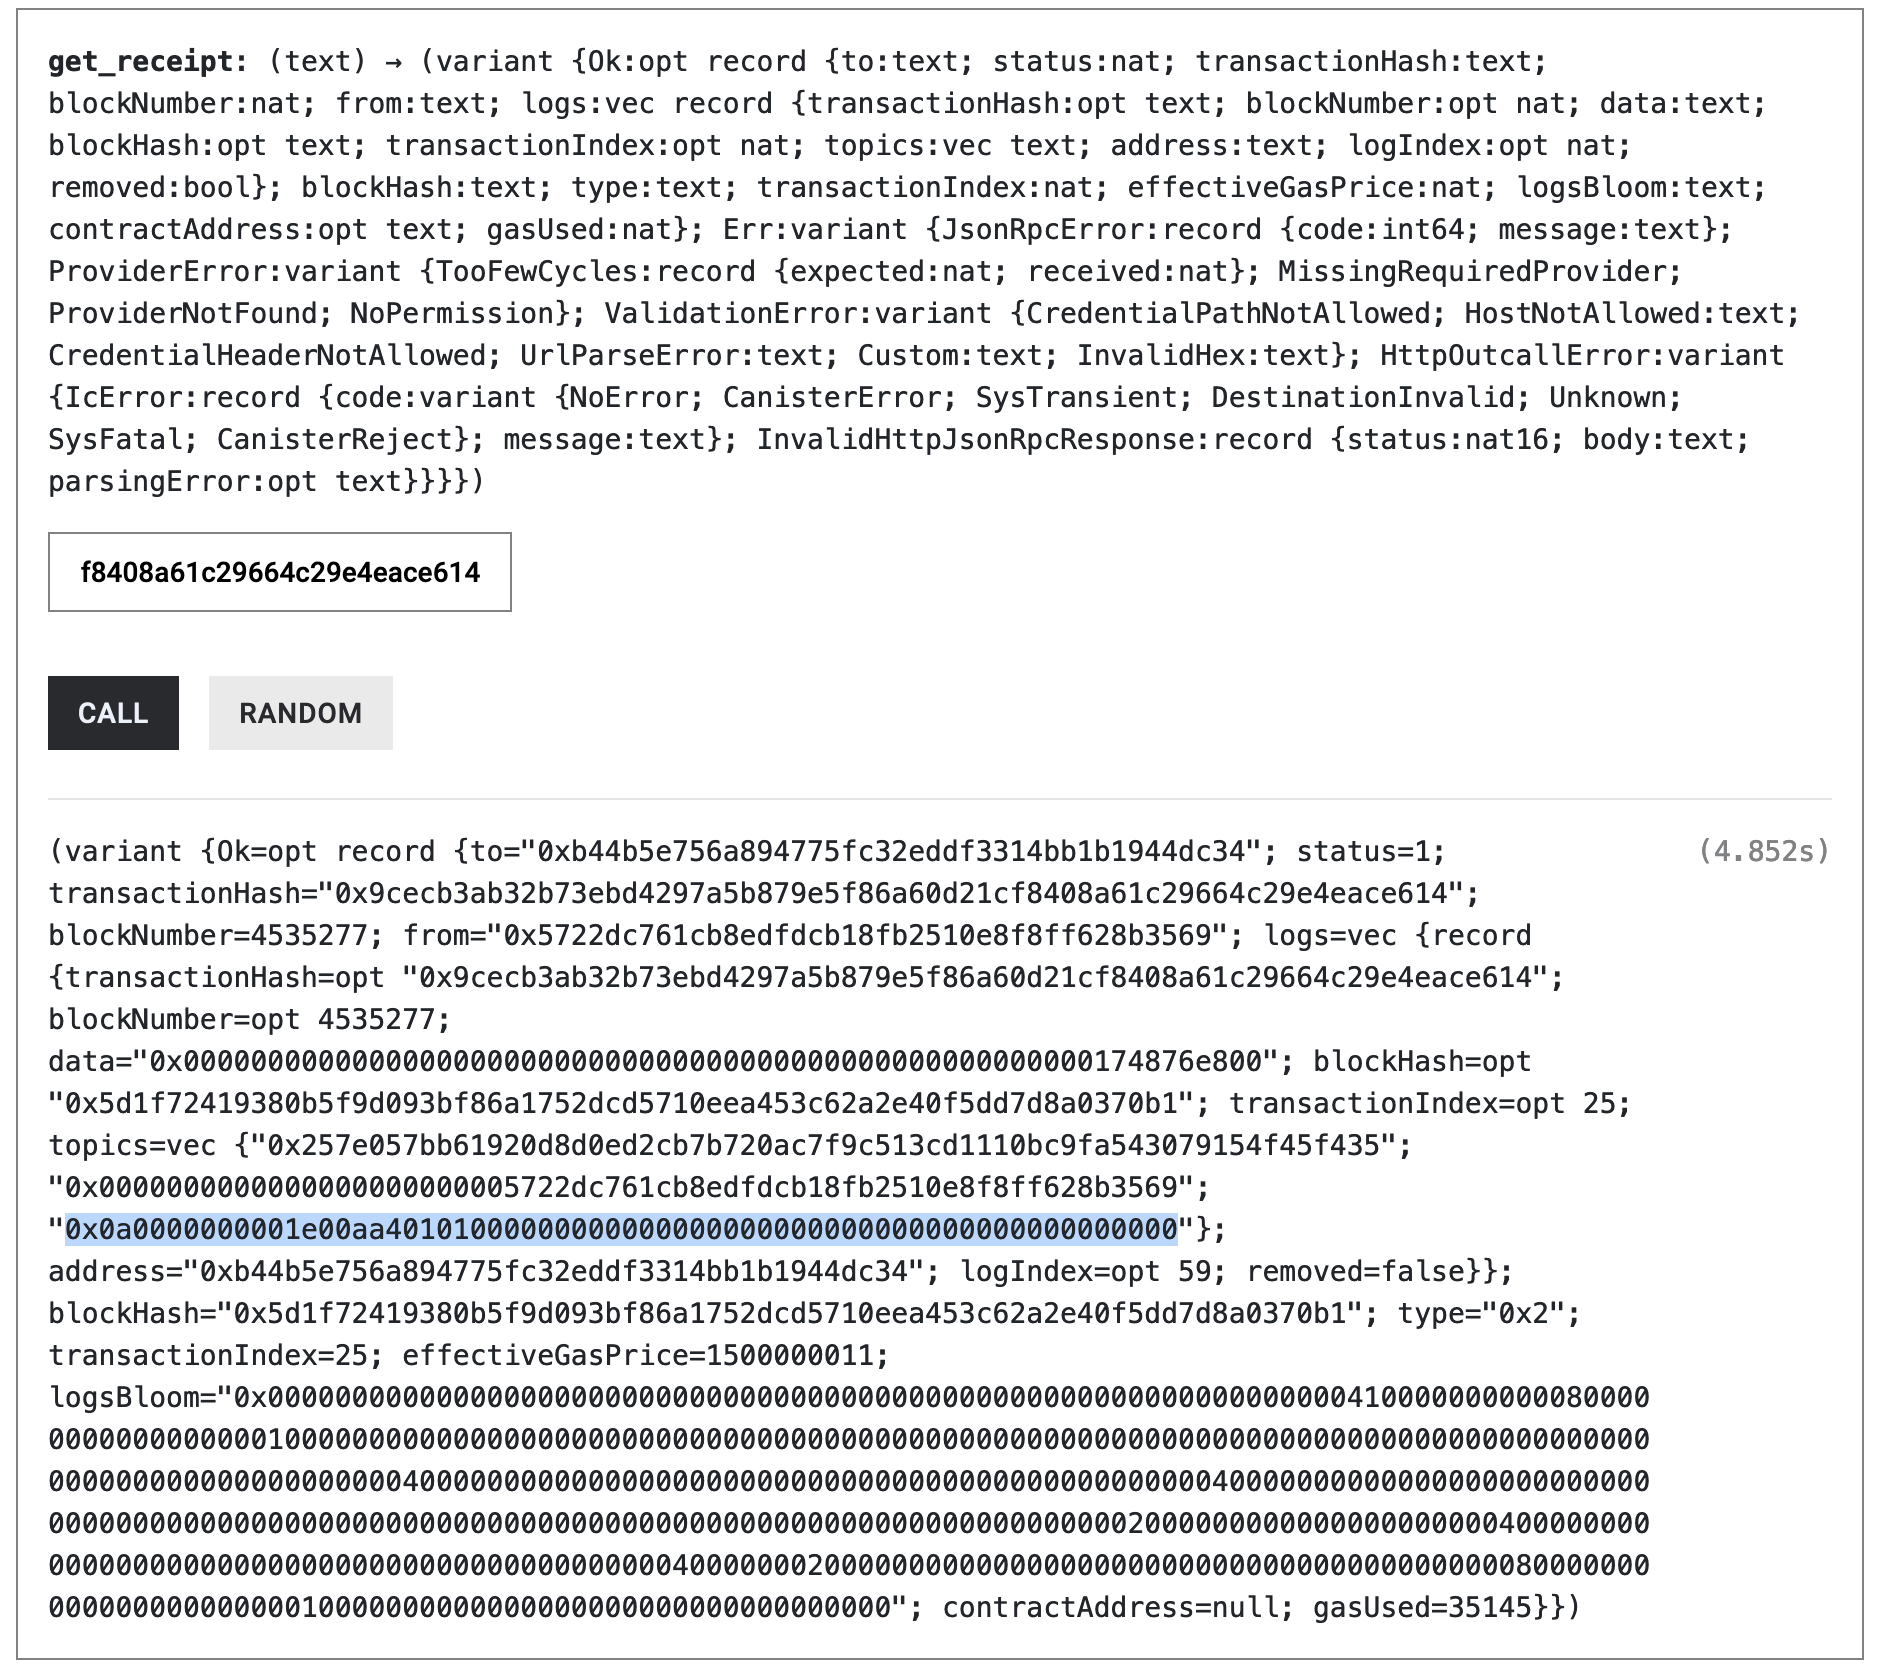

In this step, we'll create a function to verify Ethereum transactions on-chain. This function will use the logs emitted by the smart contract to verify the transaction details.
The logs' topics are based on the ReceivedEth event, which has the following signature:

ReceivedEth (index_topic_1 address from, uint256 value, index_topic_2 bytes32 principal)log.topics[0]: Event signature hashlog.topics[1]:fromaddress (index_topic_1)log.topics[2]:principal(index_topic_2)
log.data:value(uint256)
Here's the code snippet for the function:
const MINTER_ADDRESS: &str = "0xb44b5e756a894775fc32eddf3314bb1b1944dc34";

use b3_utils::hex_string_with_0x_to_nat;
use candid::Nat;
#[ic_cdk::update]
async fn verify_transaction(hash: String) -> (Nat, String) {
    let tx = eth_get_transaction_receipt(hash).await.unwrap();

    if tx.result.status != "0x1" {
        panic!("Transaction failed")
    }

    let log = tx.result.logs[0].clone();

    if tx.result.to != MINTER_ADDRESS || log.address != MINTER_ADDRESS {
        panic!("Address mismatch")
    }

    if log.topics[2] != canister_deposit_principal() {
        panic!("Principal mismatch")
    }

    let amount = hex_string_with_0x_to_nat(log.data).unwrap();

    (amount, tx.result.from)
}The function verify_transaction performs the following tasks:
-
Check Transaction Status: It checks if the transaction was successful by comparing the
statusfield to "0x1". -
Verify Address: It verifies that the
toaddress in the transaction and theaddressin the logs match the minter address. -
Verify Principal: It verifies that the principal in the logs matches the canister's deposit principal. The principal is found in
log.topics[2]. -
Return Transaction Details: It returns the amount and the sender's address.
For a more robust and secure way, create a new function that returns the canister's deposit principal:
#[ic_cdk::query]
fn canister_deposit_principal() -> String {
    let subaccount = Subaccount::from(ic_cdk::id());

    let bytes32 = subaccount.to_bytes32().unwrap();

    vec_to_hex_string_with_0x(bytes32)
}-
Deploy the Canister: Deploy the updated canister using
yarn deploy hello. -
Navigate to Candid UI: After successful deployment, navigate to the Candid UI using the link provided in the terminal.
-
Test the Functions: Inside the Candid UI, you should see the
verify_transactionandcanister_deposit_principalfunctions. Test them by passing a transaction hash and observing the response.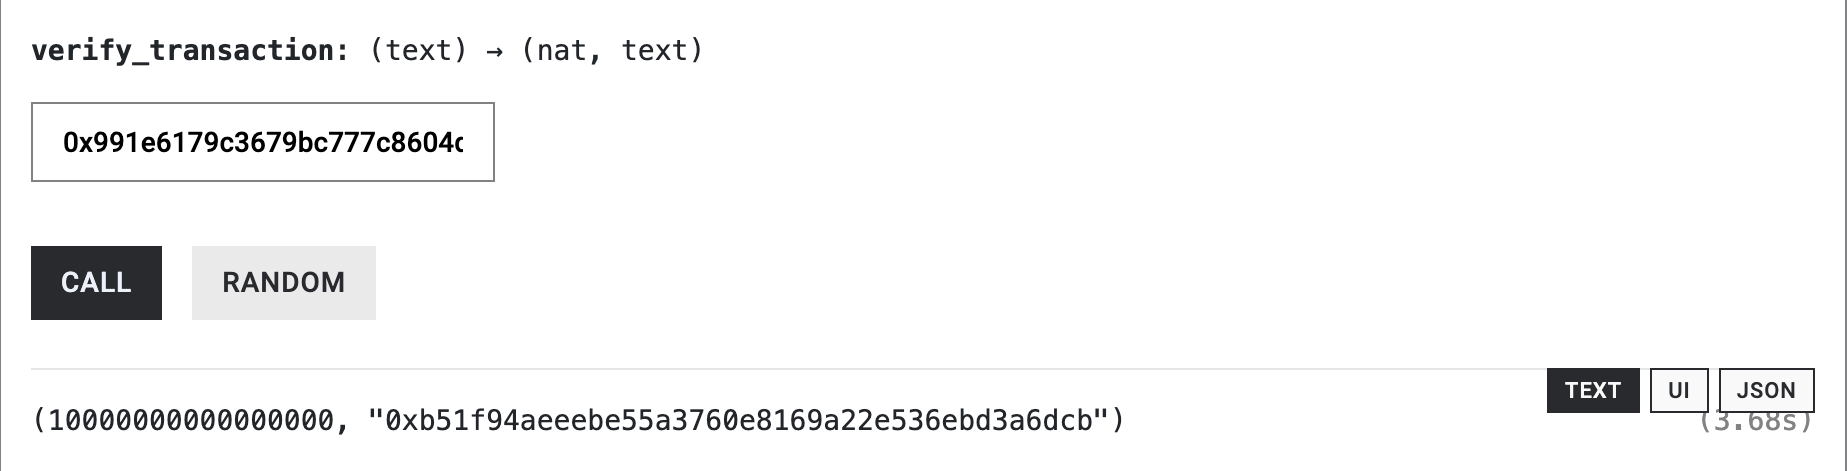

In this step, we'll update the frontend to call the verify_transaction function after the transaction has been confirmed on-chain.
The VerifyTransaction component performs the following tasks:
-
Call
verify_transaction: It calls theverify_transactionfunction from the canister when thehashprop is provided. -
Display Status: It displays the transaction details, including the amount and the sender's address, once the transaction is confirmed on-chain.
Here's the code snippet for the component:
import { useEffect } from "react"
import { useActorMethod } from "service/hello"
import { formatEther } from "viem"

interface VerifyTransactionProps {
  hash: string;
}

const VerifyTransaction: React.FC<VerifyTransactionProps> = ({ hash }) => {
  const { loading, error, data, call } = useActorMethod("verify_transaction")

  useEffect(() => {
    call(hash)
  }, [hash])

  if (loading) {
    return <div>Processing…</div>
  } else if (error) {
    return <div>{error.toString()}</div>
  } else if (data) {
    return (
      <div>
        Transaction(<b>{hash}</b>) with <b>{formatEther(data[0])}</b>ETH from{" "}
        <b>{data[1]}</b> is confirmed on-chain.
      </div>
    )
  } else {
    return null
  }
}

export default VerifyTransactionReplace the line that shows the transaction status with the VerifyTransaction component:
Change this:
return <div>Transaction Status: {data.status}</div>To this:
return <VerifyTransaction hash={data.transactionHash} />-
Initiate a Transaction: Initiate a deposit transaction and confirm it.
-
Check the Output: You should see the transaction details displayed once the transaction is confirmed and procceed on-chain.

In this step, we'll deploy our project to the Internet Computer mainnet. This involves a few key steps:
Before deploying to the mainnet, you'll need to ensure that your wallet has enough cycles.
-
Quickstart: Run
dfx quickstartin your terminal and follow the process to top up your wallet. -
Faucet Cycles: Alternatively, you can get some free cycles from the DFINITY cycles faucet.
Run the following command to deploy your canister to the mainnet:
yarn deploy --network=icAlternatively, you can choose to deploy only the backend to the mainnet and run the frontend locally. To deploy just the backend, use:
yarn deploy hello --network=icTo run the frontend locally, execute:
yarn devUpon successful deployment of the backend, you should see output similar to this in your terminal:
-
Open the Frontend: If you've deployed the frontend to the mainnet, navigate to the frontend URL provided in the terminal. If you're running the frontend locally, you can access it via
http://localhost:3000or the URL provided in your local development server. -
Initiate a Transaction: Initiate a deposit transaction and confirm it.

-
Check Alchemy Logs: Open your Alchemy dashboard to check the logs. You should see 13 different calls to the JSON-RPC, which collect consensus on the result and then send it to your canister. This ensures that you can trust the whole process as a successful payment.

Here's what you should see:

In this step, we'll integrate our canister with the ckETH ICRC standard to show the balance and enable ETH withdrawal.
First, add the "ledger" feature to the b3_utils crate in your Cargo.toml:
b3_utils = { version = "0.8.0", features = ["ledger"] }Add the following lines at the top of your Rust code to specify the ledger and minter canister IDs:
const LEDGER: &str = "apia6-jaaaa-aaaar-qabma-cai";
const MINTER: &str = "jzenf-aiaaa-aaaar-qaa7q-cai";The balance function uses the ICRC1 trait from b3_utils to fetch the balance of the canister in ckETH.
Here's the code snippet for the function:
use b3_utils::ledger::{ICRCAccount, ICRC1};
use candid::Principal;

#[ic_cdk::update]
async fn balance() -> Nat {
    let account = ICRCAccount::new(ic_cdk::id(), None);

    ICRC1::from(LEDGER).balance_of(account).await.unwrap()
}-
Deploy to Mainnet: Run
yarn deploy hello --network=icto upgrade canister. -
Open Candid UI: Navigate to the Candid UI and test the
balancefunction. Note that the minting process might take some time.

The transfer function allows the canister to transfer a specified amount of ckETH to another account.
The function uses the ICRC1 trait from b3_utils to transfer the specified amount of ckETH to the recipient.
Here's the code snippet for the function:
use b3_utils::ledger::{ICRC1TransferArgs, ICRC1TransferResult};
use std::str::FromStr;

#[ic_cdk::update]
async fn transfer(to: String, amount: Nat) -> ICRC1TransferResult {
    let to = ICRCAccount::from_str(&to).unwrap();

    let transfer_args = ICRC1TransferArgs {
        to,
        amount,
        from_subaccount: None,
        fee: None,
        memo: None,
        created_at_time: None,
    };

    ICRC1::from(LEDGER).transfer(transfer_args).await.unwrap()
}-
Deploy to Mainnet: Run
yarn deploy hello --network=icto upgrade canister. -
Open Candid UI: Navigate to the Candid UI and test the
transferfunction by passing the recipient's ICRCAccount comptible format string and the amount of ckETH to transfer.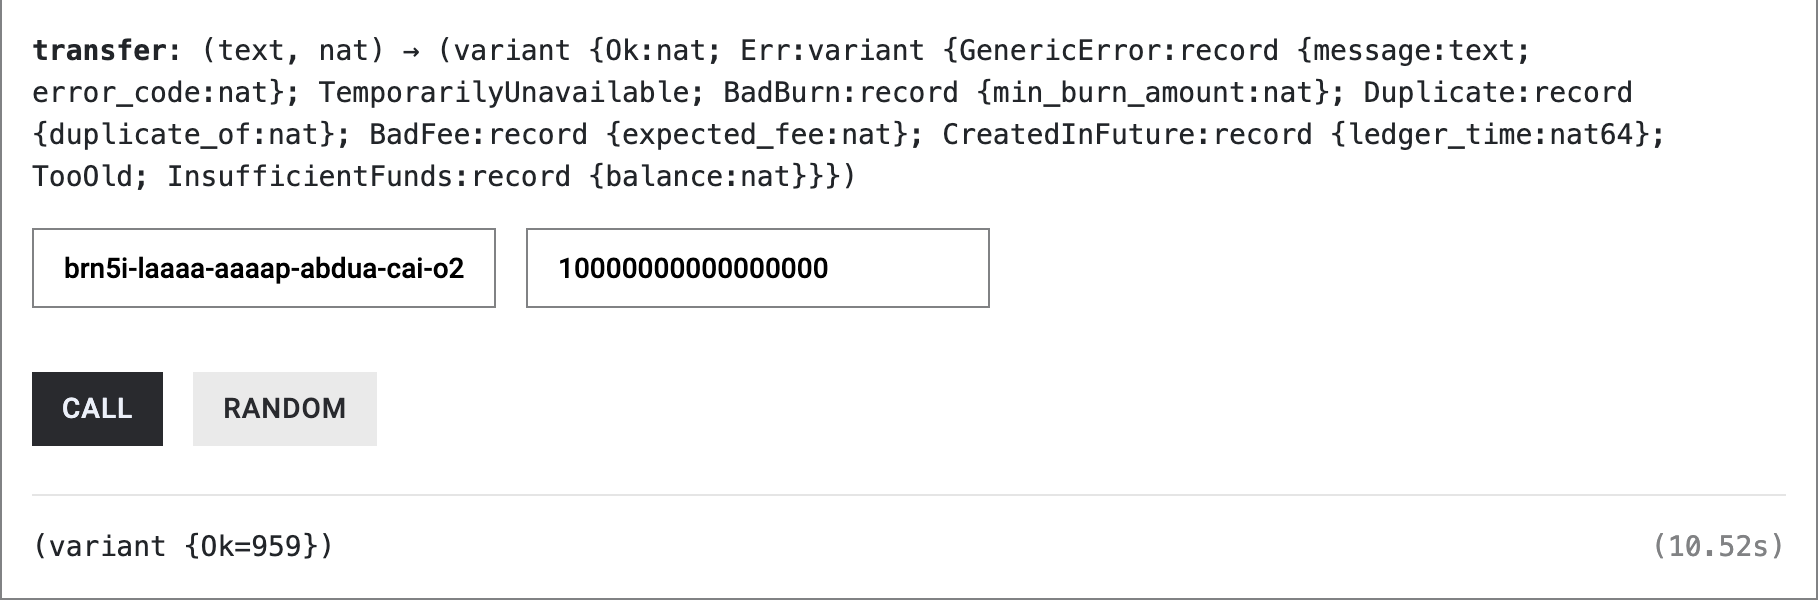

The approve function uses the ICRC2 trait from b3_utils to approve the minter to spend your ckETH. This is a one-time action if you approve a large amount.
Here's the code snippet for the function:
use b3_utils::ledger::{ICRC2ApproveArgs, ICRC2ApproveResult, ICRC2};

#[ic_cdk::update]
async fn approve(amount: Nat) -> ICRC2ApproveResult {
    let minter = Principal::from_text(&MINTER).unwrap();

    let spender = ICRCAccount::new(minter, None);

    let args = ICRC2ApproveArgs {
        amount,
        spender,
        created_at_time: None,
        expected_allowance: None,
        expires_at: None,
        fee: None,
        memo: None,
        from_subaccount: None,
    };

    ICRC2::from(LEDGER).approve(args).await.unwrap()
}-
Deploy to Mainnet: Again upgrade the canister using
yarn deploy hello --network=ic. -
Open Candid UI: Navigate to the Candid UI and test the
approvefunction.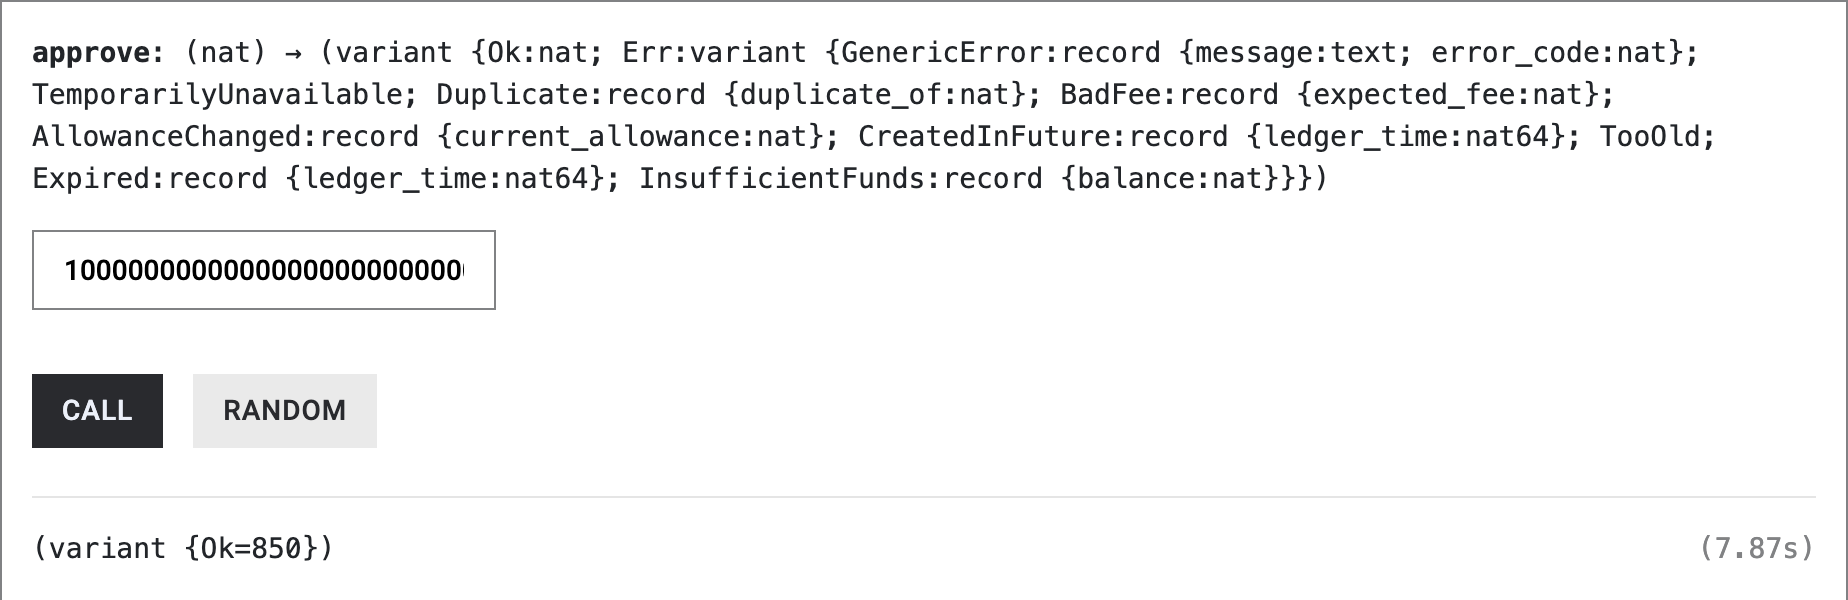

In this step, we'll create a withdraw function that allows users to withdraw ETH from the canister.
First, define some types that will be used for the withdrawal operation. These types are derived from the minter canister.
use candid::{CandidType, Deserialize};

#[derive(CandidType, Deserialize)]
pub struct WithdrawalArg {
    pub amount: Nat,
    pub recipient: String,
}

#[derive(CandidType, Deserialize, Clone, Debug)]
pub struct RetrieveEthRequest {
    pub block_index: Nat,
}

#[derive(CandidType, Deserialize, Debug)]
pub enum WithdrawalError {
    AmountTooLow { min_withdrawal_amount: Nat },
    InsufficientFunds { balance: Nat },
    InsufficientAllowance { allowance: Nat },
    TemporarilyUnavailable(String),
}

type WithdrawalResult = Result<RetrieveEthRequest, WithdrawalError>;The withdraw function uses the InterCall trait from b3_utils to make an internal canister call to the minter canister. The function takes an amount and a recipient as arguments and initiates the withdrawal process.
Here's the code snippet for the function:
use b3_utils::InterCall;

#[ic_cdk::update]
async fn withdraw(amount: Nat, recipient: String) -> WithdrawalResult {
    let withraw = WithdrawalArg { amount, recipient };

    InterCall::from(MINTER)
        .call("withdraw_eth", withraw)
        .await
        .unwrap()
}-
Deploy to Mainnet: Run
yarn deploy hello --network=ic. -
Open Candid UI: Navigate to the Candid UI and test the
withdrawfunction. Make sure to enter the amount in wei.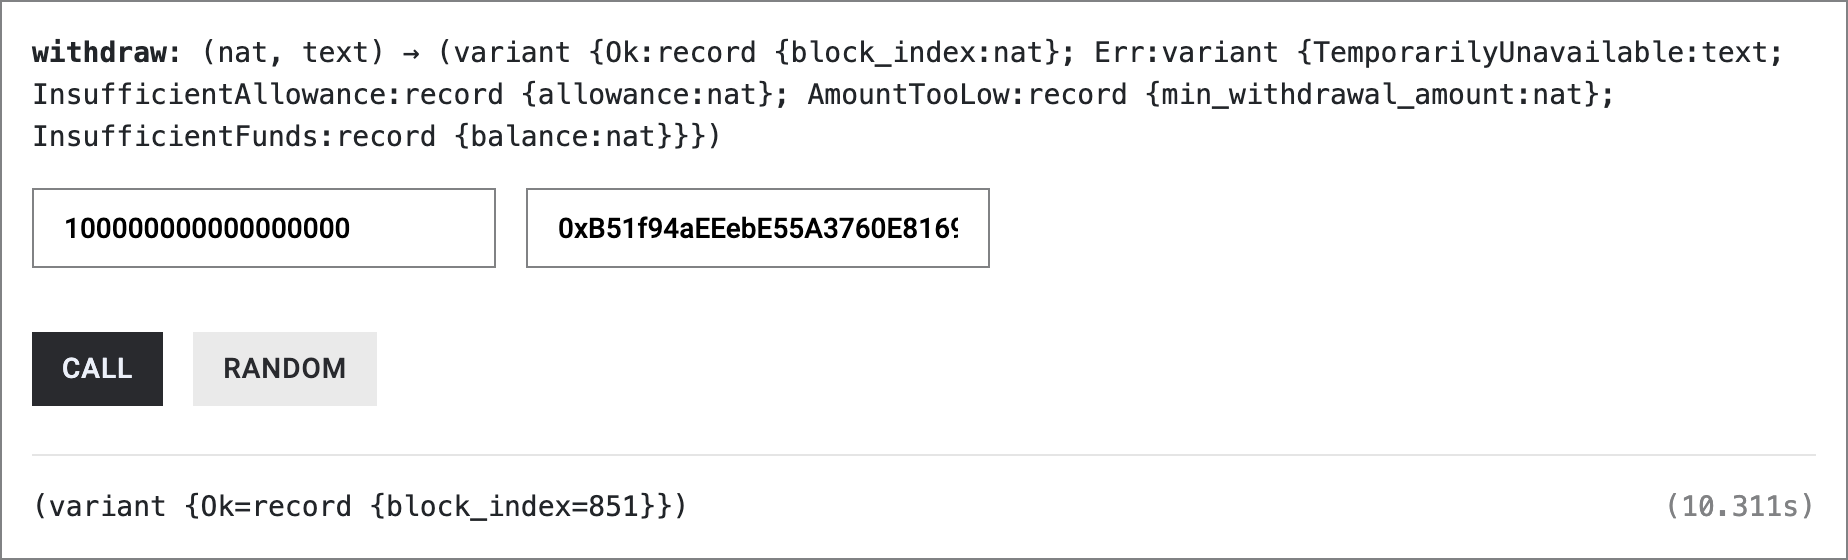

In this step, we'll add some security measures and functionalities to our canister.
We'll add guards to the withdraw and approve functions to ensure that only the controller can call them. Add the following line at the top of your Rust code:
use b3_utils::caller_is_controller;Then, add the guard attribute to the withdraw and approve functions:
#[ic_cdk::update(guard = "caller_is_controller")]To prevent a transaction from being processed more than once, we'll use stable memory. Add the "stable_memory" feature to b3_utils in your Cargo.toml:
b3_utils = { version = "0.8.0", features = ["ledger", "stable_memory"] }Then, add the following code to initialize stable memory:
use b3_utils::memory::init_stable_mem_refcell;
use b3_utils::memory::types::DefaultStableBTreeMap;
use std::cell::RefCell;

thread_local! {
    static TRANSACTIONS: RefCell<DefaultStableBTreeMap<String, String>> = init_stable_mem_refcell("trasnactions", 1).unwrap();
    static ITEMS: RefCell<DefaultStableBTreeMap<String, u128>> = init_stable_mem_refcell("items", 2).unwrap();
}We'll add functionalities to set items and their prices, and to get the list of items. Here are the functions:
#[ic_cdk::query]
fn get_transaction_list() -> Vec<(String, String)> {
    TRANSACTIONS.with(|t| {
        t.borrow()
            .iter()
            .map(|(k, v)| (k.clone(), v.clone()))
            .collect()
    })
}

#[ic_cdk::update(guard = "caller_is_controller")]
fn set_item(item: String, price: u128) {
    ITEMS.with(|p| p.borrow_mut().insert(item, price));
}

#[ic_cdk::query]
fn get_items() -> Vec<(String, u128)> {
    ITEMS.with(|p| {
        p.borrow()
            .iter()
            .map(|(k, v)| (k.clone(), v.clone()))
            .collect()
    })
}We'll add a function to buy items. This function will check the transaction list to ensure that the transaction has not been processed before. and check the amount to ensure that it's not too low.
Here's the function:
#[ic_cdk::update]
async fn buy_item(item: String, hash: String) -> u64 {
    if TRANSACTIONS.with(|t| t.borrow().contains_key(&hash)) {
        panic!("Transaction already processed")
    }

    let price = ITEMS.with(|p| {
        p.borrow()
            .get(&item)
            .map(|p| p.clone())
            .unwrap_or_else(|| panic!("Item not found"))
    });

    let (amount, from) = verify_transaction(hash.clone()).await;

    if amount < price {
        panic!("Amount too low")
    }

    TRANSACTIONS.with(|t| {
        let mut t = t.borrow_mut();
        t.insert(hash, from);

        t.len() as u64
    })
}-
Deploy to Mainnet: Run
yarn deploy hello --network=ic. -
Testing Guards: Use the terminal to execute functions with guards. For example:
dfx canister call hello withdraw '(10000000000000000, "0xB51f94aEEebE55A3760E8169A22e536eBD3a6DCB")' --network icTo add a new controller, run:
dfx canister update-settings hello --add-controller 'YOUR_PRINCIPAL' --network=ic -
Adding Items: Add items using the terminal:
dfx canister call hello set_item '("Pizza", 1000000000000)' --network icCheck the items inside the Candid UI using
get_items.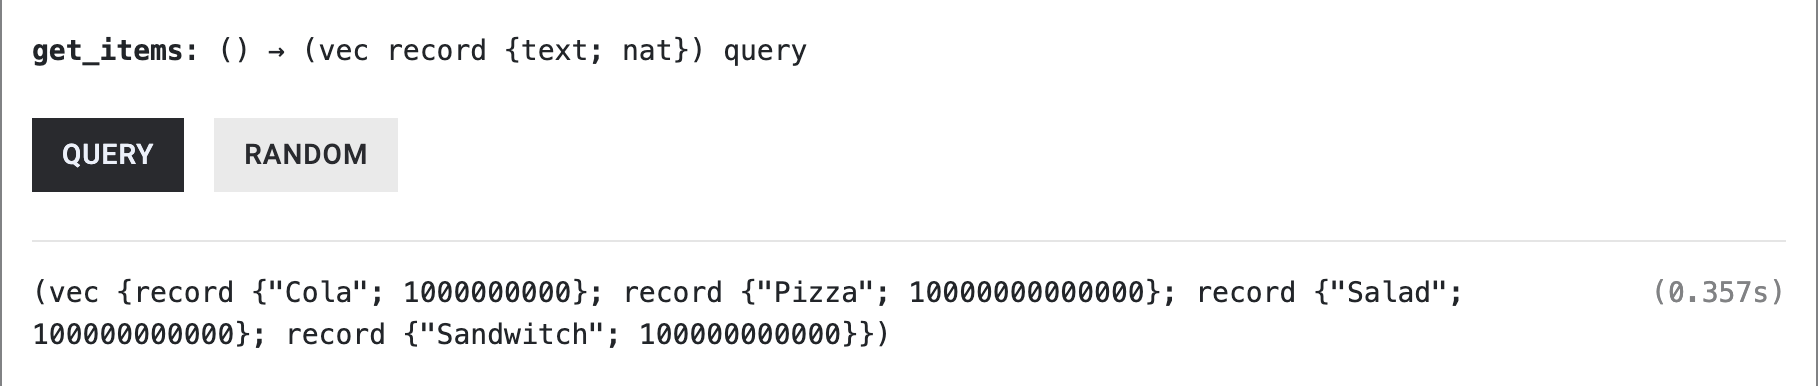

In this step, we'll integrate the frontend to display a shop and handle item purchases.
Create a new file Shop.tsx inside the src/components directory and add the following code:
import { useEffect } from "react"
import { useActorMethod } from "service/hello"
import Item from "./Item"

interface ShopProps {}

const Shop: React.FC<ShopProps> = ({}) => {
  const { data: items, loading, call } = useActorMethod("get_items")

  useEffect(() => {
    call()
  }, [])

  return (
    <div
      style={{
        marginTop: 10,
        display: "grid",
        gridTemplateColumns: "repeat(2, 1fr)",
        gridGap: 20
      }}
    >
      {loading ? (
        <div>Loading...</div>
      ) : (
        items?.map(([name, price]) => {
          return <Item name={name} price={price} key={name} />
        })
      )}
    </div>
  )
}

export default Shop
This component fetches the list of items from the backend and displays them in a grid layout.
Create a new file Item.tsx inside the src/components directory and add the following code:
import { useEffect } from "react"
import helperAbi from "service/abi.json"
import { useActorMethod } from "service/hello"
import { formatEther } from "viem"
import { useContractWrite } from "wagmi"
import Confirmation from "./Confirmation"

interface ItemProps {
  name: string
  price: bigint
}

const Item: React.FC<ItemProps> = ({ name, price }) => {
  const { data: canisterDepositAddress, call } = useActorMethod(
    "canister_deposit_principal"
  )

  useEffect(() => {
    call()
  }, [])

  const { data, isLoading, write } = useContractWrite({
    address: "0xb44B5e756A894775FC32EDdf3314Bb1B1944dC34",
    abi: helperAbi,
    functionName: "deposit",
    value: price,
    args: [canisterDepositAddress]
  })

  if (isLoading) {
    return <div>Buying {name}…</div>
  } else if (data?.hash) {
    return <Confirmation hash={data.hash} item={name} />
  } else {
    return (
      <div>
        <h3>{name}</h3>
        <div>{formatEther(price).toString()} ETH</div>
        <button onClick={() => write()}>Buy {name}</button>
      </div>
    )
  }
}

export default Item
This component handles the purchase of individual items. It uses the canister_deposit_principal and deposit methods to handle the transaction.
Edit the existing Confirmation.tsx file to add the item prop:
import { Hash } from "viem"
import { useWaitForTransaction } from "wagmi"
import VerifyTransaction from "./VerifyTransaction"
interface ConfirmationProps {
item: string
hash: Hash
}
const Confirmation: React.FC<ConfirmationProps> = ({ item, hash }) => {
const { data, isError, error, isLoading } = useWaitForTransaction({
hash,
confirmations: 6
})
if (isError && error) {
return <div>Transaction error {error.toString()}</div>
} else if (isLoading) {
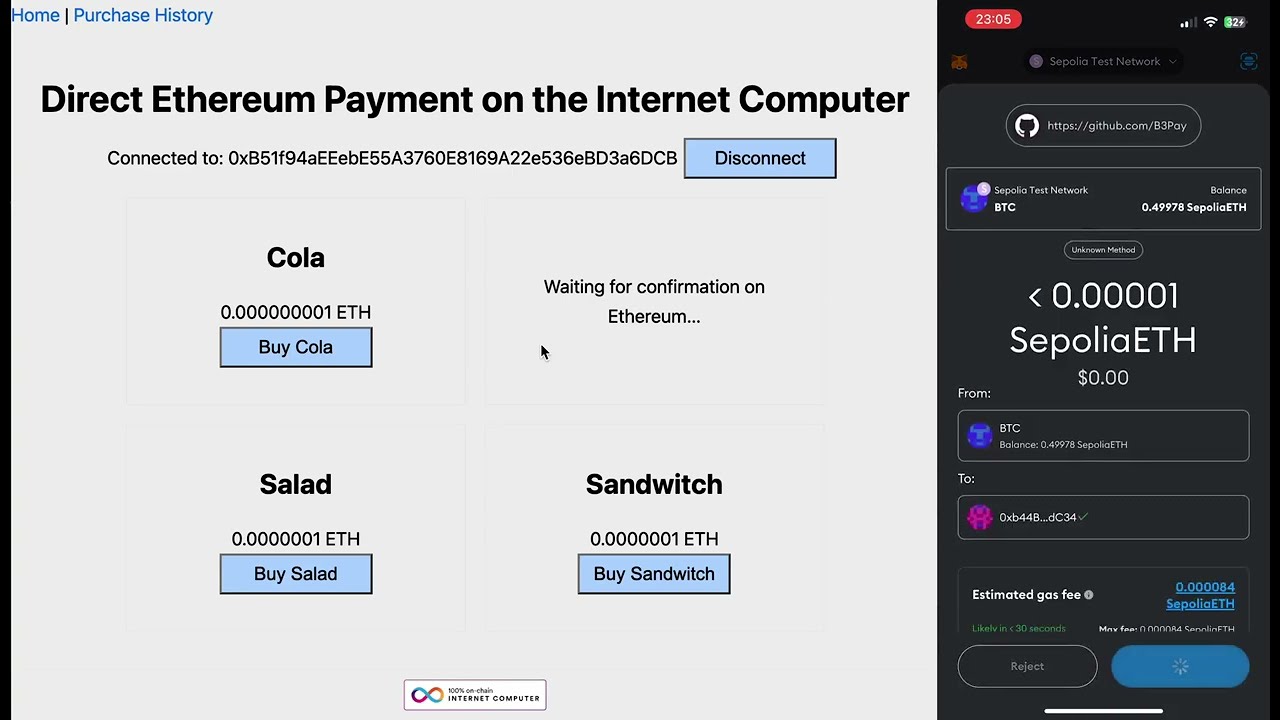
return <div>Waiting for confirmation on Ethereum…</div>
} else if (data) {
return <VerifyTransaction hash={data.transactionHash} item={item} />
} else {
return null
}
}
export default ConfirmationThis component waits for the Ethereum transaction to be confirmed and then triggers the on-chain verification on the Internet Computer.
Edit the existing VerifyTransaction.tsx file to add the item prop and work with the new buy_item method:
import { useEffect } from "react"
import { useActorMethod } from "service/hello"

interface VerifyTransactionProps {
  item: string
  hash: string
}

const VerifyTransaction: React.FC<VerifyTransactionProps> = ({
  item,
  hash
}) => {
  const { loading, error, data, call } = useActorMethod("buy_item")

  useEffect(() => {
    call(item, hash)
  }, [hash])

  if (loading) {
    return <div>Processing Purchase on ICP...</div>
  } else if (error) {
    return <div>{error.toString()}</div>
  } else if (data) {
    return (
      <div>
        <h3>{item} bought!</h3>
        <div>Purchase ID: {data.toString()}</div>
      </div>
    )
  } else {
    return null
  }
}

export default VerifyTransaction
This component calls the buy_item method on the backend to finalize the purchase and display a purchase ID.
In your Wallet.tsx, replace <Deposit /> with <Shop />.
-
Local Testing: Run
yarn devto test the application locally. -
Deploy to Mainnet: Run
yarn deploy --network=icto deploy the application to the Internet Computer mainnet. -
Live Example: The live example can be accessed at https://uu4vt-kqaaa-aaaap-abmia-cai.icp0.io/.