Playwright Demo - This project is based on Microsoft Playwright which enables reliable end-to-end testing for modern web apps.
Top Features:
- Easy to Configure.
- Auto-waits for all the relevant checks to pass and only then performs the requested action.
- Records videos for Test Cases.
- Records the test script and every action on the target page is turned into generated script.
- Generates trace file, which gives in-depth details of Test Case execution.
- Execution of test case is faster when compared with other competitive framework in market.
- Supports Headful/Headless mode execution for Firefox/Webkit/Google Chrome/Chromium/MS Edge on Windows/Linux/Mac machines.
- It supports API testing (From Playwright version 1.16 onwards)
- It can be used to simulate browser behaviour on mobile devices, and supports over 100+ devices.
- It has ability to produce and visually compare screenshots.
- To slow down execution slowMo option is available.
- Supports 'download' event monitoring, so there is no need for user to actually wait for downloads to finish.
- Supports Serial and Parallel execution.
- Allure/HTML/Ortoni HTML Reports are generated after execution with an option to capture screenshot/video/trace file on failure.
- Nonetheless Support from Microsoft so FREQUENT RELEASES and turn arounf time for any queries is 48 hours.
Bonus:
- Supports PostgresSQL using 'pg' module.
- Supports Excel File Read/Write using 'excel-js' module.
- Converts HTML Reports to Zip format which can shared across.
- Extracts Text from PDF files.
- Shows Page performance using Lighthouse Library.
- Docker Image is created with node:20.5.1-bookworm-slim
- Configured GitHub Actions to get triggered on pull/push actions
- Slack Notifications with html-report url once Github Actions is completed.
- Playwright
- Typescript
- node-postgres
- excel-js
- ESLint
- SonarQube
- Lighthouse
- pdfjs-dist-es5
- [ortoni-report] (https://github.com/ortoniKC/ortoni-report)
The following software are required:
- nodejs : Download and Install Node JS from
https://nodejs.org/en/download/
- Install Java 8 or above, Allure Reports require Java 8 or higher.
- Install Java 11 instead of Java 8 if you intend to use Sonar Qube.
- allure commandline : Install allure command line for generating Allure Reports using
npm ci -g allure-commandline
- If you wish to include SonarQube follow the below steps:
- Install Java 11 and add java path to "PATH" environment variable.
- Download SonarQube community server from the below url and unzip it to desired location.
https://www.sonarqube.org/downloads/
- Download Sonar Scanner for your desired OS (Windows in my case) from below location and unzip it to desired location. Then navigate to bin location once unzipped and provide the path to "PATH" environment variable.
https://docs.sonarqube.org/latest/analysis/scan/sonarscanner/
- Clone the repo using below URL
https://github.com/akshayp7/playwright-typescipt-playwright-test.git- Navigate to folder and install npm packages using:
npm install- For first time installation run below command to download required browsers
npx playwright install- For MAC and Ubuntu OS before running please exexute below code as per your environment qa|dev
export npm_config_ENV="qa"- For Browser Configuration, change required parameters in
playwright.config.ts. - For execution entire test suite on all available browsers simultaneously execute below command where "ENV" can be "qa" or "dev",
Test Cases are present in "tests" folder:
npm run test --ENV="qa"- For executing single test case on Chrome browser execute the below command, you can change the browser for execution e.g. if you want to run test cases on Firefox, you can change
--project=Firefoxagainsttest:singleinpackage.json, just make sure the browser name given matches the name given inplaywright.config.ts.
npm run test:single --ENV="qa"- For executing test cases in parallel, provide a suitable tag
@SmokeTestat the start of your test case name, then inpackage.jsonagainsttest:parallelgive the tag value and execute :
npm run test:parallel --ENV="qa"- For executing test cases in sequence, provide a suitable tag
@SmokeTestat the start of your test case name, then inpackage.jsonagainsttest:serialgive the tag value and execute,workersparameter correspond to test cases you want to execute simultaneously e.g.--workers=3, executes 3 test cases simultaneously :
npm run test:serial --ENV="qa"- For executing API test cases, please provide "ENV" value as "qaApi" or "devApi" :
npm run test:api --ENV="qaApi" - For recording test scripts :
npm run test:record- To produce and visually compare screenshots execute below command. On first execution reference screenshot will be generated for comparision with subsequent runs.
npm run test:visual --ENV="qa"- For emulating test cases on any device, in
playwright.config.ts, under device section provide desired device name and execute :
npm run test:device --ENV="qa"- For Allure Report generation execute :
npm run allureReport- For HTML Report generation execute below command , single static HTML report(index.html) which can be sent via email is generated in "html-report" folder:
- For debugging test cases add debug points, the press CNTRL+SHIFT+P and type "debug:debug npm script", on the edit box select desired script.
- Screenshots, Videos and Trace files will be generated in test-results folder.
- To change your username go to
testConfig.tsand provide value againstusername - To change password, go to
lib/WebActionsindecipherPassword()uncommentENCRYPTcode block and replacepasswordwith your password, execute the test case, Encrypted password will be printed on your console . Copy Encrypted password intestConfig.tsagainstpasswordfield. You can comment Encrypt bloack ater this. - For executing Postgres DB test case, navigate to
testConfig.tsand provide values fordbUsername, dbPassword, dbServerName, dbPort, dbName. Refer totests/DB.test.tsfor connecting to DB and Firing a Query. - For viewing trace files, go to folder where
trace.zipis generated and execute :
npx playwright show-trace trace.zip- You can change the Logging Message at Test Case/Test Step Level in CustomReporterConfig.ts file
- In
tsconfig.jsonfile inpathssection we can re-assign the long path imports like '../../' to a variable which starts with '@' and then we can use it to shorten our import statements in respective file. In the below example wherever '../../pageFactory/pageRepository/' import statement is used we can replace it with '@pages'
"@pages/*":["pageFactory/pageRepository/*"]- Network Replay : For using this featre in Playwright we use HAR file. HAR (HTTP Archive) is a file format used by several HTTP session tools to export the captured data. This can be highly useful in troubleshooting complex issues by obtaining additional information about the network requests that are generated in the browser while an issue occurs.
To generate HAR file navigate to HAR.test.ts inside functional folder, in that use the below line
await page.routeFromHAR('har/personalInfo.har',{update:true});where update:true means to record a new har file and store it in the location provided by first parameter har/personalInfo.har, this generates and links all the required subfiles for personalInfor.har and stores it in har directory
Once HAR file is recorded comment the line await page.routeFromHAR('har/personalInfo.har',{update:true}); and uncomment below line
await page.routeFromHAR('har/personalInfo.har',{update:false});where update:false means to use the existing HAR from from the path given in first paraeter har/personalInfo.har, to see this in action you can turn off your internet and run the script, complete webpage is mocked up along with assertions on the browser of your choice this is done using the Network Replay feature and by using our recorded HAR file.
We can use this feature when webpage is down for some reason and we want to test some scenarios.
- Logging is implemented in
CustomReporterConfig.tsusing winston logger.
First we have to create a logger object using winston.createLogger and then provid the configuration you need.
First argument is "level" for which i have provided value as "info", in winston logger every logging level is provided with a numeric value, for info the numeric value is 2, so if we provide level as info then all the logs which are equal to or less than info level will be displayed. In our case logs with error(0) and warn(1) wil also be logged. For more info on logging refer below link
https://github.com/winstonjs/winston#logging
Second we have to provide format for the log file generate I have provided format as json using winston.format.json() because JSON is widely used. There are various levels like printf, simple, colorize which you can refer in below link
https://github.com/winstonjs/logform#formats
Third part is transports which defines where the log file will be written. I have provided the location as logs/info.log in my case
Once logger object is created I have provided logger.add(console); which instructs logger to write the log files in console as well.
Once logger object is created you can use this instead of console.log in your framework and these logs will be written both in your console and log file.
- UI mode in Playwright is lets you explore, run and debug tests, it comes with a built-in watch mode. It opens like Traceviewer where you can use the window to find selectors, its directly integrated to VS Code, all the browsers definned in playwright config will be automatically picked up and you can chosse to run individual test cases in browser of choice and also we can run tests directly from UI mode instead of IDE. I have used the tag
@Smokeintest:uisection of package.json, because all my UI test cases are tagged with@Smoketag and we want to run only Web based test cases. To use UI mode use below command withENVvalue of your choice
npm run test:ui --ENV="qa"-
For Extracting text from PDF we are using
pdfjs-dist-es5library. You can run the test casePdfToText.test.tsto verify contents of PDF file.getPDFText()method inlib/WebActions.tsclass is used for extracting text from PDF file. -
Accessibility test case is written in
tests/accessibility/Axe.test.ts, to run this test use the command
npm run test:accessibility --ENV="qa"- GitHub Actions is configured in
.github/workflows/playwright.ymlfile and events(trigger points) are set to pus/pull actions on master branch. Changes in command to run test cases can be made in "Run tests" section in this file. - Once GitHub Actions job is completed Slack notification is triggered to the assigned channel with build status and html-report link. For enabling Slack you have to configure Incoming Webhooks for your repo, below is the great tutorial on that. https://www.youtube.com/watch?v=hzIub2noFw8&t=357s&pp=ygUUZ2l0aHViIGFjdGlvbnMgc2xhY2s%3D
- For Configuring Ortoni HTML Report, navigate to "playwright.config.ts" and provide desired changes "reportConfig" variable, then pass this variable in reporter section as ,['ortoni-report', reportConfig]. For more details on this please refer below video https://www.youtube.com/watch?v=HMaiL6cARZk
-
Overall Report
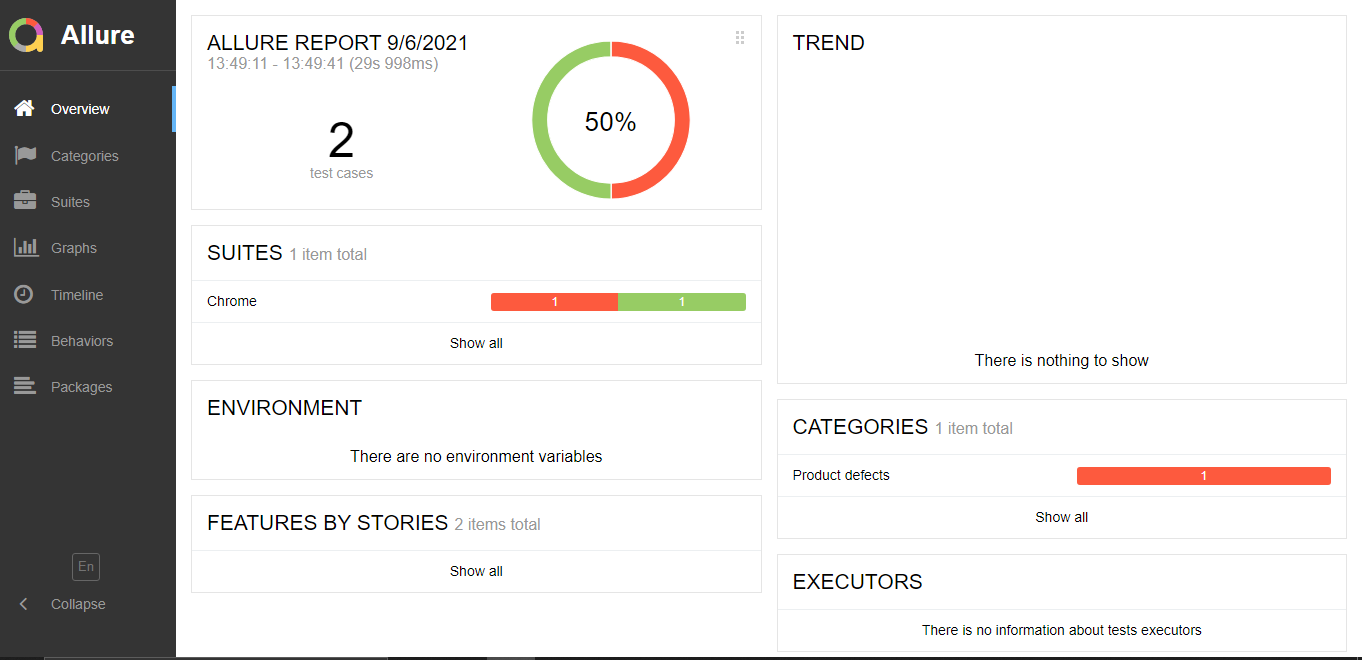
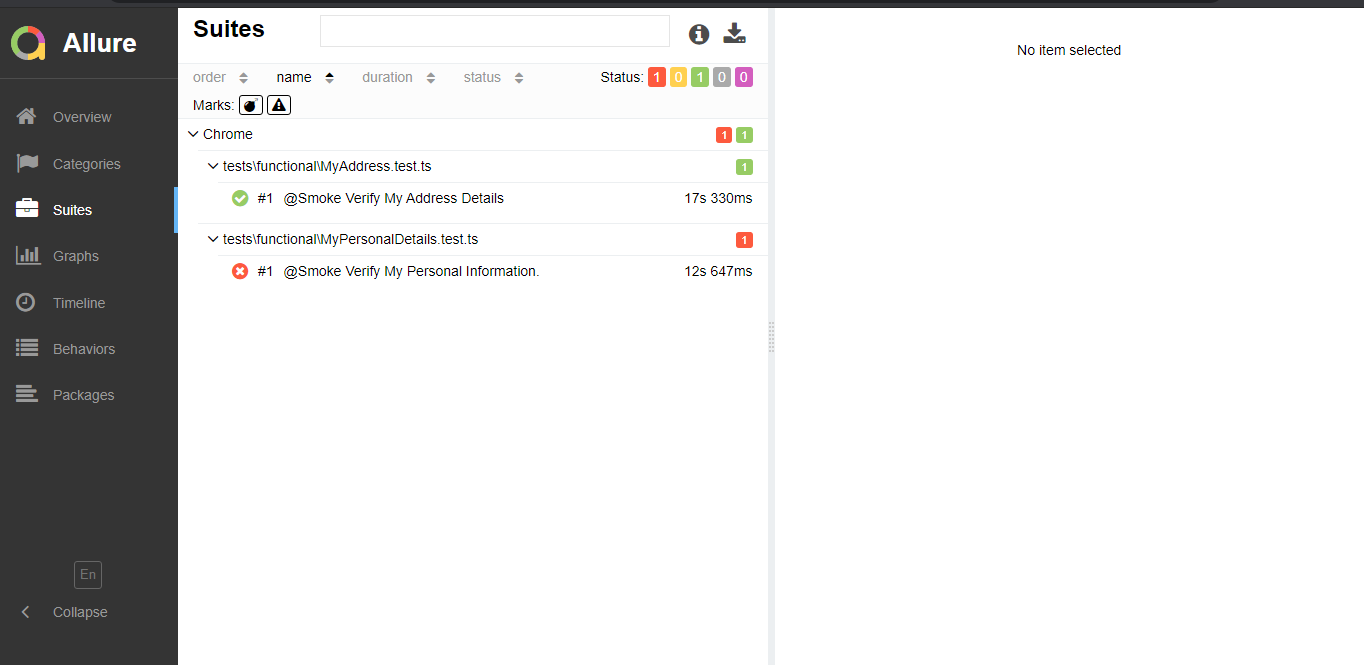
-
Detailed Report
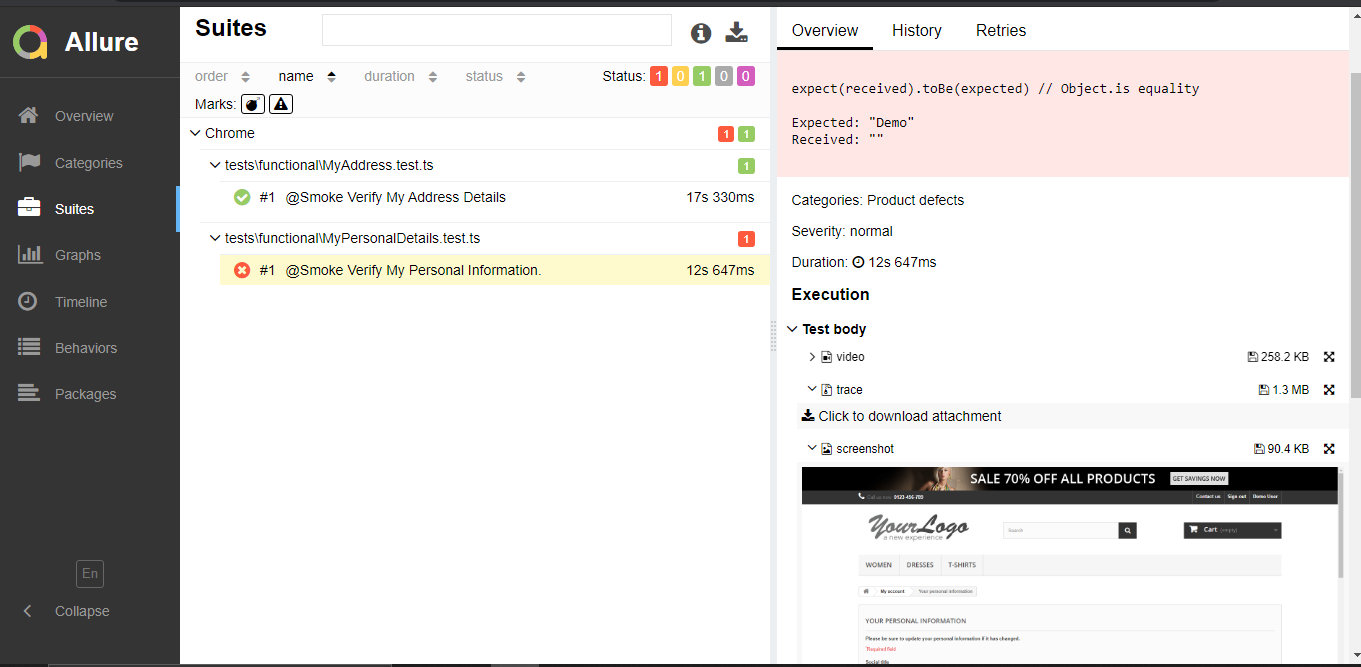
-
Failure Report


Once you have completed setup for SonarQube given in Prerequisites section, configure SonarQube as given below
- Go to the path where sonarqube server(For e.g. : C:\SonarQube\sonarqube-9.1.0.47736) is unzipped -> Go to conf Folder -> open sonar.properties file and add the below prperties and save the file, you can give any port you wish I have used port 9000.
sonar.host.url=http://localhost:9000
sonar.sourceEncoding=UTF-8- Go to the path where sonarqube server(For e.g. : C:\SonarQube\sonarqube-9.1.0.47736) is unzipped -> Go to bin section -> Go to the folder as per the OS you are using , in my case windows-x86-64 -> Double click on Start Sonar and wait for it to display SonarQube is up (you might encounter some java errors but its fine don't close the terminal).
- Go to the browser and naigate to http://localhost:9000 , default username is
admin, default password isadmin. It might ask you to provide a new password for if you have logged in for first time, I have changed default password topassword. - In your working project (playwright-typescipt-playwright-test), navigate to
sonar-project.propertiesfile and provide the credentials configured on server webpage username value insonar.loginand password insonar.password, in my case username isadminand password was changed topassword.
sonar.login=admin
sonar.password=password-
You can provide any project name in
sonar.projectKey. -
Specify a version in
sonar.projectVersion. -
Provide
UTF-8insonar.sourceEncoding. -
In
sonar.languageprovide the language you want to run scan on (For e.g. for typescipt its ts and for javascript its js). -
If you have eslint file in your project provide the location in
sonar.eslint.eslintconfigpath. -
You can exclude file from scanning like node_modules, results , Downloads section in
sonar.exclusions. -
You can give your project location in
sonar.sourcessection I have provided it as./because mysonar-project.propertiesfile is within my project. If your properties files is somewhere else you have to provide the complete project path. -
Now go to the location where
sonar-project.propertiesis present and runsonar-scannercommand (In my case I will diectly run it inside my project), and wait for scan to get over with success message. -
Now navigate to
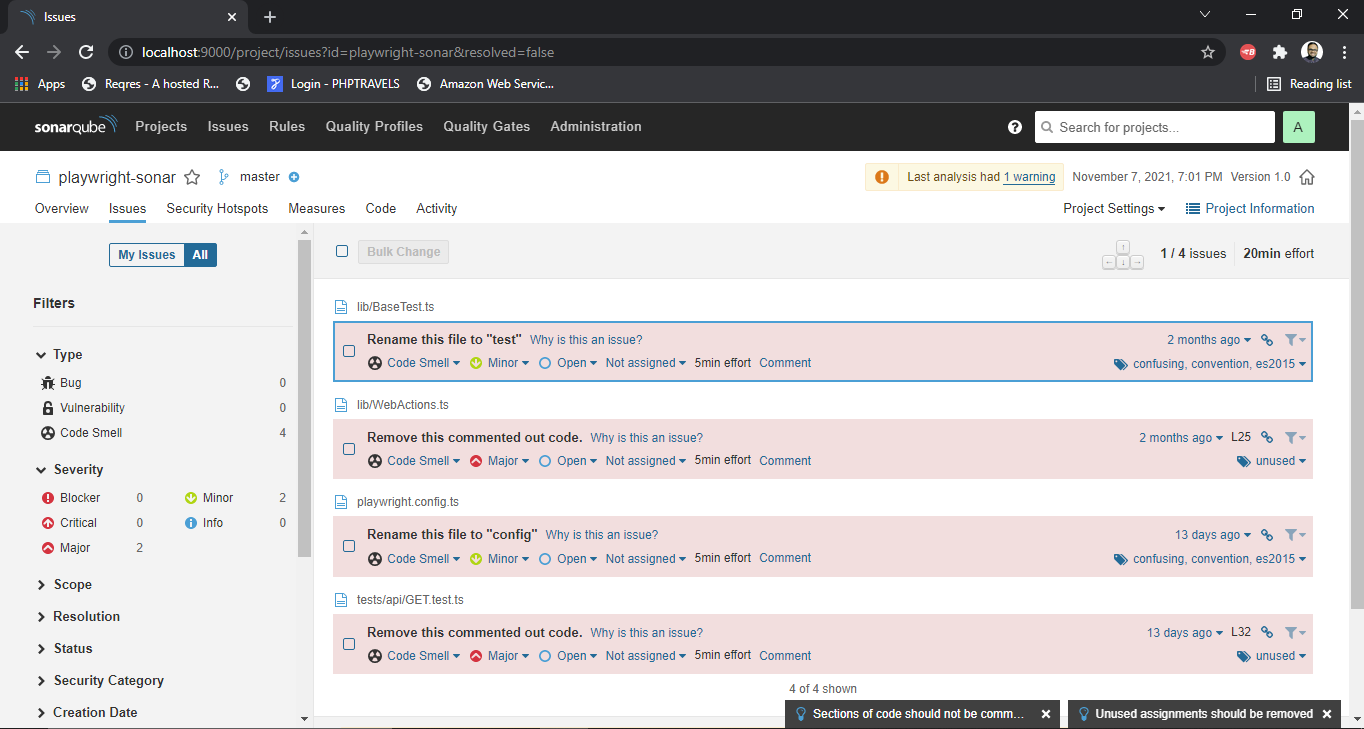
http://localhost:9000/and click on your project key displayed and go to Issues section, you can find all the suggestions and issues here. You can fix the issues ans rerunsonar-scannercommand once again. -
SonarQube Report
For running the tests on Docker container we have to first build a image from Dockerfile and then run the image to spawn container on which the test scripts will run.
-
For building image from Docker run below command, where path to Dockerfile must be provided after -f tag and name of the image must be provided after -t tag.

docker build . -f Dockerfile -t playtest- Once the image is generated we can run the image to spawn container and run scrips using below command. In Below Command "playContainer" is name of the container created using "playtest" image and "-e npm_config_ENV" corresponds to the environment you are providing e.g. dev/qa etc.
docker run -e npm_config_ENV=qa --name playContainer playtest- If you want to run a different test or provide custom command, Go to Dockerfile and edit the last line which is CMD section. The below sample runs test cases serially on QA environment. Once you have edited the CMD section we have to follow Step 1 to build a new image and ten run the Container from that image.
CMD npm run test:serial --ENV="qa"Lighthouse is an open-source, automated tool for improving the quality of web pages. You can run it against any web page, public or requiring authentication. It has audits for performance, accessibility, progressive web apps, SEO and more. I have configure Lighthouse for Performance in my Project. Please use version 9.6.8 as later versions are not compatible.
- To configure Lighthouse navigate to "tests/lighthouse/Lighthouse.js" and replace "https://www.google.com" with desired URL to test.
- To run test on Mobile devices, comment out desktop mode config line and uncomment the config line written for mobile devices, Default Device is Moto G4
- To run Lighhouse test use below command, reports will be generated in htnl format in root directory with name "LighthouseReport.html"
npm run lighthouse