Techman Robot is a state-of-the-art production tool that is highly compatible and flexible to collaboration between human and machine. The Robot Operating System (ROS) provides abundant libraries and tools which can be utilized to reduce the cost of trivial development software tool and build robot applications without struggling. Our TM ROS driver provides nodes for communication with Techman Robot controllers, data including robot states, images from the eye-in-hand camera and URDF models for various robot arms via TMflow.
This driver is for ROS1 Melodic version.
To use the driver, make sure your ROS PC is installed correctly.
If the user wants to know how to use the ROS2 driver, please visit the TM ROS2 driver website or directly click on the listed Github repo: TM App Release below ROS2 projects in the table.
More information: TM ROS driver support list
| TMflow + TM Robot Series | ||||
|---|---|---|---|---|
| ROS Distro | GitHub repo: TM App Release | TM ROS Driver | TMvision Support | GitHub Branch |
| ROS Melodic Morenia | TM ROS1 Melodic | ◯ | ✕ | melodic |
| ROS Noetic Ninjemys | TM ROS1 Noetic | ◯ | ◯ | noetic |
| ROS 2 Dashing Diademata | TM ROS2 Dashing | ◯ | ◯ | dashing |
| ROS 2 Foxy Fitzroy | TM ROS2 Foxy | ◯ | ◯ | foxy |
| ROS 2 Humble Hawksbill | TM ROS2 Humble | ◯ | ◯ | humble |
| TMflow 2 + TM AI Cobot S-Series | ||||
| ROS Distro | GitHub repo: TM 2 App Release | TM ROS Driver | TMvision Support | GitHub Branch |
| ROS Noetic Ninjemys | TM2 ROS1 Noetic | ◯ | ◯ | noetic |
| ROS 2 Foxy Fitzroy | TM2 ROS2 Foxy | ◯ | ◯ | foxy |
| ROS 2 Humble Hawksbill | TM2 ROS2 Humble | ◯ | ◯ | humble |
Note: The Github repo: TM 2 App Release applies to TMflow Version 2.14 or above and adapts to HW5.0 mainly.
The TM ROS driver connects to TMflow Ethernet Slave to control TMflow project. The robot state is transmitted through this connection. A working driver also connects to a Listen node (running at a TMflow project) at the same time. To control the robot locomotion, IO, etc., the TM ROS driver sends the robot script (TM Robot Expression) through this connection. More information about TM Robot Expression and Ethernet Slave, see Expression Editor and Listen Node.pdf. The TM ROS driver for ROS1 is a single ROS node that creates a ROS interface such as topics and services:
Action Server
- An action interface on /follow_joint_trajectory for seamless integration with MoveIt
Topic Publisher
- publish feedback state on /feedback_states
The FeedbackState includes robot position, error code, and io status, etc. (see tm_msgs/msg/FeedbackState.msg)- publish joint states on /joint_states
- publish tool pose on /tool_pose
Service Server
- /tm_driver/send_script (see tm_msgs/srv/SendScript.srv) :
send robot script (TM Robot Expression) to Listen node- /tm_driver/set_event (see tm_msgs/srv/SetEvent.srv) :
send "Stop", "Pause" or "Resume" commands to Listen node- /tm_driver/set_io (see tm_msgs/srv/SetIO.srv) :
send digital or analog output value to Listen node- _/tm_driver/set_position (see tm_msgs/srv/SetPosition.srv) :
send motion command to Listen node, the motion type include PTP, LINE, CIRC, and PLINE, the position value is a joint angle(J) or tool pose(T), see [[Expression Editor and Listen Node.pdf]]
Just clone the TM ROS driver of the git repository into your working directory and then build it.
The user can directly refer to the chapters introduced in the following text: steps 1 to 4 of § Usage with demo code & driver.
The TM ROS driver is designed to interface the TM Robot's operating software (TMflow) with the Robot Operating System (ROS) so that program developers and researchers can build and reuse their own programs to control the TM robot externally.
After installing the correct ROS version of the computer, the next step is to ensure that your hardware, control computer, and TM Robot are all properly configured to communicate with each other. See below to make sure the network settings on your computer are correct, the TM Robot's operating software (TMflow) network settings are ready and the Listen node is running.
The Listen node: a socket server can be established and be connected with ROS by an external device to communicate according to the defined protocol. The user can make the robot communicate with the user's ROS (remote) computer equipment through a wired network when all the network parameters in the Network setting are set.
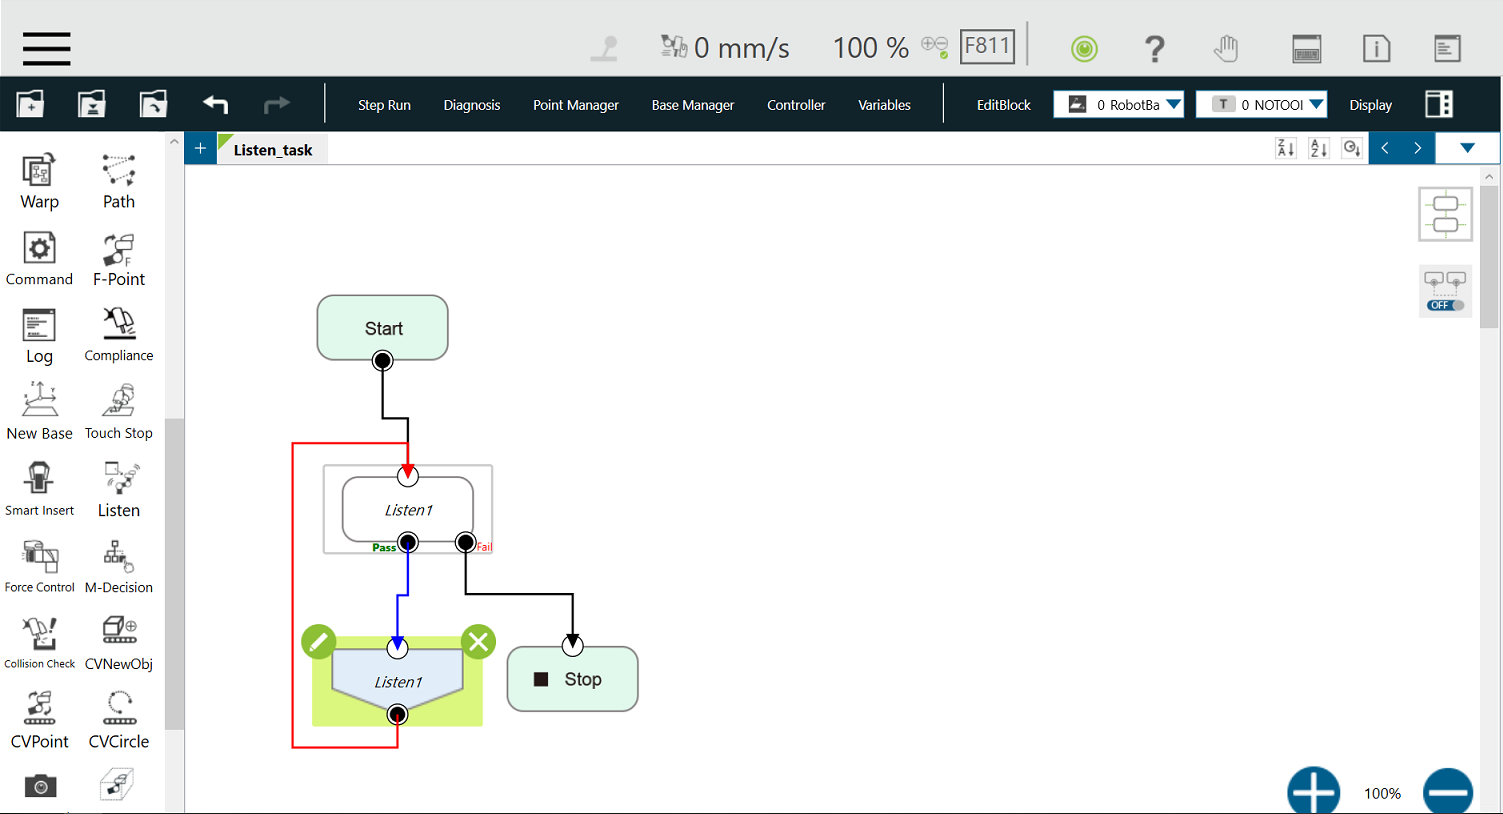
Create a Listen task of flow project of TMflow software, and then drag the Listen node from the nodes menu onto the project flow, as shown below.
Set the
Networksettings: mouse-click to enter the page of System ⇒ Network in order.
Example: Set the Subnet mask: to 255.255.255.0 and IP address 192.168.10.2
Note: Set the network mask, and the communication with the TM Robot must be in the set domain.
Set the Ethernet Slave
Data Table Settingitem: mouse-click to enter the page of Setting ⇒ Connection ⇒ Ethernet Slave in order.
We recommend one easy method 1 to set the Ethernet SlaveData Table settingis to directly import the software package.
1 See TM ROS Driver vs TMflow Software Usage: Import Data Table Setting.
Or the previously provided method as follows: (Note: TMflow software version changes may have slightly different settings.)
The user can manually click theData Table Setting2 item and check the following boxes as item predefined 3 to receive/send specific data:
- Robot_Error
- Project_Run
- Project_Pause
- Safeguard_A
- ESTOP
- Camera_Light
- Error_Code
- Joint_Angle
- Coord_Robot_Flange
- Coord_Robot_Tool
- TCP_Force
- TCP_Force3D
- TCP_Speed
- TCP_Speed3D
- Joint_Speed
- Joint_Torque
- Project_Speed
- MA_Mode
- Robot Light
- Ctrl_DO0~DO7
- Ctrl_DI0~DI7
- Ctrl_AO0
- Ctrl_AI0~AI1
- END_DO0~DO3
- END_DI0~DI2
- END_AI0
2 Turn off Ethernet Slave. Let "STATUS: Disable" be displayed on the Ethernet Slave setting page, then click
Data Table Settingto enter the next page for related settings.
3 The checked items listed above must all be selected for TM ROS setting.When you need to check more about the maximum, minimum, and average calculation properties of joint torque, the three checked items 4 listed below can be checked individually or all of them, please leave them unchecked when not in use.
- Joint_Torque_Average
- Joint_Torque_Min
- Joint_Torque_Max
4 This function requires TMflow 1.84 or later versions to support.
Enable the Ethernet Slave settings: mouse-click to enable or disable TM Ethernet Slave. Once enabled, the robot establishes a Socket server to send the robot status and data to the connected clients and permissions to access specific robot data.
Mouse-click to enable theEthernet Slavesetting and letSTATUS:⇒Enable.Press the Play/Pause Button on the Robot Stick to start running this Listen task project.
Note: Software TMflow version changes may have slightly different settings. (SW1.76_Rev2.00) (SW1.82_Rev1.00)


Static IP of remote connection network settings through the wired network.
- Set the wired network of the user's (remote) Ubuntu computer by mouse-click on the top right of the desktop ⇒ Click on "Wired Settings" ⇒ Click on the gear icon ⇒ In the IPv4 feature options, click on "Manual" in order.
- Set the Static IP settings: where the IP address is fixed for the first three yards same as the previous setting 192.168.10, last yards 3-254 machine numbers are available. (Because TM ROBOT, you have been set to 192.168.10.2)
Example: Set the Netmask: 255.255.255.0 and IP address 192.168.10.30
- Check Internet connection: start a terminal to test the connectivity with the target host TM ROBOT, by typing ping 192.168.10.2
💡 Tip: Remember to reconfigure the network settings due to static IP changes or replacement of the ROS control PC.
As mentioned above, a valuable debugging tool is your operating system's ping command. If nothing appears to happen or an error is thrown, the robot cannot be accessed from your computer. Please go back to the top of this chapter and re-operate in the order of instructions.
If you are an experienced user, you may just need to turn off ⇒ turn on the gear icon of "Wired Settings" on your computer or to turn off ⇒ turn on the "Ethernet Slave Data Table" setting of the robot to reconfigure the hardware settings.


ROS1 driver usage
After the user has set up the ROS1 environment and built the TM driver based on the specific workspace, please enter your workspace
<workspace>by launching the terminal, and remember to make the workspace visible to ROS.source /opt/ros/melodic/setup.bash cd <workspace> source ./devel/setup.bash💡 Do you prepare the TM Robot ready ? Make sure that TM Robot's operating software (TMflow) network settings are ready and the Listen node is running.
Then, run the driver to maintain the connection with TM Robot by typing
rosrun tm_driver tm_driver <robot_ip_address>Example :
rosrun tm_driver tm_driver 192.168.10.2, if the <robot_ip_address> is 192.168.10.2Now, the user can use a new terminal to run each ROS node or command, but don't forget to source the correct setup shell files as starting a new terminal.
Usage with MoveIt
See Moveit tutorial to install the MoveIt packages.
💡 Do you prepare the TM Robot ready ? Make sure that TM Robot's operating software (TMflow) network settings are ready and the Listen node is running.
Note: The following directive settings vary slightly due to package changes. The earlier TM ROS1 TM5, TM12, TM14 descriptions, and related moveit_config packages were migrated to another repository.To bring up the MoveIt environment in simulation mode with virtual TM Robot (Example: TM5-900), by typing
roslaunch tm5-900-moveit_config tm5-900_moveit_planning_execution.launch sim:=TrueOr with virtual TM Robot (Example: TM5X-900 the eyeless model), by typing
roslaunch tm5x-900-moveit_config tm5x-900_moveit_planning_execution.launch sim:=True📑 Note1: There are several built-in TM Robot nominal robot model settings, available for tm5-900, tm5-700, tm12 and tm14 models, as well as the eyeless models tm5x-900, tm5x-700, tm12x and tm14x models.
The user can also manipulate real TM5-900 Robot (Example: TM5-900) to run, by typing
⚠️ [CAUTION] This demo will let the real TM Robot move, please be careful.roslaunch tm5-900-moveit_config tm5-900_moveit_planning_execution.launch sim:=False robot_ip:=<robot_ip_address>Or TM Robot (Example: TM5X-900 the eyeless model), by typing
roslaunch tm5x-900-moveit_config tm5x-900_moveit_planning_execution.launch sim:=False robot_ip:=<robot_ip_address>The parameter
<robot_ip_address>means the IP address of the TM Robot.
📑 Note2: If your real Robot is a TM12, in the above example, you should type "tm12-moveit_config" to instead of "tm5-900-moveit_config" and type "tm12_moveit_planning_execution.launch" to instead of "tm5-900_moveit_planning_execution.launch".
📑 Note3: If your real Robot is the eyeless model as a TM12X, in the above example, you should type "tm12x-moveit_config" to instead of "tm5x-900-moveit_config" and type "tm12x_moveit_planning_execution.launch" to instead of "tm5x-900_moveit_planning_execution.launch".
📑 Note4: In MoveIt planning_context.launch, TM Robot set the default to read the Xacro file, such as TM5-900 model, to read the file tm5-900.urdf.xacro into robot_description or such as TM12 model, to read the file tm12.urdf.xacro into robot_description. If the user wants to use the specific model parameters instead of the nominal model to control the robot, please refer to the following section Take generating a new Xacro file as an example of chapter 6 to modify the Xacro file.
Usage with Gazebo Simulation
See Gazebo tutorial to install the Gazebo packages.
Then, install the other joint_trajectory_controller plugin:
sudo apt-get install ros-melodic-joint-trajectory-controller
sudo apt-get install ros-melodic-rqt-joint-trajectory-controllerThe tm_gazebo package contains the URDF/Xacro/SDF model files to simulate the TM Robot in Gazebo.
A simple SDF model demonstrating the generation of a virtual TM robot to Gazebo using
rosruncommand, by typing To open the terminal 1: Startup ROS coreroscoreIn a new terminal 2: Source ROS environment settings, specify the model database path for Gazebo, then run Gazebo with ROS.
source /opt/ros/melodic/setup.bash cd <workspace> catkin_make source ./devel/setup.bash export GAZEBO_MODEL_PATH=~/<workspace>/src/tm_gazebo/models/ rosrun gazebo_ros gazebo
- In another new terminal 3: Source ROS environment settings, then spawn TM Robot model (Example: TM5-900) in Gazebo.
source /opt/ros/melodic/setup.bash cd <workspace> source ./devel/setup.bash rosrun gazebo_ros spawn_model -database tm5-900 -sdf -model tm5-900 -x 0 -y 0 -z 0Or directly to bring up the Gazebo environment in simulation paused mode with a virtual TM5-900 robot using
roslaunchcommand in a terminal, by typingNote: When opening each terminal, don't forget to set up the ROS environment first.
roslaunch tm_gazebo tm5-900_gazebo_example.launchThere are several built-in launch files that can be used to start the TM Robot simulated robot using the nominal Xacro robot model settings in Gazebo. The common command's form to bring up the TM simulated robot in Gazebo as follows:
roslaunch tm_gazebo <tm_robot_type>_gazebo.launchThe prefix
<tm_robot_type>means the TM Robot type, available for the tm5-900, tm5-700, tm12, and tm14 models, as well as the eyeless models tm5x-900, tm5x-700, tm12x, and tm14x models.
For the TM5-900 Robot, simply replace the prefix accordingly to tm5-900 and type "roslaunch tm_gazebo tm5-900_gazebo.launch".
📑 Note1: If your real Robot is a TM12, in the above example, you should type tm12_gazebo.launch.
📑 Note2: If the user needs to improve end-point simulation accuracy, please refer to the following section Take generating a new Xacro file as an example of chapter 6 to modify the Xacro file.
Using Moveit! with Gazebo Simulator
You can also use MoveIt! to control the simulated robot which is configured to run alongside Gazebo.
- Launch the Gazebo simulation and load the ros_control controllers:
roslaunch tm_gazebo <tm_robot_type>_gazebo.launchAfter the Gazebo simulator is running, proceed to the next command to launch moveit!.
- Launch the combined of moveit! and Gazebo to allow motion planning plugin run:
roslaunch <tm_robot_type>-moveit_config <tm_robot_type>_moveit_planning_execution_gazebo.launchTaking the TM5-900 robot as an example, use the commands introduced above: Note: If you have started some executable programs with ROS commands in some terminal windows, it is recommended that you close them and then execute the following commands.
To open the terminal 1: Running with Gazebo
source /opt/ros/melodic/setup.bash
cd <workspace>
source ./devel/setup.bash
roslaunch tm_gazebo tm5-900_gazebo.launchIn a new terminal 2: Running with moveit!
roslaunch tm5-900-moveit_config tm5-900_moveit_planning_execution_gazebo.launch📑 Note1: Remember to close all these executables when you no longer use them for Gazebo simulations.
📑 Note2: Sometimes when gzserver is not properly shut down with ROS or cannot run Gazebo again after shutting down, you can try to kill the corresponding process with the following command.💡 Tip: To kill both the Gazebo server and Gazebo client executables.
sudo killall -9 gazebo gzserver gzclient
This chapter describes the demo package and the code used as a C++ programming example, showing how to program robot scripts (TM Robot Expressions) through the TM ROS driver connection.
demo_send_script:
In this demo code, it shows how to send a Listen node script to control the TM Robot.
The user can use a service named "send_script" to send the script.
"id" → The transaction number expressed in any alphanumeric 1 characters.
"script" → the script that the user wants to send.
"ok" → the correctness of the script.
1 If a non-alphanumeric byte is encountered, a CPERR 04 error is reported. When used as a communication packet response, it is a transaction number and identifies which group of commands to respond.demo_ask_item:
In this demo code, the user can use this service to send TMSVR 2 cmd.
2 For more detailed information, please refer to defined protocol: Expression Editor and Listen Node.pdf (Chapter 9.6 TMSVR)demo_ask_sta:
In this demo code, the user can use this service to send TMSTA 3 cmd.
3 For more detailed information, please refer to defined protocol (Chapter7.5 TMSTA)demo_connect_tm:
In this demo code, the user can set the connection type.
If the user sets reconnect to true, every time the driver disconnects from the Listen node, it will try to reconnect.
There are two kinds of connection settings the user can select, one is "connect_tmsvr" for Ethernet server connection, and the other is "connect_tmsct" for TMflow connection.demo_set_event:
In this demo code, six event types can be selected.
func → TAG, WAIT_TAG, STOP, PAUSE, RESUME and EXIT
arg0 → if func is TAG or WAIT_TAG, arg0 is the tag number
arg1 → if func is TAG or WAIT_TAG, arg1 is timeout in msdemo_set_io:
In this demo code, the user should set the module, type, pin, and state. 4
module → MODULE_CONTROLBOX or MODULE_ENDEFFECTOR
type → TYPE_DIGITAL_IN, TYPE_DIGITAL_OUT, TYPE_INSTANT_DO, TYPE_ANALOG_IN, TYPE_ANALOG_OUT, TYPE_INSTANT_AO
pin → pin number
state → STATE_OFF or STATE_ON value, or other value (if type expressed in a specific control module)
4 For more detailed information, please refer to defined protocol (Chapter6.5 IO)demo_set_positions:
In this demo code, the user should pay attention to the parameter definition of the data format setting 5 and the parameter unit to be operated.
motion_type → PTP_J , PTP_T , LINE_J , LINE_T , CIRC_J ,CIRC_T , PLINE_J ,PLINE_T
positions → motion target position: If expressed in Cartesian coordinate (unit: m), if expressed in joint angles (unit: rad)
velocity → motion velocity: if expressed in Cartesian coordinate (unit: m/s) 6, if expressed in joint velocity (unit: rad/s, and the maximum value is limited to π ) 6
acc_time → time to reach maximum speed (unit: ms)
blend_percentage → blending value: expressed as a percentage (unit: %, and the minimum value of 0 means no blending)
fine_goal → precise position mode: If activated, the amount of error in the final position will converge more, but it will take a few more milliseconds.
5 For more detailed information, please refer to defined protocol (Chapter8 PTP, Line, Circle, Pline, Move_PTP, Move_Line, Move_PLine)
6 The unit of the parameters are different, the user can find the conversion in the program of TM ROS driver.demo_write_item:
In this demo code, the user can use this service to send TMSVR 7 cmd.
7 For more detailed information, please refer to defined protocol (Chapter9.3 svr_write())demo_leave_listen_node:
In this demo code, the user can use send_script service sending a script to leave the Listen node.
💡 If the user has sent the demo_leave_listen_node script to leave the Listen node, and you want to run the TM Robot again, please remember that the Listen task project should be resumed to run. You can press the Stop Button on the Robot Stick and then press the Play/Pause Button to resume operation.
Note: If the user has even successfully built a specific code(tmr_ros1), the user only needs to change to the TM driver workspace path
cd ~/tmdriver_ws, and then directly refer to steps 5~7 below.
- Type to create a root workspace directory by starting a terminal: For example,
tmdriver_wsorcatkin_ws, then type to change the current directory into the workspace directory path.
mkdir ~/tmdriver_ws
cd ~/tmdriver_ws- Clone the TM driver of the git repository into the current directory by typing
git clone https://github.com/TechmanRobotInc/tmr_ros1.git- After the download done, rename the download folder
tmr_ros1(ortmr_ros1-melodic) tosrcby typing
mv tmr_ros1 src
(or right-click on the download folder, select "Rename...")- At the workspace directory to build the download packages and source 'setup.bash' in this workspace to make the workspace visible to ROS of this terminal 1.
Note: Do you setsource /opt/ros/melodic/setup.bashready? Make sure to obtain the correct setup file according to your workspace hierarchy, and then type the following below to compile.
catkin_make
source ./devel/setup.bash- Terminal 1: Startup ROS core and type
roscore- In a new terminal 2: Source setup.bash in the workspace path and run the driver to connect to TM Robot by typing
source ./devel/setup.bash
rosrun tm_driver tm_driver <robot_ip_address>
The <robot_ip_address> is the IP address of the TM Robot, the user can get it through TM Flow, for example, 192.168.10.2- In another new terminal: Source setup.bash in the workspace path and type specific demo node function which the user wants to study for applications. For example: the user select to run demo_set_io, the user can type
source ./devel/setup.bash
rosrun demo demo_set_io
⚠️ [CAUTION] Some demos will let the TM Robot move, please be careful.
This chapter describes a simplified GUI for displaying tm_driver connection status, sct, sta, svr messages, and robot status. The user can optionally install the ui_for_debug_and_demo package to aid in viewing messages between the driver and the robot through the GUI display. If the driver connection fails, the user can also try to send a reconnect command on this GUI for debugging.
- If the user forgets to run the TM ROS driver, the user will see all the controlled label items of the GUI displayed as "NaN".
- The user can click the"
Quit_GUI" button or click the "x" close button in the upper right corner to close this GUI.- If "
Ethernet" and "Listen Node" connection displays are "on", it means that ROS SvrClient and SctClient are successfully connected.- If the"
Ethernet" connection display is "off", the user should check whether the TM Robot has been started or whether the network settings are correct.- If the"
Listen Node" connection is "off", the user should check whether the task project is running.
💡 If "Listen Node" connection is interrupted as "Project_Run" is stopped, the "Listen Node" connection will be "off".- If both "
Ethernet" and "Listen Node" connection displays are "on", but the "Robot_Link" is false or "Robot_Error" is true; this means the robot is working abnormally, or maybe the ESTOP button was pressed or some kind of protection or error 1 occurred. Therefore, when the user sends a move script command at this time, it will not work.
1 For more detailed information, please refer to the TM Robot User Guide.- The user can use the self-developed script to read/write project data through communication protocols to control the TM Robot. If it does not work properly, the user can quickly determine whether there is a communication error code by viewing the "
Response ROS Node Status" display.- When the user sends a command or clicks DO0 Ctrl "
H/L" button of Control_Box, the user also can see the response message 2 embedded in the "Robot Response" item view.
2 For details of this item, please refer to SctResponse.msg, StaResponse.msg and SvrResponse.msg of TM ROS driver code.- The user can click "
clear" button to clear the old response message.
💡 If the"Ethernet" connection is interrupted, the display of most controlled label items in the GUI will be displayed as "NaN" and the robot feedback state will remain the last state and become invalid.
Note: If the user has even successfully built a specific code(tmr_ros1), the user only needs to change to the TM driver workspace path
cd ~/tmdriver_ws, and then directly refer to steps 5~7 below.
- Type to create a root workspace directory by starting a terminal: For example,
tmdriver_wsorcatkin_ws, then type to change the current directory into the workspace directory path.
mkdir ~/tmdriver_ws
cd ~/tmdriver_ws- Clone the TM driver of the git repository into the current directory by typing
git clone https://github.com/TechmanRobotInc/tmr_ros1.git- After the download done, rename the download folder
tmr_ros1(ortmr_ros1-melodic) tosrcby typing
mv tmr_ros1 src
(or right-click on the download folder, select "Rename...")- At the workspace directory to build the download packages and source 'setup.bash' in this workspace to make the workspace visible to ROS of this terminal 1.
Note: Do you setsource /opt/ros/melodic/setup.bashready? Make sure to obtain the correct setup file according to your workspace hierarchy, and then type the following below to compile.
catkin_make
source ./devel/setup.bash- Terminal 1: Startup ROS core and type
roscore- In a new terminal 2: Source setup.bash in the workspace path and run the driver to connect to TM Robot by typing
source ./devel/setup.bash
rosrun tm_driver tm_driver <robot_ip_address>
The <robot_ip_address> is the IP address of the TM Robot, the user can get it through TM Flow, for example, 192.168.10.2- In another new terminal 3: Source setup.bash in the workspace path and start GUI debug by typing
source ./devel/setup.bash
rosrun ui_for_debug_and_demo robot_ui
Real kinematic values vary from TM robot to another one as each robot is calibrated at the factory.
This chapter describes that the user can use a script program to extract specific kinematic values from your TM robot. The Python script function automatically generates a new URDF or Xacro robot model description file using a specific set of commands.
If the user just wants to use the TM Robot nominal model to control the robot, the user can skip the rest of this chapter.
The precise kinematic parameters of a robot are useful for improving the end-point accuracy of the robot.
Due to manufacturing tolerances during manufacturing and the installation error in the robot assembly process, the positioning accuracy and precision of the mechanism will be affected. The error between the reality and the nominal robot model is significantly reduced by the corrected robot description. The kinematic parameter compensated deviations of the robot can improve the absolute positioning accuracy of the robot.
If the user needs to improve simulation accuracy or end effector tracking performance, it is recommended that the user import the corrected calibrated kinematic parameters from the real TM Robot to replace the nominal set of D-H parameters. Techman Robot provides a URDF file that configures the TM Robot model with a set of nominal DH parameters, and one that uses the programming scripts to obtain calibrated kinematic parameters from a parameter server connected to your TM robot and perform a set of overrides to output a new corrected URDF file.
The common Python script is used as follows:python2 <script_name> <urdf_from> <urdf_gen>
- <script_name> : Provide modify_xacro.py or modify_urdf.py two Python scripts program as options.
- <urdf_from>: The first argument represents the original URDF model form of the TM Robot, and the file part naming 1 is <urdf_from>.
1 There are several built-in TM Robot nominal robot model settings, available for tm5-900, tm5-700, tm12, and tm14 models, as well as the eyeless models tm5x-900, tm5x-700, tm12x and tm14x models.
For example, select the tm12 nominal robot model as the input model form, the user can type tm12 as the <urdf_from>. For details of this item, please refer to the modify_urdf.py or modify_xacro.py code.- <urdf_gen>: The second argument means the newly generated URDF model form of the TM Robot, and the file 2 name is <urdf_gen>.
2 For example, if the user names it test and select modify_xacro.py as script program, a test.urdf.xacro robot description file will be generated.The Python script for more specific arguments is used as follows:
python2 <script_name> <urdf_from> <urdf_gen> <specific_para>
- <specific_para>: The third argument is provided for use in some special cases. Please refer to the scripting program 3 for details of this item.
3 For a simple third argument example, type the argument "-M" as follows:
Example :python2 modify_xacro.py tm5-900 test -M
→ A robot description file "macro.test.urdf.xacro" will be generated, and the string 'macro.' is prepended to the <urdf_gen> name.
💡 Do you run the driver to maintain the connection with TM Robot, make sure that TM Robot's operating software (TMflow) network settings are ready and the Listen node is running.
The following steps describe how to import specific kinematic values using a real TM5-900 Robot following the procedure below and select the corresponding type tm5-900 as an example of <urdf_from>.
- Terminal 1: Startup ROS core and type
roscore- In a new terminal 2: Source setup.bash in the workspace path and run the driver to connect to TM Robot by typing
source /opt/ros/melodic/setup.bash
cd <workspace>
source ./devel/setup.bash
rosrun tm_driver tm_driver <robot_ip_address>
The parameter
<robot_ip_address>means the IP address of your TM Robot, the user can get it through TM Flow.
- In another new terminal 3: source setup.bash in the workspace path, change the current directory to the directory path of the python script to get the specific kinematic parameters of your TM Robot, and then enter the specified command format to generate a new name by the <urdf_gen> argument, for example, named user_defined.
source /opt/ros/melodic/setup.bash
cd <workspace>
source ./devel/setup.bash
cd src/tm_description/scripts
python2 modify_xacro.py tm5-900 user_defined
When this procedure is completed, the user can find that the newly generated named robot description file has been saved, e.g."
user_defined.urdf.xacro".
📑 Note: In the previous chapter, we renamed the download folder tmr_ros1 (or tmr_ros1-melodic) to src. If the user misses this step, they will encounter such an error "[Error] [modify_xacro]: workspace directory not find" on the screen when executing the above command.
- Next, the user must modify the filename part of the default pre-built nominal robot model in tm5-900.urdf.xacro to a newly generated robot model description naming file.
cd src\tm_description\xacro\
sudo vim tm5-900.urdf.xacro
or use
gedittext editor instead ofvimto edit the file contents, by typingsudo gedit tm5-900.urdf.xacro📑 Note1: If your real Robot is a TM5-700, in the above example, you should type tm5-700 as an example for <urdf_from> and modify the tm5-700.urdf.xacro file.
📑 Note2: If your real Robot is the eyeless model as a TM5X-700, in the above example, you should type tm5x-700 as an example for <urdf_from> and modify the tm5x-700.urdf.xacro file.Please refer to the following to modify the content format of the filename line:
# Before modification : (Take the pre-built TM5-900 nominal robot model as an example)
  <xacro:include filename="$(find tm_description)/xacro/macro.tm5-900-nominal.urdf.xacro" />
# After modification : (Replace with your actual newly generated Xacro file)
  <xacro:include filename="$(find tm_description)/xacro/user_defined.urdf.xacro" />
Finally, the user can launch the modified robot file "
tm5-900.urdf.xacro" to run your TM Robot or simulate the robot more accurately.💡 Tip: Remember to recompile since the code has been changed.
Please go back to your specific workspace. Then you can clean the build and devel directories withrm -r build develbefore executingcatkin_make.
The following steps describe how to import specific kinematic values using a real TM5-900 Robot following the procedure below and select the corresponding type tm5-900 as an example of <urdf_from>.
- Terminal 1: Startup ROS core and type
roscore- In a new terminal 2: Source setup.bash in the workspace path and run the driver to connect to TM Robot by typing
source /opt/ros/melodic/setup.bash
cd <workspace>
source ./devel/setup.bash
rosrun tm_driver tm_driver <robot_ip_address>
The parameter
<robot_ip_address>means the IP address of your TM Robot, the user can get it through TM Flow.
- In another new terminal 3: source setup.bash in the workspace path, change the current directory to the directory path of the python script to correct urdf, and then enter the specified command format to generate a new named URDF with arguments, for example, named user_defined.
source /opt/ros/melodic/setup.bash
cd <workspace>
source ./devel/setup.bash
cd src/tm_description/scripts
python2 modify_urdf.py tm5-900 user_defined
When this procedure is completed, the user can find that the newly generated named robot description file has been saved, e.g."
user_defined.urdf".📑 Note1: If your real Robot is a TM12, in the above example, you should type tm12 as an example for <urdf_from>.
📑 Note2: If your real Robot is the eyeless model as a TM12X, in the above example, you should type tm12x as an example for <urdf_from>.Finally, the user can use the new robot file, such as "
user_defined.urdf", instead of the default nominal URDF model to run your TM Robot or simulate the robot more accurately.💡 Tip: Remember to recompile since the code has been changed.
Please go back to your specific workspace. Then you can clean the build and devel directories withrm -r build develbefore executingcatkin_make.
- How can the user confirm that the data conversion process has been completed?
Ans: The user can find the string "File saved with new kinematic values." displayed on the screen.- How can the user find the location of the newly generated named robot description file?
Ans: The user can first find the displayed string "[new save file path:]" on the screen, and the following string is the file save location.
More Support & Service, please contact us. @TECHMAN ROBOT[https://www.tm-robot.com/zh-hant/contact-us/]