Microscenes is a highly experimental visual scripting solution I developed to design small gameplay sections. Its main idea is to provide UX with minimum need for technical knowledge & fast iteration, without having to constantly update node database like Bolt forces you to. All graphs are stored in scene, not as scriptable objects so nodes can contain references to scene objects without any limitations. Though if you need to save graph to asset you can always use prefabs or presets.
Please note that this is not one of designer-only visual scripting solutions, this one is actually pretty programmer oriented and will require you to write custom nodes yourself.
Minimum supported unity version: 2021.3
Icons shown in examples are not available in this package. You can find example nodes in Runtime/Core/BuiltIn * directories.
The API will change in the future, no backwards compatability is guaranteed.
- Go to package manager.
- Click Add Package button (Plus icon), select "Add package from Git URL..."
- Paste this:
https://github.com/SanielX/Microscenes.git - Click Add
Note that you need Git installed on your computer for this to work, you can grab it here
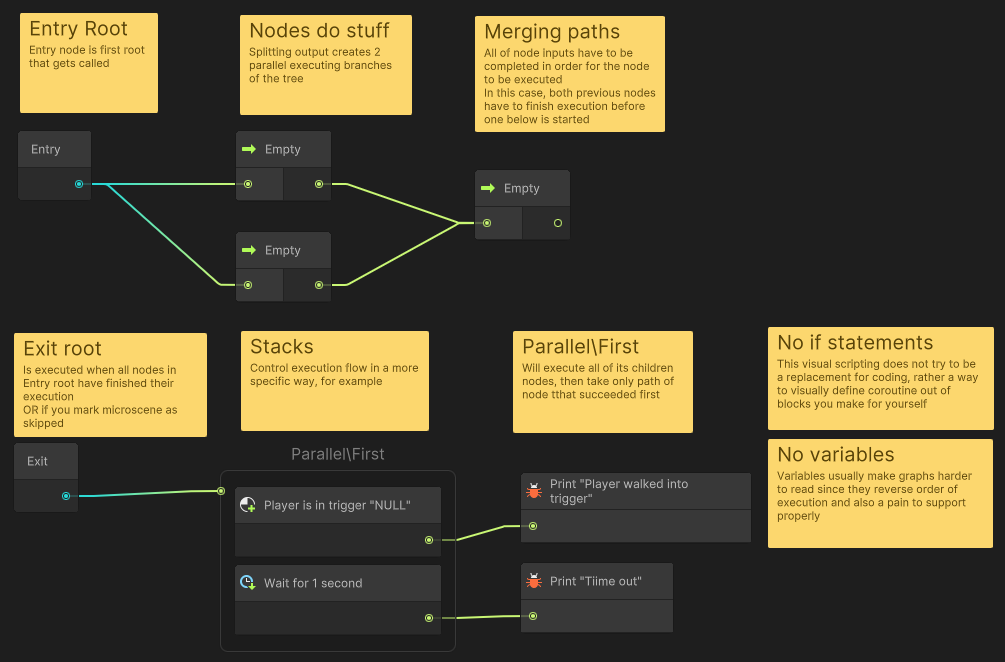
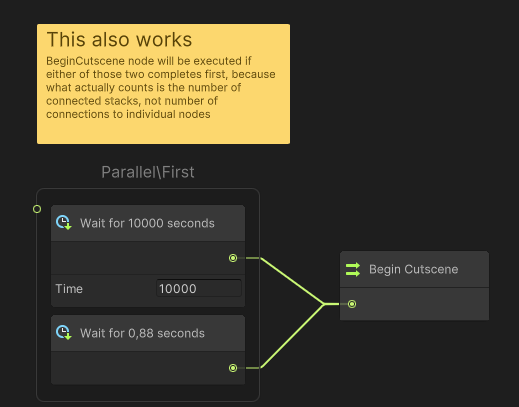
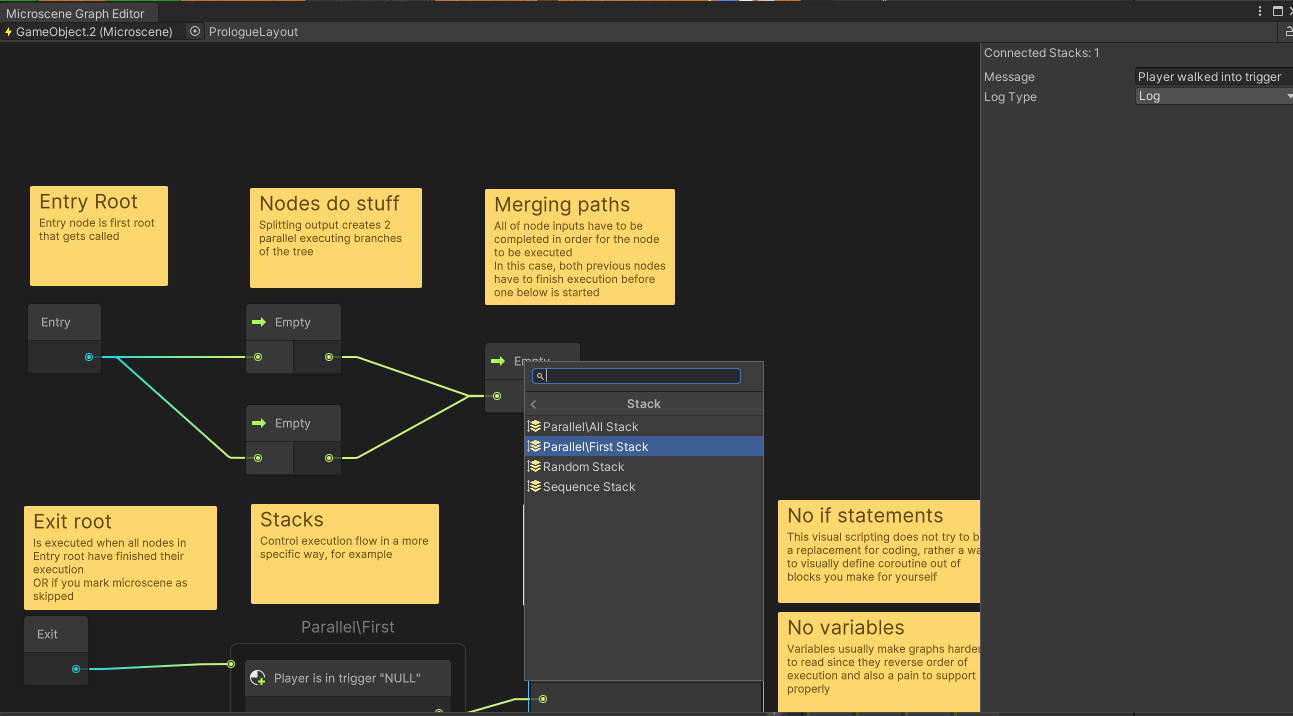
Microscene system is designed for linear games that have pretty defined order of events, though I don't see much of a problem in using them elsewhere. The idea behind this system is very simple can is described in following pictures.
Basically, you should make nodes that are suitable for your game and are abstract enough that you can describe what they do in one actual sentence like "Wait until player is in trigger".
- Graphs are serialized as part of the scene, so there's no limitation on referencing scene objects
- But if you want to save graph as an asset you can use Presets or Prefabs to do so
- Each node is a scriptable object so you can use CustomEditors like you would with any other unity object for free
- Undo/Redo in graph view
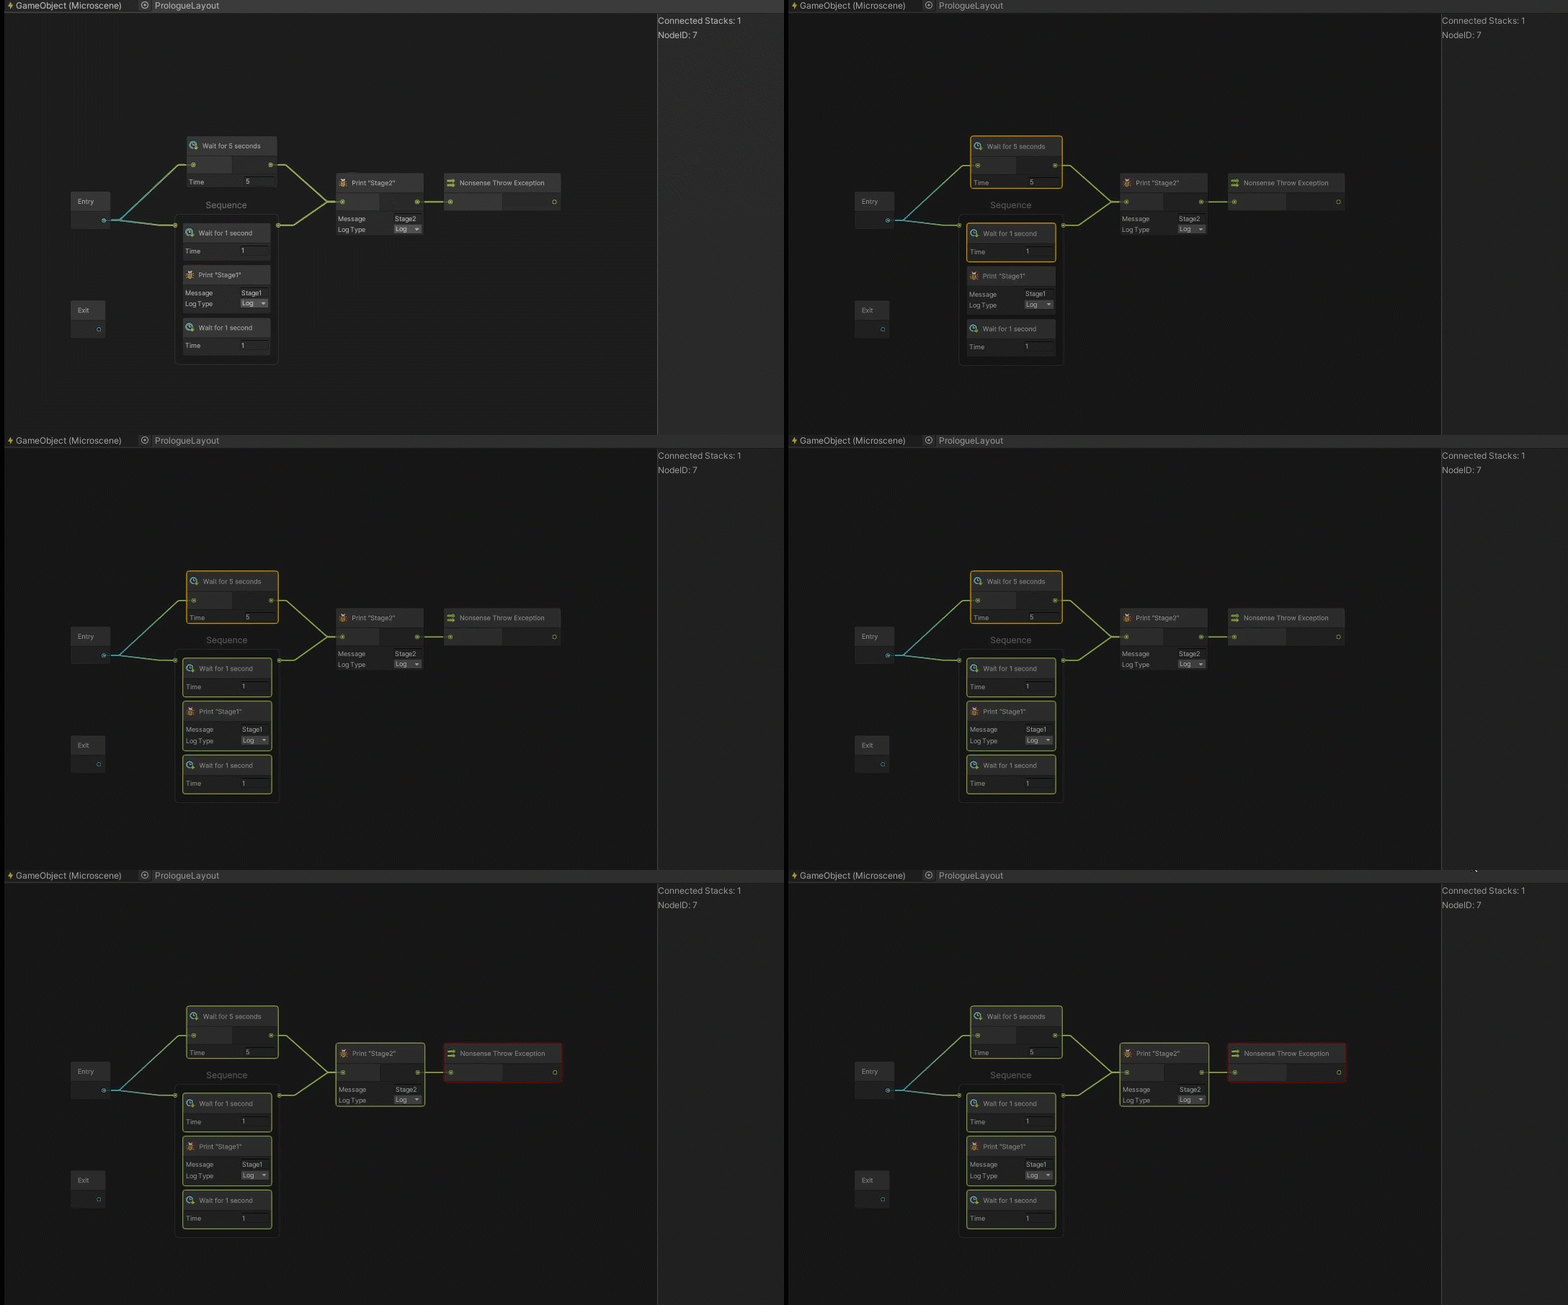
- See what nodes are being executed at runtime
- If any node throws, you can see last exception in node inspector when selecting it
- You can "Skip" graph execution which will lead to "Exit" root immediately. This allows to test levels and skip towards the thing you need to happen
Just add Microscene component to any GameObject and open graph using corresponding button. You can also open editor window from Window/Microscene Graph Editor menu. This window will automatically find Microscene component in your selection and regenerate graph. You can lock the window if you don't want selection change to change graph.
Graph is saved along with the scene, when you change target object or when closing window.
Graph is then executed as soon as component is enabled. It uses LateUpdate() to update.
Note that since graph is serialized in a component itself, you can't modify it when the game is running. You also must save scene before any changes made to graph structure are applied to the component.
To add node all you have to do is inherit your class from MicroAction or MicroPrecondition. Since every node is just a class serialized using [SerializeReference], you don't need to create separate file for each one.
You node will be available in Create Node dropdown automatically.
using Microscenes;

// ... EmptyAction.cs ... MicrosceneNode is a scriptable object so you have to keep 1 class per file
// for it to work
[MicrosceneNode("Useful tooltip")]        // Mark node to make it visible in graph window
[NodePath(NodeFolder.Abstract + "Empty")] // Enum is a shortcut to make folders, you can skip
                                          // this attribute if you don't want custom path in node explorer
// Note that if you class name ends with Node, Action, Precondition or Stack then
// these words will be removed in graph view
public class EmptyNode : MicrosceneNode
{
    protected override void OnStart(in MicrosceneContext ctx)
    {
        Complete();  // Immediately finish execution of a node
    }
}

// Example of checking condition every frame
[NodePath(NodeFolder.Abstract + "Wait")]
class WaitNode : MicrosceneNode
{
    private double timeOverStamp;
    [SerializeField, Min(0)] float m_Time;

    // Called just before Update if node was updated for the first time
    protected override void OnStart(in MicrosceneContext ctx)
    {
        if(m_Time == 0.0f)
        {
            // Completing from OnStart will prevent OnUpdate
            Complete();
            return;
        }

        timeOverStamp = Time.timeAsDouble + m_Time;
    }

    protected override void OnUpdate(in MicrosceneContext ctx)
    {
        // Use ctx.caller to debug with reference to Microscene component
        UnityEngine.Debug.Log("Time left: "+(timeOverStamp - Time.timeAsDouble), ctx.caller);

        if(timeOverStamp >= Time.timeAsDouble)
            Complete();
    }

    // NOTE: Throwing exception in OnStart on OnUpdate will lead to node state set to Crashed
    // This node will never finish its execution. This only happens if UNITY_ASSERTIONS is true
    // In release builds whole microscene will get aborted, so be sure to handle your errors properly

    // Also available
    public override void OnDrawSceneGizmo(bool selected, Microscene owner) { }
}You can define custom stack nodes in order to provide custom behaviour for node execution.
using Microscenes;

// Mark with this attribute in order to make type visible in node explorer
// Also marks whether stack can handle each node leading to a different path
[MicrosceneStackBehaviour(MicrosceneStackConnectionType.SingleOutput)]
sealed class SequenceStack : MicrosceneStackBehaviour
{
    private int index;

    // Note that Start may be called multiple times if microscene was activated multiple times
    public override void Start(ref MicrosceneStackContext ctx)
    {
        index = 0;
    }

    public override MicrosceneStackResult Update(ref MicrosceneStackContext ctx)
    {
        var nodeState = ctx.UpdateNode(index); // index must be in [0; ctx.StackLength) range
                                               // This is basically children nodes of a stack
        if(nodeState == MicrosceneNodeState.Finished) // Updating node returns its state after update
            ++index;

        // There are a bunch of methods to return result
        // Continue() - to continue execution of a stack,
        // Finish()   - to finish execution of a stack and select output at index 0,
        // FinishIf(condition) - to finish execution if condition is true,
        // FinishAndSelect(int nodeIndex) - finish and select output at index nodeIndex
        // FinishIfAndSelect(bool condition, int nodeIndex) - combination of the above
        return FinishIf(index >= ctx.StackLength);
    }
}

[MicrosceneStackBehaviour(MicrosceneStackConnectionType.MultipleOutput,
    tooltip: "Will update each child node every frame and select output "+
             "of a node that was completed first")]
[NodePath("Parallel\\First Stack")]
sealed class ParallelFirstStack : MicrosceneStackBehaviour
{
    public override MicrosceneStackResult Update(ref MicrosceneStackContext ctx)
    {
        // Going through all children until one of them finishes
        for (int i = 0; i < ctx.StackLength; i++)
        {
            var nodeState = ctx.UpdateNode(i);

            if (nodeState == MicrosceneNodeState.Finished)
            {
                return FinishAndSelect(i);
            }
        }

        return Continue();
    }
}
NodeIconAttribute allows to add an icon to a node. You can initialize it using string 'filter', then the next set of rules is applied:
- If filter starts with "Assets/" or "Packages/", then icon is loaded using absolute path using AssetDatabase.LoadAssetAtPath<Texture>.
- If filter starts with "Resources/" then rest of the path is used for Resources.Load(string) call.
- If filter starts with t: and contains '.' symbol, icon is retrieved from type with the same name (Must match whole name including namespace)
- If filter starts with t: and does not contain '.', then search through types is used but only for Type.Name, first match is used to retrieve the icon.
- If type is found, then rules are the same as for initialization with
System.Type - If none of these criteria are met, icon is loaded using EditorGUIUtility.IconContent(string)
Initialization with Type works as follows:
- If type is
MonoBehaviourthen findsMonoScriptasset and retrieves icon from it. - If type is
ScriptableObjectthen creates temporary instance and gets icon from it. - If type is built in unity type, then
AssetPreview.GetMiniTypeThumbnail(Type)is used
Just implement INameableNode interface. This will make graph view will set node name to whetever GetNiceNameString returns.
Rich text is supported.
class NamedAction : MicrosceneNode, INameableNode
{
    [SerializeField] string m_NodeName;

    // This name will be displayed in graph view
    string INameableNode.GetNiceNameString() => m_NodeName;
}
Check out Microscenes.Utility.NodeNaming class for helper methods to implement this interface, such as text coloring.
So one other thing I noticed is that microscenes can be nicely used for interactions with objects, but in this case some nodes would need additional data such as lookDirection and so on. Therefore I made context system. Basically, any node can define RequireContext attribute, which will make it to not be available until context request is satisfied.
To provide context you have to implement IMicrosceneContextProvider interface. If microscene finds IMicrosceneContextProvider component on the same game object, it will disable itself and activation will only be possible from external source. See example
public class InteractionData
{
    public Vector3 ViewDirection;
}

public class InteractableItem : MonoBehaviour, IMicrosceneContextProvider
{
    public Type MicrosceneContext => typeof(InteractionData);


    /// ... somewhere in code ... ///
    void enableScene(Vector3 direction)
    {
        InteractionData data = new() { ViewDirection = direction };
        GetComponent<Microscene>().StartExecutingMicroscene(data); // This will enable microscene

        // You can also check whether is completed by using
        // Microscene.IsExecutingAnyNode
    }
}

[RequireContext(typeof(InteractionData))] // Node won't be available unless Microscene has component which provides such context
public class InteractionDependentAction : MicrosceneNode
{
    protected override void OnUpdate(in MicrosceneContext ctx)
    {
        var interactionData = ctx.customData as InteractionData; // Get custom data
    }
}- Can't copy paste nodes
- You can't really modify graph at runtime in a way that won't break it. I didn't have a need for it yet and I also don't know how would you implement such a thing
- Since intended for internal use, some editor code is really junky, sorry if you break your leg there :)
- Apparently, graph view is going to get deprecated. Great :')
- Search window in graph view is not very good and repeats some entries on search
- No loops (Don't know if that's a problem actually)


