This is based on the React Redux Hooks Boilerplate by Vicesoftware.
- Virtual Care for Families UI
- Installation and Running
- Goals
- Features
- Folder Structure
- Patterns
- Infrastructure Components
- Best Practices
- Configuration
- Learn More
- Automated Testing
- Feature Flagging
This project was bootstrapped with Create React App.
Note that the app supports docker for projects that want to use micorservices. Because of this the Web Application is in the webApp folder.
IMPORTANT
All of the commands below require you to be in the webApp directory
- Runs the app in the development mode.
- Open http://localhost:3000 to view it in the browser.
- The page will reload if you make edits.
- Prettier will run and auto-format your code whenever a file is saved.
- You will also see any lint errors in the console.
- Currently lint errors get written out twice. We will try and fix this soon.
- Runs with the same specification as npm start, but the api endpoints will be sent to https://pond.dev
- Runs with the same specification as npm start, but the api endpoints will be sent to http:://localhost:3040
- This command should only be used if the backend environment is running locally with the correct configuration (In the local services runner repo, this could be done with the script 'npm run only-pond-api')
- Launches the test runner in the interactive watch mode.
- See the section about running tests for more information.
NOTE
You must place
node-modulemocks in thewebapp/src/__mocks__director becausecreate-react-appreset Jest'srootsconfig for performance reasons. I lost half a day on figuring this out so figured I'd share. The PR is below.https://github.com/facebook/create-react-app/pull/7480/files
- Builds the app for production to the
buildfolder. - It correctly bundles React in production mode and optimizes the build for the best performance.
- The build is minified and the filenames include the hashes.
- Your app is ready to be deployed!
- See the section about deployment for more information.
NOTE
This is a one-way operation. Once you
eject, you can’t go back!**
If you aren’t satisfied with the build tool and configuration choices, you can eject at any time. This command will remove the single build dependency from your project.
Instead, it will copy all the configuration files and the transitive dependencies (webpack, Babel, ESLint, etc) right into your project so you have full control over them. All of the commands except eject will still work, but they will point to the copied scripts so you can tweak them. At this point you’re on your own.
You don’t have to ever use eject. The curated feature set is suitable for small and middle deployments, and you shouldn’t feel obligated to use this feature. However we understand that this tool wouldn’t be useful if you couldn’t customize it when you are ready for it.
To run the Web Application in a docker container from the root directory execute the command below.
docker-compose up
The code running in the container uses a mapped volume and will have all the same features as when you run npm start from webApp directory (file watching for prettier, rebuild, etc...). The main difference is that you won't get as pretty formatted output (no colors, etc...) and you won't be able to click on the source code paths to jump to the file.
These are the goals of this boilerplate
We don't want to waste time or our clients budgets rewriting the same code over and over for things every web app needs like
- authentication
- authorization
- popups (errors, notifications)
- busy indicators
- caching
- forms and validations
- ect...
We want to make sure that
- developers are able to do the 80% they need to do most often easily without a lot of boilerplate
- new developers on the project can get up and running quickly and modify the code confidently
It's much easier to create software that is a liability, that offers little value to the sponsors without the team that wrote it. We want the systems built with this boilerplate to be easy to transfer from one team to another. We often help clients to build apps that their own teams will take over one day and want that transfer to be as easy as possible.
We don't want to include libraries because they are popular, we want to include them because they add value that we want to take advantage of. So for example if we are using Redux then we want to take advantage of the valuable features it provide (dev tooling, serializable state, etc...).
We want to make sure that if the projects that use this boilerplate become successful and complex overtime that they won't outgrow the patterns, infrastructure and best practices.
Below are some of the features that we've added to this boilerplate
We've added easy to use support for polling. See the videos that follow for details.
Our architecture uses a pattern we call Feature Module and we have added a blueprint template that will allow generating a working Feature Module from the context menu. The video below walks through quickly creating a feature using this approach.

To take advanatage of this feature you need to use Visual Studio Code with the Blueprint Templates plugin. Once you have Blueprint installed then you can simply:
-
Right click on a folder
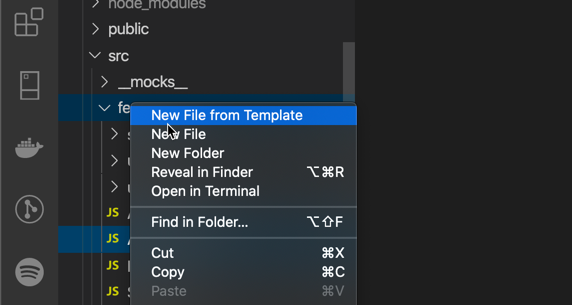
-
Select the
Feature Moduletemplate
-
Enter the name of your new feature
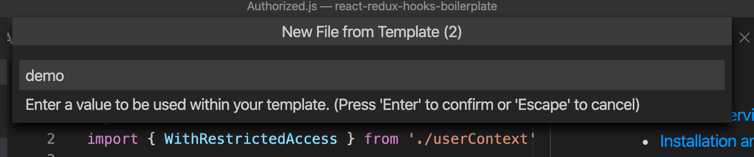


Now you will have a new feature module created like the one showed below.

We provide a login flow that you can plug in Auth0 or whatever IDP you like to use. Our authentication flow will allow you to call your IDP and handles redirecting from protected routes to Sign In page for you as well as redirecting back to the calling page after successful sign in. The user profile returned from your IDP will be put into redux and available on the state.userContext slice.
NOTE
You can watch a video demonstrating this feature in the Overview Video section.
We have added withRestrictedAccess(component, permissions) HOC which takes permissions array that will be cross referenced with state.userContext.permissions automatically and prevent access for users without the configured permissions.
NOTE
You can watch a video demonstrating this feature in the Overview Video section.
Via the doAsync module that can be easily used with createAsyncThunk from redux-toolkit we support redux caching. Passing useCaching: true to doAsync({url, useCaching: true}) will not go to the server if the data has already been fetched and is in redux.
NOTE
You can watch a video demonstrating this feature in the Overview Video section.
Via the doAsync module that can be easily used with createAsyncThunk from redux-toolkit we support background loading of data via API calls. Passing noBusySpinner: true to doAsync({url, noBusySpinner: true}) will start a call to the API but not turn on the busy indicator. Note that if a call comes through for the same url before the first background call returns then the busy spinner will be turned on and the API will not be called and the current request will not be sent to the API.
NOTE
You can watch a video demonstrating this feature in the Overview Video section.
The busyIndicator module allows for redux based busy indicator management. Our doAsync module will automoatically turn on and off the busy indicator for you as you call the API. You can also manually turn on and off the busy indicator and there is support for named busy indicators allowing for creating regional busy indicators.
NOTE
You can watch a video demonstrating this feature in the Overview Video section.
Every time a file is saved when the app is running in dev via npm start that file will be beautified via prettier and the prettier rules have been configured to match the eslint rules.
If you introduce a circular dependency in your import statements the build will fail and you will be forced to fix it by refactoring your code. If circular references aren't fixed you will eventually get a very hard to fix object null null type of exception. This usually happens after there are a lot of circular references in the code making cleaning all up difficult and expensive.
We are using the folder structure described below.
webapp: contains the web app sourcefeatures: one folder for each app feature (userProfile, orders, accounts, etc...)infrastructure: contains code that is a cross cutting concern but not a component (httpCache, doAsync, etc...)widgets: contains reusable UI widgets (NavBar, Modal, NotificationPopup, etc...)
Below are patterns we use and best practices we recommend.
The feature module pattern is the pattern we recommend for organizing a feature in the application where a feature is a set of functionality that uses one or more Redux reducer slices. Basically, this means any feature of your app that uses redux. This could be a widget like a busy indicator or a domain specific feature like a document list. You can easily create feature modules using the technique described in the Feature Module Generation in VS Code secont above.
NOTE
You can watch a video on generating a Feature Module in the Feature Module Generation in VS Code section.
A feature module is designed to be contained using the module approach found in node JS. We can thinkg of each features as being a self contained node module. It's desirable that if you write a component that could be used in another project that you could easily move the files over to the new project and using this organization will give you that benifit. Each module is made up of a folder with the following files.
- demo
-- index.js
-- demo.slice.js
-- demo.asyncActions.js
-- demo.selectors.js
-- Demo.js
NOTE
Not all files are required in all cases
This file defines the public interface of the module and allows us to be explicity about how it should be used.
NOTE
In Javascript it's possible for anyone to
importany file so the goal here is to express intent not to prevent misuse.
Every export in this file is something that you can easily import else where in the system. The structure of this file is
import Demo from './Demo'
import * as selectors from './demo.selectors'
import * as asyncActions from './demo.asyncActions'
import slice from './demo.slice'

export const {
  name,
  actions: { updateFilter },
  reducer,
} = slice

export const { fetchAllDemo } = asyncActions

// we prefix all selectors with the the "select" prefix
export const { selectAllDemo, selectDemoFilter } = selectors

// we export the component most likely to be desired by default
export default Demo
NOTE
We are using
redux-toolkitand they recommend following an approach calledduxwhere you put all your actions and selectors and other data flow code in a a single file. We are not following that here. Instead we have put./module-name.selectors.jsand./module-name.asyncActions.jsin seperate files and this is because we find these get large over time in complex systems.redux-toolkitis being responsive to it's users complaints about having to modify too many files when they make changes but we feel that the benifits in a large system out weigh this concern.
Exports
What we are exporting is:
This is available to consumers and should be used as the name of the slice on the root reducer as shown below:

NOTE
The name is part of the slice created by
redux-toolkit'screateSlice()builder function.
This is available to consumers and should be used as the reducer for this module and mounted to the root reducer:

NOTE: The name is part of the slice created by
redux-toolkit'screateSlice()builder function.
Here we destructure each action that we wanted exported from the colloction of actions that will be created for us by redux-toolkit's createSlice() builder function.
import Demo from './Demo'
import * as selectors from './demo.selectors'
import * as asyncActions from './demo.asyncActions'
import slice from './demo.slice'

export const {
  name,
  actions: { updateFilter }, // <=== export each action here
  reducer,
} = slice
Each of these actions will be created for us when we build our slice as shown below.
import { createSlice } from '@reduxjs/toolkit'
import * as asyncActions from './demo.asyncActions'

const initialState = {
  allDemo: [],
  filter: '',
}

const slice = createSlice({
  name: 'demo',
  initialState,
  reducers: {
    // synchronous actions
    updateFilter(state, action) {
      // <=== action to be exported
      state.filter = action.payload
    },
  },
  extraReducers: {
    // asynchronous actions
    [asyncActions.fetchAllDemo.fulfilled]: (state, action) => {
      state.allDemo = action.payload
    },
  },
})

export default slice

export const { name, actions, reducer } = slice
In the above example when we declare reducders as an object with a updateFilter() method, under the hood redux-toolkit will create an action for us and make it available on the slice.actions collection.
As part of the feature module pattern when we add a new action/reducer function to our slice's reducer section we need to also export it from our index.js file if it's meant to be available to other modules in the system.
NOTE
It is possible that you would want to have actions that are only used internal to your module.
We destructure each of our asyncActions that we want available externally.
// removed for clarity

import * as asyncActions from './demo.asyncActions'

// removed for clarity

export const { fetchAllDemo } = asyncActions

// removed for clarityWe destructure each of our asyncActions that we want available externally.
// removed for clarity

import * as selectors from './demo.selectors'

// removed for clarity

// we prefix all selectors with the the "select" prefix
export const { selectAllDemo, selectDemoFilter } = selectors

// removed for clarity
Each generated selector file will have a selectSlice function defined like shown below.
import slice from './demo.slice'

export const selectSlice = (state) => state[slice.name]

export const selectAllDemo = (state) => selectSlice(state).allDemo
This function should be used to access the root of the slice as it will use slice.name and allow for easier refactoring of the slice name.
NOTE
See the Only access redux state in selectors and Always collocate selectors with reducers best practices.
We are following APIGee's pragmatic REST as documented here: https://pages.apigee.com/rs/apigee/images/api-design-ebook-2012-03.pdf
Here we document the APIs of the infrastructure components.
This is our most feature packed module. It is a thunk builder that allows easily wiring up asynchronous calls to the API with full redux support. It can be used inside Redux Toolkit's createAsyncThunk builder function or stand alone. It's common usage is shown below.
export const fetchAllDemo = createAsyncThunk(
  'demo/getAll',
  async ({ useCaching, noBusySpinner } = {}, thunkArgs) =>
    await doAsync({
      url: 'demo',
      useCaching,
      noBusySpinner,
      successMessage: 'Demo loaded',
      errorMessage: 'Unable to load demo. Please try again later.',
      stubSuccess: ['Dummy item 1', 'Dummy item 2'],
      ...thunkArgs,
    })
)doAsync only takes on argument which is a config object with the properties shown below.
| Properties | Description | Default |
|---|---|---|
| url | Specifies the API endpoint to call where a url is build with 'transport://host/api-prefix/endpoint'. doAsync will build the url with the correct transport, host, and api-prefix for the current environment. |
no default, must be specified |
| httpMethod | Specifies the http verb to use. | 'get' |
| errorMessage | An error message to show to the user using the popupNotification module after a reqeust returns an error code. | 'Unable to process request. Please try again later.' |
| successMessage | A sucess message to show to the user using the popupNotification module after a request returns successfully. | no default, optional |
| httpConfig | doAsync uses fetch internally. doAsync will provide reasonable defaults for the request argument to fetch(url, request) which will include configurations for authentication, accept, etc... However, you can specify any values for the request argument to fetch here and they will override the defaults provided by doAsync |
no default, option |
| onError | Callback that can be used to have code called when an error occurs. | no default, optional |
| noBusySpinner | If true then no busyIndicator won't be incremented for this request. Note that if an additional request comes through for the same url and httpMethod with noBusySpinner set to false before the previous request with noBusySpinner set to true completes then the busyIndicator will be incremented and the current request will not be sent to the API. |
false |
| busyIndicatorName | Name of the busyIndicator to increment | no default, optional |
| useCaching | If true then subsequent requests to the same url and httpMethod (and body for POST, PUT, UPDATE) will not be sent to the server. This will allow components to use the data in Redux as a cache for better responsivness for the users. |
false |
| stubSuccess | Specifies a dummy body to return to the caller. This is intended to be used to get UIs built before the APIs are ready. If you specify an object or array here it will be returned to the caller after a delay which will allow simulated busy indicator. | no default, optional |
| stubError | Same as stubSuccess except will return an error code and reject the promise |
no default, optional |
The busy indicator module allows for easy busy indicator functionality. To show a busy indicator simply wrap your components in the BusyIndicator component as shown below.
<div>
  <h2>Demo</h2>
  <input
    type='text'
    value={filter}
    onChange={(e) => dispatch(updateFilter(e.target.value))}
    placeholder='Filter by...'
  />
  <BusyIndicator>
    <ul>
      {demo &&
        demo
          .filter((item) => (filter ? item.includes(filter) : true))
          .map((item) => <li key={item}>{item}</li>)}
    </ul>
  </BusyIndicator>
</div>
The busy indicator integrates with doAsync and will show by default when any request is pending that was called with noBusySpinner set to false will decrement the global busy indicator. If you want to have more than one busy indicator then pass doAsync a busyIndicatorName and then put that name on your busy indicator instance as shown below.
// foo.asyncActions.js
doAsync({ url, busyIndicatorName: 'foo'})

// bar.asyncActions.js
doAsync({ url, busyIndicatorName: 'bar'})

// SomeComponent.js

<BusyIndicator name="foo">  // will only show buys for "foo"
   // foo related components
</BusyIndicatory>

// other components

<BusyIndicator name="bar">  // will only show buys for "bar"
   // bar related components
</BusyIndicatory>An HOC that allows creating components that support authentication and authorization.
To require a user be authenticated simply wrap your component in WithRestrictedAccess as shown below.
import React from 'react'
import { WithRestrictedAccess } from './userContext'

const Authenticated = () => <h2>Authenticated</h2>

export default WithRestrictedAccess(Authenticated)To create a component that requires one or more premission pass an array of strings to the WithRestrictedAccess as shown below.
import React from 'react'
import { WithRestrictedAccess } from './userContext'

const Authorized = () => <h2>Authorized Page</h2>

export default WithRestrictedAccess(Authorized, ['can-do-foo', 'can-do-bar`])To show popup notifications use the actions in the popupNotification module shown below.
| Action | Description |
|---|---|
| notifyError | Will show an error popup |
| notifySuccess | Will show an information stype popup |
| resetError | Will reset the popup so that it won't be shown again |
| closePopup | Will close the popup |
Below are best practices we recommend following.
We recommend only accessing state from selectors and not directly in components.
Good
// Foo.js

// Inside component
const foo = useSelector(selectFoo) // loosely coupled
Bad
// Foo.js

// Inside component
const foo = useSelector((state) => state.foo) // couples component to state shape
This approach greatly improves your ability to refacotor you state atom shape and improve it over time by incorporating patterns like normalization.
The creator of Redux, Dan Abromov's, recomends collocating selectors with reducers and we agree. While Dan shows doing this by keeping selectors in the reducer file you can also collocate by keeping the selectors in the same module and then bundling everything into the same module in your index.js file as shown in our Module Structure section above.
Below are configurations supported in this boilerplate.
coming soon...
You can learn more in the Create React App documentation.
To learn React, check out the React documentation.
This section has moved here: https://facebook.github.io/create-react-app/docs/code-splitting
This section has moved here: https://facebook.github.io/create-react-app/docs/analyzing-the-bundle-size
This section has moved here: https://facebook.github.io/create-react-app/docs/making-a-progressive-web-app
This section has moved here: https://facebook.github.io/create-react-app/docs/advanced-configuration
This section has moved here: https://facebook.github.io/create-react-app/docs/deployment
This section has moved here: https://facebook.github.io/create-react-app/docs/troubleshooting#npm-run-build-fails-to-minify
- To run the end to end tests against the local environment use 'npm run test:e2e'
- If using docker, npm run only-pond-api will give you the appropriate backend containers (it does not spin up containers for the admin dashboard)
- To run the end to end tests against pond.dev use 'npm run test:e2e:pond'
- Currently linting is not automated for tests, so prior to merging use 'npm run format'
- Additionally, there may be a use case to clear the test cache, if so, use 'npm run test:cache'
Page Object Approach
The pageObjects folder contains page objects that represent either pages or components. We collocate selectors that are found on that page or in that component in that page object class.- Two examples of components are scheduleVisit and requestVisit that are both modals, but get their own page object class.
Tests
The specs folder contains the tests. Each test represents a happy path flow in pond. The beforeEach is the setup portion of the test. The assertions take place in the tests using the expect-playwright utility library.-
Playwright has a class of selectors
Selectors
The page objects house the selectors for that page or component.- Ideally a selector can be as clean as possible, such as:
async modalNextStep() {
	await this.page.click('text="Next"')
}- If no intuitive selector exists, a classname, id, or data attribute can be used, the following example is a dynamic selector using a css class name paired with its html element
	async searchGroupName(groupName: string) {
	await this.page.fill('input.e2e-visits-sessions-archive-search', groupName)
}
CodeGen / Creating a test
- Playwright also has a cli tool https://github.com/microsoft/playwright-cli
- Install it using: npm install -D playwright-cli
- To use the code gen tool: npx playwright-cli codegen {website_name_here}
- This will allow you to click through the ideal flow and have a generated set of methods (the selectors will likely need to be revised)
Config / Global Variables
-
The global config is stored in the root at jest.e2e.config.js
-
Global variables such as user account information is stored there.
-
This is also a place to switch between:
- Headless mode
- Switch between chromium / webkit
- Add a mobile target device
Why waitForTimeOut?
Problem: The tests often fail because they are unable to find an element. Playwright exposes many different selectors to handle this, such as waitForSelector, waitForPageNavigation, waitForNetworkIdle, and others, but they all appear to be flakey and also at times inconsistent across chromium / webkit.
Solution: So far the cleanest solution is to simply add waitForTimeout. It's easy to read and works across both environments.
- Not scalable, but solves the issue for right now
Why TestSequencer / --runInBand / why are the tests running serially?
-
Problem: Although playwright and jest allow for running in parallel. There are two issues:
- If all the tests run at the same time, Auth0 may rate limit one or more and deny access, causing failed tests
- The tests do not have an independent DB environment, meaning they may run into each other or cross paths causing failed tests
-
Solution: The test sequencer and run in band are the current approaches to solving this. The test sequencer allows for ordering the tests, which is why the file names start with numbers. The run in band forces the tests to run serially (this is typically used for debugging, but we are using it to guarantee one by one test running). Test sequencer creates an order but still runs the tests in parallel as far as I am aware.
- Not scalable, but solves the problem currently
- Note: this is all set up already, and no extra configuration is necessary
Cross Browser Inconsistencies / Testing in Webkit
- Problem: Tests that work in chromium may not work in other environments. Unfortunately, Safari cannot be opened locally in playwright.
Solution: The only option I have found to solve this is to simply merge the test changes if they work with chromium then follow up post merge with tests to safari against pond.dev using npm run test:e2e:pond.
-
Additional note: the tests fail in firefox, but firefox is not a current target environment.
-
If anyone is able to solve safari being opened in localhost, please let me know and will update the docs.
Sharing Selectors across pages
Problem: How to share a selector from one page to another, such as two page components that are modals (requestVisit and scheduleVisit)?.
Solution: I ended up duplicating the selectors in this case. Other options were:
-
Use prototypal inheritance with the classes and create a base class.
-
Pass the page object back and forth in the spec file Both of the above options are definitely viable, but duplicating selectors seemed the cleanest.
Global Timeout / Why are tests timing out?
- Problem: Jest tests will currently timeout before a typical e2e test will complete.
Solution: Adding a jest.setTimeout(time_here) will override the jest configuration time and allow the test to complete. There is a global timeout option, but it appears not to work consistently, so jest.setTimeout is the preferred option currently.
File Naming
Problem: Why are the files named with numbers?
Solution: The custom sequencer file (CustomSequencer.ts) orders the test files. The simplest approach to maintaining the order was to add numbers to the beginning.
-
The library we are using is called Flagged
How to use the current implementation of feature flagging?
- Flagged has a suite of apis available, currently the approach is to wrap the feature flag component or page in the Flagged HOC, then pass in the name of the feature- The env variable with the key NEXT_PUBLIC_FEATURE_FLAGS will read and determine which variables can be shown
How to use feature flagging with organization id?
- use the useFeatureWithOrg hook, pass in the feature name (a string) and the orgid (a number). A boolean will be returned indicating whether the feature is enabled for that org-
Example with no organization id:
-
NEXT_PUBLIC_FEATURE_FLAGS={"patientArchive": true, "videoVisit": true, "visitAndSessionArchive": true, "visitsArchive": true, "sessionsArchive": true}
-
Example with organization id:
-
NEXT_PUBLIC_FEATURE_FLAGS={"patientArchive": true, "videoVisit": [1, 2, 3], "visitAndSessionArchive": true, "visitsArchive": true, "sessionsArchive": true}
- Organizations 1, 2, & 3 will display videoVisit if the hook is used, such as:
const isFeatureEnabled = useFeatureWithOrg('feature', 1)
- isFeatureEnabled will be a boolean indicating whether that feature is true for the particular organization
-
Notes:
- This api may change again in the future
- There is a native api provided by the flagged library that this custom hook uses, and in the future it may be worthwhile to switch to that
- If this hook stays in usage, it would be good to check for performance optimizations