![]()
This is a collection of commands I'm using on my linux machine (Ubuntu 20.04.1 LTS) as a Python/Java developer. It is a structured documentation of the commands I'm using throughout interactive shell sessions. Caution, this abstract is highly opinionated 😉

- Cheat Sheet - Linux
- 1. Shell Expansions, Shell Operators
- 2. Built-in Commands
- 3. Third Party Tools
- 4. Aliases and Functions
- 5. Shortcuts
- 6. Shell Configuration
I use the alias marcopolo to reach this cheat sheet faster:
echo "\nalias marcopolo='xdg-open https://github.com/NiklasTiede/cheatsheet && exit'" >> ~/.zshrc
source ~/.zshrcExpansions are performed by the shell before the command is executed. Tilde and filename expansion are used more frequently when interacting with the shell. Brace, variable and arithmetic expansion tend to be used more often while doing shell scripting.
The tilde ~ expands to the environment variable $HOME, which is usually the home directory. If $HOME is not defined, tilde ~ expands with the home directory by default.
$ echo ~
/home/username
Filename expansion is a way to select easily a number of files or directories from within the current working directory as arguments for a command. This is accomplished by pattern matching: A so-called glob pattern containing wildcard characters is used to specify the files or directories. The wildcard characters can represent any of the 128 ASCII characters and can be less specific (* or ?) or more specific ([...])
| Wildcard Character | Description |
|---|---|
* |
Matches any number of any characters |
? |
Matches any single character |
[...] |
Matches any one of the enclosed characters |
Examples:
$ ls
file1.go  file2.go  file3.py  file4.py  file40.py

$ ls *.py
file3.py  file4.py  file40.py

$ ls file?.py
file3.py  file4.py

$ ls file[0-3].*
file1.go  file2.go  file3.py
The lesser known extended globbing (like *(pattern)), is used more commonly in shell scripting than in interactive shell sessions. The same applies for brace, variable and arithmetic expansions which are explained within the Shell Scripting section.
Shell operators let you combine commands which expands your tool belt vastly. They can be divided into two categories: redirection and control operators. Control operators allow for coupling commands.
| Token | Example | Description |
|---|---|---|
| |
history | grep "patt" |
Pipelining: direct output of com1 to com2 |
& |
python myscript.py & |
Start child process (execute in background) |
&& |
com1 && com2 |
Execute com2 only if com1 is executed |
; |
com1; com2 |
Execute both commands always |
Especially the pipe operator | here shines. Any output printed by command1 is passed as input to command2.
Examples:
$ ls | head -3

$ cat filename | grep 'pattern'
Whereas redirection operators direct the output of a command to another command.
| Token | Example | Description |
|---|---|---|
> or < |
echo '#projectname' > README.md |
Direct output of com1 to com2 or vice versa |
>> or << |
echo 'source x' >> ~/.bashrc |
Append output |
>& |
./script.py > script.out 2>&1 |
Redirect both standard error and standard output |
Examples:
$ echo 'alias=' >> ~/.zshrc

$ more good examples
These operators and shell expansions will be found throughout this cheat sheet repeatedly.
Linux distributions contain a plethora of powerful built-in commands. The presented commands are sorted by topic. If you're not aware of a commands capabilities you can add the --help or -h flag to display all options. The --version or -v flag returns the version number and is commonly used right after installation to check correct installation.
<command> --help
<command> --version

time <command>             # returns time to execute command
exec zsh                   # replace current shell process with new instance
Sometimes it's nice to know how much time the execution of a command or a chain of commands took, here the time command does the job!
Navigation on the file system is the first step towards learning how to utilize the power of a linux system. Notice: Tab enables auto completion of file-/dirnames and saves valuable time!
ls                # list content of current working dir
ls -la            # display all files and extended file metadata
ls -la *.py       # lists only python files

cd <directory>    # change directory
cd ..             # goes on folder up
cd -              # goes back to previous dir

pwd               # print working directory
date              # to navigate yourself in time ;-)

xdg-open .        # opens the Nautilus file manager
gnome-terminal    # opens a new terminal window
Since most people (like me) don't have a photographic memory, it's always a good choice to use the machines memory.
history           # prints a list of all historically used commands
history | tail    # prints 10 recently used commands

clear             # clears the terminal
Pressing arrow keys Up Down or Ctrl R (search bar) is my preferred choice. BTW: I geared the shell towards my needs (see Shell Configuration) so everything looks nice and pretty.
Wanna get more information about a commands features? Look into the manual pages or use whatis if time is tight. which can clear things up about a commands origin on the filesystem.
man <command>           # shows a manual (man pages)
whatis <command>        # returns a one-line description

which <command>         # returns path to the programs binary
file *                  # lists the types of all files

type <command>          # discriminates between built-in and 3rd party tools
File space estimation:
sudo du -sh <file/dir>  # shows size of specified file/dir
sudo du -sh *           # shows the size of all files/folders
df -h # shows all memory usage on filesystemSome basic operations when working with files and directories.
touch <file>            # creates an empty file

rm <file_name>          # removes a file
rm -rf                  # forces to remove a directory with content recursively

mkdir <dir_name>        # create directory
mkdir -p a/b/c          # creates a directory tree
mkdir file{1..5}        # creates 5 enumrated files

rmdir <dir_name>        # removes a directory
Files and directories can be copied or linked. Hard links point to the files in memory directly whereas soft links point to the file which references to the place in memory.
cp <file> <path/new_filename>  # copies a file to the advised path
cp -R <source> <destination>   # copies recursively

ln <target> <new_link>         # creates a hard link to a file
ln -s <target> <new_link>      # creates a soft link to a file
rm <new_link> # removes the symlinkThere are several commands to see the content of a file without opening it with an editor.
head <file>       # prints the first 10 lines of a file
head -n 5 <file>  # prints the first 5 lines
tail <file>       # shows last 10 lines
cat <file>        # prints content of a file

wc <file>         # word count, returns number of lines, words and characters
When changing the content of a file, it's best to use an editor. Nano is an into the terminal integrated file editor. I'm using it when surfing between files and making minor changes. For writing bigger pieces of code I'm using VSCode as my IDE. Efficiency of editing is improved by usage of shortcuts.
nano <file>      # file editing with nano
code <file> # file editing with VSCodeAlways keep your system up to date 😉
sudo apt update
sudo apt upgrade
sudo apt autoremove
sudo gives super user privileges temporarily. su lets you switch to super user (root) and back.
sudo !!            # runs previous command as sudo
sudo su            # switchs to root user
su <username>      # switchs back to the user account
Some commands to turn local/remote systems on/off.
sudo reboot        # reboots system
sudo poweroff      # powers system off
logout             # logout from current users session
Hibernate and suspend are useful for desktop distributions of linux to save energy. But this can interrupt running scripts. So turn automatic suspension off (Settings -> Power -> Automatic Suspend) when running a script. On the other hand it's also a good idea to run your scripts remotely (x86 server or Raspberry Pi).
Compression is always a space-time complexity tradeoff. On linux systems many files are collected usually into one archive file, referred to as a tarball. tar is the tool of choice for compression and decompression.
tar -ztvf filename.tar.gz          # list content

tar -zxvf filename.tar.gz          # decompression
tar -zxvf filename.tar.gz <path>   # decompressed into target folder

tar -cvzf filename.tar.gz <path> # compression of a folder, returns filename.tar.gzLinux is a multi-user OS and therefore implements concepts like users and groups to ensure proper security. There are 3 types of owners:
- User | A user is the one who created the file.
- Group | A group can contain multiple users sharing the same permissions. By default the group is the same as the user.
- Other | Any one who has access to the file other than user and group falls int this category. Other has neither created the file nor is a group member.
Each files/dirs access mode can be displayed when using the ls -l command. Each filesystem entry can have read, write and execute permissions.
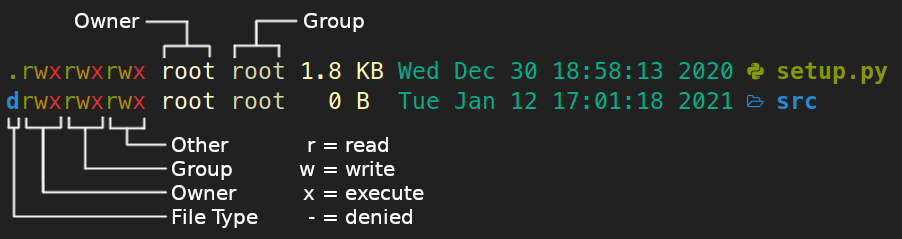
The access modes ('Owner, Group, Other' below the image) can be modified using the chmod command. I prefer to use the octal notation over the symbolic notation when changing permissions.
chmod <octal> <file/dir>  # change permissions of a file/dir

chmod 777 <file/dir>      # full permissions
chmod 644 <file/dir>      # default permissions when creating new file

chmod +x <script.sh>      # makes a script executable
chmod -R 755 <path>       # changes permissions recursively
The following table displays the octal notation and it's representation.
| Octal Notation | Symbolic Repr | Permissions |
|---|---|---|
| 0 | --- | No permissions |
| 1 | --x | Execute only |
| 2 | -w- | Write only |
| 3 | -wx | Write and execute |
| 4 | r-- | Read only |
| 5 | r-x | Read and execute |
| 6 | rw- | Read and write |
| 7 | rwx | Read, write and execute |
To modify ownership (Owner and Group above image) chown is used.
chown user:group <file/dir> # changes the ownershipEnvironment variables are key-value pairs on the system that can be retrieved by applications. They're used to ensure separation of concerns. Important default Environment variables are $HOME, $SHELL and $PATH. HOME defines the systems home directory. PATH tells the shell which directories to search for executable files. Multiple values assigned to a variable must be separated by a colon :. By convention, environment variables should have UPPER CASE names.
printenv           # prints all environment variables
printenv HOME      # prints the value of a specified environment variable
echo $HOME         # same as above
For instance credentials can be separated from code as environment variables (or as a separate file). The creation of new env vars can be achieved by the export command. To set a env var for the current user permanently it has to be appended to your .bashrc or .zshrc file.
export VARNAME="value"                         # set in current shell
echo 'export VARNAME="value"' >> ~/.bashrc     # set permanently in all bash sessions
sudo -H nano /etc/environment # set system wide, no export-keyword usedSeveral tools to search for files and file-content exist. This can speed up things. grep prints lines matching a pattern. The table below shows some important flags of grep I use on a daily basis.
| Flag | Description |
|---|---|
-r |
Recursive |
-l |
Only filenames |
-n |
Number of line within file |
-w |
Only whole words |
--include |
Only certain files included |
Sometimes I search through a folder filled with files for a pattern. Most commonly I use grep -rnw 'patt' . to know how much times the pattern is occurring.
grep -i 'patt' <file>            # search for pattern in specified file

grep -rnw 'patt' .               # search through cwd for pattern

grep -rl 'patt' .                # print names of files containing pattern

grep -rnw 'patt' --include=*.py  # searches only specified files for pattern
sed is a stream editor for filtering and transforming text. tail and head return top and bottom of a file. Wanna see parts in the middle? Use sed!
sed -n '5,10p' <file> # returns line 5 to 10For replacing a pattern sed can be used.
sed -i 's/foo/bar/g' * # replace pattern (foo) by bar in multiple filesBut when I refactor code I prefer to use VSCode's search-and-replace capabilities.
find searchs for files in a directory hierarchy.
find . -name <file>           # prints all filenames containing the exact pattern

find . -type f -name "*.py"   # prints rel. path of specified files
Git also has a nice grep functionality.
git grep 'pattern'When pipelining these commands you can be pretty creative. For instance if you would like to see your 10 most used commands, then try this:
history | sed -e 's/ *[0-9][0-9]* *//' | sort | uniq -c | sort -rn | head -10Python makes it easy to automate things by just writing a simple script and running it. But how to we achieve this without an opened terminal? Using ampersand & and nohup! The Ampersand sends the process in the background and nohup assures that the process continues even if you're logged out from the current shell session. jobs will show you each of these running processes.
<command> &                   # executes command in the background
nohup <command> &             # command is executed even if shell session ends

nohup python myscript.py &    # example
nohup ./myscript.py           # script is executable and has shebang line

./script.py > script.out 2>&1 # redirect stdout/stderr into script.out file

jobs                          # shows each running job
If your script prints messages to the terminal and you want to save the output in a file: use the tee command! It will redirect the scripts output to a file. And if you like to continue working within your current shell redirect the terminal output to /dev/null.
tee                                                      # read from stdin and writes to stdout and a file
tee -a                                                   # append
./myscript.py | tee ~/myscript_output.txt &              # save script output
./myscript.py | tee ~/myscript_output.txt > /dev/null &  # continue working within current shell
But when starting a process it's also nice to know how to stop it. So how do we locate processes in linux and kill it? ps aux is your friend for listing all running processes.
ps aux                   # list of all processes
ps aux | grep 'program'  # find a process and it's ID (PID)
pgrep 'program'          # returns only the PID

pstree                   # shows processes as tree

kill <SIGNAL> <PID>      # killing a process
killall -9 firefox       # if the exact name of the process is known
Depending on the signal value you can kill the process (value 9) or do other things.
| Signal Name | Value | Effect |
|---|---|---|
| SIGHUP | 1 | Hangup |
| SIGINT | 2 | Interrupt from keyboard |
| SIGKILL | 9 | Kill signal |
| SIGTERM | 15 | Termination signal |
| SIGSTOP | 17, 19, 23 | Stop the process |
BTW: there are some interesting 3rd party tools to monitor your system (see Miscellaneous Tools)
The cron daemon is a built-in linux utility that runs processes on your system at a scheduled time. Cron reads the crontab (cron tables) for predefined commands and scripts. So if you want to execute certain scripts repeatedly, then doing cron jobs is the way to do. Add a new line with specified values to the crontab.
crontab -l                                  # list all running cronjobs
crontab –e                                  # setting up a new cronjob

a b c d e </directory/command> output       # standard format for a crontab line
* * * * * directory/command >/dev/null 2>&1 # output redirected to dev/null
The fields a to e are used to set up the time at which the script is triggered. Furthermore, you have to specify the scripts path.
| Field | Possible Values | Syntax | Description |
|---|---|---|---|
| a - min | 0 - 59 | 7 * * * * | Every 7th min |
| b - hour | 0 - 23 | 0 7 * * * | Every 7 am |
| c - day | 0 - 31 | 0 0 7 * * | Every 7th day of the month |
| d - month | 1 - 12 | 0 0 0 7 * | Every july |
| e - day of week | 1 - 7 | 0 0 * * 7 | Every sunday |
The output of the job can be send to an email address when configured. It's also possible to send emails from within your scripts. Alternatively you can redirect the output to a log-file or to /dev/null.
* * * * * ~/myscript.py                     # runs every minute
0 8,17 * * * ~/send_reminder_mail.py        # runs at 8 and 17 o'clock
* 0,11 * * * ~/webscraping.py               # runs every 12 hours
* 0 * * * ~/webscr.py >> ~/webscr.out 2>&1  # redirect output to logfile
10 0 * * * ~/neural_network.py              # runs every night at 00:10 a.m.
50 0 * * 2 ~/backup.sh                      # runs every tuesday at 00:50 a.m.
If you're still not understanding the cronjob syntax, check out the crontab.guru!
Before we can benefit from any 3rd party tool, we have to install these using a package management system. Linux distributions have different package managers to handle dependencies. I'm using Ubuntu 20.04 LTS so apt (Advanced Package Tool), snap and homebrew are my package managers of choice.
apt search <package>*      # search for package
apt show <package>         # shows package details
apt install <package>      # installing package
apt remove <package>       # removing package
apt list                   # lists all packages

snap find <package>
snap info <package>
snap install <package>
snap remove <package>
snap list

brew search <package>
brew info <package>
brew install <package>
brew uninstall <package>
brew list
For managing python packages pip and conda are two quite popular package managers.
pip is a package-management system used to install and manage python packages. It's repositories can be found at pypi.org.
pip search <package>            # search pypi
pip install <package>           # installing a package from pypi
python -m pip <package>         # recommended over pip install (especially on windows)
pip uninstall <package>         # uninstalls specified package
pip list                        # lists all pip-packages within the current env
pip freeze > requirements.txt   # saves all package-versions of current env
pip install -r requirements.txt # installs packages requirements.txt file
The package dependencies of each python project should be managed with care. Therefore using an isolated virtual environment for each project is best practice. pipenv is a nice dependency manager.
pipenv --python 3.8                 # creates new env
pipenv install numpy                # install package (I prefer pip install)
pipenv shell                        # activate environment

exit                                # deactivates the venv
pipenv --rm                         # removes the venv (not the pipfile)

pipenv install -r requirements.txt  # builds env up from an requirements file
pipenv graph                        # shows packages and their dependencies
pipenv --py                         # returns path to python version
Some packages can only be found at the repository of Anaconda.
pip and pipenv are focused around python, neglecting non-python library dependencies. This is where Anaconda starts to shine. It is a language-agnostic cross-platform environment manager simplifying the package management of non-python libraries. It's main audience is the scientific community.
How to retrieve information about Anaconda, your environments and configurations.
conda info                                         # information about version, virtual envs
conda env list                                     # shows all environments

conda update -n base conda                         # updates conda
conda clean -h                                     # cleans download cache ('pkgs'-folder)
How to create new environments, activate them and install packages.
conda create --name <env_name> python=3.8          # creating conda env with specific python-version

conda create -n <env_name> python=3.9 rdkit        # creating conda env with specific package
conda install -c rdkit rdkit-postgresql            # installing PostgreSQL as client for rdkit-postgreSQL cartridge
conda activate <env_name>                          # activates conda env
conda deactivate                                   # deactivates current conda env
How to list packages and remove them.
conda list                                         # lists all packages/versions of the active conda env
conda list --name <env_name>                       # lists all packages of a certain conda env
conda list --revisions                             # lists all revisions made in active conda env
conda remove --name <package_name>                 # deletes a specified list of packages from spec. conda env
conda env remove --name <env_name>                 # deletes an specified environment
How to share environments (export to/create from YAML-file). pip stores dependencies within a requirements.txt file whereas conda uses a .yml file.
conda create --clone <env_name> --name <new_env>   # make copy of an env

conda env export --name <env_name> > <envname.yml> # export env to YAML file

conda env create --file envname.yml                # creates env from YAML file
conda env create                                   # shorter: creates env from the file named environment.yml in cwd

conda list --explicit > pkgs.txt                   # export env with exact package versions for one OS (the URLs)
conda create --name <new_env> --file pkgs.txt      # create env based on exact package versions
How channels work, managing Anaconda.
# using packages and channels
anaconda-navigator                                 # opens the Anaconda navigator
anaconda search <package_name>                     # search for a package on all channels (not only default chan)
conda install conda-forge::<package_name>          # installs a package from a specific channel
conda config --add channels <channel_name>         # add a channel to your conda configuration (conda-forge)

# manage anaconda account
conda install anaconda-client                      # install client
anaconda --help                                    # needed when uploading/searching for packages

conda update --all --name <env_name>               # updates all packages within a specified env
conda config --show # shows all configurationsVisit git-scm.com, it's a great source for commands!
A version control system (VCS) like Git is a developers lab notebook. Don't forget that making good commit messages and doing work bit by bit is of uttermost importance. Connecting a newly created local repository with a remote repository is important for sharing things. Go to github.com, create a new repo and add it's URL to the local repo by entering the following commands:
echo "# projectname" >> README.md
git init
git add README.md
git commit -m "first commit"
git branch -M main
git remote add origin https://github.com/NiklasTiede/projectname.git
git push -u origin mainExploring other peoples projects is also easy. Clone it and build its dependencies to run it properly. Python projects which contain a setup.py file can also be installed directly from a github repo.
git clone https://github.com/owner/projectname                                    # download repo into cwd
git clone -b <branchname> --single-branch git://github.com/owner/projectname.git  # clone only a sidebranch

git clone <url> --depth=1                                                         # ignores git history, faster download

pip install git+https://github.com/owner/projectname                              # download, built and install main branch
pip install https://github.com/owner/projectname/archive/branchname.zip # dwn, built, install on side branchEach commit should address a particular problem. So having control about working directory and staging area is crucial.
git add <file1> <newfile2>    # adds new/changed files to staging area
git add -u <file>             # adds only already tracked files to staging area

git restore --staged          # moves file from stages to unstaged area
git restore --staged .        # empty staging area
git restore <file>            # restores file which is in working dir (from last commit)

git rm file1.py               # Removes from working directory and staging area
git rm --cached file1.py      # Removes from staging area only
git rm ---cached -r bin/      # removes files from staging area recursively

git mv file1.js file1.txt     # renaming or moving files
Checking status and differences.
git status                    # status of working dir/staging area files
git status -s                 # short form of status

git diff                      # show changes between working dir and last commit
git diff --staged             # show changes between staging area and last commit
If ready for commit, use short or lang commits.
git commit -m '🐛 descr. of commit'
git commit git log returns the a number of interesting information about a repositories history.
git log                                     # Full history
git log --all --decorate --oneline --graph  # nice overview
git log --oneline                           # Summary
git log --patch                             # Content of commits

git log --oneline --author="Niklas"         # filter by author
git log --oneline --after="2020-08-17"      # filter by date

git log --oneline --grep="GUI"              # filter by commit description
git log --oneline -S "fct()" --patch        # filter by commits content

git log --oneline file.txt                  # all commits which changed this file
git log --oneline -- file.txt               # if git complains about the file name
Looking at specific commits and comparing them.
git show 921a2ff                # Shows the given commit
git show HEAD
git show HEAD~2                 # Two steps before the last commit
git show HEAD:file.js           # Shows the version of file.js stored in the last commit
git show f40a820:file.js        # Shows the version of file.js stored at specified commit

git show HEAD~2 --name-only     # showing only filenames that has been modofied etc
git show HEAD~2 --name-status   # shows if added/modified/deleted

git diff HEAD~2 HEAD            # changes across commits of all files
git diff HEAD~2 HEAD <file>     # changes across commits of specified file
git diff HEAD~2 HEAD <file> --name-status  # changes across commits of specified file

git checkout <commit-id>        # HEAD goes back to that commit (HEAD is detached)
git checkout master
Finding a commit where a bug was introduced with bisect method.
git bisect start
git bisect bad
git bisect good <commit-id>

git bisect good/bad             # typing good or bad, depending if code is good
git bisect reset                # back on master
Restoring a deleted file.
git log --oneline -- <file>
git checkout <comm-id> <file>
git status -s
git commit -m 'restore file'
Restoring a file from a commit.
git restore --source=HEAD~2 file.js   # restore file to a previous version
git restore --source=f40a820 file.js Creating/Deleting and switching between local branches.
git branch                       # show all local branches
git branch -r                    # show all remote brnaches
git branch -a                    # show all remote and local branches

git checkout -b bugfix/database  # create a branch and switch immediately
git switch -C bugfix/database    # same as above

git switch main                  # switch branch
git branch -m oldname newname    # rename branch

git branch -D more-sections      # deletes a local branch
git push origin my-branch        # create remote branch
Comparing branches.
git diff master..add-feature-y
git diff --name-status master..add-feature-y   # shows only filenames
Uncommitted files can be stashed when you want to switch to another branch and uncommitted work is left. stash is stored as number.
git stash push -m 'new tax rules'  # untracked files are not included in the stash!
git stash push -am 'my new stash'  # this includes untracked files

  switch to branch and back

git stash show 1
git stash apply 1                  # applied to working dir
git stash drop 1                   # remove stash when back to workdir
git stash clear # removes all stashesWhen working on a more sophisticated project, you separate your work (adding features/bug-fixes) from the production-ready main branch by switching to a branch which is named according to it's purpose (like fix-readme-typo). You commit changes and push it to the remote repo. If you're the owner of the repo, you can decide to merge it into your production-ready main branch on your own. If the owner of the project is someone else, you push it and make a pull request. Usually merging bug-fix/feature-branches into the main branch is associated with semantic versioning.
When working solo on a project I create branches, push them to the remote repo and merge them later remotely into the main branch. Then I delete the local side branch. This gives you a nice history at hand about how you work.
git checkout -b <new-branch>           # create new branch
git branch --list                      # list all branches
git push --set-upstream origin <new-branch>

loop:
   [make changes to project]
   git add <file>
   git commit -m 'message'
   git push                            # save a copy of the branch remotely

git checkout main                      # switch to main-branch
git merge <new-branch>                 # merge <new-branch> into main-branch
git push                               # push local into remote main
git branch -d <new-branch>             # delete local <new-branch>
git push origin --delete <new-branch> # delete remote <new-branch>Pull requests are the way to contribute on Github. It's workflow is: fork -> clone -> edit -> pull request.
on Github:
   - fork the repository

git clone <https://github.com/your-profile/repo-fork.git>
cd <repo-fork>
git checkout -b <branch-name>        # create a new branch

loop:
   [make changes to the project]
   git status/diff/log
   git add <file>
   git commit -m 'message'
   git push origin <branch-name>

on Github:
- create pull request # add description and titleEach branch has to be merged sooner or later. Fast-forward merges just move the pointer forward and create a linear history while three-way merges create a history where the branch is still visible. I prefer three-way merges due to a better 'true' representation of the history.
git merge --no-ff                        # reflects true history (I will prefer this kind of merging in the future!)
git merge --abort


git branch --merged                      # shows branches which have been merged into master
git branch --no-merged                   # shows branches which have not been merged currently
git branch -d branch-name                # delete merged branches, to clean everything up
Merge conflicts have to be resolved with care.
Origin is the URL which is used by git for pushing/fetching.
git remote
git remote -v            # URLs for fetch/push
git branch -vv           # shows how local and remote repos are diverging
git branch -r            # all remote tracking branches

git fetch                # downloads changes of remote repo; origin/MASTER moves forward and master kept on last commit
git merge origin/master  # fast forward merge
git pull                 # fetch + merge

git pull --rebase        # getting linear history, when remote repo has a diff commit and local another as well

git remote update        # brings remote refs up to date
git status -uno          # tells if you're behind/ahead etc.

git push                 # push commit to remote repo
Create/Delete remote branches.
git push <my-branch>            # creates remote branch
git push -u origin <my-branch>

git switch master
git push -d origin my-branch    # deletes branch from origin
git branch -d my-branch         # deletes local version
Keep a forked repo up to date.
git remote add upstream <url>   # add a url
git remote rename               # renaming
git remote rm <my-branch>

git fetch base                  # update local repo
git switch master
git merge base/master
git pushRewrite only local history to avoid messing up other peoples history. Here's how to undo a screwed merge:
git reset --soft HEAD~1     # undo commit (mixed is default option)

  --soft   # removes the commit only
  --mixed  # unstages files
  --hard   # discard local changes

git revert HEAD             # if history was shared, this is used
Wanna squash multiple commits into one?
git reset --soft HEAD~2   # brings last 2 commits back to staging area
git commit                # they can be committed as 1 commit
Reverting commits. All changed can be found in the staging area
git revert --no-commit HEAD~3..     #

git revert --continue
git revert --abort
Reverting already pushed commits. New commit is created which has the state before the reverted commit.
git revert <commit_hash>A .gitignore file specifies intentionally untracked files that git should ignore. But if a file was already indexed, how do we remove this file from the index? Add the filename to the .gitignore file and then type:
git rm -r --cached .         # untracks all files
git add .                    # tracks all files except for files declared within .gitignore

git add .
git commit -m 'Removing ignored files'
git pushTo prevent tracking files unintentionally it's useful to use git add -u instead of git add .! Git can be configured globally and locally. The .gitconfig file is the way to go.
git config -e                                         # edit current projects git config file
git config --global                                   # edit global git config file

git config --global user.email "my@emailaddress.com"
git config --global user.name "first_name last_name"
git config --global core.autocrlf input               # collaboration win/linux
git config --add merge.ff false                       # disable fast-forward merging for all branches within current repo
git config --global --add merge.ff false # disable ff for all branches within all reposCreating lightweight git tags to make snapshots of your project. This tag can be used to make a release.
git tag v1.0.0                         # tagging last commit
git tag v1.0.0 <comm-id>               # if you wanna tag an earlier commit
git tag -a v1.0.0 -m 'feature x added' # annotated tag

git tag                                # shows all lightweight tags
git tag -n                             # shows the tags messages
git show v1.0.0                        # shows a specific tag
git tag -d v1.0.0                      # delete a tag

git push origin v1.0.0                 # pushing to github
git push origin --delete v1.0.0 # deletes the tag from originA good commit message has good style (punctuation, capitalization etc.). I add gitmojis to make the commits visually more appealing. The body of the message should explain WHAT and WHY vs how. A properly formed git commit subject line should always be able to complete the following sentence If applied, this commit will <your subject line here>.
Containerizing applications is incredible important to improve portability and scalability. Thus developing your application within a docker container is common practice. This awesome cheat sheet helps me very much when working with docker. I still got a lot to learn so I'm visiting their repo now and then.
Here are some basic commands.
docker info                     # information about docker

docker image ls                 # displays docker images
docker container ls             # displays running containers
docker inspect <cont-ID>        # shows all the info of a container

docker search <image-name>      # search for image in docker registry
docker pull <image-name>        # pulling a pre-built image (ID or name)
docker rm <cont-ID>             # removes a container
docker rmi <cont-ID>            # removes an image
docker rmi -f <cont-ID>         # forces removal

docker run <cont-ID>            # creates and starts a container in one operation.
docker run -p 8000:8000 <cont-ID> # connects app to a port
docker stop <cont-ID>           # stopping container
docker start <cont-ID>          # starts container

docker commit <cont-ID> <name>  # save the state of the container as image
docker history <cont-ID>        # history of the images

docker login                    # log into registry
docker push <cont-ID>           # push image to registry

docker exec                     # execute a command in container
docker exec -it <ID> /bin/sh    # enter shell of a running container (-it attach newshell process)
docker-compose exec db psql -h localhost -U postgres --dbname=postgres  # enter database within a container

docker build .                        # creates image from dockerfile
docker build -t github-trending-api . # creates an image and gives a tag name

docker save my_image:my_tag | gzip > my_image.tar.gz   # save an image
docker load < my_image.tar.gz                          # load image from file

docker run <image> env                # returns env vars of image

docker run $(docker ps -a -q)         # deletes all stopped containers
docker rmi $(docker images -q) -f     # deletes ALL docker images
Usually your application is based on a image from the docker registry and it contains several other libraries. You could run the base image and install everything from within the container, but it's much more preferable to create a Dockerfile which advises docker to build up the image. BTW: Docker stores everything within /var/lib/docker.
| Instruction | Meaning |
|---|---|
| FROM <image name> | Sets base image for subsequent instructions |
| RUN <command> | Execute any command in a new layer on top of img and commit results |
| CMD | Provide defaults for an executing container. |
| EXPOSE <port> | Informs Docker that the container listens on the specified network ports at runtime |
| ENV <key> <value> | Sets environment variable |
| ADD <src> <destination> | Copies new files, directories or remote file to container |
| COPY <src> <destination> | Copies new files or directories to container. |
| ENTRYPOINT ["executable", "param1", "param2"] | Configures a container that will run as an executable |
| VOLUME [‘/data’] | Creates a mount point for externally mounted volumes or other containers |
| USER <uid> | Sets the user name for following RUN / CMD / ENTRYPOINT commands |
| WORKDIR /path/to/workdir | Sets the working directory |
| ARG <name>[=<default value>] | Defines a build-time variable |
| ONBUILD <INSTRUCTION> | Adds a trigger instruction when the image is used as the base for another build |
| STOPSIGNAL | Sets the system call signal that will be sent to the container to exit |
| LABEL | Apply key/value metadata to your images, containers, or daemons |
| SHELL ["executable", "parameters"] | Override default shell is used by docker to run commands |
| HEALTHCHECK | Tells docker how to test a container to check that it is still working |
The instructions are stored within the Dockerfile. Your image is then built from this file using the docker build . command. A typical Dockerfile of a fastAPI app (my Github-Trending-API):
FROM python:3.9.2-alpine3.13

LABEL maintainer="Niklas Tiede <niklastiede2@gmail.com>"

WORKDIR /github-trending-api

COPY ./requirements.txt .

RUN apk add --update --no-cache --virtual .build-deps \
    g++ \
    libxml2 \
    libxml2-dev && \
    apk add libxslt-dev && \
    pip install --no-cache-dir -r requirements.txt && \
    apk del .build-deps

COPY ./app ./app

CMD uvicorn app.main:app --host 0.0.0.0 --port=${PORT:-5000}
Here's another example of Dockerfile. A fastAPI-postgreSQL backend:
FROM python:3.8.1-alpine

WORKDIR /backend

ENV PYTHONDONTWRITEBYTECODE 1
ENV PYTHONBUFFERED 1

COPY ./requirements.txt /backend/requirements.txt

RUN set -eux \
  && apk add --no-cache --virtual .build-deps build-base \
     libressl-dev libffi-dev gcc musl-dev python3-dev \
     libc-dev libxslt-dev libxml2-dev bash \
     postgresql-dev \
  && pip install --upgrade pip setuptools wheel \
  && pip install -r /backend/requirements.txt \
  && rm -rf /root/.cache/pip

COPY . /backend
The following docker build command:
docker build -t myimage:1.0 . # build image from dockerfileif your applications needs multiple container (your app needs a db container) then you need docker compose. It will help you running multi-container applications.
Again you need a file which contains a set of instructions to docker-compose. The file is called docker-compose.yml.
version: "3.7"
services:
  server:
    build:
      context: ./backend
      dockerfile: Dockerfile
    volumes:
      - ./backend/:/backend/
      - /var/run/docker.sock:/var/run/docker.sock
    command: uvicorn app.api.server:app --reload --workers 1 --host 0.0.0.0 --port 8000
    env_file:
      - ./backend/.env
    ports:
      - 8000:8000
    depends_on:
      - db

  db:
    image: postgres:12.1-alpine
    volumes:
      - postgres_data:/var/lib/postgresql/data/
    env_file:
      - ./backend/.env
    ports:
      - 5432:5432

volumes:
  postgres_data:
To build and run your multi-container application you need the following commands:
docker-compose up --build                # builds
docker-compose up                        # runs the image
If the application grows further multiple hosts are used to handle the workload. Therefore kubernetes is needed to manage the containerized applications across multiple hosts.
There's a plethora of smaller command line tools I use.
HTTPie is designed for testing, debugging, and generally interacting with APIs & HTTP servers. I use it mainly for testing and exploring API's.
http <url>     # returns response header/body
flags:
    -h   # returns only the header
    -b   # returns only the body
    -d   # download
    -F   # following redirects
You can easily test API endpoints which are served on your local machine. Instead of JSON which is not well suited for command line Httpie allows to write key-value pairs like this:
http GET localhost:5000/recipes      # GET request

http POST localhost:5000/recipes \   # POST request
name=Soup \
description="Asian soups are the best!"
predic8 provides a free testing API:
http POST https://api.predic8.de/shop/products/ \      # Post
category=Fruits \
name=MyFruit \
price=0.89 \
vendor=672

http -b GET https://api.predic8.de/shop/products/148   # get
I Added "--style=monokai" to Httpie's default options (.httpie/config.json) to get a nicely colored output.
Openssl s a general-purpose cryptography library. I'm using it only for generating passwords.
openssl rand -hex 30 # generate hexadecimal key, 30 characters longTlp is a tool to optimize laptop battery life for linux. It will also return some interesting parameters like CPU temperature and information about your disk.
sudo tlp-stat -s      # system information
sudo tlp-stat -d      # disk information
watch tlp-stat -t     # returns your CPU temperature every 2s
Tokei is a static code analysis tool. It counts the number of lines code of each file within a selected directory. I use it to get a rough idea of how big a project is and which languages are included. Tokei itself is written in Rust, so it's blazing fast.
tokei <dir> # counts the number of lines code per language recursivelyA fancier interface than the normal python interpreter. Bpython gives your REPL session a nice syntax highlighting and autocomplete. It will definitly enhance REPL session experience.
bpythonI have a background in chemistry, so python and data science tasks are a natural fit to me. Jupyter notebooks took data science collaboration to another level. Notebooks enable us to share how a set of data is processed and then used for modeling. Jupyter lab has a nicer interface. Kaggle is the best place to get a plethora of interesting data sets.
conda install jupyter lab
jupyter lab                   # starts a jupyter lab server
A lot of extensions are available to customize jupyter lab.
Setting up a python project can be time-consuming. Cookiecutter speeds this process up. The templating engine Jinja2 is used by cookiecutter. You select a cookiecutter project template you like (search at github search?q=cookiecutter+YourSearch) and use its github URL. Then you're enter your settings of choice and voilà: you have a good foundation for a new project!
cookiecutter <git-URL>                                    # base command
cookiecutter https://github.com/Buuntu/fastapi-react.git  # example: fastAPI-react app
As you can see cookiecutter is not only used for python projects but for other languages as well! Here are some other python-related templates I like:
https://github.com/ionelmc/cookiecutter-pylibrary.git   # PyPi package, libary
https://github.com/conda/cookiecutter-conda-python.git  # conda package
Linting tools increase readability and give your project a consistent style. Black is quite common for code formatting python code. Isort sorts the import-statements nicely. Some linting tools are only code formatter (like black), some give you also some introspection in your code (like Flake8) and can help fixing potential bugs. I also try to make use of Pythons optional static typing capabilities, MyPy helps me here.
black <file.py>           # code formatting in black-style performed on file.py
yapf -i <file.py>         # --in-place has to be used here to apply linting
isort <file.py>           # sorts import statements
flake8 <file.py>          # linting
pylint <file.py>          # linting
mypy <file.py>            # static type checker
Uvicorn is a nice asynchronous server gateway interface (ASGI) written in python. Makes an app in combination with Gunicorn lightning fast.
uvicorn app.main:app --host 0.0.0.0 --port 5000 --reload
Heroku is a nice cloud PaaS to build, run and scale applications. Some iles have to be created on the root directory of the project.
The Procfile specifies the commands that are executed by the app on startup. Here a fastAPI app served by uvicorn is executed:
web: uvicorn app.main:app --host 0.0.0.0 --port $PORT
The heroku.yml allows you to build Docker images on Heroku:
build:
  docker:
    web: Dockerfile
Python apps need a runtime.txt to specify a Python runtime:
python-3.9.2
Then the apps can be tested locally and then a dyno created and pushed:
heroku local                              # run app locally
heroku create -a <my-app>                 # creates the app on Heroku
heroku container:push web -a <my-app>     # build and push code
heroku container:release web -a <my-app>  # release
heroku logs --tail <my-app> # log of running dynoAliases save time and work wonders on lengthy commands. Functions let you create new commands.
Here's a list of some of my aliases.
alias name="command flags"                      # basic stucture of an alias
unalias name                                    # remove alias
echo "alias name='command flags'" >> ~/.bashrc  # gives alias persistency: in every shell session

alias update='sudo apt-get update && sudo apt-get upgrade'

alias ..='cd ..'                                # quicker navigation
alias ...='cd ../../../'
alias ....='cd ../../../../'
alias .....='cd ../../../../'

alias dl="cd ~/Downloads"
When your newly defined command needs arguments: functions are the solution! Here are a few functions.
c() { cd "$@" && ls; }                          # ls right after cd

alias unstage="git restore --staged ."          # unstages everything from staging area

alias glog1="git log --all --decorate --oneline --graph"

alias glog2="git log --graph --abbrev-commit --decorate --format=format:'%C(bold blue)%h%C(reset) - %C(bold green)(%ar)%C(reset) %C(white)%s%C(reset) %C(dim white)- %an%C(reset)%C(bold yellow)%d%C(reset)' --all"

gitcom() {                                      # add/com/push all in one
    git add .
    git commit -m $1
    git push
}

response() {
    curl -s -w 'Testing Website Response Time for :%{url_effective}\n\nLookup Time:\t\t%{time_namelookup}\nConnect Time:\t\t%{time_connect}\nPre-transfer Time:\t%{time_pretransfer}\nStart-transfer Time:\t%{time_starttransfer}\n\nTotal Time:\t\t%{time_total}\n' -o /dev/null $1
}
Git aliases of 'Oh My Zsh' I'm using quite often.
| Alias | Command |
|---|---|
| ga | git add |
| gau | git add --update |
| gcmsg | git commit -m |
| gst | git status |
| gss | git status -s |
| glog | git log --oneline --decorate --graph |
| gds | git diff --staged |
Usually I'm jumping between the terminal, my IDE and the browser. Using shortcuts makes everything more convenient.
| Shortcut | Effect |
|---|---|
| Screenshot of entire screen | |
| alt Print | Screenshot of current window/application |
| Shift Print | Screenshot of selected area |
| Super Key | Opens Activities search |
| Ctrl Alt Up or Down | Move between workspaces |
| Super Key L | Lock screen |
| Ctrl Alt T | Open terminal |
| Ctrl Shift Q | Close terminal |
gnome-terminal     # opens a second terminal window
xdg-open . # opens cwd with nautilus file manager| Shortcut | Effect |
|---|---|
| Tab | Autocomplete, navigation |
| Ctrl Shift up or down | Scrolling up or down |
| Ctrl R | Search history bar |
| Ctrl C | Abort current running process |
| Ctrl D | Log out of current shell (SQL, Mongo, Python) |
| Ctrl L | Clear terminal |
| Ctrl U | Erase current line |
| Ctrl A | Move cursor to beginning of line |
| Ctrl E | Move cursor to end of line |
| Ctrl left or right | Move cursor to next word |
| Alt D | Delete all characters after the cursor |
nano <file> # opens a file| Shortcut | Effect |
|---|---|
| Ctrl O | Save file |
| Ctrl X | Exit |
| Ctrl W | Search for pattern |
| Shift right or left | Select |
| Ctrl K | Cut |
| Ctrl U | Paste |
| Ctrl </kbd> | Replace pattern |
xdg-open <url> # open website with default browser (my default browser is chromium)| Shortcut | Effect |
|---|---|
| Ctrl Shift T | Reopens recently closed tabs |
| alt left or right | Moves one page back/forward |
| Ctrl + or - | Zoom in, out |
| Ctrl Tab | Jumps to the next tab |
| Ctrl F | Find content on web page |
| F5 | Refresh current webpage |
| Ctrl left-click | Open link in the background of a new tab |
| Ctrl Shift I | Inspect |
| Ctrl U | View page source |
| Spacebar | Scrolls down a section of the webpage |
| Spacebar Shift | Scrolls up a section of the webpage |
code <file> # opens file with VSCode| Shortcut | Effect |
|---|---|
| F11 | Full screen |
| Ctrl Shift P | Show command palette |
| Ctrl , | User Settings |
| Ctrl K, Ctrl S | Keyboard shortcuts |
| Ctrl L | Line selection |
| alt Up or Down | Move line up/down |
| Ctrl / | Toggle line comment |
| Home or End | Go to beginning/end of line |
| Ctrl Home or End | Go to beginning/end of file |
| F12 | Go to definition |
| Ctrl Shift I | Format document |
| Shift Alt Up or Down | Add cursor above/below |
| Alt Click | Add cursor |
| Ctrl + or - | Zomm in/out |
| Ctrl Shift F | Show search |
| Ctrl Shift C | Open new command terminal |
| Ctrl Shift V | Open Markdown preview |
| Ctrl F | Find |
| Ctrl H | Replace |
| Ctrl S | Save |
| Alt Scrolling | Faster scrolling |
I'm using the Z-shell instead of bash as my default shell and some plugins to colorize my terminal. It's not increasing the productivity like 10 times but as a human being with an aesthetic demand I'm feeling more satisfied.
LSDeluxe | Nicer looking ls command.
Oh My Zsh | Framework for managing zsh configuration.
Powerlevel10k | Layout looks nicer, syntax-highlighting.
I'm synchronizing all my computers with my dotfiles to experience a consistent configuration. Furthermore, it makes things not such a pain when setting up a new workstation.