

This repository contains firmware for streaming motor IQ and RPM data over UART from the DSPIC33CK LVMC development board.
- dsPIC33CK Low Voltage Motor Control (LVMC) Development Board (DM330031)
- 24V 3-Phase Brushless DC Motor (AC300020)
- dsPIC33CH512MP508 Product Family Page
- motorBench® Development Suite Software Plugin Details
The steps below explain the process of configuring the data logger firmware build, compiling it, and flashing it to the dsPIC33CK device.
-
Plug your dsPIC33CK Low Voltage Motor Control (LVMC) Development Board into your PC via USB.
-
Install the MPLAB X IDE and XC16 compiler. These are required to load the data logger project and to program the dsPIC33CK board.
-
Open the
ml-33ck256mp508-lvmc-datalogger.Xproject folder in MPLAB X. -
Open
app_config.hfile located under Header Files. -
Select the data streaming format you want by setting the
DATA_STREAMER_FORMATmacro infirmware/src/app_config.hto the appropriate value as summarized in the table below.Streaming Format app_config.h Configuration Value ASCII text #define DATA_STREAMER_FORMAT DATA_STREAMER_FORMAT_ASCIIMPLAB Data Visualizer stream #define DATA_STREAMER_FORMAT DATA_STREAMER_FORMAT_MDV -
Modify high-level parameters like sample rate (
SAMPLE_RATE), number of axes (NUM_AXES), and others by changing the macro values defined infirmware/src/app_config.h. See the inline comments for further description. -
Once you're satisfied with your configuration, click the Make and Program Device button in the toolbar.
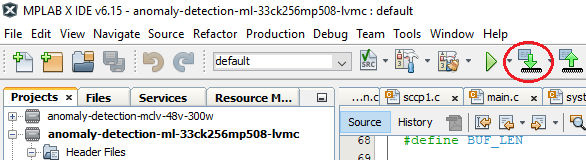
Make and Program Device

The data streamer firmware will output Motor parameter data over the UART port with the following UART settings:
- Baudrate 115200
- Data bits 8
- Stop bits 1
- Parity None
This project can be used to generate firmware for streaming data to the MPLAB Data Visualizer plugin by setting the DATA_STREAMER_FORMAT macro to DATA_STREAMER_FORMAT_MDV as described above. Once the firmware is flashed, follow the steps below to set up Data Visualizer.
 |
|---|
| Setting macro |
- Connect the dsPIC33CK board to your computer, open up MPLAB X, and open the Data Visualizer plugin.
- Click the Load Workspace button as highlighted in the image below. Select the workspace files included in this repository - located under the
mplab-dv-workspacesfolder. you can always modify the configuration once it is loaded if needed.
 |
|---|
| Loading the workspace file |
- Next, select the Serial/CDC Connection that corresponds to the dsPIC33CK board, and adjust the baud rate to 115200.
 |
|---|
| Configuring the serial port |
- In the Variable Streamers tab, you can see preloaded variable configurations such as IQ and RPM. You may delete or add variables here if your configuration differs from the pre-loaded ones.
 |
|---|
| Variable streamer data source selection |
The data should now be available in the time plot. Double-click anywhere within the time plot to start/stop scrolling the time axis
 |
|---|
| Data Visualizer Time Plot |
Visit the Machine Learning Plugin page to learn more about using the Data Visualizer plugin to export your data for machine learning applications.