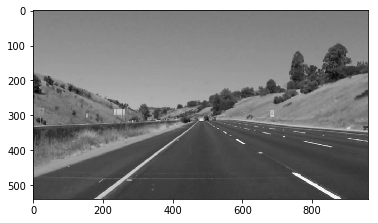
When we drive, we use our eyes to decide where to go. The lines on the road that show us where the lanes are act as our constant reference for where to steer the vehicle. Naturally, one of the first things we would like to do in developing a self-driving car is to automatically detect lane lines using an algorithm.
In this project I wrote a Python project to detect lane lines in images using Python and OpenCV. OpenCV means "Open-Source Computer Vision", which is a package that has many useful tools for analyzing images.
- Make a pipeline that finds lane lines on the road
- Reflect on your work in a written report
There are two sections to this README, the Setup instructions and the Reflection of the project
Step 1: Getting setup with Python
To run this project, you will need Python 3 along with the numpy, matplotlib, and OpenCV libraries, as well as Jupyter Notebook installed.
I recommend downloading and installing the Anaconda Python 3 distribution from Continuum Analytics because it comes prepackaged with all of the Python dependencies needed, makes it easy to install OpenCV, and includes Jupyter Notebook. Beyond that, it is one of the most common Python distributions used in data analytics and machine learning, so a great choice if you're getting started in the field.
Choose the appropriate Python 3 Anaconda install package for your operating system here. Download and install the package.
If you already have Anaconda for Python 2 installed, you can create a separate environment for Python 3 and all the appropriate dependencies with the following command:
> conda create --name=yourNewEnvironment python=3 anaconda
> source activate yourNewEnvironment
Step 2: Installing OpenCV
Once you have Anaconda installed, first double check you are in your Python 3 environment:
>python
Python 3.5.2 |Anaconda 4.1.1 (x86_64)| (default, Jul 2 2016, 17:52:12)
[GCC 4.2.1 Compatible Apple LLVM 4.2 (clang-425.0.28)] on darwin
Type "help", "copyright", "credits" or "license" for more information.
>>>
(Ctrl-d to exit Python)
run the following command at the terminal prompt to get OpenCV:
> conda install -c https://conda.anaconda.org/menpo opencv3
then to test if OpenCV is installed correctly:
> python
>>> import cv2
>>>
(Ctrl-d to exit Python)
Step 3: Installing moviepy
I recommend the "moviepy" package for processing video in this project (though you're welcome to use other packages if you prefer).
To install moviepy run:
>pip install moviepy
and check that the install worked:
>python
>>>import moviepy
>>>
(Ctrl-d to exit Python)
Step 4: Opening the code in a Jupyter Notebook
This project is done in a Jupyter notebook. If you are unfamiliar with Jupyter Notebooks, check out this link to get started.
Jupyter is an ipython notebook where you can run blocks of code and see results interactively. All the code for this project is contained in a Jupyter notebook. To start Jupyter in your browser, run the following command at the terminal prompt (be sure you're in your Python 3 environment!):
> jupyter notebook
A browser window will appear showing the contents of the current directory. Click on the file called "P1.ipynb". Another browser window will appear displaying the notebook.
My pipeline consisted of a number of steps described below:
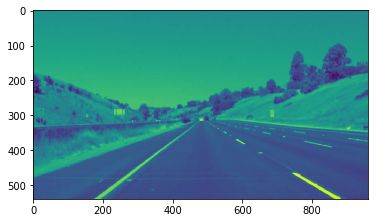
- The image is converted to grayscale using the OpenCV function.
cv2.cvtColor(img, cv2.COLOR_RGB2GRAY) where img is the image.
- Applied Gaussian Smoothing to the image using OpenCV as follows
cv2.GaussianBlur(img, (kernel_size, kernel_size), 0) After a number of tweaks an appropriate kernel size of 5 produced the most suitable results. The kernel size affects the smoothing over an area. A larger kernel_size implies averaging, or smoothing, over a larger area.
- Applied Canny Edge detection with a low threshold of 50 and a high threshold of 150 using OpenCV as follows
cv2.Canny(img, low_threshold, high_threshold)
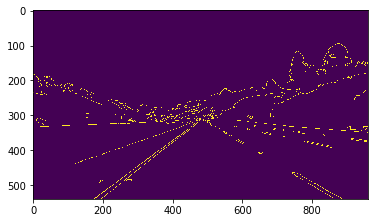
- Then the image was masked to produce only the region in the image that lane lines would need to be extracted from. A few bounds for the region were tried until it produces the following suitable region of interest
 After Canny Edge detection
 Region of interest on the main image
- Then the Hough Transform was used to find lines in the image containing on the region of interest. The values used in the Hough transform were tweaked until only lane lines in the region were marked as follows
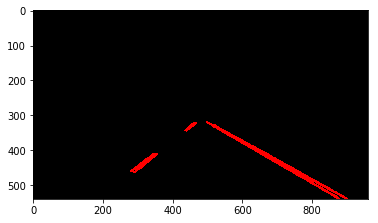 Sample hough transform before averaging of lines
Sample hough transform on full image before averaging of lines
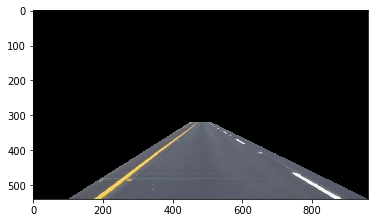
- The Hough Transform was then modified to now produce 2 solid lines. The slope of the lines were used to decide which lines were a part of the left line and the right line and then averaged and used to produce start and end points of the left and right lines. See results:
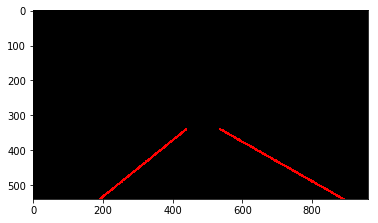 Sample hough transform after averaging of lines
- Finally the Hough transformed image was placed on the 3 color image to produce the final
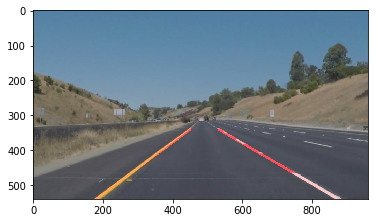 Sample final image
-
It only detects the straight lane lines. My pipeline at the moment falls short in handling curved lanes well and as such falls short on the challenge video. Currently behind on submission but plan to improve this asap.
-
Another shortcoming of my pipeline is that it will definitely fall short on steep (up or down) roads because the region of interest mask is assumed from the center of the image.
-
Since the algorithm is "trained" on a very specific road and light conditions when these conditions change we can expect that the algorithm performance will deteriorate.
-
Research shows that to handle curved lines better we'll need to use perspective transformation and also poly fitting lane lines rather than fitting to straight lines.
-
Also for steep roads, an approach could be to first detect the horizontal line (between the sky and the earth) so that we can tell up to where the lines should extend.