(Last Update on March 30, 2021)
- Overview
- Create and Configure Your Account
- Request an Increase in GPU Quota
- Set Up Google Cloud VM Image
- Access Your Newly created VM
- Remote Server Development
For your class project, we recommend setting up a GPU instance on GCP (Google Cloud Platform).
(We know you won't read until the very bottom once your assignment is running, so we are printing this at the top too since it is super important)
Don't forget to stop your instance when you are done (by clicking on the stop button at the top of the page showing your instances), otherwise you will run out of credits and that will be very sad. :(
If you follow our instructions below correctly, you should be able to restart your instance and the downloaded software will still be available.
While Colab is good for assignments, and is still a helpful and free tool for experimentation for your project, you will likely need a dedicated GPU instance when you start training on large datasets and collaborating as a team:
- Colab will disconnect after 12 hours or ~30 min of idling (and you will lose your unsaved data). A GCP VM instance will not disconnect untill you stop it (or run out of credits).
- A GCP VM instance's disk space allows you to deal with larger datasets. In Colab's case, you will have to save all your data and models to Google Drive.
- Colab does not innately support real-time collaboration.
- You can choose your GPU models and can set >1 GPUs for distributed training on GCP.
You should use your personal GMail account for GCP, i.e. NOT SUID@stanford.edu, because Stanford University managed email accounts do not support creating a new project.
For the class project, we offer students $50 GCP coupons for each student to use Google Compute Engine for developing and testing your implementations. When you first sign up on GCP, you will have $300 free credits.
If your credits ends up not being enough, contact course staff on Piazza. We will also send out forms for extra GCP credit request form later in the quarter.
This tutorial lists the necessary steps of working on the projects using Google Cloud. We expect this tutorial to take up to an hour. Don't get intimidated by the steps, we tried to make the tutorial detailed so that you are less likely to get stuck on a particular step. Please tag all questions related to Google Cloud with google_cloud on Piazza.
You should receive $300 credits from Google when you first sign up with Personal GMail and also UPGRADE it into a full account. Please try to use the resources judiciously.
-
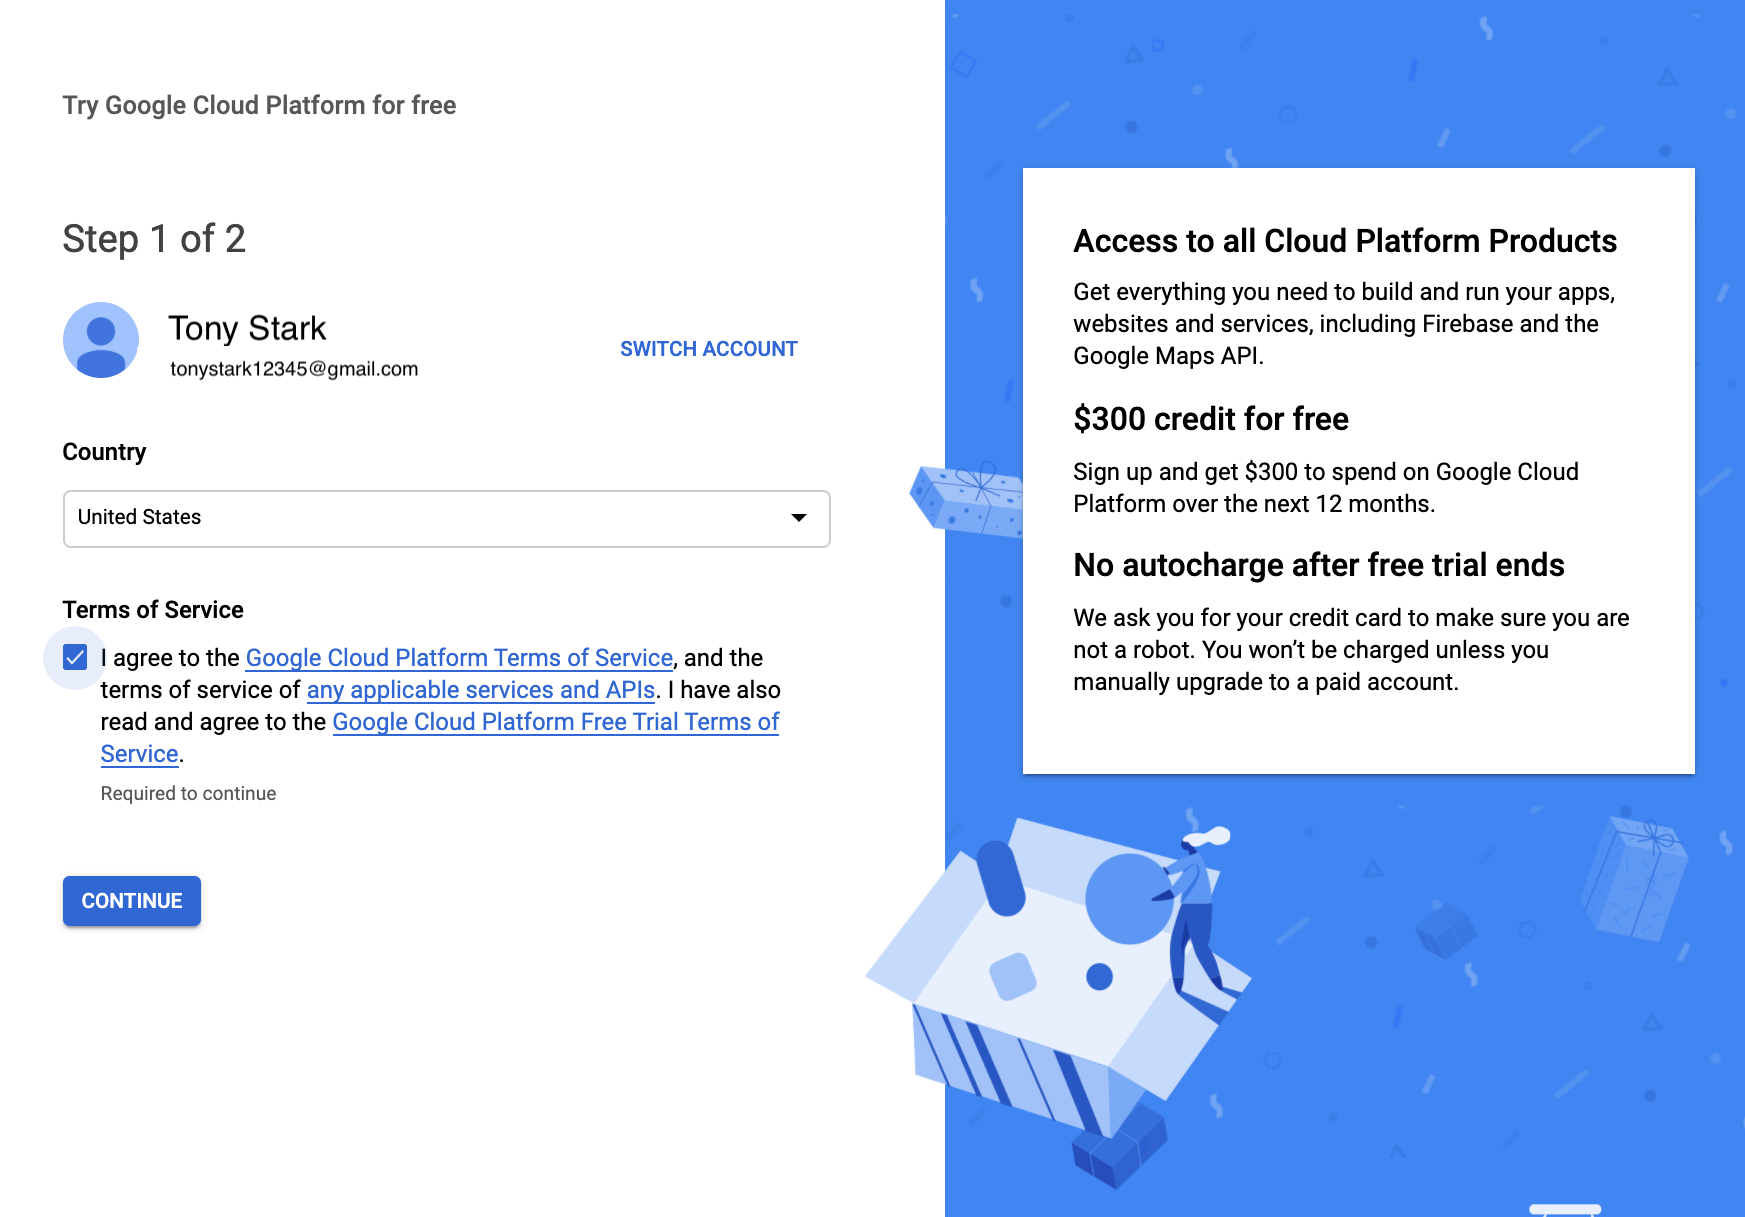
Create Google Cloud account by going to the Google Cloud homepage. Click on the blue Get Started for free button. Sign into your Gmail account. Here is an illustrative example.
-
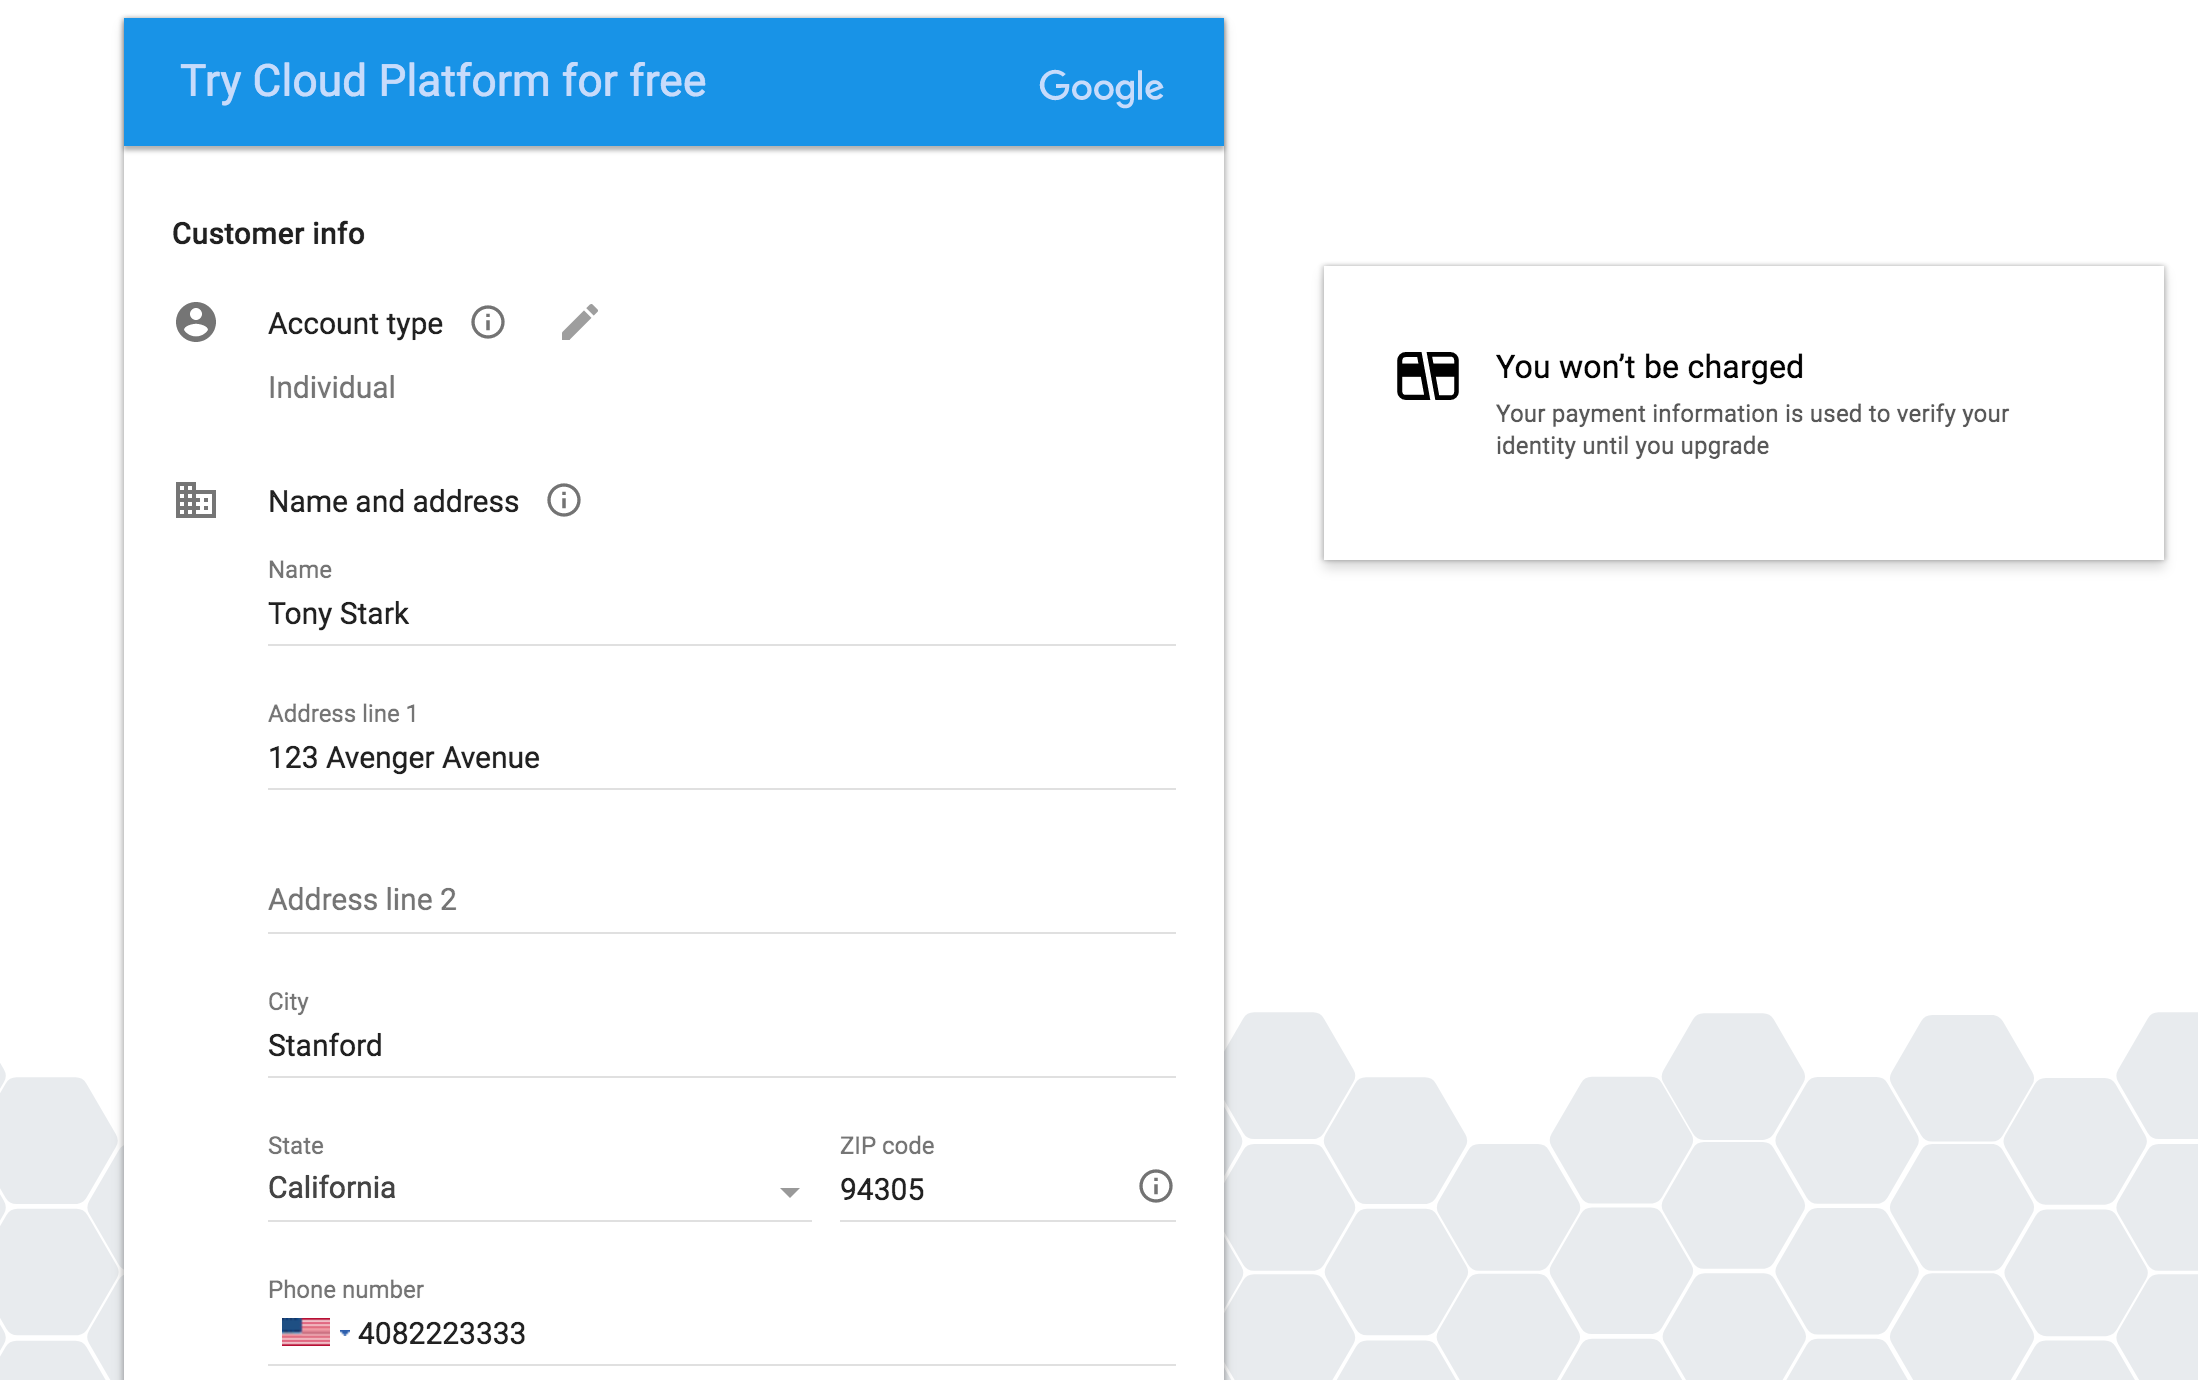
Choose Account type to be Individual. You will then fill in your name, address and credit card information.
-
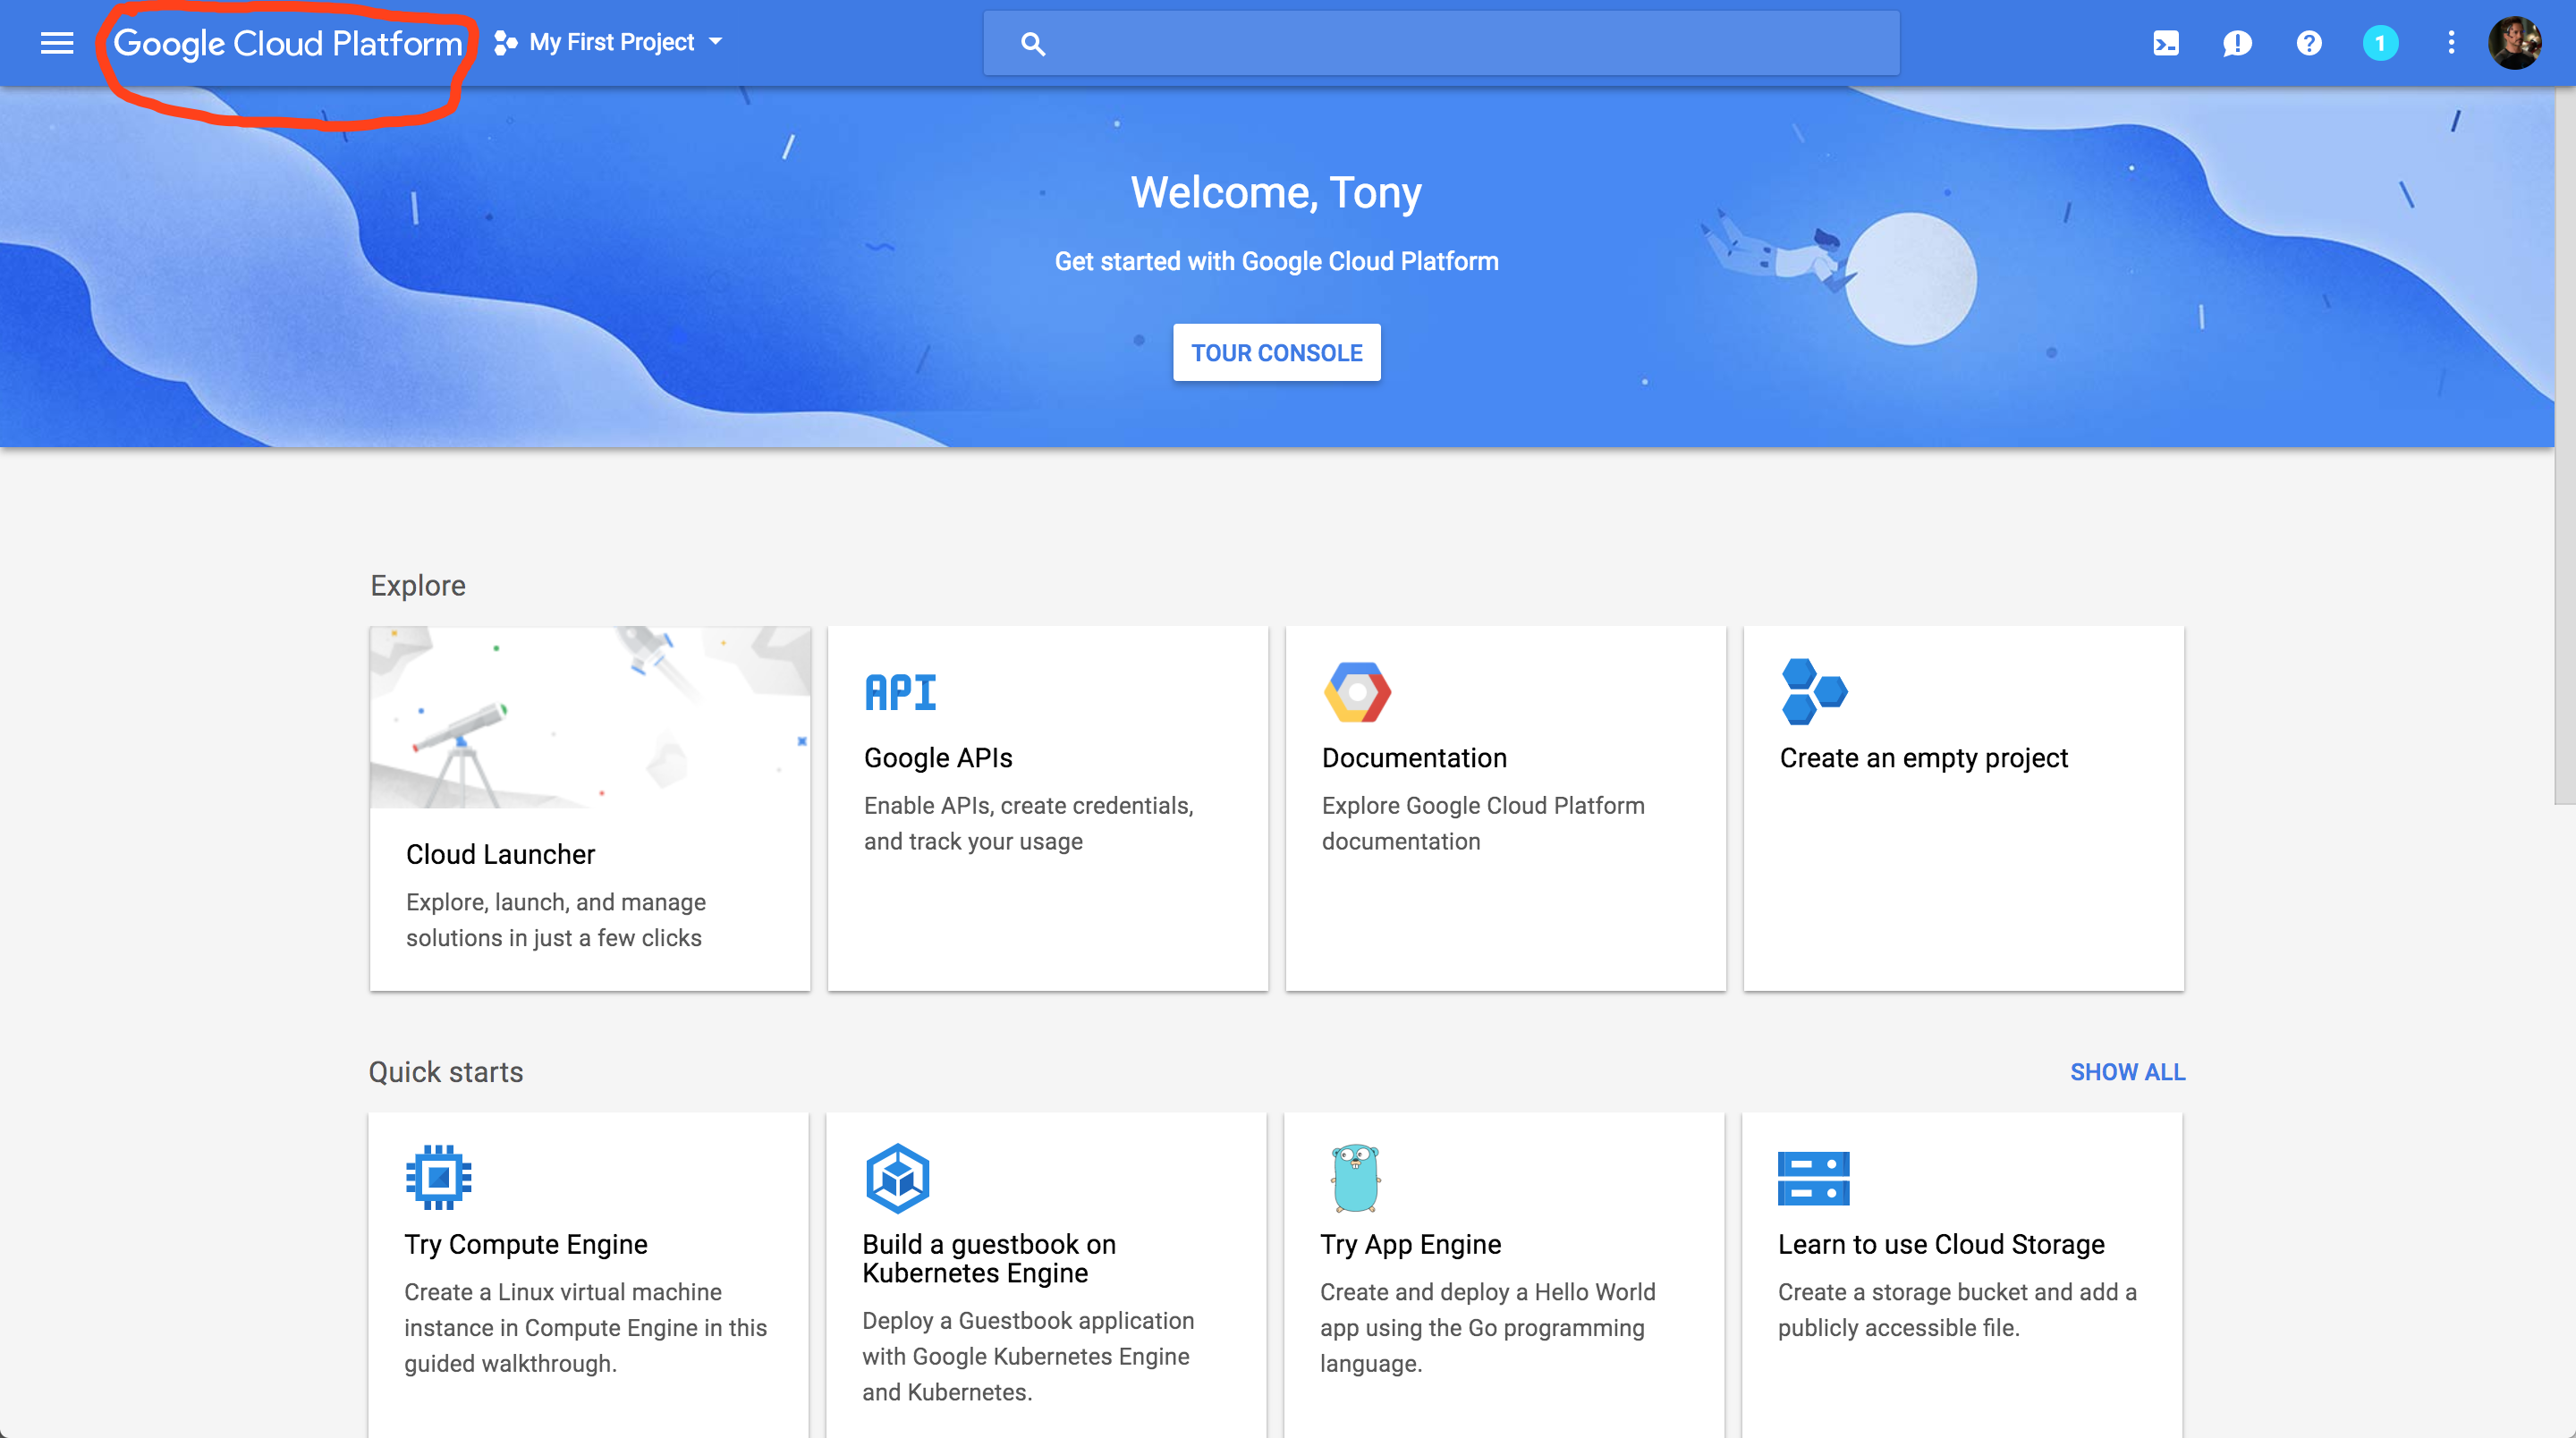
Click the "Google Cloud Platform" (in red circle), and it will take you to the main project dashboard:


-
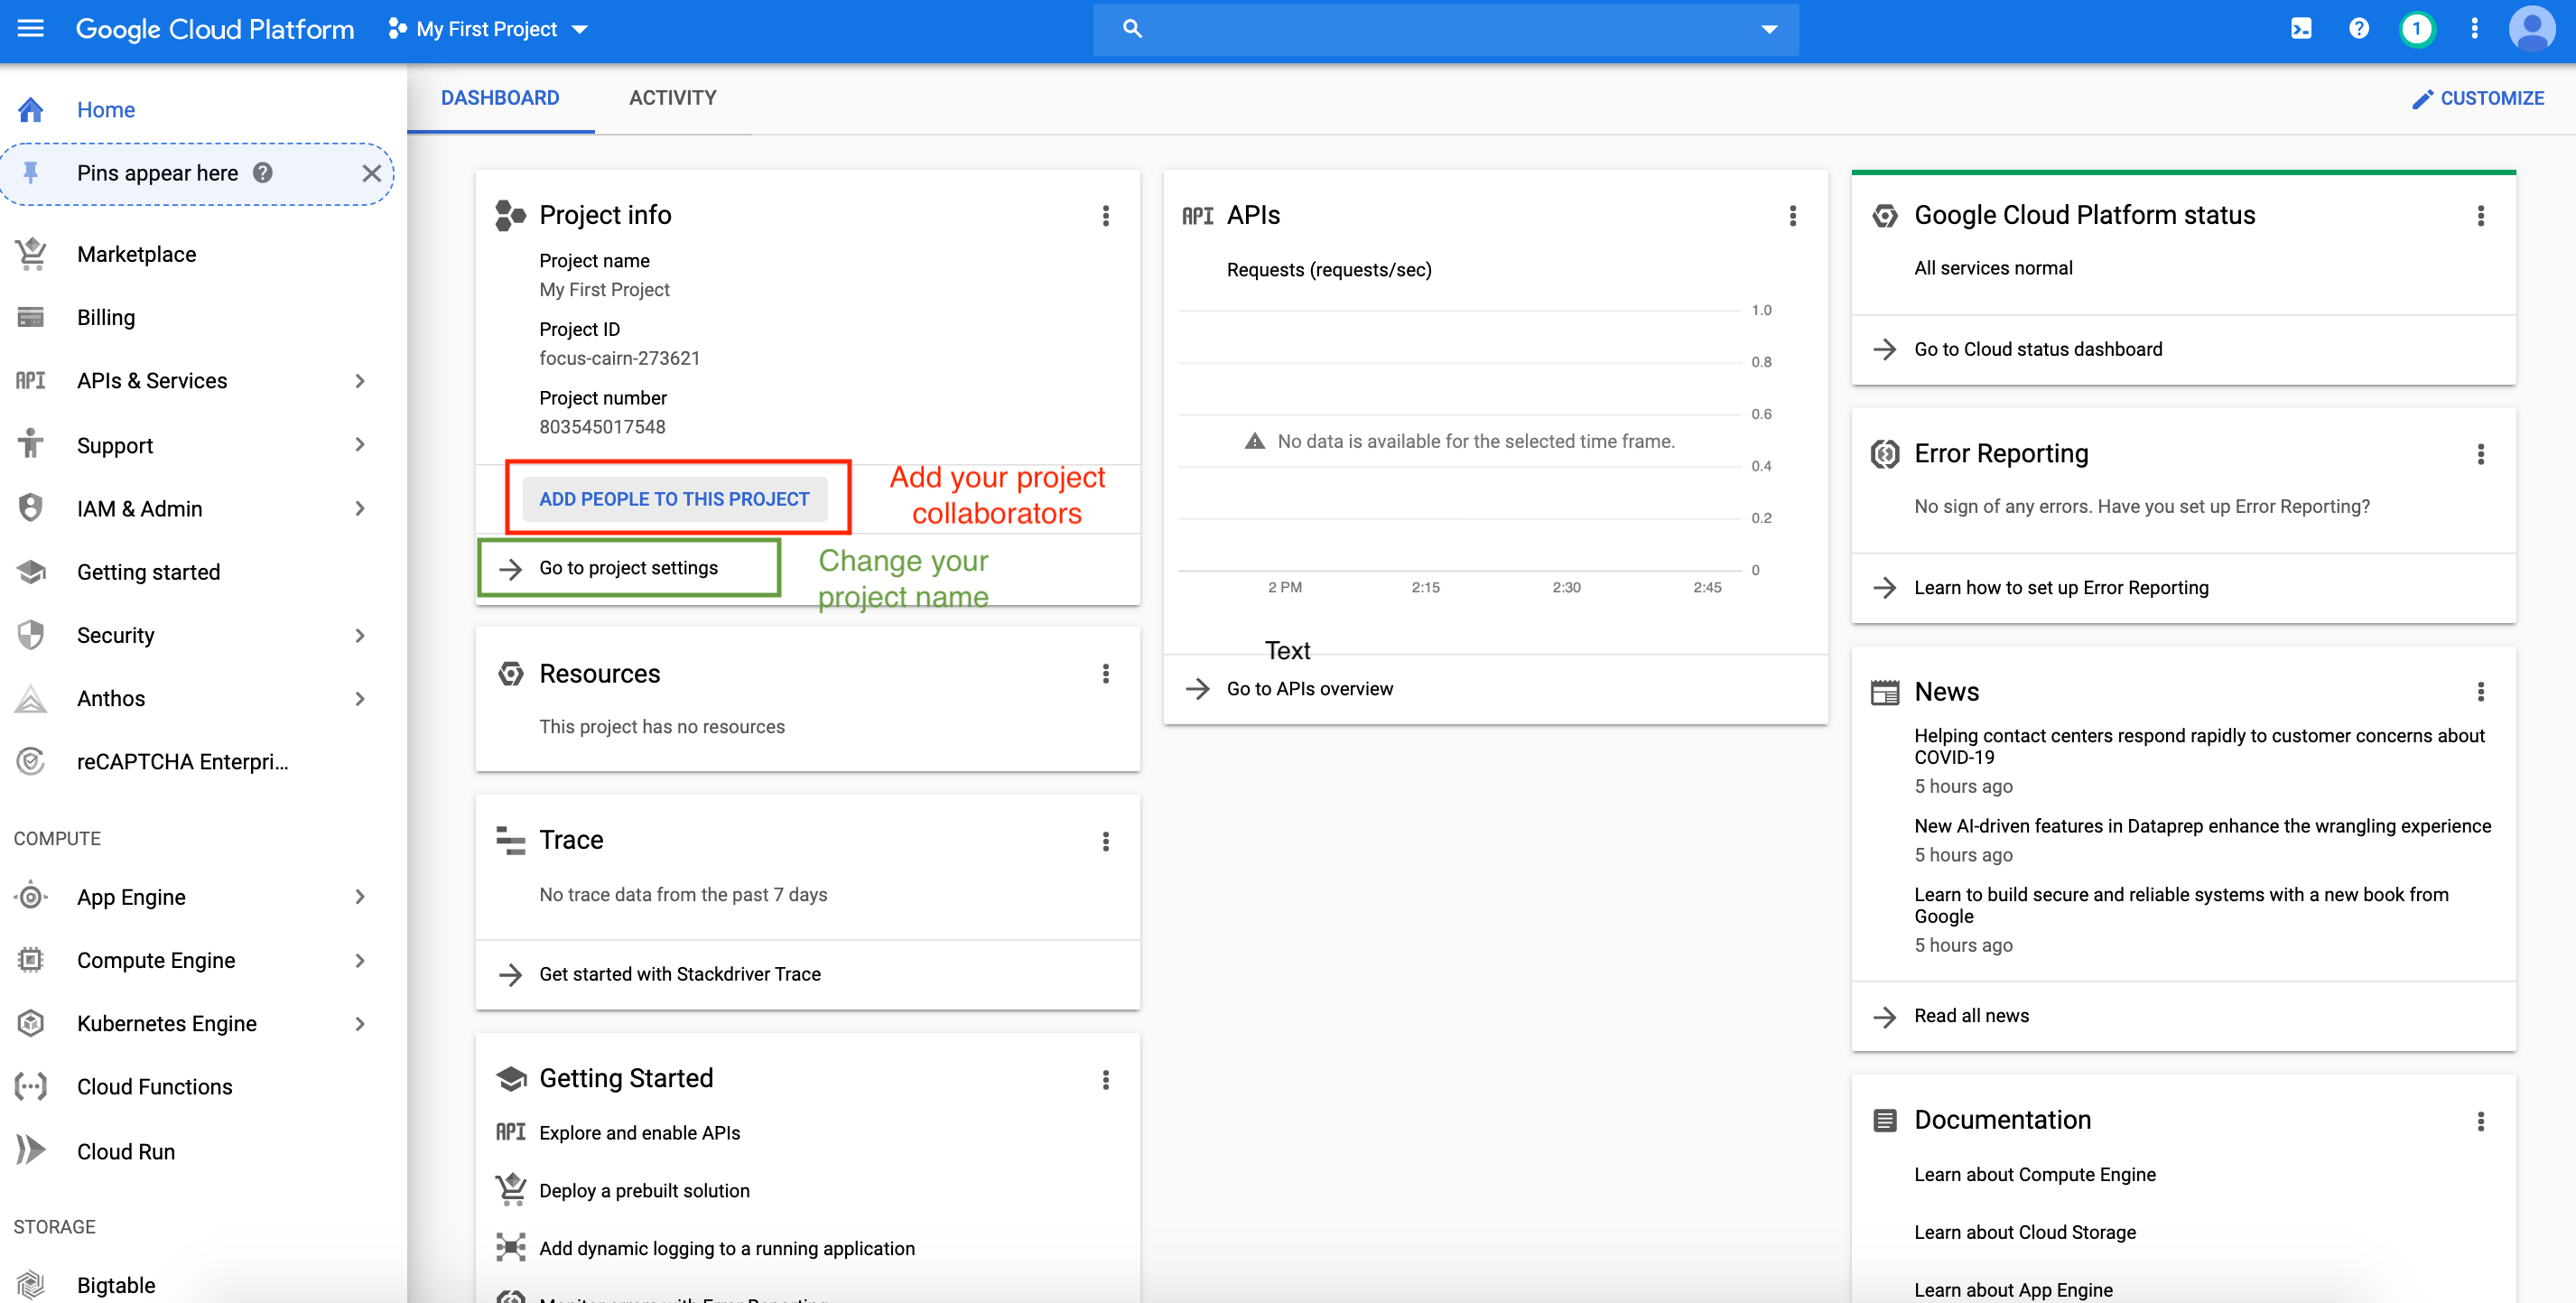
On the main project dashboard, you can change the name of your project by clicking Go to project settings. Take a note of your project ID.
-
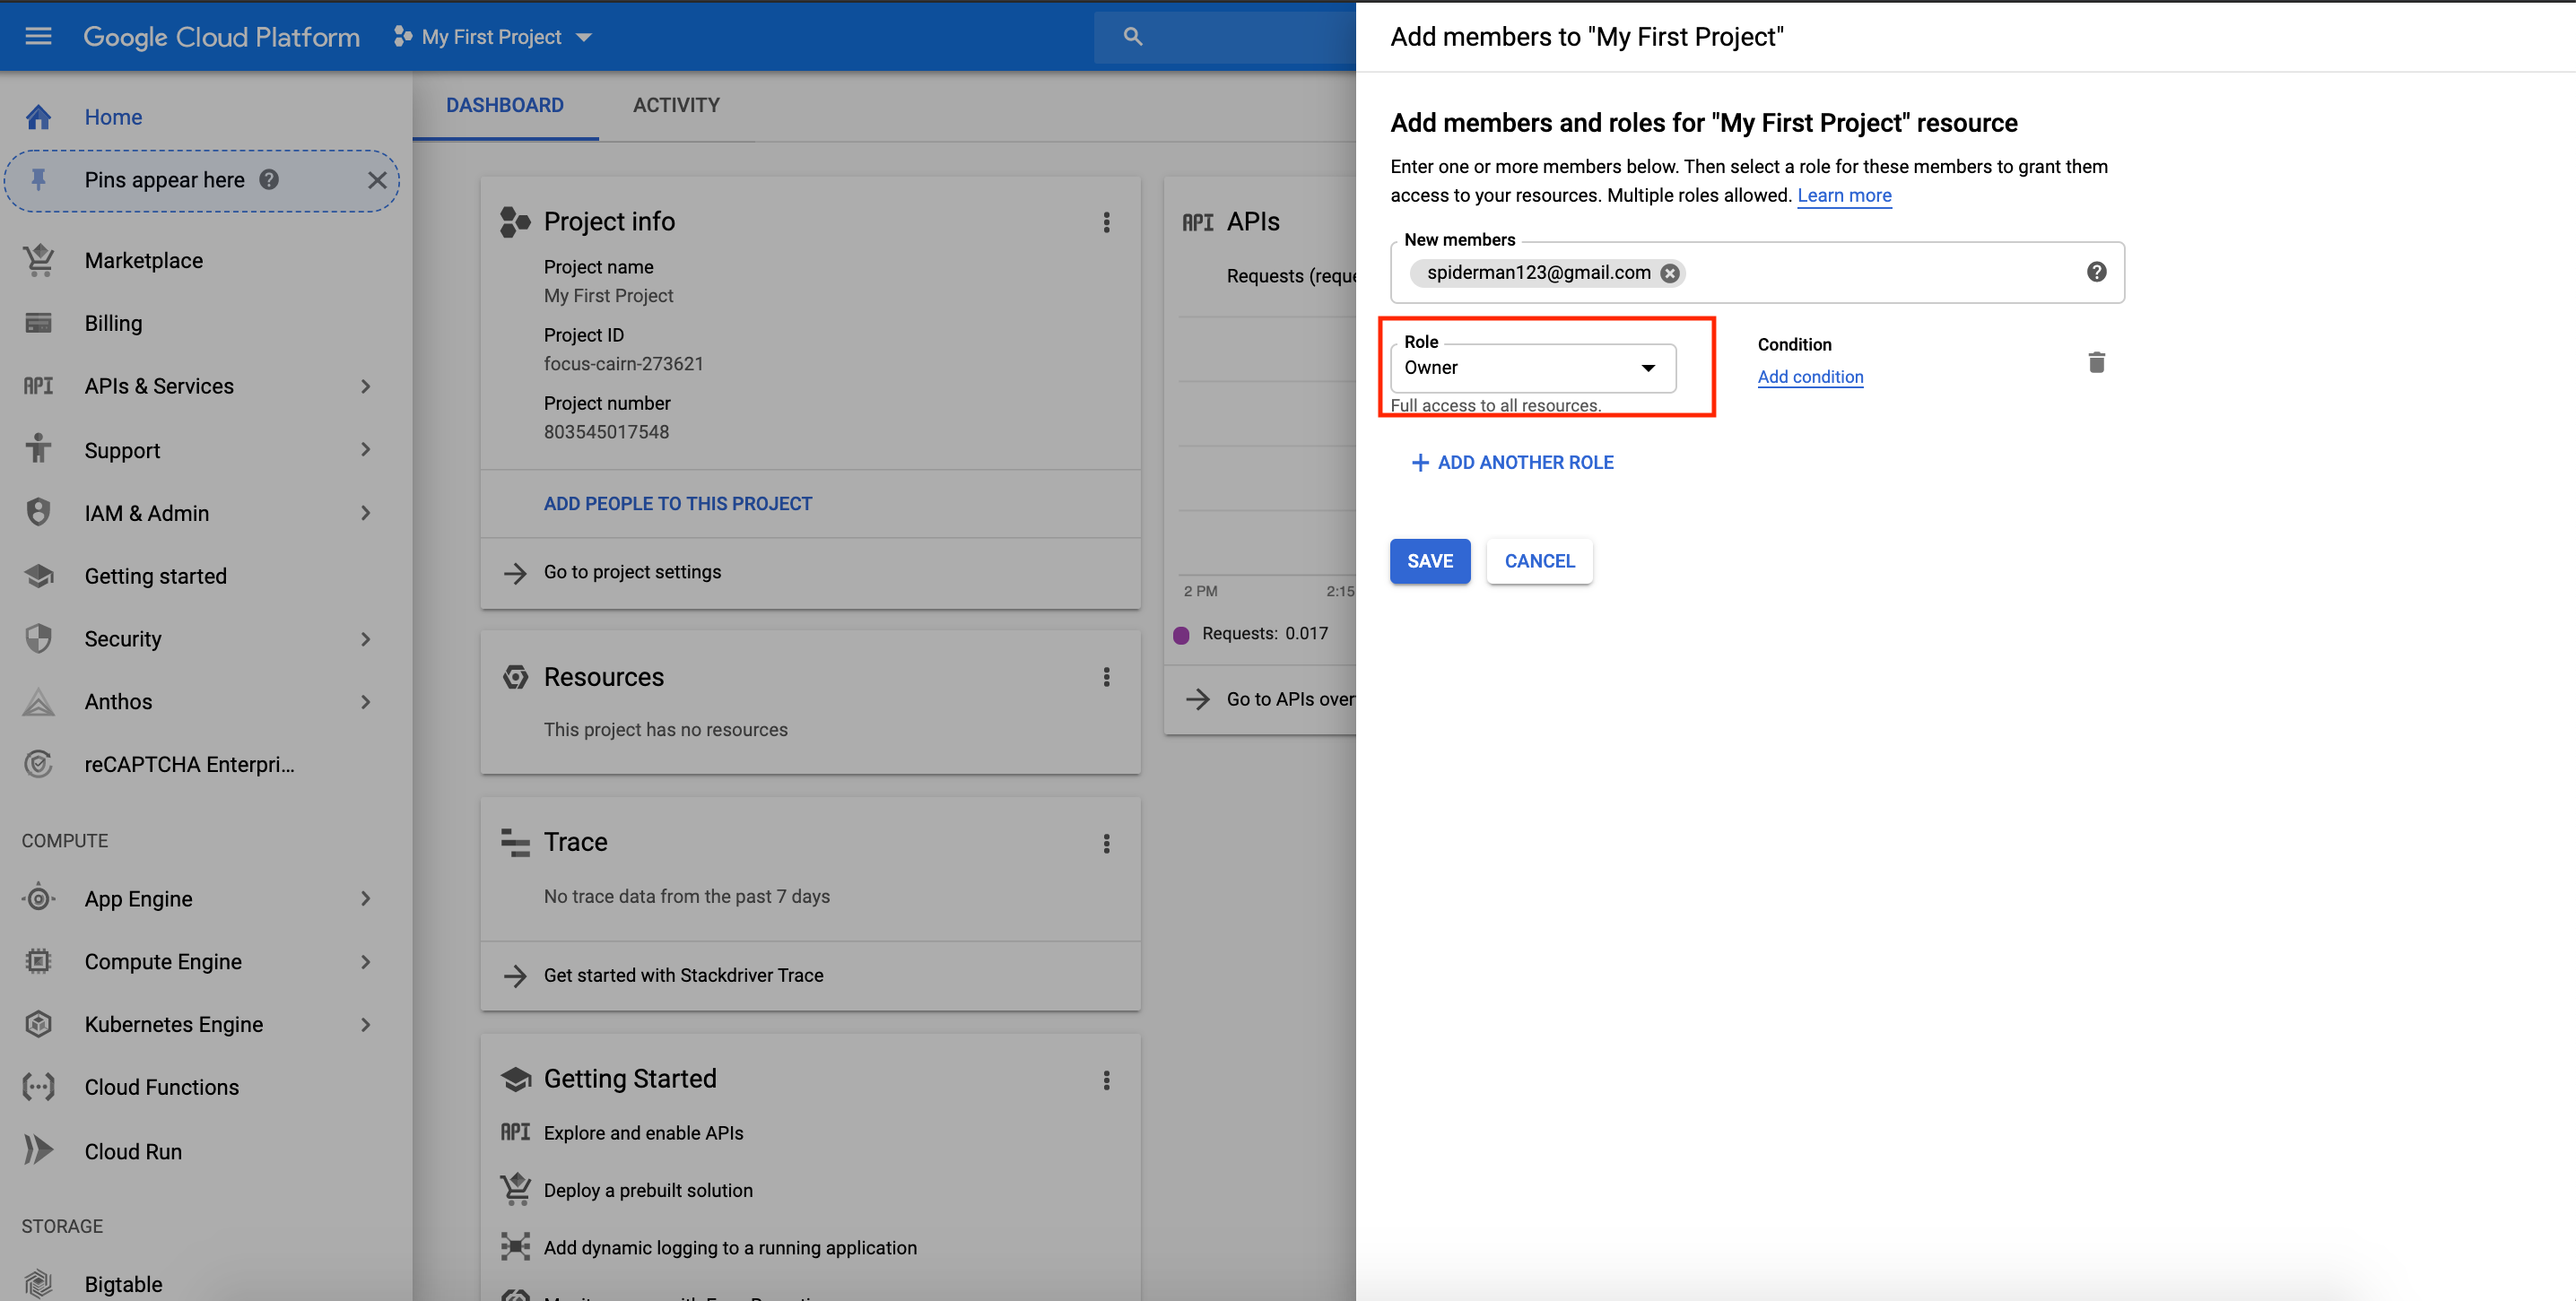
To add project collaborators, click ADD PEOPLE TO THIS PROJECT. Add their email and make their role owners.
-
Upgrade your account in order to use GPUs following this instruction. Otherwise Google Cloud Free Tier does not come with GPU support or quota.
-
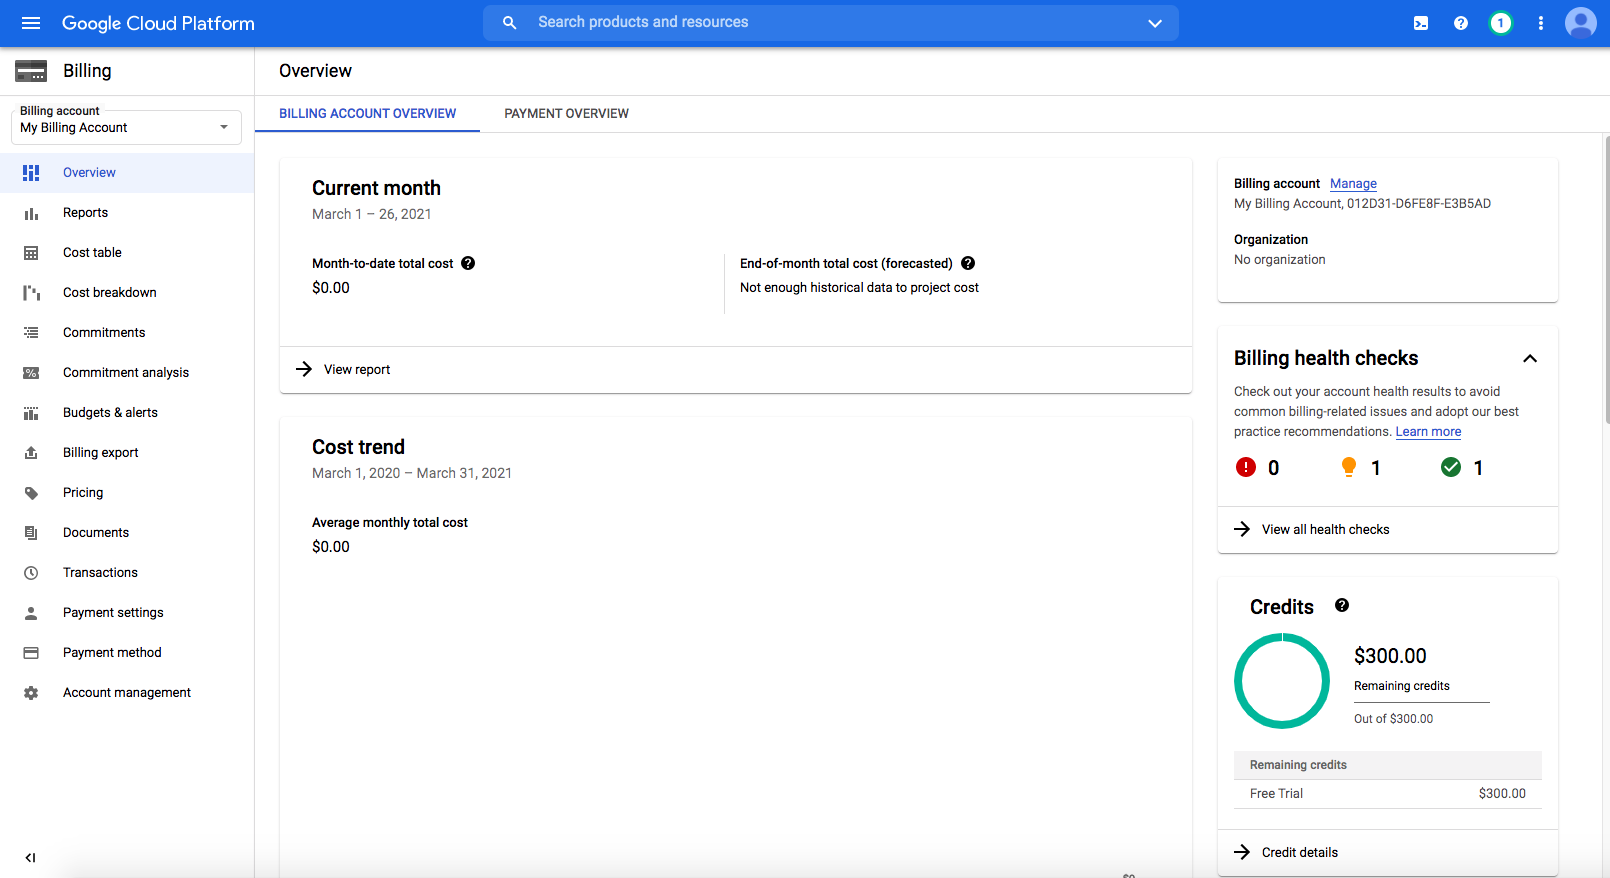
Go to Billing and click "Upgrade" on the "Credits" section at the bottom right corner. An upgraded account should look like this.


Your account typically does not come with GPU quota. You have to explicitly request for it under IAM Admin > Quotas.
Please request the quota increase ASAP, because they will take up between couple minutes to a week to process! If you don't have GPU quota, you will have to create a CPU-only VM first and create another GPU VM later, explained in the next section.
-
Enable VM instances. Go to Compute Engine > VM instances and click "Enable". Then you should see something like this.

-
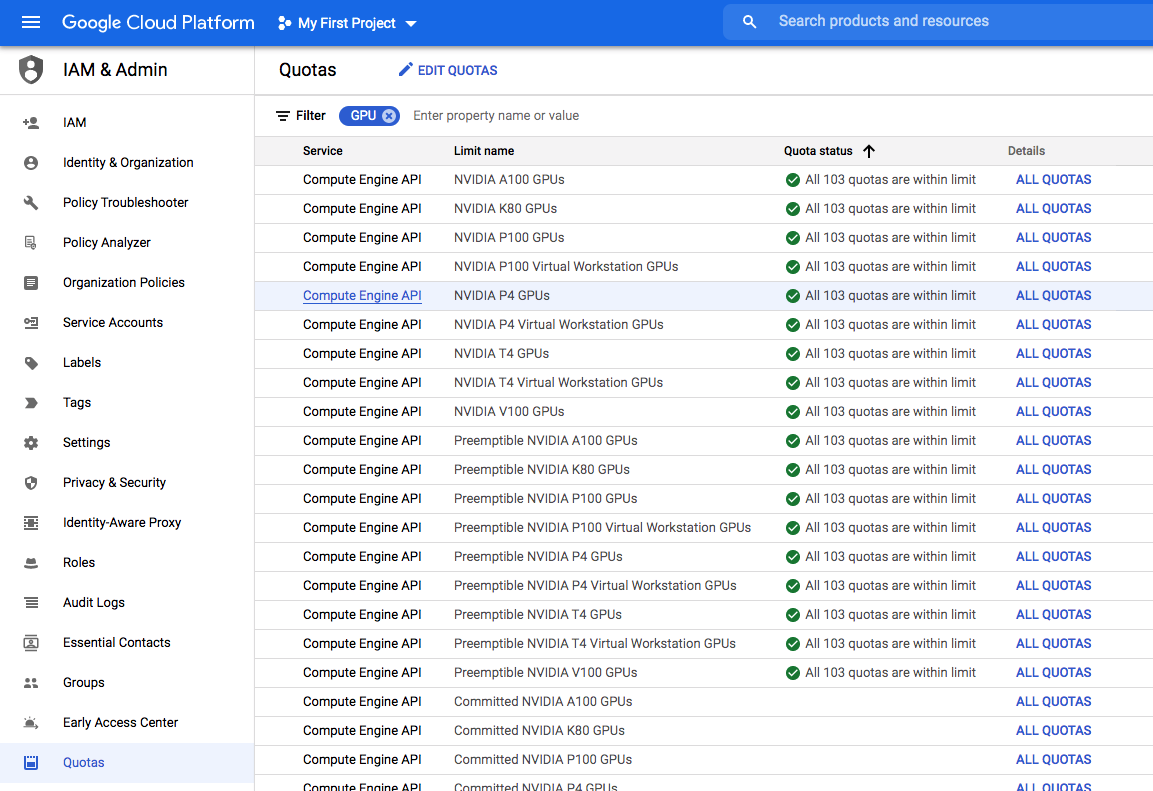
Change your quota of GPUs (all regions). Search "GPU" in the search bar and scroll all the way down. You should see GPUs (all regions) and click ALL QUOTAS.

-
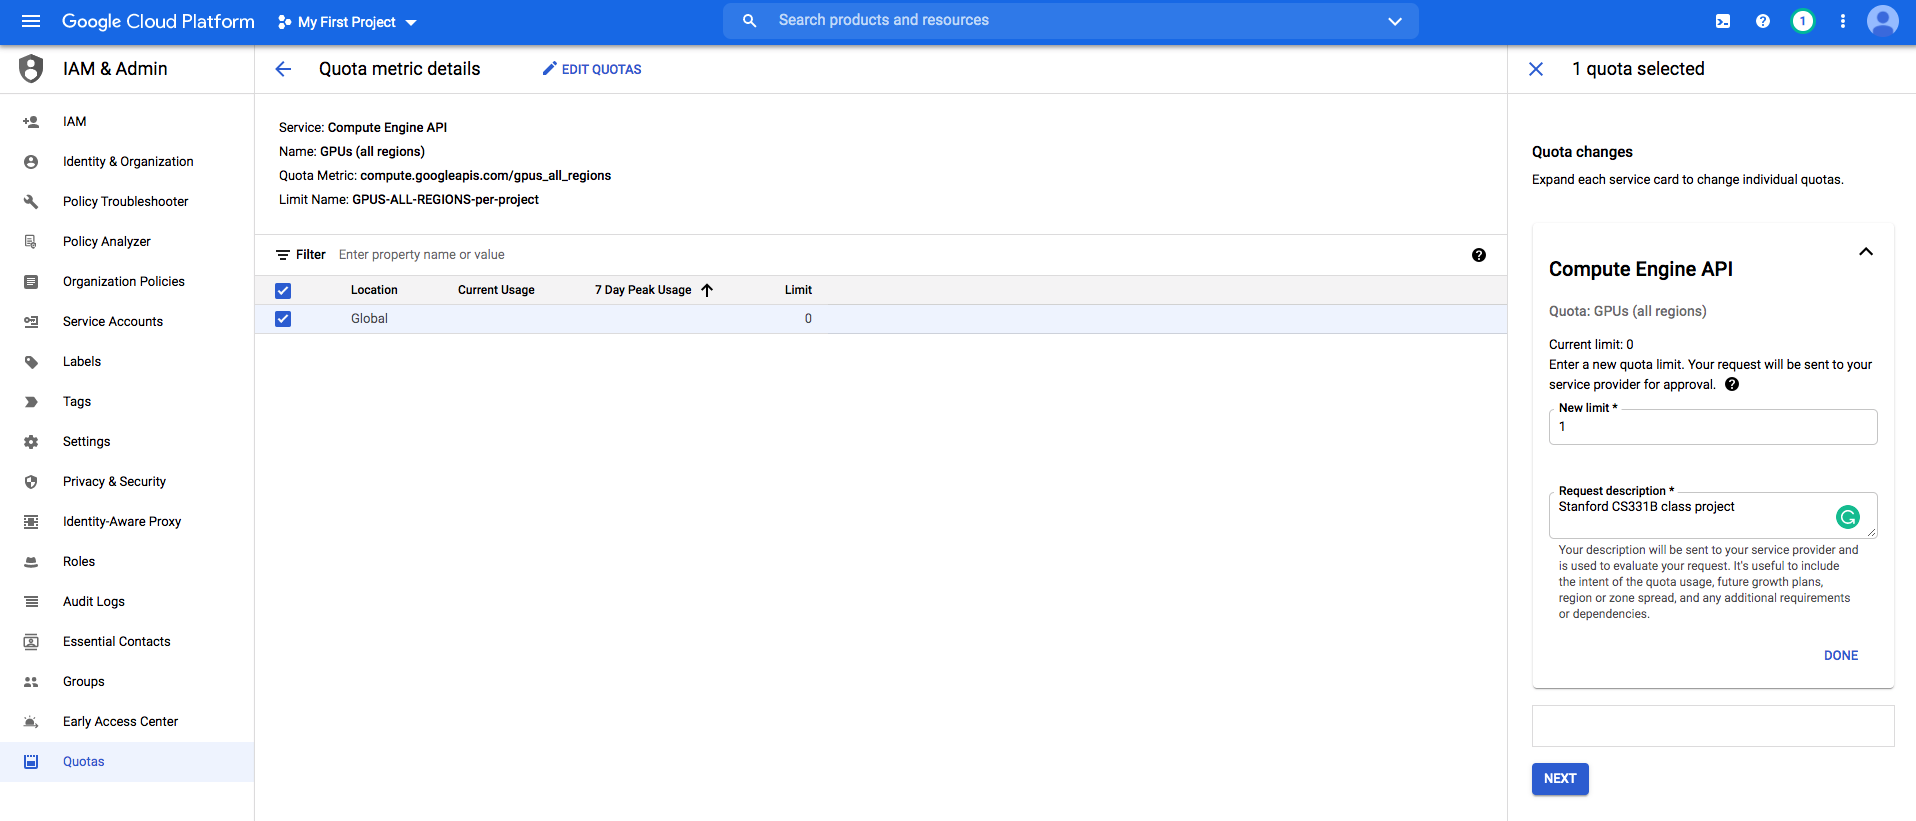
Select the quota with Location: Global and click EDIT QUOTAS. Then put in "1" in the "New limit" text box and proceed to "Next".
-
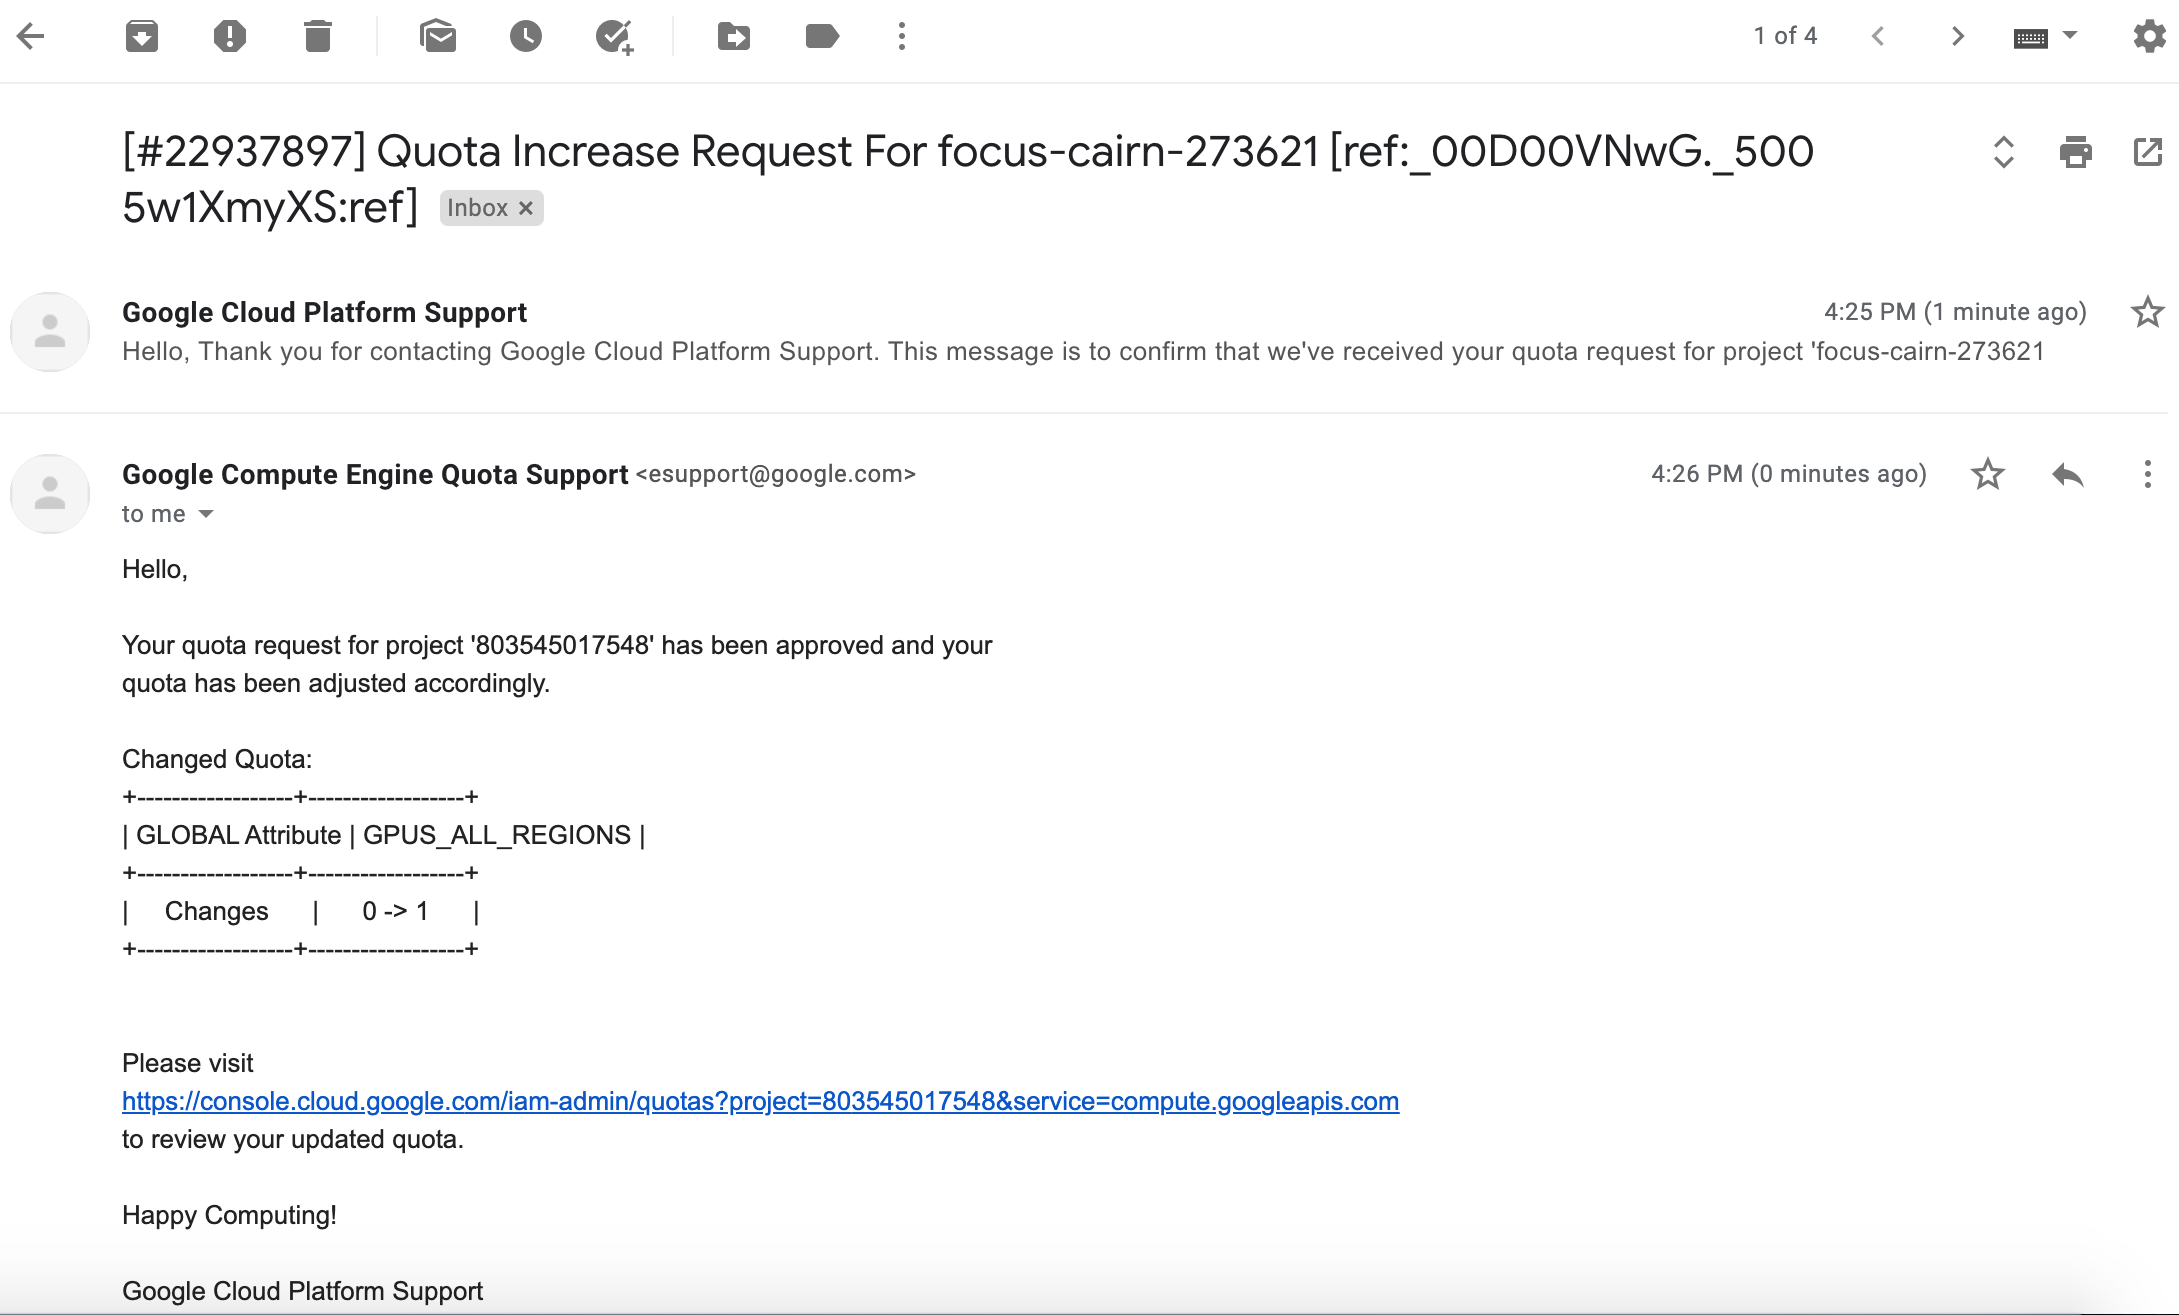
Wait until GCP send you the second email (the first email is just to notify they receive the request) that looks like this. It could take couple minutes to couple days for them to approve.


-
Go to Create Instance. You will see a page where you can customize specifications to create a VM instance.
-
Fill in
Namefield with your preferred VM name, e.g.cs331b. -
In
Machine configurationpart, Customize following the screenshot below. -
Choose your desired number of CPUs and memory. If you need to run iGibson, 8 vCPUs, 32 GB memory would be the minimum.
-
Set
Number of GPUsto 1 since we will need GPU to run iGibson. -
For
GPU type,NVIDIA Tesla K80is typically enough.P100andV100are way more expensive (check the price on the right), but also faster and has larger memory. Check pricing and spec for GCP GPUs. GPU drivers and CUDA will be automatically installed only if you select at least 1 GPU.Alternatively, you can choose None if you are not in need of GPU resources yet (you can always add on later) to save cost, and in this case GPU drivers and CUDA will not be installed.
-
In
Boot diskfield, change toPublic images -> Deep Learning on Linux -> Deep Learning Image: Base m66 CUDA 11.0. Select at least 100GB Memory. -
Check the box
Allow HTTP trafficandAllow HTTP trafficsince we will be using tensorboard and jupyter notebook. -
Leave all other options as default.
-
Click the blue botton
Createat the end of the page. It will Automatically Start your Instance, so if you don't need to use it now, Stop it Immediately.
Your configuration sheet should look similar to below image. Follow exactly the same configuration for the ones with red boxes. For configurations with orange boxes, you can adjust it based on your project need as discussed below.
Pay attention to the monthly price, make sure you claim only necessary HW resources, so that you can use your GCP instance for longer. Once you run out of credits, the VM instance will be shut down automatically and you might lose unsaved data and models. If you are almost running out of credits, contact the course staff.


-
You can always change number of CPUs, number of GPUs, CPU memory, and GPU type after your VM has been created.
-
Just stop your instance, go to your VM instance's details at Compute Engine > VM instances > [click on instance name].
-
Click "edit" on your VM's page to modify the settings. Finally click "Save".
Wait until the deployment is finished. You should see a running VM with a green checkmark next to it on your Compute Engine page.
We need to tweak a few more settings to enable remote access to Jupyter notebooks.
- Go to Firewall config page.
- Click "CREATE FIREWALL RULE"
- Give it an arbitrary name, such as
cs331b. - In
Targetsfield, selectAll instances in the network. - In
Source IP ranges, enter0.0.0.0/0. - In
Protocols and portsfield, select "Specified protocols and ports". Then checktcpand enter7000-9000. - Click the blue button
Create. - Restart your instance on the Compute Engine page.
Your configuration sheets should look similar to below:

If you want to have a static IP for ease of access, you can change the External IP address of your Google Cloud Engine instance to be static (see screenshot below).

To Do this, click on the 3 line icon next to the Google Cloud Platform button on the top left corner of your screen, go to VPC network > External IP addresses (see screenshot below).

To have a static IP address, change Type from Ephemeral to Static. Enter your prefered name for your static IP, ours is cs331b-ip (see screenshot below). And click on Reserve.
NOTE: At the end of CS 331B when you don't need your instance anymore, release the static IP address because Google charges a small fee for unused static IPs (according to this page).

Take note of your Static IP address (circled on the screenshot below). We use 35.185.240.182 for this tutorial.

Now that you have created your virtual GCE, you want to be able to connect to it from your computer. The rest of this tutorial goes over how to do that using the command line.
- Install Google Cloud SDK.
- Log in using
gcloud auth login. It will ask you to copy/paste a link to your browser. Authenticate using the same gmail account that you used for this tutorial and then copy the code and paste it in your terminal after the promptEnter verification code: - Set the current project using
gcloud config set project <PROJECT_ID> - Connect to your VM instance using
gcloud compute ssh <INSTANCE_NAME> - If you connect for the first time, you will be asked "Would you like to install the Nvidia driver?". Input
y. It should take 1 min or so. - Run the setup script. This is optional unless you want to use jupyter notebook.
git clone https://github.com/ChengshuLi/gcloud.git
cd gcloud/
chmod u+x setup.sh
./setup.shIf you have GPU enabled, you should be able to:
- run
nvidia-smiand see the list of attached GPUs and their usage statistics. Runwatch nvidia-smito monitor your GPU usage in real time. - first
pip install torchand then inside thegcloud/folder, runpython verify_gpu.py. If your GPU is attached and CUDA is correctly installed, you shouldn't see any error.
Start Jupyter Notebooks
jupyter notebook
The default port is 8888, specified in ~/.jupyter/jupyter_notebook_config.py.
You can connect to your Jupyter session from your personal laptop. Check the external ip address of your instance, say it is 35.185.240.182. Open any browser and visit 35.185.240.182:8888. The login password is the one you set with the setup script above.
Start Tensorboard
tensorboard --logdir . --port 8000 --bind_all
Visit <external_ip>:8000 on your browser to access the Tensorboard.
For instance, to transfer file.zip from GCE instance to your local laptop. There is an easy command for this purpose:
gcloud compute scp <user>@<instance-name>:/path/to/file.zip /local/path
For example, to download files from our instance to the current folder:
gcloud compute scp tonystark@cs331b:/home/shared/file.zip .
The transfer works in both directions. To upload a file to your instance:
gcloud compute scp /my/local/file tonystark@cs331b:/home/shared/
If you would like to transfer an entire folder, you will need to add a resursive flag:
gcloud compute scp --recursive /my/local/folder tonystark@cs331b:/home/shared/
You can use Tmux to keep the training sessions running when you close your laptop. Also, if your collaborators log into the same account on the VM instance, they will see the same tmux session screen in real time.
You can develop your code on remote server directly if you are comfortable with vim or emac.
You can develop locally on your favorite editor, push to your branch on Github, and pull on remote server to run. (git commit frequently is also one of good Github practices)
Besides gcloud compute scp, another tool you can check out is rsync which can synchronize files and folders between your local machine and remote server.
Don't forget to stop your instance when you are done (by clicking on the stop button at the top of the page showing your instances). You can restart your instance and the downloaded software will still be available.
We have seen students who left their instances running for many days and ran out of credits. You will be charged per hour when your instance is running. This includes code development time. We encourage you to read up on Google Cloud, regularly keep track of your credits and not solely rely on our tutorials.