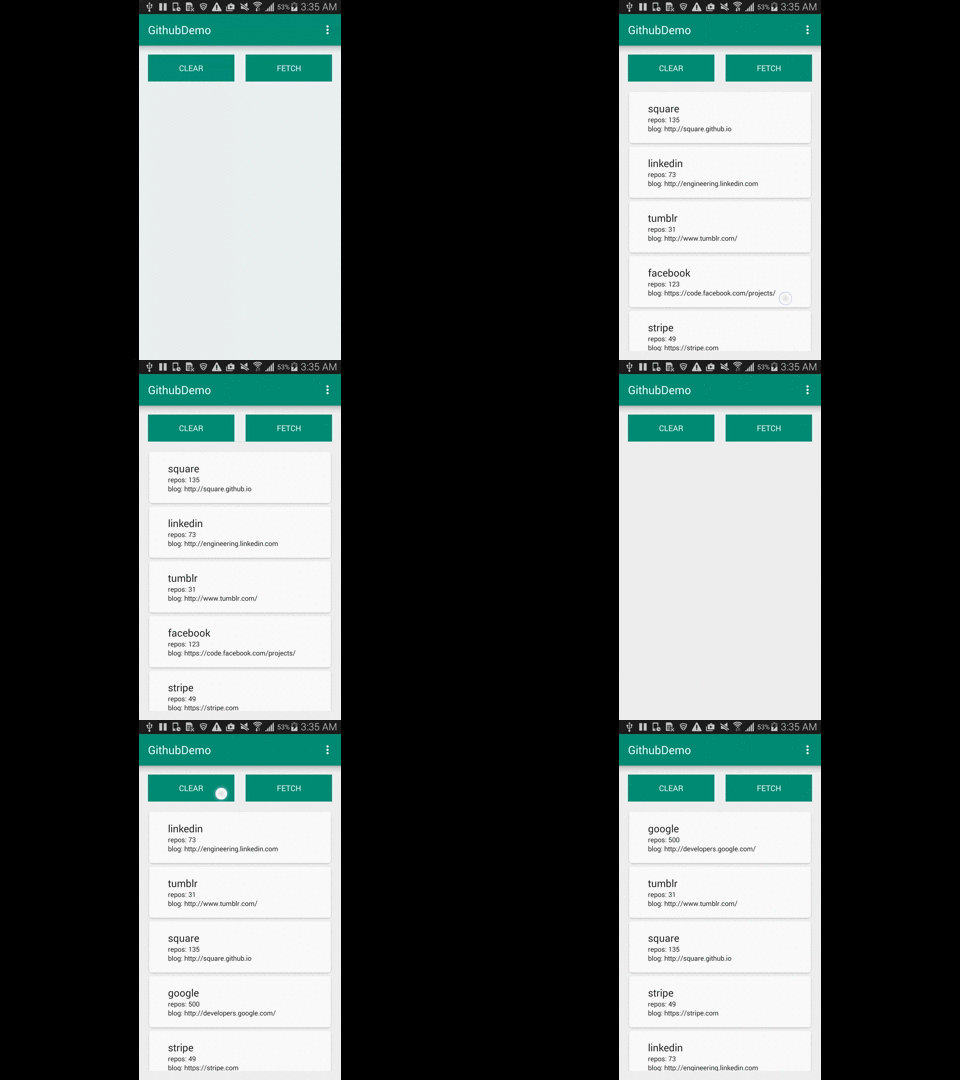
GithubDemo
#####Introduction GithubDemo showcases the use of Square's Retrofit and RxJava to make asynchronous HTTP Requests in Android Application. The App makes HTTP GET requests to the Github API to retrieve public repo count and blog URL.
The FETCH button kicks off a series of HTTP requests to Github API. The HTTP requests are built via Retrofit. The calls are made asynchronously through RxJava. Notice that the cards are laid out in different order each time the button is pressed. You are seeing async threading at work! Each card is rendered when the result comes back from a GET request.
See my blog post for the full story: [http://randomdotnext.com/retrofit-rxjava/]
#####The Setup Let's take care of the depency injection for retrofit and RxJava/RxAndroid:
dependencies {
    compile 'io.reactivex:rxjava:1.0.+'
    compile 'io.reactivex:rxandroid:0.23.+'
    compile 'com.squareup.retrofit:retrofit:1.9.+'
}
Don't forget Android App Permissions in AndroidManifest:
<uses-permission android:name="android.permission.INTERNET" />#####Retrofit Service/Model Retrofit uses a Java interface as proxy for the REST API calls. All we have to do is to define the @GET method and the url/path. The following code makes a GET request to the Github URL and returns an Observable. The Observable object is used by RxJava to do stream processing (I'll explain this later).
public interface GithubService {
    String SERVICE_ENDPOINT = "https://api.github.com";
    //note: you don't need to define this URL String here

    @GET("/users/{login}")
    Observable<Github> getUser(@Path("login") String login);
}
Hang on! GithubService needs a RestAdapter implementation. In the spirit of good programming practice, I created a generic factory class to do the implementation:
static <T> T createRetrofitService(final Class<T> clazz, final String endPoint) {
    final RestAdapter restAdapter = new RestAdapter.Builder()
            .setEndpoint(endPoint)
            .build();
    T service = restAdapter.create(clazz);

    return service;
}
The Github REST API returns the following JSON. You can try it yourself!
curl https://api.github.com/users/linkedin
{
  "login": "linkedin",
  "blog": "http://engineering.linkedin.com",
  "public_repos": 73,
  //...truncated JSON
}
We will define the model in a separate Java file. The field variables in the model are automatically parsed from the JSON response. So you don't need to worry about writing the parsing code. Make sure that the variable names are exactly the same as API definition:
public class Github {
    private String login;
    private String blog;
    private int public_repos;

    public String getLogin() {
        return login;
    }

    public String getBlog() {
        return blog;
    }

    public int getPublicRepos() {
        return public_repos;
    }
}
And you are done! Other than Java's boilerplate stuff (boo), the code is very concise and readable. If you have more than one endpoint you want to access, simply add it to your service interface at little additional cost!
#####RxJava Async Stream The Observable object from our GithubService streams data when it becomes available. We need to have an Subscriber (sometimes called Observer) to watch for the data stream changes. Conceptually, the Subscriber subscribes to an Observable. The following block of code performs the entire process described.
GithubService service = ServiceFactory.createRetrofitService(GithubService.class, GithubService.SERVICE_ENDPOINT);
for(String login : Data.githubList) {
    service.getUser(login)
        .subscribeOn(Schedulers.newThread())
        .observeOn(AndroidSchedulers.mainThread())
        .subscribe(new Subscriber<Github>() {
            @Override
            public final void onCompleted() {
                // do nothing
            }

            @Override
            public final void onError(Throwable e) {
                Log.e("GithubDemo", e.getMessage());
            }

            @Override
            public final void onNext(Github response) {
                mCardAdapter.addData(response);
            }
        });
}
That was probably a bit confusing. Let's break the code down line by line.
service.getUser(login)GithubService Interface has the getUser method which returns an Observable. We are chaining method calls on this Observable to get the REST call response.
.subscribeOn(Schedulers.newThread())
.observeOn(AndroidSchedulers.mainThread())
These two lines specify that the REST call will be made in a new thread (YES!). And when the call response returns, it call the onNext, onError, and onComplete methods on the mainThread. The reason we need to call them on the mainThread is that only the mainThread can update the UI. If you have data that do not need to be displayed immediately, you would not need to observe on main thread. The difference between observeOn and subscribeOn is best explained in this stackoverflow.
new Subscriber<Github>() {
    @Override
    public final void onCompleted() {
        // do nothing
    }

    @Override
    public final void onError(Throwable e) {
        Log.e("GithubDemo", e.getMessage());
    }

    @Override
    public final void onNext(Github response) {
        mCardAdapter.addData(response);
    }
}
This Subscriber responds to the Observable's stream. onNext is called when the REST call receives data. In this Github example, there is only 1 item, so it is only called once. When the REST response is a list, the code can be called each time an item is received. onComplete and onError behave exactly as the name implies.
#####We are done Viola! We have just made our non-blocking HTTP calls on Android. Special thanks to the folks at Square and ReactiveX for making our lives easier!
#####Reference: Code on github: [https://goo.gl/DGMF2F]
Square Retrofit Doc: [http://goo.gl/UwksBu]
RxJava Doc: [https://goo.gl/5AqMNi]
Github API: [https://goo.gl/7nsdh0]
CardView/RecycleView UI Reference: [http://goo.gl/stNj2J]
