- Pass, access, and display props.
- Utilize props to create conditional statements.
- Define event handlers in a component and pass them to other components.
- Work with a component's children.
- Set default values for props.
- Fork and clone this repository.
- Create a new branch called
trainingfor your work. - Install the necessary dependencies using
npm install. - Start your server by running
npm start
In a React application, components act as small building blocks that come together to form the user interface.
Each component has a specific role in the interface, and there are times when components need to communicate with each other.
In this lesson, we will explore another way for components to interact: passing information from one component to another.
This information passed from one component to another is known as props.
Props allow us to customize the output of each component based on the information that is passed in.
By enabling components to communicate and share data through props, we can introduce a higher level of flexibility that was not possible before.
Let's dive in and get started with props!
Every component in React has something called props.
Props for a component is an object that holds information specific to that component.
You might have encountered props before without realizing it! Let's take a look at the HTML <button> tag. We can pass various pieces of information to the button tag, such as the button type.
<button type="submit" value="Submit">Submit</button>In this example, we have passed two pieces of information to the button tag: a type and a value. Depending on the type attribute we give to the <button> element, it will behave differently within a form. Similarly, we can pass information to our own components to specify their behavior!
Props serve the same purpose for components as arguments do for functions.
To access a component's props object, you can refer to the props object using dot notation for its properties. Here's an example:
props.name;This will retrieve the name property from the props object.
- In
PropsDisplayer.js, we have a component calledPropsDisplayerthat receivespropsas a parameter. Inside the function body, we define astringPropsvariable that holds the string representation of thepropsobject.
To display the stringProps on the screen, inject it between the <h2></h2> tags.
- In
App.js, we import thePropsDisplayercomponent. Render it within theAppcomponent's return statement.
When you run the code, you might see an empty object displayed. This is because the props object may have properties that are not detected by JSON.stringify(). Even if you could see those properties, the props object doesn't have much to show at this point.
Let's continue and see what else we need to do.
To utilize props, we need to pass information to a React component. In the previous exercise, we rendered an empty props object because no props were passed to our PropsDisplayer component.
So how do we pass props? By providing the component with an attribute:
<Greeting name="Jamel" />Let's say you want to pass the message "We're great!" to a component. Here's how you can do it:
<SloganDisplay message="We're great!" />As you can see, when passing information to a component, you need to assign a name to the information you want to pass. In the example above, we used the name message. You can choose any name you prefer.
If you want to pass information that isn't a string, you can wrap it in curly braces. Here's an example of passing an array:
<Greeting myInfo={["Astronaut", "Narek", "43"]} />In the next example, we pass multiple pieces of information to the <Greeting /> component. Values that are not strings are enclosed in curly braces:
<Greeting
  name="The Queen Mary"
  city="Long Beach, California"
  age={56}
  haunted={true}
/>
Remember, props allow us to pass information and customize the behavior of our components.
In the App top-level component, find the line where we call the PropsDisplayer component. Modify this line by passing a prop named myProp with the string value "Hello".
By passing the myProp prop with the value of "Hello", we are providing the PropsDisplayer component with a prop that it can access and display.
Save your changes to rerender your app in the browser.
Props allow us to customize a component by passing it information.
To ensure that a function component can use the props object, define your function component with props as the parameter:
function Button(props) {
  return <button>{props.displayText}</button>;
}
In the above example, props is accepted as a parameter, and the values from the props object are accessed using dot notation (e.g., props.displayText).
Alternatively, since props is an object, you can use destructuring syntax to directly extract the specific prop values you need:
function Button({ displayText }) {
  return <button>{displayText}</button>;
}
Using destructuring, you can directly access the displayText prop without explicitly referencing props.displayText.
Both approaches are valid and achieve the same result. Choose the one that feels more convenient for your use case.
-
In
Product.js, modify theProductcomponent to acceptpropsin the function definition. -
Within the component, use the dot notation to access the specific prop values and inject them into the appropriate elements.
- Inject
props.nameinto the<h1></h1>tag to display the name of the product. - Inject
props.priceinto the<h2></h2>tag to display the price of the product. - Inject
props.ratinginto the<h3></h3>tags to display the rating of the product.
- In
App.js, theProductcomponent is called with three pieces of information:name,price, andrating. The values are passed as props to theProductcomponent. To test the code, you can tweak the values ofname,price, andratinginApp.js. When you run the code, the browser will refresh and display the updated information about the product on the screen.
In React, props are commonly used to pass information from a parent component to a child component. Props travel in a one-way direction, from the top (parent) component to the bottom (child) component.

You already have experoence with passing props from a parent component (App) to a child component (Product):
function App() {
  return <Product name="Apple Watch" price={399} rating="4.5/5.0" />;
}
In this example, App is the parent component, and Product is the child component. The name, price, and rating props are passed from App to Product.
Inside the child component (Product), you can access and display the passed-in props using props.propertyName. For example:
function Product(props) {
  return (
    <div>
      <h1>{props.name}</h1>
      <h2>{props.price}</h2>
      <h3>{props.rating}</h3>
    </div>
  );
}
In the Product component, the values of name, price, and rating are accessed from props using dot notation (props.name, props.price, props.rating), and then they are displayed in the appropriate elements.
It's important to note that props passed to a component are immutable, meaning they cannot be changed within the component itself. If a component needs new values for its props, it should rely on the parent component to pass updated props.
By passing props from component to component, you can effectively share information and customize the behavior and rendering of child components based on the provided data.
Pass the props songName, and artist to the Player component from the App component.
If you were successful, The Player component will render the song name and artist name based on the passed props.
To render different UI based on props, you can use conditional statements within your components. Here's an example:
function LoginMsg(props) {
  if (props.password === "a-tough-password") {
    return <h2>Sign In Successful.</h2>;
  } else {
    return <h2>Sign In Failed.</h2>;
  }
}
In this example, the LoginMsg component receives a password prop. Inside the component, a conditional statement is used to check the value of the password prop. If the password is equal to 'a-tough-password', the component returns <h2>Sign In Successful.</h2>. Otherwise, it returns <h2>Sign In Failed.</h2>.
By using conditional statements like this, you can customize the UI of your components based on the values of the props passed to them. This allows you to handle different cases and display different content accordingly.
In the Greeting.js component, you can see that it expects two props: name and signedIn. The signedIn prop is only used to determine which message to display.
Inside the component, a conditional statement is used to check the value of the signedIn prop. If it is true, the component displays a welcome message with the name prop. If it is false, it displays a sign-in message with the name prop.
In the App.js file, pass an additional attribute to the Greeting component to control the value of signedIn. Set the value ti false.
Save your code to see the changes in the browser.
In React, you can define an event handler as a method within a function component. This allows you to handle events such as clicks, form submissions, or keyboard interactions.
Here's an example in Example.js:
import React from "react";

function Example() {
  // Event handler method
  const handleClick = () => {
    console.log("Button clicked!");
  };

  return (
    <div>
      <button onClick={handleClick}>Click Me</button>
    </div>
  );
}

export default Example;
In this example, the handleClick function is defined as an event handler for the button's onClick event. When the button is clicked, the function will be executed, and the message "Button clicked!" will be logged to the console.
Note that the event handler method is defined within the function component's body, and it can access other variables and props within the component.
By passing event handler functions as props, you can enable interactivity in your React components and respond to user actions.
- In Talker.js, we need to rewrite the
talk()function as a method defined inside the Talker component.
Remember to delete the original talk() function before running the code.
- Now, we want to pass the
talk()method from theTalkercomponent to theButtoncomponent. To do that, we need to give theButtoncomponent an attribute and set its value to thetalkmethod.
To do so, we can pass the talk method as a prop named talk to the Button component. The prop value is set to the talk method, and we use curly braces to indicate that it is a JavaScript expression.
Now the Button component can access and use the talk method through its props.
- In Button.js, we want to attach the
talkfunction as an event handler to the<button>element. To do that, we need to add anonClickattribute to the<button>element and set its value to thetalkproperty of theprops.
Now, when you click on the button, the talk function will be invoked.
When choosing names for event handlers and props that pass event handlers, there is a commonly used naming convention in React.
For the event handler function itself, the convention is to use a name that starts with "handle" followed by the type of event you are listening for. For example, if you are listening for a "click" event, you can name your event handler function as handleClick. If you are listening for a "hover" event, you can name your event handler function as handleHover.
Here's an example:
function MyComponent() {
  function handleClick() {
    // Event handler logic
  }

  function handleHover() {
    // Event handler logic
  }

  return (
    <div>
      <button onClick={handleClick}>Click me!</button>
      <div onMouseOver={handleHover}>Hover over me!</div>
    </div>
  );
}
For the prop that passes the event handler, the convention is to use the prefix "on" followed by the type of event you are listening for. For example, if you are listening for a "click" event, you can name your prop as onClick. If you are listening for a "hover" event, you can name your prop as onHover.
Here's an example:
function ParentComponent() {
  function handleClick() {
    // Event handler logic
  }

  return <ChildComponent onClick={handleClick} />;
}
Following this naming convention can make your code more consistent and easier to understand. However, it's important to note that these naming conventions are not required by React and you can choose different names if you prefer.
Fix the naming in Talker.js, and Button.js to match React's naming convention.
It's important to note that names like onClick have special meanings when used on HTML-like JSX elements. In Button.js, the onClick attribute on the <button> element creates an event listener that listens for clicks on the button. However, in Talker.js, the onClick attribute given to <Button /> is just a normal attribute name because <Button /> is a component instance, not an HTML-like JSX element.
Please run your program to ensure the button is working as intended.
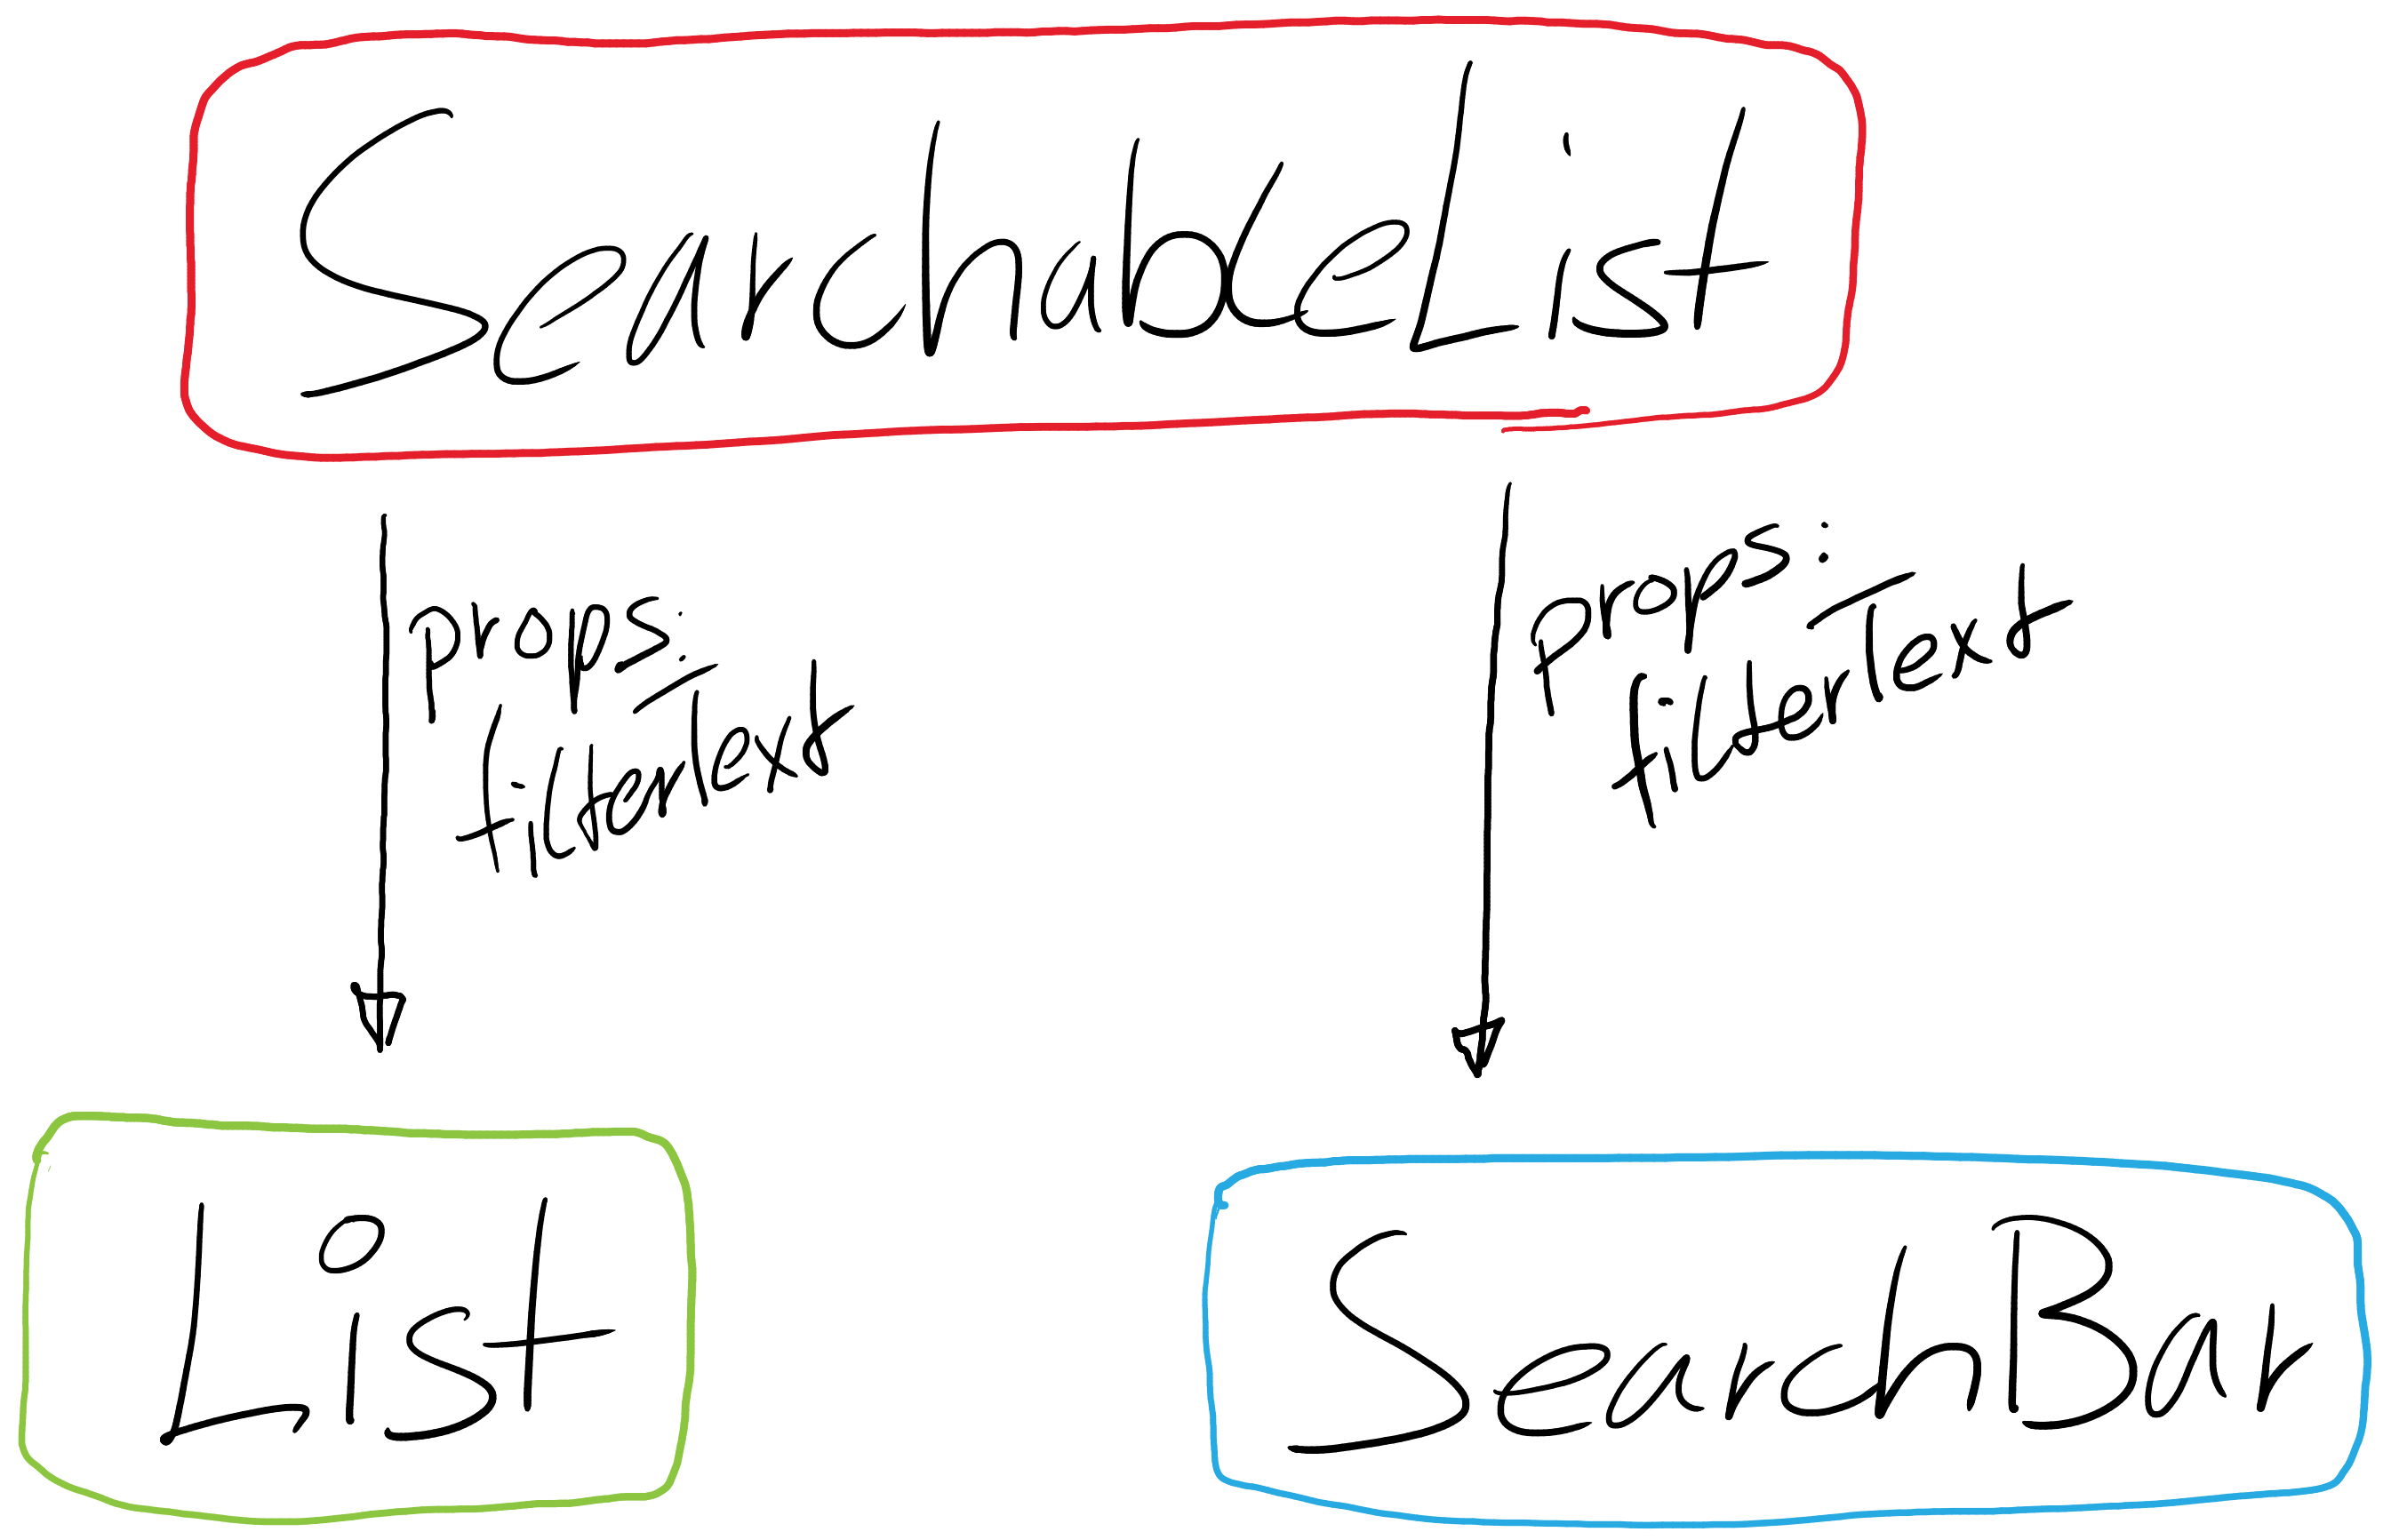
Every component's props object has a property called children.
props.children will give you everything that is placed between the opening and closing tags of a component in JSX.
Up until now, you have seen components with self-closing tags like <MyFunctionComponent />. However, they don't have to be written that way! You can use <MyFunctionComponent></MyFunctionComponent>, and it will still work.
With props.children, you can access everything placed between <MyFunctionComponent> and </MyFunctionComponent>.
By utilizing props.children, we can separate the outer component (in this case, MyFunctionComponent) from its content. This makes the component flexible and reusable.
Take a look at BigButton.js.
Try to guess the output for each example
If a component has more than one child between its JSX tags, then props.children will return those children as an array. However, if a component has only one child, then props.children will return that single child without being wrapped in an array.
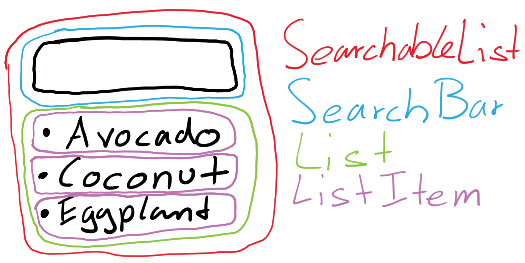
Take a look at ButtonContainer.js, notice how it is rendering two instances of <List>, and each <List> has at least one <li> child.
Now, open List.js and examine the List component.
Consider the fact that each List instance will be rendered with two JSX tags:
<List> // opening tag

</List> // closing tag
And there will be at least one <li></li> child between those tags:
<List>
  {" "}
  // opening tag
  <li></li> // child
</List> // closing tag
You can see two list titles in the browser, but no list items! How can you make the list items appear?
-
Open
List.js. In the return statement of theListcomponent, add{props.children}between the<ul></ul>tags. -
Save code to see the changes in your browser.
-
Optional Task: Each
<List></List>instance has a singular title: "Living Musician" and "Living Cat Musician" respectively. Somehow, each<List></List>automatically adds an "s" to the end of its title if the count of list items is greater than one. Even if we add a second piano cat, the second list title will automatically become plural.
See if you can figure out how the instances of the List component class automatically pluralize their titles!