First, watch this 12 minute video. Do not worry about understanding everything. I just want to make sure you are starting to get a feel of how things work in Javascript so we don't dive in completely cold.
As developers, the command line is how we interact with our computer. Anything you can do by clicking on the pretty interface of your computer, you can do with the command line. Needless to say, the possibilities are endless. There's only a couple of things I want you to know
The cd command is probably the most important for our purposes. cd stands for change directory. When you double click on a folder, you're basically doing a cd behind the scenes. Let's try some things out.
Open up iTerm. Right now you're going to be in your root directory. I know that because of the ~. Cool. type cd Desk and hit TAB. The TAB is an insanely helpful autocomplete trick we use so we don't have to type out the full name everytime we want to go somewhere. It should autocomplete to "Desktop". Hit enter. You're now in you Desktop!
Want proof? type l and hit enter. The l command is short for listing out the contents of your directory. You're going to use it all the time so get comfortable with him.
You should see all the files located in your Desktop directory!
OK, great. Now I want you to type cd ... Hit enter.
See how you're back in the ~ directory? the .. take you one out. So if you want to go out a folder, you cd ... If you want to go in you cd FOLDER_NAME
There's only one more command I want to teach you. On your Desktop (the GUI version not the command line version) I want you to manually create a new folder by right clicking and selecting "New Folder." Name it test
Go back into your command line. cd into Desktop. Type l and hit entere to confirm that test is a listed folder there.
Now, I want to delete test. Type rm -rf te and hit TAB. Let it autocomplete to test for you. We are developers now. Developers are lazy.
You just deleted the test folder! 😱 If you l again, you'll see our folder is now gone.
rm -rf is a very quick way to throw things in the trash. Use it wisely!
Go to the template-frontend repository and click the button that says "Fork" in the top right. When prompted, select your username.
Go to iTerm. Type cd Desktop and hit enter to move into your Desktop. Type l and hit enter to see all the files on your desktop. You're in the Desktop folder without all the fancy UI that your operating system provides. This is what a computer looks like behind the scenes.
While in Desktop, clone the frontend template repository and name is fundamentals. Do this by running the following command. MAKE SURE YOU REPLACE YOUR_USERNAME_HERE WITH YOUR USERNAME!:
➜ Desktop git clone git@github.com:YOUR_USERNAME_HERE/template-frontend.git fundamentals
Now cd into the folder you just created:
➜ Desktop cd fundamentals
Now you're in the fundamentals directory. We need to install dependencies to get this to run. we do that by running yarn:
➜ fundamentals git:(master) yarn
It's going to install a bunch of stuff. Let it run for a minute or two.
Once it's done, start the app by running yarn dev:
➜ fundamentals git:(master) yarn dev
A window should pop open in your default browswer – you're now running an app. If your default isn't Chrome, please copy and paste the url (http://localhost:3005/) into Chrome; it's much better for developers.
We're going to use the Chrome console for this exercise. Let's get that open.
On the page that opened automatically:
- Right click anywhere on the page
- Click "Inspect". A little bottom bar should pop up or from the right.
- A screen will pop up from the bottom or the right. Click "Console" on the top of this screen.
In the terminal, press ⌘ + T. to open a new tab
In the new tab, run code . to open our project in VS Code:
➜ fundamentals git:(master) code .
Inside of VS Code, type ⌘ + P and search for Home. Press enter to select the file. The Home/index.js should open.
Right above the thing that says render() copy and paste the following lines of code exactly how I have it:
componentDidMount() {
  console.log("HELLO WORLD!");
}
Then press ⌘ + S to save the file. On every file save our app automatically reloads, running the new code. If you look in your console (the thing we opened up via inspect) you should see HELLO WORLD! logged.
We're going to be using console.log a lot in this lesson. All it does is print things to this Chrome console. Try changing the 'HELLO WORLD!' text in the console.log to whatever you'd like – just make sure it's wraped in quotes. The app will reload and update what it prints in the Chrome console.
Congratulations, you have just written your first lines of code :).
Computers run code in the same way humans read it, top-down. Change the componentDidMount() method to the following:
componentDidMount() {
  console.log('THIS IS READ FIRST');
  console.log('THIS IS READ SECOND');
}
This will print as follows:
THIS IS READ FIRST
THIS IS READ SECOND
It's common sense, but important to know. The computer runs code from top-down.
Commenting out code is done with // on one line and /*...*/ when multi-lined
When you comment out code, you make it so the compiler completely ignores it. This is really useful for two reasons:
- It helps with debugging. Sometimes you want to comment out code so certain things stop running
- You can leave helpful comments (ah!) for other developers to explain how things are working
Go to our componentDidMount(). Insert a comment on top with //:
// This a wonderful comment. The componentDidMount function is run automatically when this page loads.
Let the page reload. You should see no mention of your comment in the console or on the page.
OK, now highlight the console.log's we have in there. Press ⌘ + /. It should comment out our console.logs. Our function should now look like this:
componentDidMount() {
  // This a wonderful comment. The componentDidMount function is run automatically when this page loads.
  // console.log('THIS IS READ FIRST');
  // console.log('THIS IS READ SECOND');
}
Let the page reload. You'll notice nothing logs anymore! You've successfully commented out code :)
Variables are ways to store information. For our purposes, there are two ways to define variables:
letconst
Ok, let's see this in action:
Go to componentDidMount() again. Add the following:
componentDidMount() {
  let firstVariable = "Hello";
  console.log("FIRST VARIABLE", firstVariable);
}
It will become very clear what that comma is doing in the console.log – I think it's just easier to see it.
Let the page reload. As you might have expected, this is going to print Hello. We're simply assigning a string, "Hello" to our variable firstVariable and then logging it.
OK, now lets try const:
componentDidMount() {
  let firstVariable = "Hello";
  console.log("FIRST VARIABLE", firstVariable);

  const secondVariable = "Hello";
  console.log("SECOND VARIABLE", secondVariable);
}
Let the page reload. You should see the Hello printed twice. So is there a difference?
Well, let's try reassigning firstVariable after it's set:
componentDidMount() {
  let firstVariable = "Hello";
  firstVariable = "Goodbye";
  console.log("FIRST VARIABLE", firstVariable);

  const secondVariable = "Hello";
  console.log("SECOND VARIABLE", secondVariable);
}
Let the page reload. What does it print? You should get:
Goodbye
Hello
Ok, let's try the same thing for secondVariable
componentDidMount() {
  let firstVariable = "Hello";
  firstVariable = "Goodbye";
  console.log("FIRST VARIABLE", firstVariable);

  const secondVariable = "Hello";
  secondVariable = "Goodbye";
  console.log("SECOND VARIABLE", secondVariable);
}
You 💥💥💥crashed💥💥💥 the app, giving you some message about read-only!
This highlights the difference between let and const: Once you set a let you can reassign it. Once you set a const (short for constant) it is set in stone.
So if you want a variable's value to change, you use let. If you want to protect against accidentally changing it, you use a const.
Replace componentDidMount() with the following:
componentDidMount() {
  if (true) {
    console.log("We are in the if");
  } else {
    console.log("We are in the else");
  }
}
This structure is called an if statement. Before saving, what do you think the console is going to print? Take a guess and then save, reload, and look.
If you guessed just We are in the if you see now you're correct. Here's one gold star ⭐️. if statements show us the computer is smart about what it runs. Like us, the computer wants to do as little work as possible while still accomplishing the same goal. Because of this, in an if, it checks if something is true, and executes that code and only that code. If it's not true, it goes into the else and calls it a day.
So, what do you think would happen if you turned true-->false:
componentDidMount() {
  if (false) {
    console.log("We are in the if");
  } else {
    console.log("We are in the else");
  }
}
See, now it completely ignores what's in the if and is going to print We are in the else. It never goes into the if because it doesn't want to waste its time with something that is blatantly false.
As far as if statements go, 0, null, false and undefined are all equivalent. That means these are all equivalent to an if:
if (0) == if (undefined) == if (null) == if (false)
You can do evaluations in an if. Change comopnentDidMount() to the following. the === we use to test if two things are equal
componentDidMount() {
  if (5 === 3) {
    console.log("We are in the if");
  } else {
    console.log("We are in the else");
  }
}
Because 5 is not 3, it returns false and the else statement runs.
You can have multiple if's together. The one's after the if are called an else if. Try the following code:
componentDidMount() {
  if (5 === 3) {
    console.log("We are in the if");
  } else if (5 == 4) {
    console.log("We are in the first else if");
  } else if (5 === 5) {
    console.log("We are in the second else if");
  } else {
     console.log("We are in the else");
  }
}
You'll see that the first if is false because 5 ==! (does not equal) 3. The first else if is false also for similar reasons. But the 3rd else if is true, so that's what gets logged. Also notice the else is never called because the program exited the if statement after it found a true.
Sorry if I belabored if statements for you, I just wanted to be extra clear. They're incredibly important and you will see them (or a short hand for them) all the time.
Javascript objects are one of the most important facets of the language. They're called objects but you'll know them much better as curly braces: { }
An object is a way to store more complex data. The core of objects is that they contain properties.
Let's say we had a person. Let's define this person as an object in our componentDidMount().
let person = { };
Right now our person object is blank. But people have all sorts of properties, so let's give this person a little life. How about a firstName and a lastName. We assign values with the . (dot) notation:
person.firstName = "John";
person.lastName = "Snow";
Awesome. Let's also console.log our person. Our componentDidMount() should look as follows:
let person = { };
person.firstName = "John";
person.lastName = "Snow";
console.log(person);
You'll see that our person object now contains filled in properties of firstName and lastName. Awesome.
You can access a specific property with . (dot notation) without setting it equal to anything:
console.log(person.lastName)
As you can see this will print "Snow"
An array is how we store a list of data. They are represented using brackets: [ ]
As an example, here's an array of strings (string is a fancy word for text. Remember, text always needs to be in quotes so the computer knows it's text and not a variable):
let arrayOfStrings = [ "One", "Two", "Three", "Four" ];
You can add to arrays with .push
In componentDidMount() write the following:
componentDidMount() {
  let arrayOfStrings = [ "One", "Two", "Three", "Four" ];
  console.log(arrayOfStrings);
  arrayOfStrings.push("Five");
  console.log(arrayOfStrings);
}
You'll see it tacked the "Five" onto the end of the array.
The opposite of .push is .pop. The .pop takes off the last element in the array. Try adding the following:
componentDidMount() {
  let arrayOfStrings = [ "One", "Two", "Three", "Four" ];
  console.log(arrayOfStrings);
  arrayOfStrings.push("Five");
  console.log(arrayOfStrings);
  arrayOfStrings.pop();
  console.log(arrayOfStrings);
}
You'll see through our console.log's that push adds the "Five" and then pop takes the last element, the "Five", right back off.
Arrays are super important because when we query our database we often get back an array of data. However, an array of data for its own sake is pretty useless. Usually we want to go over that data and do something to each element in the list. That's where .map comes in.
The .map goes over each element of the array and does whatever you'd like to each element, and then returns a brand new array with however you defined what to do with each element. Let's see this in action. Change the componentDidMount() to the following:
componentDidMount() {
  let arrayOfJustices = [ { firstName: "Clarence", lastName: "Thomas" }, { firstName: "Sonia", lastName: "Sotomayor" }, { firstName: "John", lastName: "Roberts" } ];
  const fullNameJustices = arrayOfJustices.map((justice) => `${justice.firstName} ${justice.lastName}`);
  console.log(fullNameJustices);
}
There's a lot going on here. Let's walk through it:
- We have an
arrayOfJustices. This is an array of objects. Each object has afirstNameand alastName - We're defining a variable,
fullNameJusticesto be equal to ourarrayOfJusticesAFTER we havemapped over it - The backticks, `, are how we join strings with variables. It automatically takes our two variables and joins them together under the backtick
- We log the newly returned array,
fullNameOfJustices. You'll see it is no longer an array of objects with{firstName:..., lastName:...}. Our map function has transformed each object into a full name string, and built an array of these full name strings to be assigned tofullNameJustices
It should log the following:
["Clarence Thomas", "Sonia Sotomayor", "John Roberts"]
If you want to see another example of map in action, here is a 90 second video clip. I've started it at the right time for you, don't watch past 20:30.
According to W3 Schools, a "function is a block of JavaScript code, that can be executed when 'called' for."
We've already used a ton of functions without you maybe realzing it. pop and push are functions. map is a function. componentDidMount is a function.
The way you define a function is really straight forward:
myFunction() {

}
This shouldn't look new to you. This is the exact way componentDidMount() is structured.
Sometimes you'll see functions with a fat arrow =>:
myFunction = () => {

}
Either are acceptable. Just know both are out there.
You call (which simply means "run") functions by including () at the end of the function you're calling
myFunction()
Try this out in componentDidMount(). Note that functions can be defined to variables just like a boring string (" ") can. In this case, we include the function prefix or use a fat arrow =>:
componentDidMount () {
  const myFunction = function myFunction() {
    console.log("Hello there");
  }
  myFunction();
}
OR
componentDidMount () {
  const myFunction = () => {
    console.log("Hello there");
  }
  myFunction();
}
See how we're calling myFunction with myFunction(). This will run the code inside of myFunction, printing "Hello there"
You can pass functions parameters. Knowing what we know about back ticks and strings, what do you think this will print?
componentDidMount () {
  const myFunction = (parameter) => {
    console.log(`Hello there ${parameter}`);
  }
  myFunction("future lawyer");
}
If you said it will print "Hello there future lawyer", give yourself 5 gold stars ⭐️⭐️⭐️⭐️⭐️
Please note, there is nothing special about the name parameter. This is identical (although really confusing):
componentDidMount () {
  const myFunction = (weirdName) => {
    console.log(`Hello there ${weirdName}`);
  }
  myFunction("future lawyer");
}
If you run, you'll see this prints exactly the same thing. It's just a really confusing name. So lets name variables, including our parameters, clear names!
OK, so in the previous example we're calling a function (myFunction) inside of another function (componentDidMount). This is actually pretty rare for what we're going to be doing. Much more common is calling another function within a class.
You may or may not have noticed it, but this entire time you've been working within a Javascript class which is defined as Home. Whenever we create React components, they are classes. I know that makes no sense right now, but that's OK.
I want you to try something. Inside of our Home file we've been working in, I want you to define a new standalone function (NOT inside of componentDidMount() like before) named printHello()). printHello should simply console.log "Hello there". I want you to call printHello from componentDidMount. It should look like this:
componentDidMount () {
  printHello();
}

printHello() {
  console.log("Hello there");
}
Save and let it reload. What happens?
It crashed saying printHello is not defined? But why? We see it defined right below?
Ah, that's because I haven't told you about scope!
First, I want to show you a simpler example.
Define two functions:
function1() {
  const variableInFunction1 = 1;
}

function2() {
  const variableInFunction2 = 2;
}
What do you think will happen when we try to access variableInFunction1 from function2?
function1() {
  const variableInFunction1 = 1;
}

function2() {
  const variableInFunction2 = 2;
  console.log(variableInFunction1);
}
You would get a 💥💥💥crash💥💥💥!
Why? Because VARIABLES DECLARED INSIDE A FUNCTION ARE LOCAL TO THAT FUNCTION. Only function2() knoes about variableInFunction2 and only function1() knows about variableInFunction1!
Ok, well, that's important to know. But what the hell does that have to do with printHello()?
Like with our variables example, when we call printHello, the computer is expecting that function to have been defined inside of componentDidMount. That's why it worked before with myFunction. printHello is not defined within componentDidMount however. It's defined on our class, Home. So how do we access it? Are we doomed?
No, of course not. That's where this comes into play.
Change componentDidMount to the following:
componentDidMount () {
  this.printHello();
}

printHello() {
  console.log("Hello there");
}
Adding the this before printHello tells the computer to look inside this class for a function named printHello. Everything should work now :). So remember:
- Variables (whether it be a string, a function, it doesn't matter) defined inside of a function are local to that function
- If you want to call functions on our React
classes, you need to usethis.
CSS is how we make things look pretty. It's often described as "makeup" – it takes the structure (HTML) and makes it look prettier.
I'm not a big fan of going through what each piece of CSS does. I just find that people forget what each piece does (I certainly do). I end up doing a lot of Googling when I want to make a page look stylish.
However, there Flexbox and Styled Components I do think deserve a quick run-through, because it's what we'll be using to style our pages. So let's dive in!
We're going to leave componentDidMount alone for a while and start working with our render method finally. render is a necessary method on every react component. Whatever the render returns is what the page is going to actually draw.
So let's try putting some stuff in the render!
Delete all the stuff in the render except the return and parentheses so it looks like this:
render() {
  return (

  )
}
Save and let the page reload. What happens?
💥💥💥Crash!💥💥💥
You'll see somethign about an unexpected token. What gives?
Well, I hope you remember that render must return something. You can never have a React component that returns nothing!
OK, let's fix that. Put in a <div> which is the most standard HTML component. Don't forget all HTML tags need to have a closing counterpart, too.
render() {
  return (
    <div>
    </div>
  )
}
Cool. Our page loads again but you'll see now it's completely blank! This is because you're returning a completely blank HTML element. If you want proof its' running, try putting some text in between the divs. You should see some really ugly text on the page :)
Ok, enough chit chat. Let's try making some actual stuff!
OK I want you to import two things on the top of the page where the rest of the imports are. Just copy and paste like I have:
import styled from 'styled-components';
import { Box, Flex } from 'rebass';
OK le'ts go back to the render method. Delete the <div>s. Add the following:
render() {
  return (
    <Flex>
    </Flex>
  )
}
Don't worry about what <Flex> is yet. Right above of the line that says export default class... add the following:
const Box1 = styled(Box)`
  background-color: green
`
This is styled-components in action. Let's walk through it:
- You know what
constis now. Just defining a variable namedBox1 styledis some magic. It is what allows us to actually applycssto a component. The component is something called aBoxbackground-coloris actual css. It does exactly what you think. It applies the green background color to this component,Box1- the
`at the bottom is really important. It's some fancy javascript magic. Just don't forget to include it :)
Ok, make three more Box styled components. Label them Box2 Box3 and Box4. Give them all different colors. It should look something like this:
const Box1 = styled(Box)`
  background-color: green
`

const Box2 = styled(Box)`
  background-color: orange
`

const Box3 = styled(Box)`
  background-color: pink
`

const Box4 = styled(Box)`
  background-color: red
`
Let's put these to use!
The <Flex> is a component we use for alignment. Inside of these <Flex>s we put <Box>s. The <Flex> takes care of aligning these <Box>s. Add our four <Box>s
render() {
  return (
    <Flex>
      <Box1>
      </Box1>
      <Box2>
      </Box2>
      <Box3>
      </Box3>
      <Box4>
      </Box4>
    </Flex>
  )
}
Save and let the page reload. Still blank...what's going on here?
Well, by default these boxes have no width. Why would they? There's nothing inside of them right now!
Let's give these Boxs width by putting text inside of them:
render() {
  return (
    <Flex>
      <Box1>
        Box1!
      </Box1>
      <Box2>
        Box2!
      </Box2>
      <Box3>
        Box3!
      </Box3>
      <Box4>
        Box4!
      </Box4>
    </Flex>
  )
}
Save and let the page reload. You should see some tiny multicolored boxes! See how the Box extends to the size of the text? Now that we put text in our Box was given an inherent width to match what's inside of it, text.
Now it's time to see where flexbox really comes in use. give each box a width of 1/4. This means that each Box will have a width 1/4 the size of the page.
render() {
  return (
    <Flex>
      <Box1 w={[1/4]}>
        Box1!
      </Box1 w={[1/4]}>
      <Box2>
        Box2!
      </Box2>
      <Box3 w={[1/4]}>
        Box3!
      </Box3>
      <Box4 w={[1/4]}>
        Box4!
      </Box4>
    </Flex>
  )
}
The page should now look something like this:
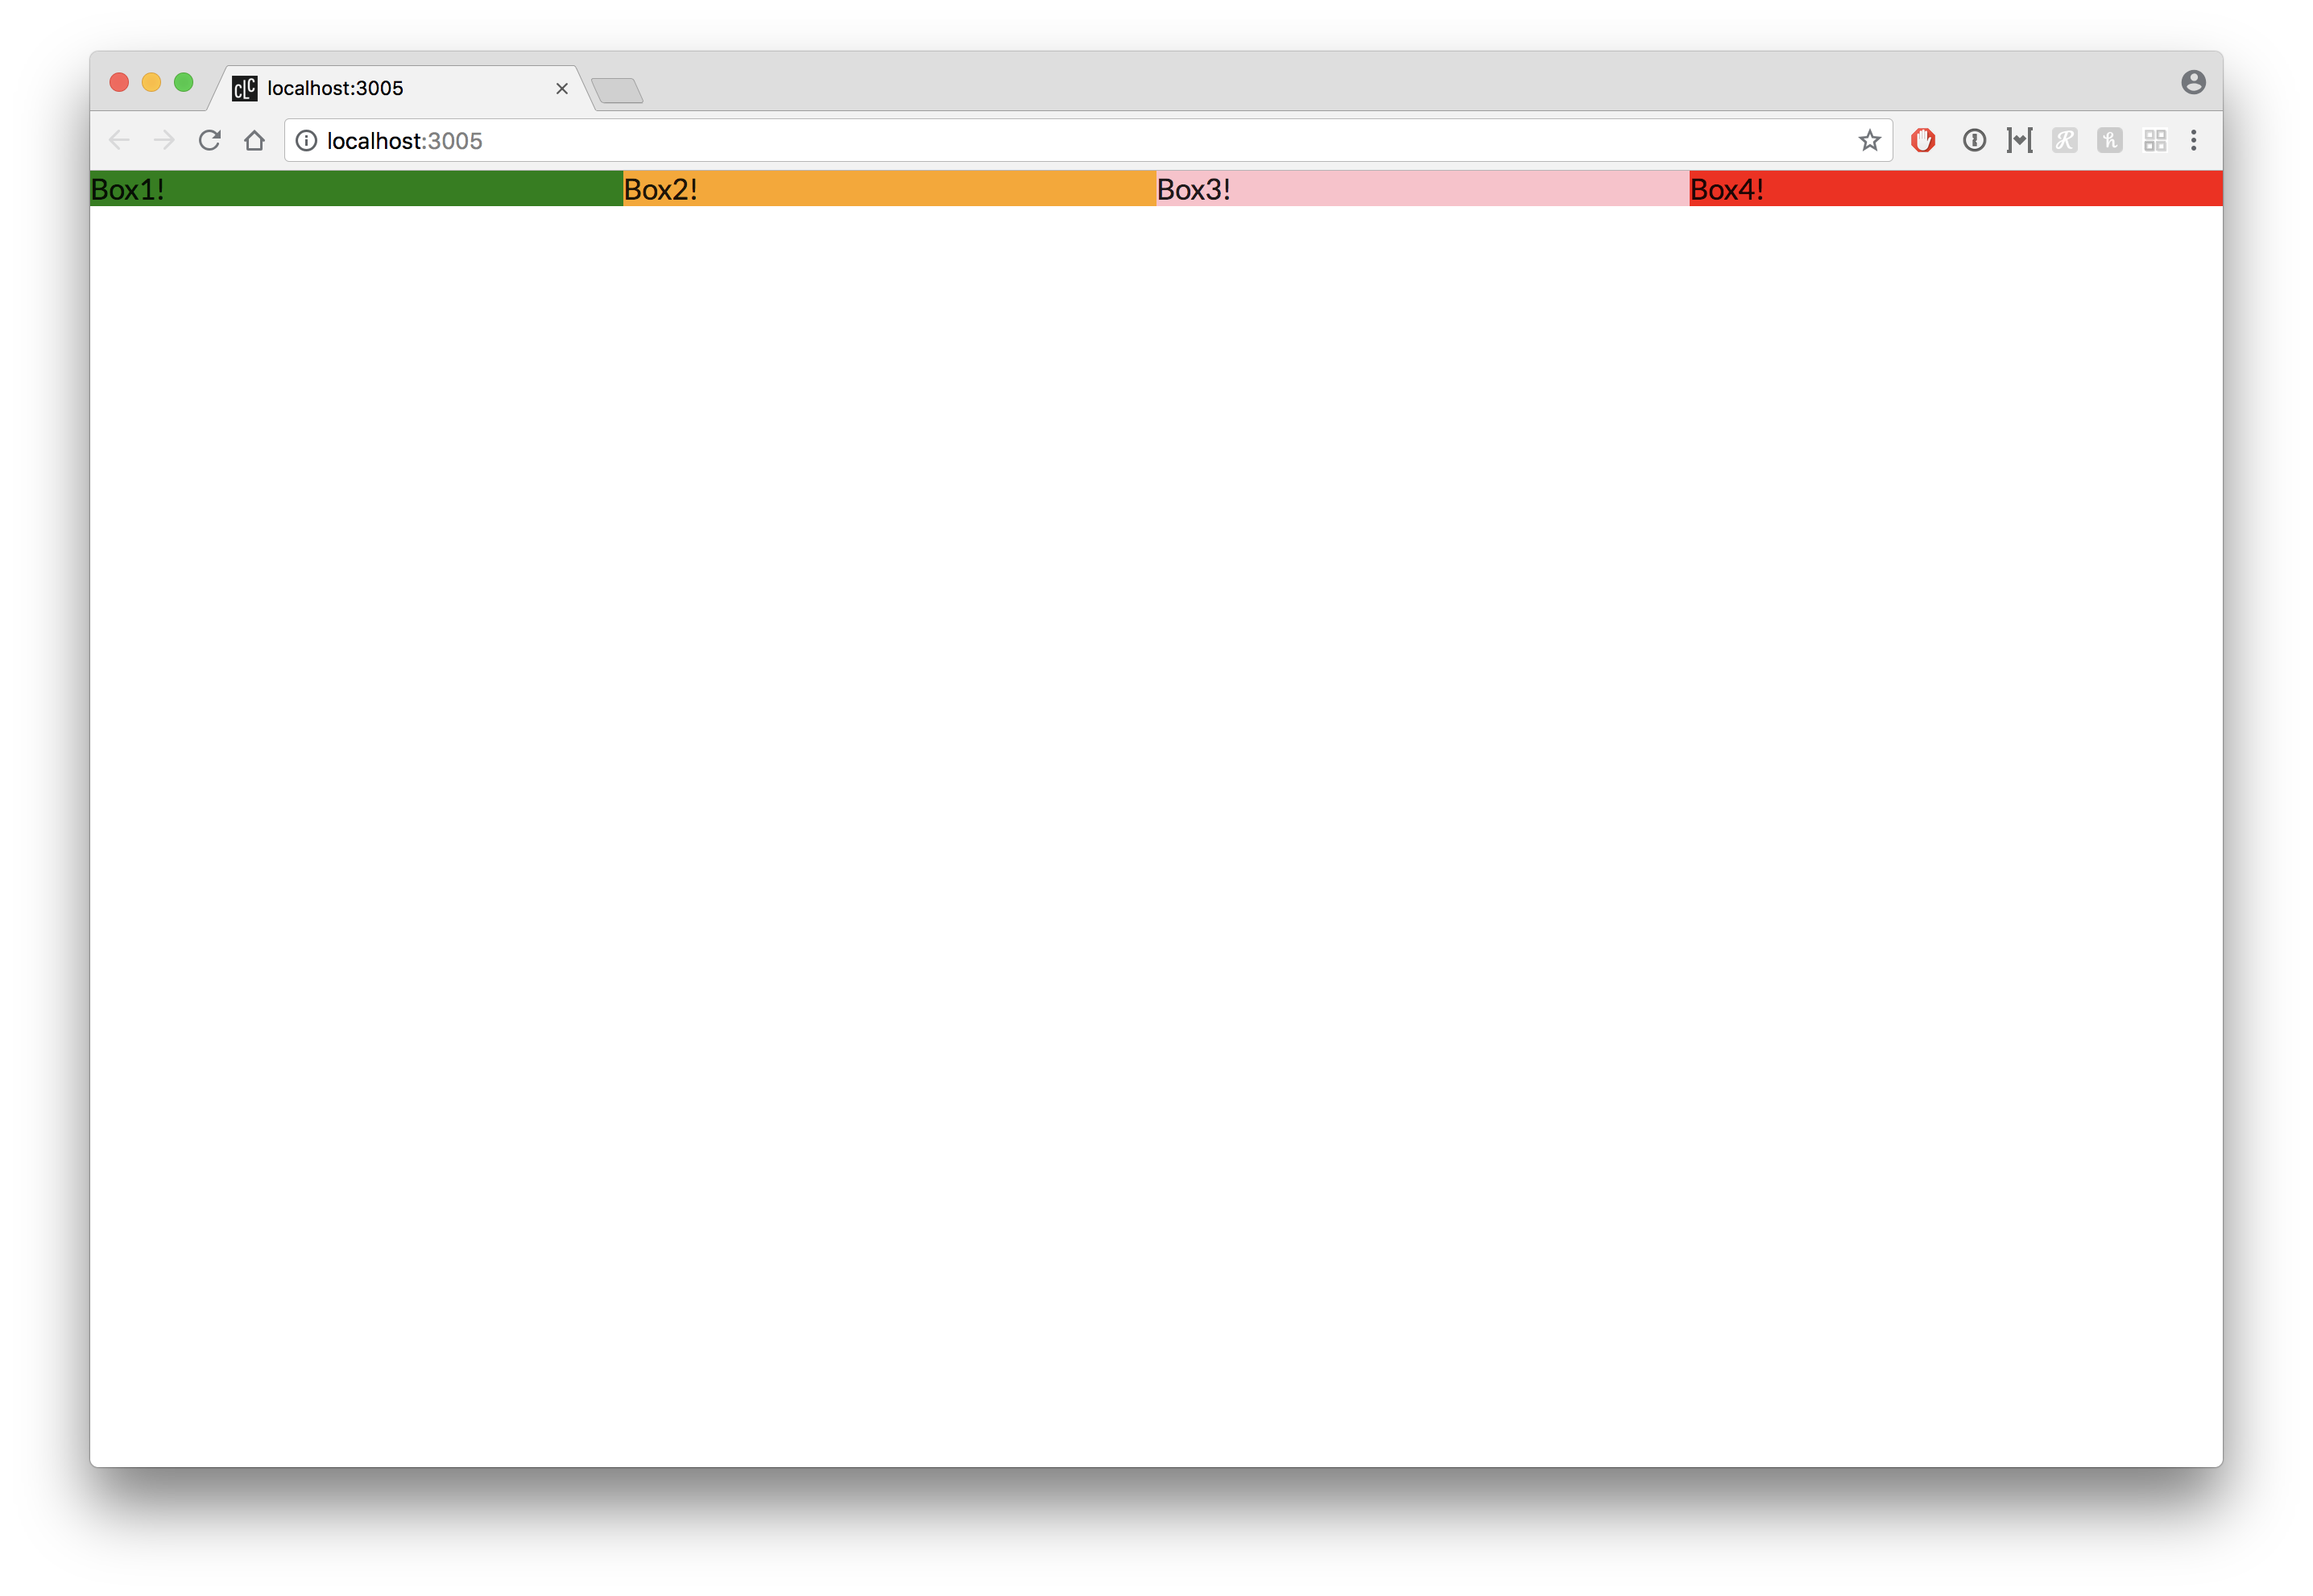
Shrink and grow the page by dragging the window to be super thin and then the size of the desktop. See how the boxes are auto adjusting? Each box will always be 1/4 of the page! 💫Flexbox magic💫
Hmm...but now you got me thinking. What would happen if we added another box with 1/4 width. That would be five boxes with 1/4 width. Let's try and find out. Create a <Box5> the same way as the others, and give it a different color.
When you reload the page you'll see it still added it to the same lines. But we know for a fact that each box is no longer 1/4 of the page because that would be 5/4 the width which, well, isn't possible. So what's going on? Well, basically, the library that does Flexbox for us realizes we made a mistake and is trying its best to give you the closest match.
See, we need to put our <Flex> element to use to get what we want – each <Box> taking up 1/4 of the page. Our <Flex> has been awfully lazy, so let's do that now.
Change the Flex to the following:
<Flex flexWrap="wrap">
Save and let the page reload. Now our fifth Box should be wrapped onto the second line. Everything should be 1/4 of the page. Wonderful.
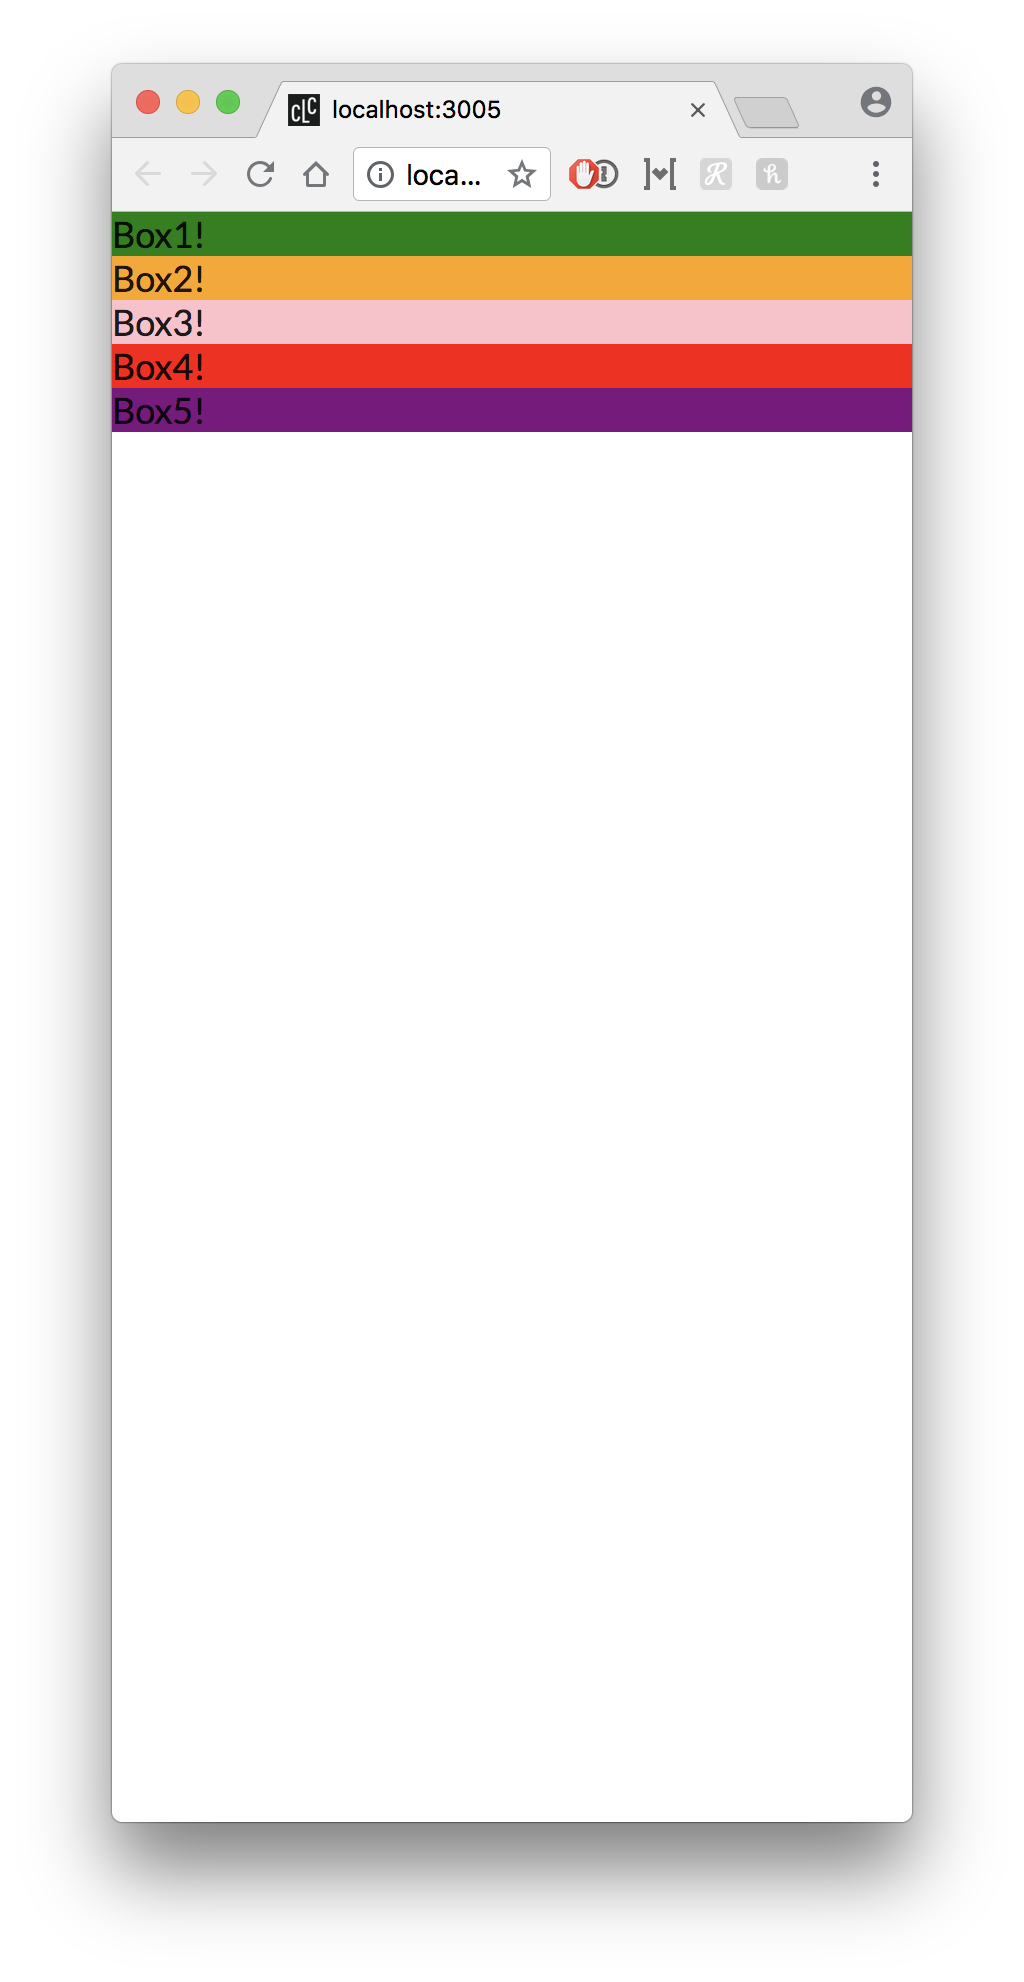
You'll probably heard of responsive design. In a nutshell, it basically means that the website needs to look good on more than just the computer. It needs to look awesome on phones, tablets, any screen size really.
For our purposes, I want each Box to take up it's own row when on a phone. 1/4 the width of a phone is way too tiny for me. We do that in the width (w) property on the Box. Change each w component on our Box to look like this:
<Box1 w={[1, 1/2, 1/4]}>
Our render should look something like this now:
render() {
  return (
    <Flex flexWrap="wrap">
      <Box1 w={[1, 1/2, 1/4]}>
        Box1!
      </Box1>
      <Box2 w={[1, 1/2, 1/4]}>
        Box2!
      </Box2>
      <Box3 w={[1, 1/2, 1/4]}>
        Box3!
      </Box3>
      <Box4 w={[1, 1/2, 1/4]}>
        Box4!
      </Box4>
      <Box5 w={[1, 1/2, 1/4]}>
        Box5!
      </Box5>
    </Flex>
  )
}
Try compressing the page by draggin chrome thinner and thinner. See how the Boxes are adjusting. From the widest up, each box will take up 1/4 of the page. Then from the middle to the widest each Box will take up 1/2 the page. Finally, at the smallest each Box will take up a full page width. Your page should look something like this when fully compressed:
You can add padding to each box with p. The padding will just give it extra fluff. Try adding p={10} to each Box.
return (
  <Flex flexWrap="wrap">
    <Box1 w={[1, 1/2, 1/4]} p={10}>
      Box1!
    </Box1>
    <Box2 w={[1, 1/2, 1/4]} p={10}>
      Box2!
    </Box2>
    <Box3 w={[1, 1/2, 1/4]} p={10}>
      Box3!
    </Box3>
    <Box4 w={[1, 1/2, 1/4]} p={10}>
      Box4!
    </Box4>
    <Box5 w={[1, 1/2, 1/4]} p={10}>
      Box5!
    </Box5>
  </Flex>
)
Delete Box3, Box4 and Box5 so only Box1 and Box2 remain.
They're kind of shoved to he left, which just feels like bad feng shui. Let's center them. This is where another <Flex> property comes into play, justifyContent:
render() {
  return (
    <Flex flexWrap="wrap" justifyContent='center'>
      <Box1 w={[1, 1/2, 1/4]} p={10}>
        Box1!
      </Box1>
      <Box2 w={[1, 1/2, 1/4]} p={10}>
        Box2!
      </Box2>
    </Flex>
  )
}
Everything should be centered now. Much better :)