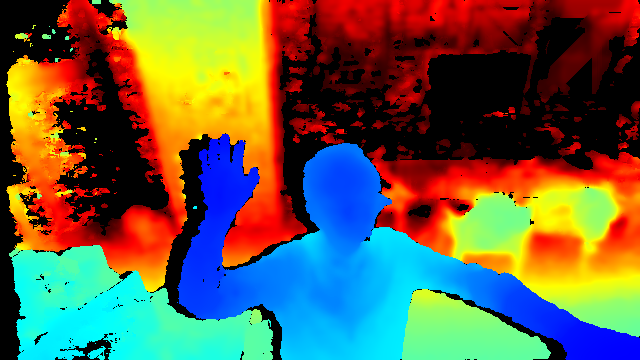
This program uses Nuitrack SDK library to detect human body joints. Then input these data into a BiLSTM network to make posture prediction.
- System: Windows 10
- Visual Studio Community 2017(C# is needed)
- PyCharm Community 2019.2
- .NET Framework 4.7.1
All instructions are based on Real Sense 2.19.0 using Depth Camera D435.
- Intel.RealSense.SDK
- Installer with
Intel RealSense Viewer and Quality Tool,C/C++ Developer Package,Python 2.7/3.6 Developer Package,.NET Developer Packageand so on. - Version: 2.19.0
- Installer with
- Latest Version of Viewer and SDK: Intel RealSense
- https://realsense.intel.com/intel-realsense-downloads
- Best Known Methods for Tuning Intel RealSense Depth Cameras D415 and D435
All instructions are based on NUITRACK 1.4.0
- Installation Instructions
- Download and run nuitrack-windows-x64.exe (for Windows 64-bit). Follow the instructions of the NUITRACK setup assistant.
- Re-login to let the system changes take effect.
- Make sure that you have installed Microsoft Visual C++ Redistributable for Visual Studio on your computer. If not, install this package depending on your VS version and architecture:
- SDK: Nuitrack SDK
Support: Unity, Unreal Engine, C++, C# - Online Documents: Nuitrack Online
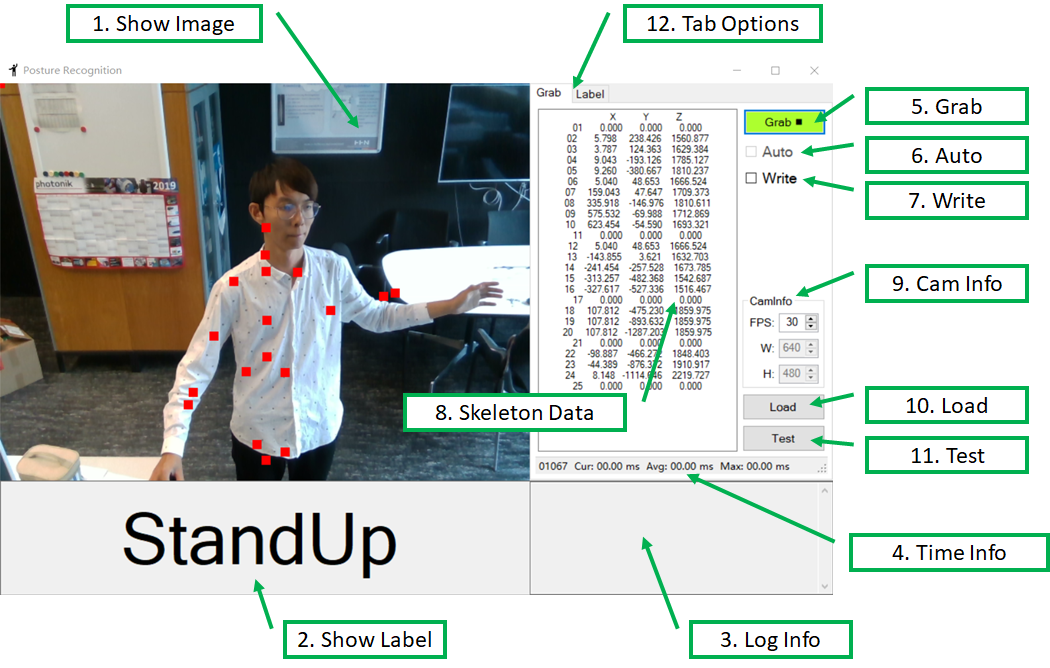
Display the RGB image, and the skeleton data by red square dots.
Display the judged gesture: Standing, Sitting, Walking, StandUp, SitDown, Falling.
Log some important information during running.
Log some time information like current processing time, average processing time and so on.
Start or Stop the camera grab.
Enabled or Disabled recognizing the posture automatically.
Enabled or Disabled writing skeleton data to local disk.
Display the skeleton data, 25 points (XYZ, 75 float data) per frame.
- FPS: Frame per second, also timer grab interval equals 1000 FPS.
- W: The width of image, read only.
- H: The height of image, read only.
Load a .pb model.
Open the file dialog and choose a sample. Then make the prediction using the loaded model.
Click different tap option to switch between Grab and Label. Grab is used for grab videos. Label is used for making labels.
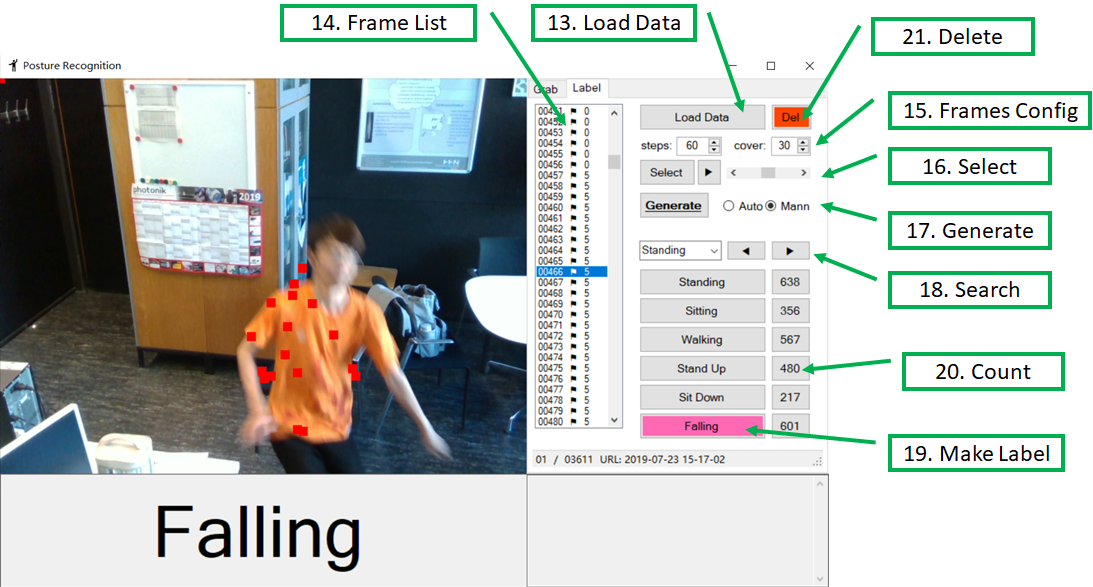
Select a .txt file. The file contains frame indices and skeleton data during the whole video.
Display the frame list. The small flag indicates that the data of the index is valid. The last number means this frame has been labeled. Number means the label index.
- steps: how many frames does a sample need in maximum. Default: 60
- cover: how many frames is coincided between two samples. Default: 30
- Select: Select and display next batch frames automatically. Maximum selection number is
steps - ScrollBar: Display speed control. Left: Slow, Right: Fast
- In
Automode: ClickGeneratebutton, it will process all the data in the current frame list, then generate many samples according tostepsandcover - In
Mannmode: ClickGeneratebutton, it will process only the selected frames in the frame list, then generate only one sample - If 'shift' key is pressed at the same time, click
Generatebutton, the program request you to choose a folder in wich all the data file locate. After you choose it, the program will automatically process all the existing data folder.
Choose an existing label from the left box. Then click ◀ and ▶ to search for the last or next one.
There are 6 labels when labeling. Choose at least one frame in the frame list, then click any button with the best label. It will update a Data_labels.md in the Raw data Output folder to record all the labels.
The number showed the current number of each valid label.
If you want to cancl some existing labels to Empty, then choose the target frames in frame list, Click Del.
+-- Debug: Application.StartupPath
| +-- Output: Save the skeleton data
| +-- yyyy-MM-dd HH-mm-ss: Save the skeleton data
| +-- Data.txt: Indices and skeleton data
| +-- Data_labels.md: Indices and labels
- Make sure the depth camera is connected.
- Click
5. Grab,1. Show Imagewill display images in real time.
- Check
6. Autoto choose a .pb model file. Then the program is in Auto mode. Click5. Grabto start capturing. The2. Show Labelarea will show the real time prediction.
- Firstly click
7. Writebutton, the folder will be created under theOutputfolder with the format of current timeyyyy-MM-dd HH-mm-ssas the folder name. For example, creating a folder named2019-01-10 10-40-54.- Further, in the
2019-01-10 10-40-54folder, a txt file namedData.txtis generated. Data.txt: The information of the skeleton data, also include the frame index. The first line isSkeleton data (X, Y, Z) * 25 points., it will be ignored in the following processing.
- Further, in the
- Secondly click
5. Grabbutton to capture image, at the same time, write images and skeleton data to theData.txt.
- Tip: You can also check
6. Autoand7. Writeboth. But the program will take more time to process.
- Click
10. Loadto load an existing .pb model file. - Click
11. Testto open the file dialog and choose a sample. Then make the prediction using the loaded model. The accuracy result will shown in3. Log Infoarea.
- Click
12. Tap Optionto switch the program into Label mode. - Click
13. Load Datato choose aData.txtfrom the output folder. Then load the frames and skeleton data. The frame will be shown in1. Show Imagearea, the skeleton data will be shown in14. Frame Listarea. The small flag in the list indicates that the data under the index is valid. - Choose at least one frame in
14. Frame List, then click the right button in19. Make Label, all the chosen frames will be labelled immediately (it's overwritten). The20. Countwill count the number in each label. - If you made wrong labels and want to CANCL them, click
21. Delete, the label will be reset to empty.
- When you are making label, you don't neet to select frames mannually. You can set
15. Frame Config. The first number steps means how many frames does a sample need in maximum, default value is 60. The second number cover means how many frames is coincided between two samples, default value is 30. - Click
Selectbutton to do the automatic selection. The program will always generate a batch withstepsframes. Move the scrollbar to control the display speed.
- If you choose
Automode, click theGeneratebutton. The program will generate many samples from the whole14. Frame List. - If you choose
Mannmode, you need to choose some frames and click theGeneratebutton. The program will generate only one sample according to the chosen frames. - [One-Click Function] If you pressed
Shiftkey, no matter in which mode, click theGeneratebutton. Choose a folder that contains all theyyyy-MM-dd HH-mm-ssfolders. The program will automatically generate samples through all the folders.
- Choose an existing label from the left box. Then click
◀and▶to search for the last or next one.
All the code is mainly based on Python 3.7 and Keras. I utilize Bidirectional LSTM layer and Dense layer. The final accuracy is around 91%.
I use Keras, and combine BiLSTM and Dense layer together. Due to the Standing and Walking is hard to distinguish. Even in the software framework, I make 2 labels for them. But when it turns to deep learning training, I regard these 2 labels as one label Walking. So there are only 5 classes in the end.

| Sitting | Walking | Standup | Sitdown | Falling | All | |
|---|---|---|---|---|---|---|
| train | 10744 | 13434 | 8947 | 3334 | 13270 | 49729 |
| val | 0 | 0 | 0 | 0 | 0 | 0 |
| test | 2750 | 3779 | 2407 | 762 | 2877 | 12575 |
| All | 13494 | 17213 | 11354 | 4096 | 16147 | 62304 |
| Train | Val | Test | All | |
|---|---|---|---|---|
| train | 892 | 0 | 223 | 1115 |
- batch_size_train=16
- batch_size_val=8
- epochs=15
- learning_rate=1e-4
- learning_rate_decay=1e-6
| Train | Train-Fall | Test | Test-Fall | |
|---|---|---|---|---|
| 1 | 0.9193 | 0.9414 | 0.9026 | 0.9369 |
| 2 | 0.9188 | 0.9469 | 0.9071 | 0.9529 |
| 3 | 0.9197 | 0.9541 | 0.8823 | 0.9449 |
| 4 | 0.9180 | 0.9502 | 0.8849 | 0.9323 |
| 5 | 0.9230 | 0.9493 | 0.8803 | 0.9374 |
| Train | Train-Fall | Test | Test-Fall | |
|---|---|---|---|---|
| 1 | 0.9244 | 0.9552 | 0.8976 | 0.9156 |
| 2 | 0.9229 | 0.9266 | 0.8741 | 0.8220 |
| 3 | 0.9260 | 0.9437 | 0.8964 | 0.9142 |
| 4 | 0.9137 | 0.9387 | 0.8983 | 0.9415 |
| 5 | 0.9138 | 0.9426 | 0.8996 | 0.9357 |
Tip: Train-Fall means only the Falling label accuracy in train set. Because this project puts more focus on the Falling posture.
- Please use Anaconda to create a new environment. Open the cmd,
cdto the main folder where the PostureRecognition.yml is.
conda env create -f PostureRecognition.yml
Then a new env is available. No matther which IDE you are using, make sure to run the.pyfile in the new env. - run
./data/sample_reduce.pyto generate the training data. Because the data in./data/Samples/contains many 'Walking' and 'Standing' labels. - run
train_sequence.pyto do the training and validation.
Compared to ZpRoc, I fix the depth camera with a pillar in a high position (he put the depth camera on the desktop). It influences the performance of Nuitrack to detect the joints. Because Nuitrack suggests developers to put camera in a height around 0.8m-1.2m, but mine is around 2m. I guess the reason of the bad performance is because of the perspective relationship.
I have only 1115 samples in total. Each of them contains about 60 frames. It's not a big dataset. So there should be more data.
If you want to get a good performance of the depth camera, you should use USB3 cable. I bought a long cable, but it's USB2, so sometimes the connection is bad.
As you see from the software framework image just now, the joints don't match the human body so well. It's because the human body comes from RGB camera, and joints data come from depth camera. So if we want to match them, we need to do calibration.
Due to the bad performance of Nuitrack in detecting joints. We plan to use the raw depth image from the depth camera. Find where is the man, then find what is the man's posture.


