Clone this starter repo, npm install, and run with npm start.
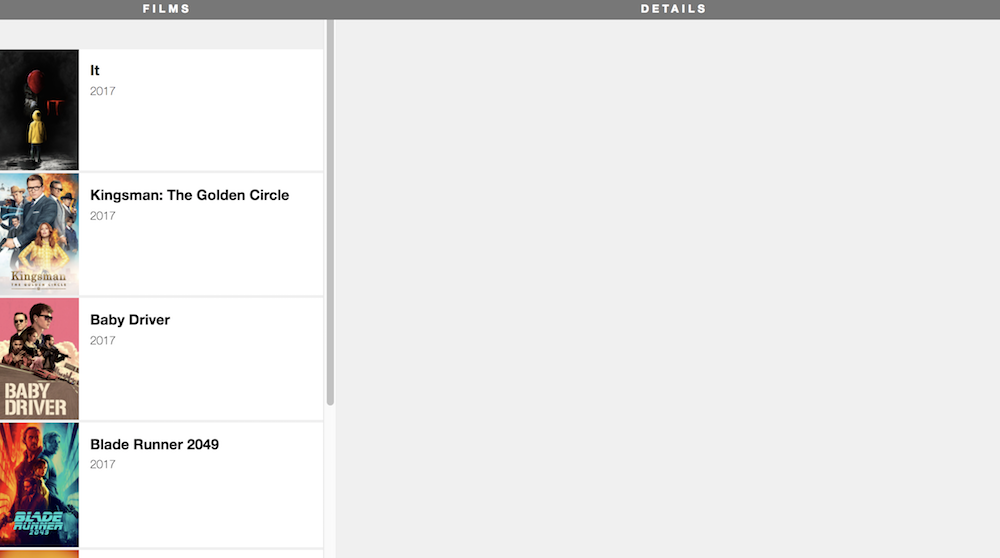
Today the plan is to identify the app components, create the overall structure, then split that structure into individual components. You'll pass films as props to each component and ultimately use iteration to render one component for each film. At the end of this exercise, you will have this app:
Important: After each step below, check your application to see how it looks before going to the next one. It's good practice to be sure your app is working correctly before adding new functionality.
NOTE: we'll be working with class-based components for the first two sections of this project. After we've built it out a bit, we'll translate it to functional components with hook-based state and finish it all the React features that are oh so hot right now.
Hint
Don't forget anyimport statements as you add more files.
First, create the layout. You'll have a Films column and a Details column.
Make the provided App component render the following code:
<div className="film-library">
  <div className="film-list">
    <h1 className="section-title">FILMS</h1>
  </div>

  <div className="film-details">
    <h1 className="section-title">DETAILS</h1>
  </div>
</div>Move the film-list and film-details divs into their own separate components (in separate files), FilmListing.js and FilmDetails.js, respectively.
Make sure you now call these components in App.js. Check your app in the browser. If you've done it right, nothing will have changed, and the application will look the same.
Our films data is stored in the TMDB.js file in the src folder. Pass the films array to each of your new components as props.
If you check your file, it still shouldn't look differently. We're sending the props to the components, but we are not using the props yet.
Hint
For now, this step is just changing theApp.js file to be sure it imports the film file and passes props.
import React, { Component } from 'react';
import './App.css';
import FilmListing from './FilmListing';
import FilmDetails from './FilmDetails';
import TMDB from './TMDB';

class App extends Component {
  render() {
    return (
      <div className="App">
        <div className="film-library">
          <FilmListing films={TMDB.films} />
          <FilmDetails films={TMDB.films} />
        </div>
      </div>
    );
  }
}

export default App;
In the FilmListing component, render the title of just the first film as an <h1>, below the section-title.
Does "It" appear on the left side of your browser?
Hint
The films prop is an array, and you just want the title from the first one.In the render() of FilmListing (above the return), create an allFilms variable that uses .map() to iterate over the array of films and return an element to display the title for each one:
  <div className="film-row">
    <h1>{film.title}</h1>
  </div>
Using JSX, display allFilms underneath the <h1 className="section-title">FILMS</h1> heading.
You should have a list of all the films appear in the left column.
Step 5 solution:
render() {
  const allFilms = this.props.films.map((film) =>{
    return (
      <div className="film-row">
        <h1>{film.title}</h1>
      </div>
    )
  })
  return (
      <div className="film-list">
        <h1 className="section-title">FILMS</h1>
        {allFilms}
      </div>
  );
}
Now we're going to move each of these film-row divs into a FilmRow component.
- Create a
FilmRow.jscomponent. - Modivy your
allFilmsarray so that yourmapfunction returns aFilmRowcomponent. - Pass the entire film to each
FilmRowcomponent as afilmprop.
NOTE: Whenever you use map to create child attributes, React wants you to imput a key attribute; if you don't, you'll get an error "Warning: Each child in a list should have a unique "key" prop."
Each company will have different naming conventions for this, but for now we can pass the index in and add filmRow-${i}
For example:
// You can also use ES6's implicit return to keep this all inline
const allDogs = this.props.dogs.map((dog, i) => <DogComponent dog={dog} key={`goodDog-${i}`} />)
Hint 1:
Don't forget to importFilmRow so you can use it in your map iterator.
Hint 2:
Inside yourFilmRow component, film is now, a prop, so you'll need to access it with this.props.film.
Make each film row in the film list look like the main finished image, using the following markup (replace "TITLE" and "YEAR" with the actual title and year of the film).
<div className="film-row">
  <img src={posterUrl} alt="" />

  <div className="film-summary">
    <h1>TITLE</h1>
    <p>YEAR</p>
  </div>
</div>- You'll have to create the
posterUrlfor each film by combining the prefixhttps://image.tmdb.org/t/p/w780/with each film'sposter_pathproperty.
Hint: getting the year
You'll also have to extract the year from therelease_date property. To do this, you could use the split(), substring() or getFullYear() JS method.
- Create a
FilmPostercomponent that resceives aposter_pathprop. - Replace the
imgtag in yourFilmRowcomponent with aFilmPostercomponent that receives aposter_path. - Find a way to populate the
alttag for each poster image

