Continuous Integration in the Cloud
With this repository, we are providing anyone wishing to creat a Continuous Integration Pipeline whether it be for personal, educational, or industrial purposes with a pipeline to do so. While we use specific environments and tools to create the sample webapp we are creating this for, it is easily customizable to suit anyones needs.
Demo Video: ( https://www.youtube.com/watch?v=spJOGnc_B1Q )
##Framwork Overview
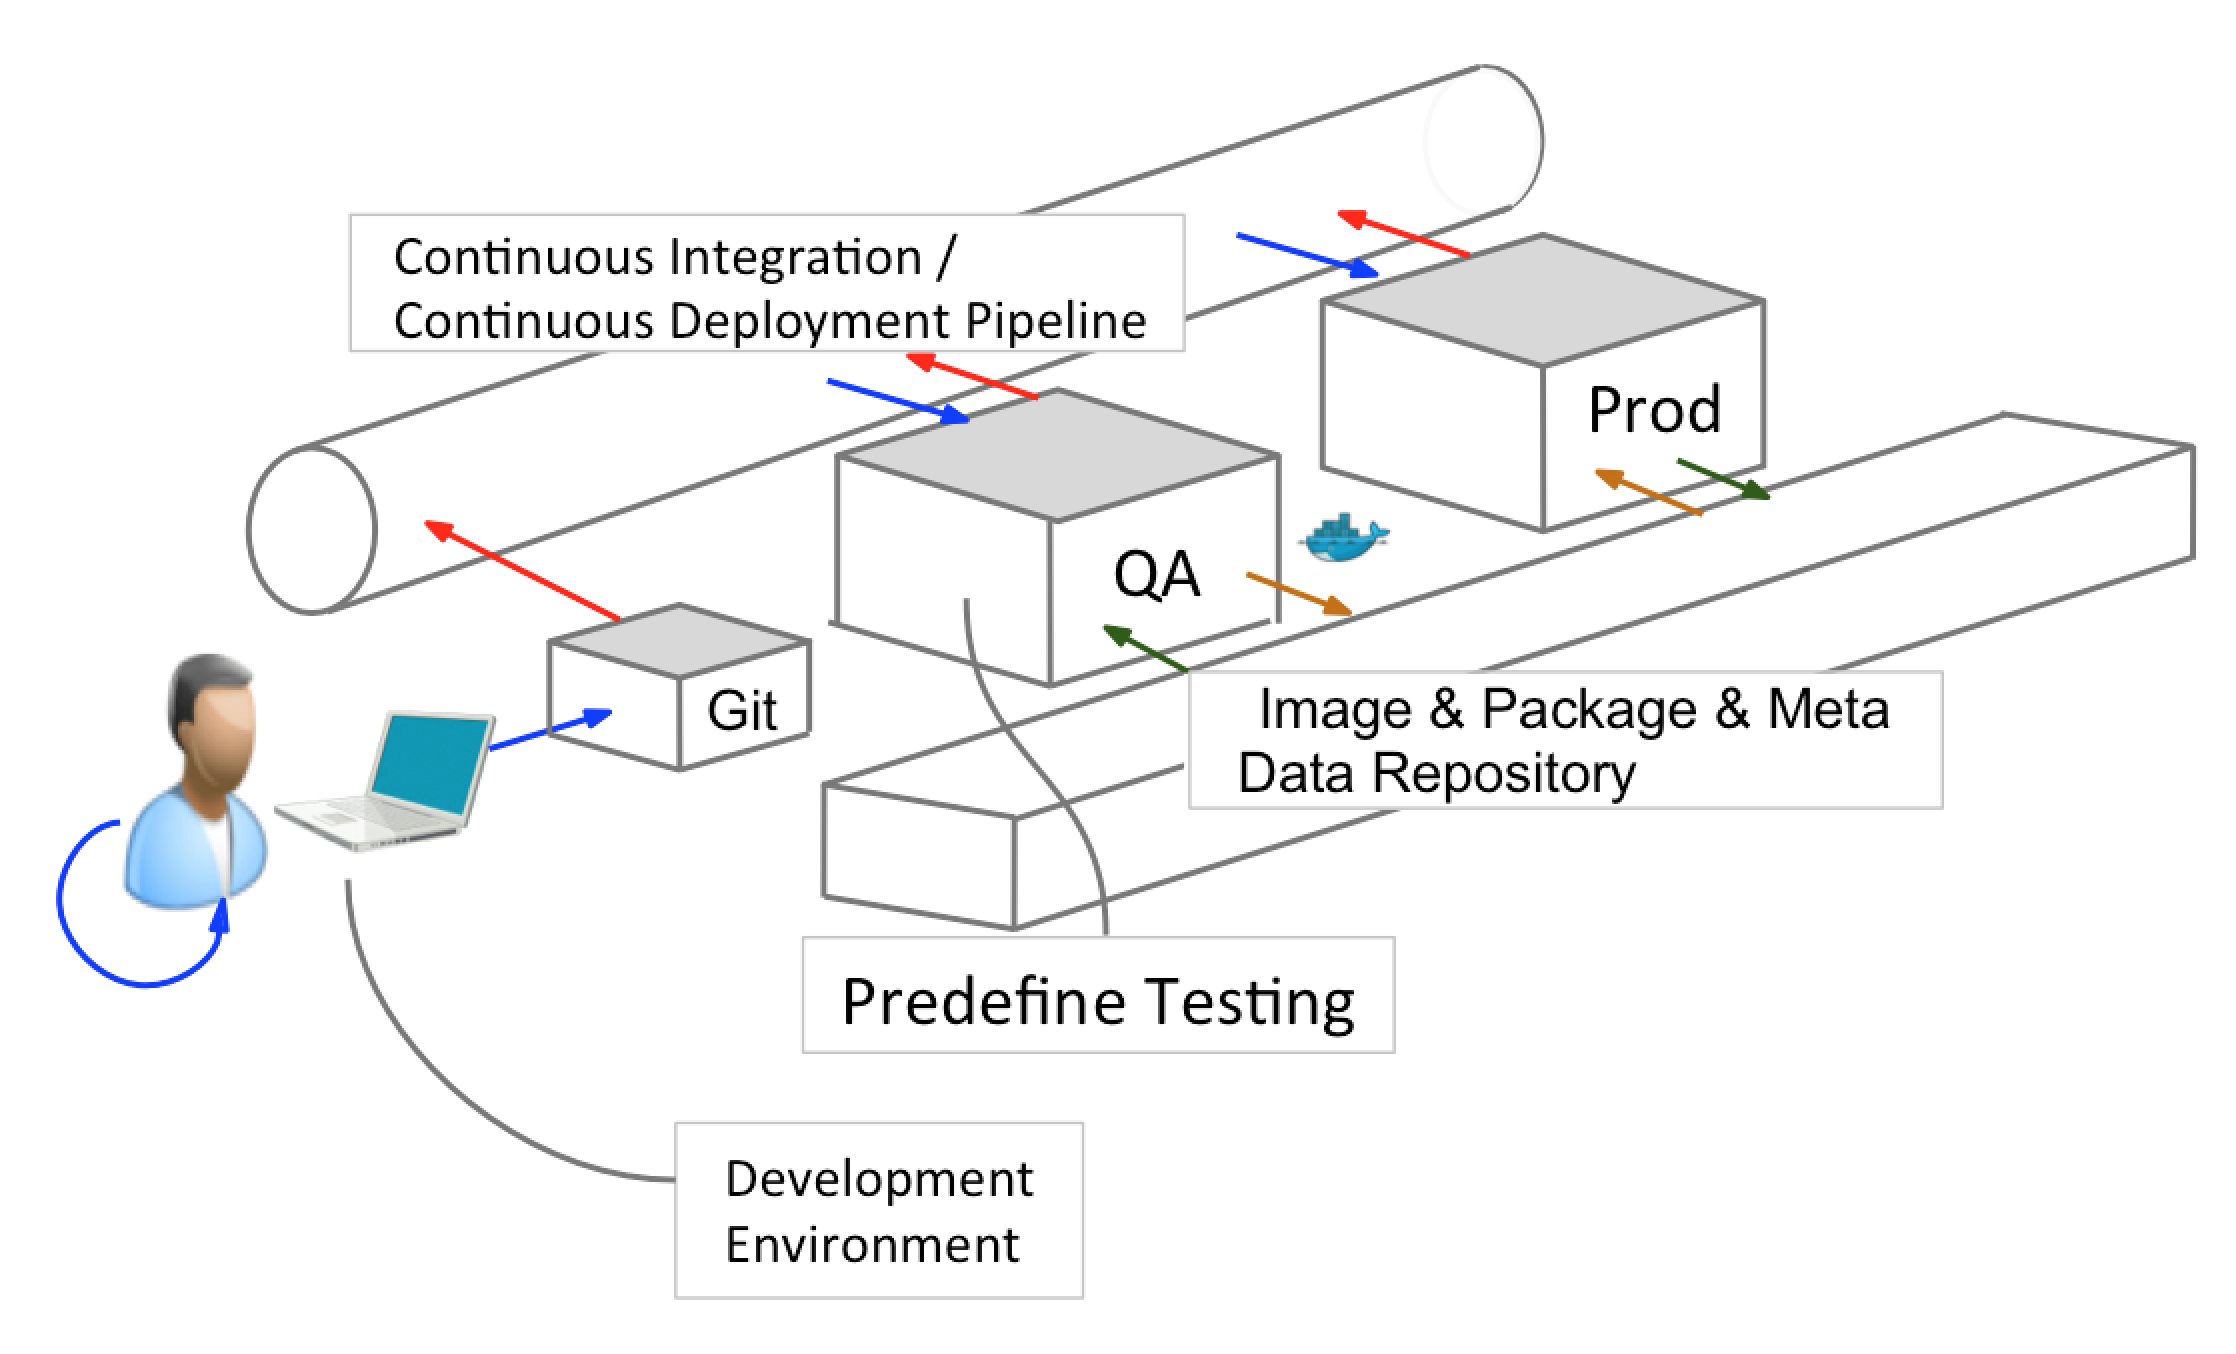
Description
In the local machine, vagrant VM provides a development environment for developers a environment for building and testing the application in the local machine. It allows developers to have a easy-to-setup environment setting in the local VM as the production environment in different operating systems. Users can develop their application both in host machine and the vagrant VM.
The modification of the application can be push to the corresponding repository and trigger the CI process of the QA environment to implement the aplication build and testings. If all the testings are passed, the CI process of the production environment will be triggered to get the newest application and deploy it automatically.
What Makes this Environment Superior to Creating Your Own Framework?
Many developers within a company or institution often write and test code in a different OS than their QA and Production environments run. This can cause many problems with programming languages that have different libraries, dictionaries, and runtime environments in one OS than another. This creates the excuse of "Well, it worked on my machine so I don't see why it doesn't work now." Luckily, Vagrant takes care of this issue as we are able to create portable VMs that can run the OS and installed software on our QA and Production servers. The developer can simply download the vagrant file, say "vagrant up", "vagrant ssh" into the Vagrant VM from the command line, run the setup.sh script and the developer is easily able to run and test the app locally before pushing the QA environment.
While Vagrant is a great tool that solves many of the problems of developing and testing in different environments, often times, Vagrant Images can be missing RPMs that are present in other builds of an OS, CentOS in our case. Luckily, we can solve this issue using Docker. Docker uses containers to encapsulate any app and any libraries and OS dependencies needed to run the app so rather than running against a server, it runs against the components in the container, therefore eliminating the issue of missing RPMs.
Another problem that Docker solves for users is that it takes away the need stop and restart your servers when launching an update to webapp. This task can take minutes in most cases and can often lead to a website experiencing downtime. When an app is containerized using Docker, we simply need to specify the "docker run" command in the post-build step of our Jenkins job for the updated container to run. Since docker apps run against the container inside the server, the server will never need to be shut down and restarted.
##How Can You Use our Framework for your Own Use?
###Prerequisites
1. Install vagrant (https://www.vagrantup.com/downloads.html)
If you are new to vagrant.Here is the official guide to Vagrant
https://docs.vagrantup.com/v2/
2. Clone cloud-int
git clone https://github.com/BU-EC500-SP15/cloud-int.git
3. Navigate into cloud-int and put your own project folder in it.
4. Give the permission of using app_setup.sh and run it
chmod 755 app_setup.sh
5. Modify the app_setup.sh for your own application
#warName: The name of the war file generated by Maven build
warName=MavenBuildTargetFileName.war
#dockerImageName: The name to build the docker image. (Do not need to change)
dockerImageName="webapp"
#containerName: The name to run the docker container. (Do not need to change)
containerName="myapp"
#appFolderName: The folder of your application.
appFolderName=youOwnFolderName
6. Run app_setup script
./app_setup.sh
After running the script, user can create the local VM
Vagrant up
Log into their VM, go to the application folder /vagrant to run the application
Vagrant ssh
cd /vagrant
run.sh -r
You can stop the application by runing
run.sh -s
7. Install Jenkins in your cloud server and install Jenkins Plugins.
Under ‘Manage Jenkins’ -> ‘Manage Plugins’, select and install both Github and Git plugins. Restart to finish the installation.
Plugins List:
- GIT client plugin: Shared library plugin for other Git related Jenkins plugins
- GIT plugin: This plugin integrates GIT with Jenkins
- GitHub API Plugin: This plugin provides GitHub API for other plugins
- GitHub plugin: This plugin integrates GitHub to Jenkins
8. Create your own Github repository for your own application and link the repository to Jenkins in your own QA and production repository.
Link your Github repository:
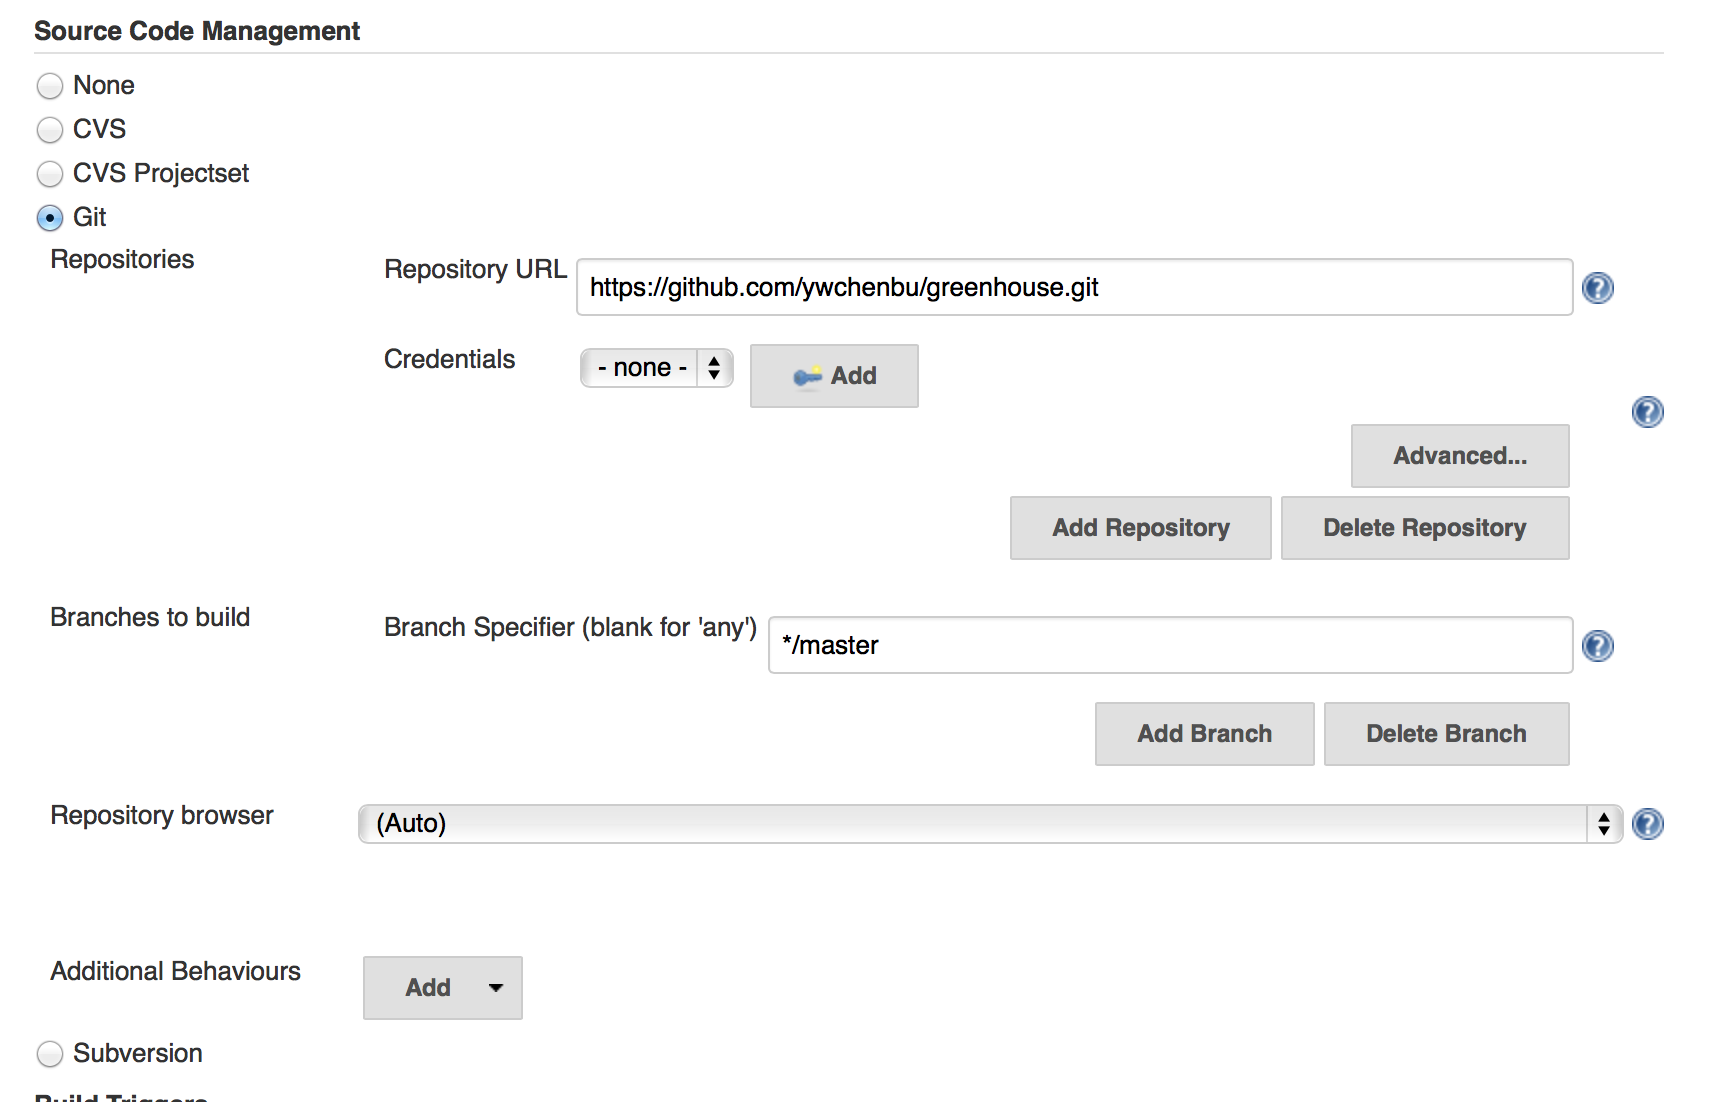
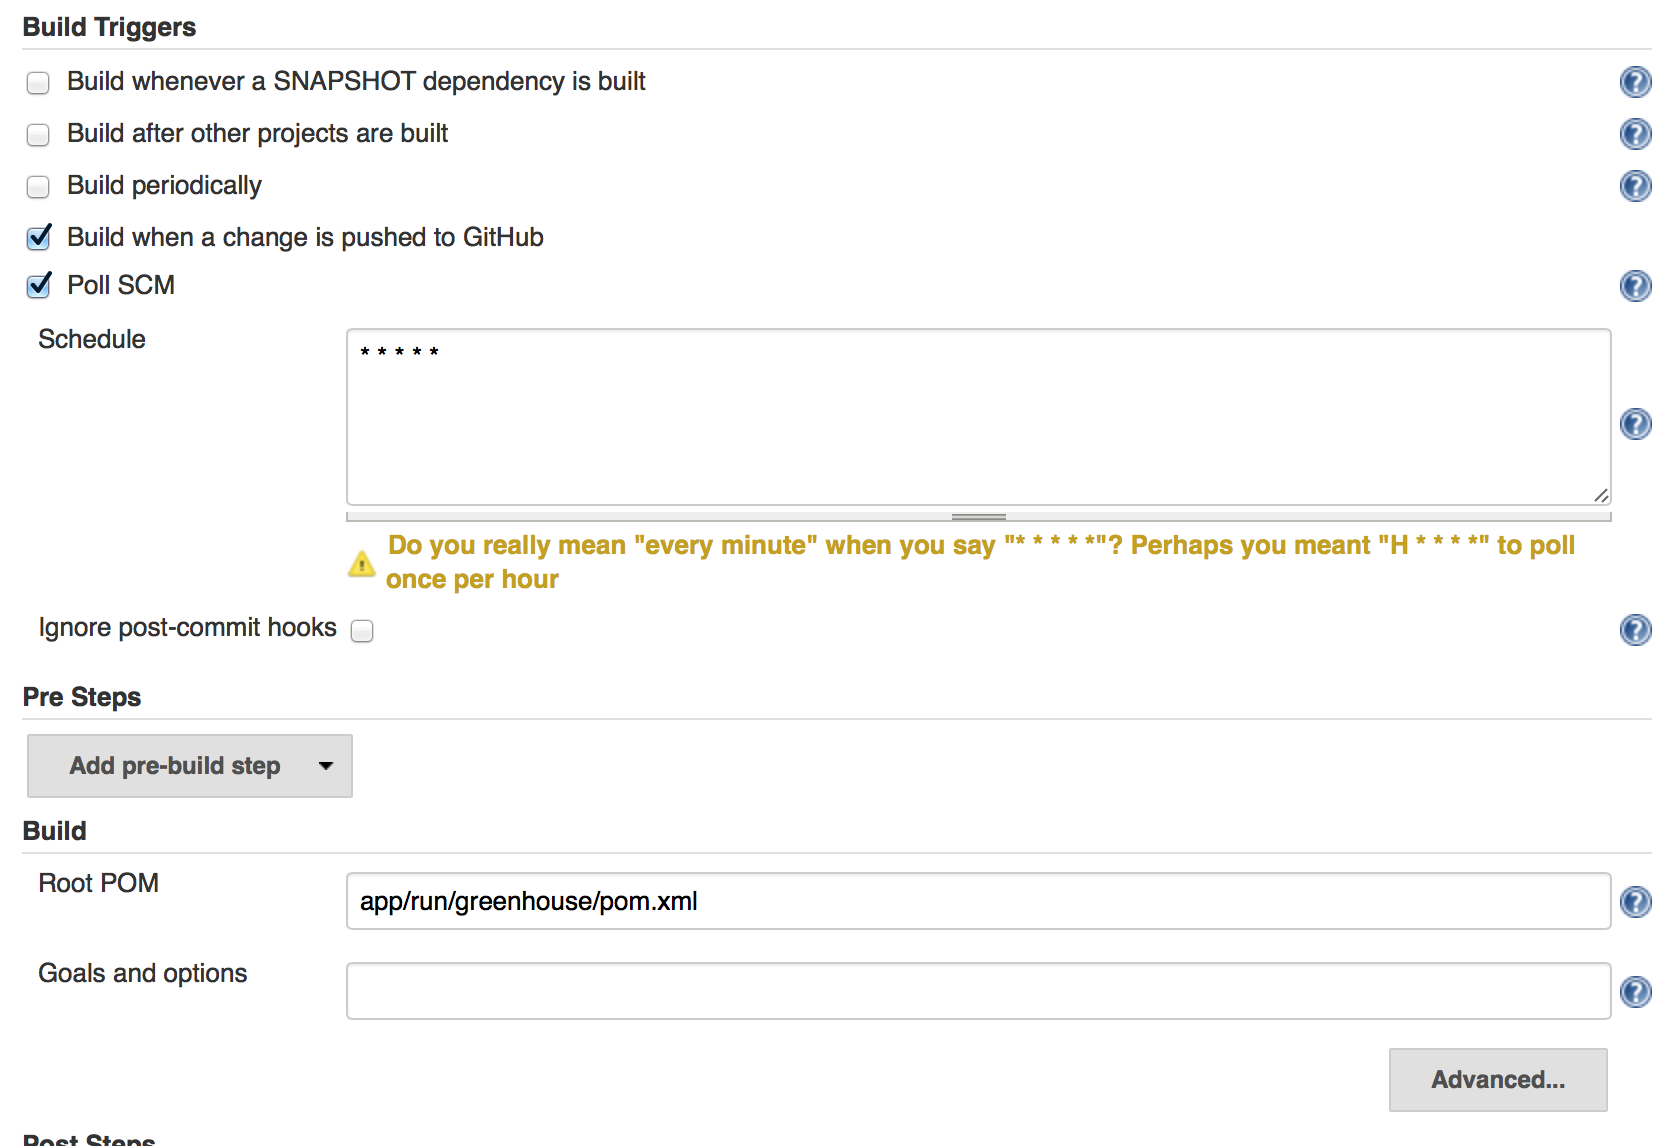
Set up the build trigger and give the correct repository for the ROOT POM
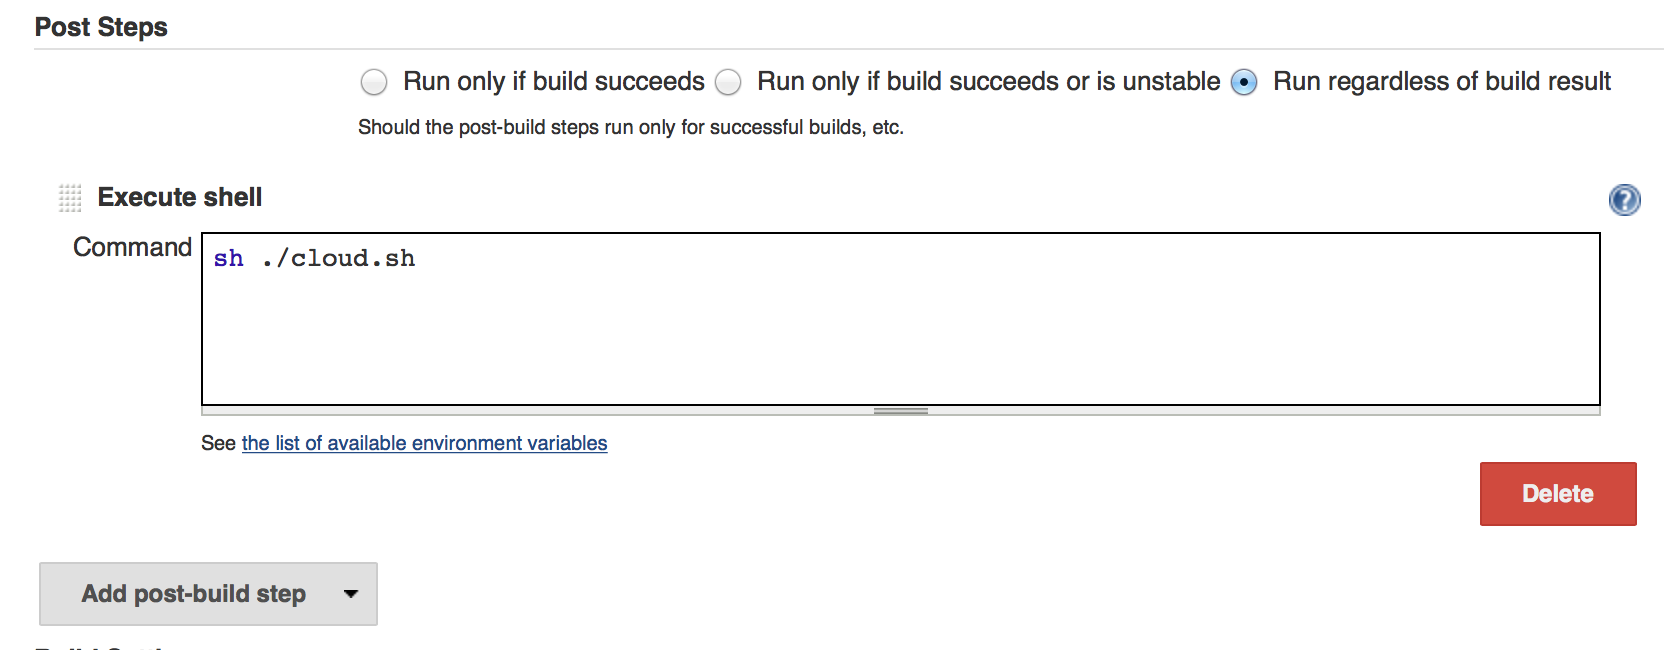
Set up the execution shell after the build, which is the cloud.sh provided in the framework
9. Push your modified application from the local machine to Github to trgger the continuous integration automatically
git push origin master
##How to Run the Pipeline as is
Down the sample project from
git clone https://github.com/Rootnotfound/Beta
In order to run the pipeline as is, you must first download and install vagrant on your local machine. This can be done here: http://www.vagrantup.com/downloads.html
Next, you will need to clone this repository to your local machine via command line git commands. After cloning the git repo, navigate to that repository in your terminal window.
Type the command "vagrant up" which will create a VM based off of the information in the vagrantfile and setup.sh script in this git repository. These files contains the Vagrant Image for the desired OS and the commands to download and install all software and tools you would like in your environment.
After the VM finishes creating, type the command "vagrant ssh" which allows you to ssh into the VM. Once inside the VM you are able to access files in directories in the VM and in your local machine seamlessly. Navigate to the vagrant directory "cd vagrant" Type "ls" to view the contents of the directory, where you will see many files and folders, including the run.sh file. Type "./run.sh -r" this script will locally build our dockerized webapp. Navigate to http://localhost:2200 (as it is set to run on port 2200) to ensure that it is running after the script finishes.
Navigate to 104.154.49.202:8080 to pull up the UI for the QA environment Jenkins. Here you will see the ninja-test job which is used to build and test the webapp in the QA environment. If you click on the job and then click on configure, you will see the git repo we are linked to, that we set it to build when a change occurs, reference the pom.xml file that Maven will use to build it, and finally, references the job in the Production environment to build once this one succeeds. Navigate to 104.154.113.137:8080 to pull up the UI for the Production environment Jenkins. Here you will see the ninja-publish job which is used to run the previously built image in our Production environment since it runs and passed the test suite in QA. You will see the post build command "sh ./cloud.sh" that runs our cloud.sh bash script to accomplish running the docker image.
Open up a new terminal window and navigate to this git repo. Type "cd app/run/ninja-sample/src/main/java/dao" Open the SetupDao.java file by typing "vim SetupDao.java" Change the line 'public string post1Title = "Welcome to Cloud Computing" ' to 'public string post1Title = "Welcome to the blog example!" ' Commit the change to the git repo by typing "sudo git add app/run/ninja-sample/src/main/java/dao/DaoSample.java" and then "sudo git commit -m "v1"" Type "sudo git push origin master" to push the commit the repo hosted on Github.
This push will trigger the Jenkins job in the QA server. You can go back to the Jenkins web UI and see the job building. If you click on the job and navigate to the console, you will see the step by step output as the job executes.
Once you see this build succeed, you can go to the tab with the Jenkins Web UI for production, click on the job, and see it was triggered by the other job succeeding by opening the console as you did in the QA environment. Once you see this build succeeds we can navigate to the website.
In your browser, navigate to 104.154.113.137:1234 (as this is the port it is set to deploy to).
You will see the Webapp has successfully gone through our CI pipeline from local machine to Production with very little work done by the developer besides committing a code change to a git repo. After your first time, you will never need to setup vagrant or any other tools on your local machine again. You'll simply just need to make code changes and it will be build, test, and deploy automatically.
##Technologies Used
Jenkins: Jenkins is a Continuous Integration tool that notices when a change is made to a Git or SVN repositoty. When a change is committed Jenkins triggers Maven to build a specified webapp. Upon a successful build, another job is triggered which will run tests against the webapp in our QA environment. We will continue to utilize Jenkins jobs to automate this CI process from local machine to Production.
Vagrant: Vagrant is a tool that allows developers to create portable development environments. The developer selects a verified Vagrant Image of the OS they desire to use. In this case, we are using CentOS as that is what our QA and Production environments are running. We then right a setup.sh script with the necessary commands to install the tools and software needed to run our app.
Maven: A tool used that automatically builds Java projects utilizing a pom.xml file with specified paths and environments to build to.
Docker: Docker is a tool used to containerize all dependencies needed to run an app or software. We use Docker to containerize our webapp with all of the necessary Java libraries and runtime environments so the app will be run within the container as opposed to against the server. We will also be able to create a Docker container for Jenkins to provide a portable server for anyone who wishes to use it.
Google Developers Console: Google Developers Console (GDC) is the server we use to host our QA and production environments. GDC acts as our servers and lets us run our code in the environment in which it will be produced in as well as lets us show that we can change code on our local environment, push to a repository, and watch it update automatically in the server.
CentOS: CentOS is the operating system we are using on GDC.
Java: Java is the language we have used to develop a web application to test our continuous integration environment. It is also the language in wich Jenkins and Maven use to operate.
##FAQ
1. Is this a platform or framework?
Framework. The purpose of this project is to create a framework for the user so that they can easily setup the CI process for their own application and the development environment in their local machine.
2. What should I do to take part in an existing project with this CI process
Download your project repository to your local machine. Install vagrant for the new computer. Develope your application and use "vagrant up" the VM, use the run.sh script to run the application locally for testing. Git push your modified application back to GitHub repository for CI process.
3. What are the benefits of using Continuous Integration
- Allow you to test the application in your local machine before pushing to the QA and production environment
- Easy to join the project by downloading one repository from git
- Automatically implement QA tests and deploy to the production environment if all tests are passed
- No need to restart the production environment for deplying the new version application
- Shorten the development, testing and deploying time for the project from days to minutes
- Compatible to most of the operating system
- Allow developer to use it in many different projects