


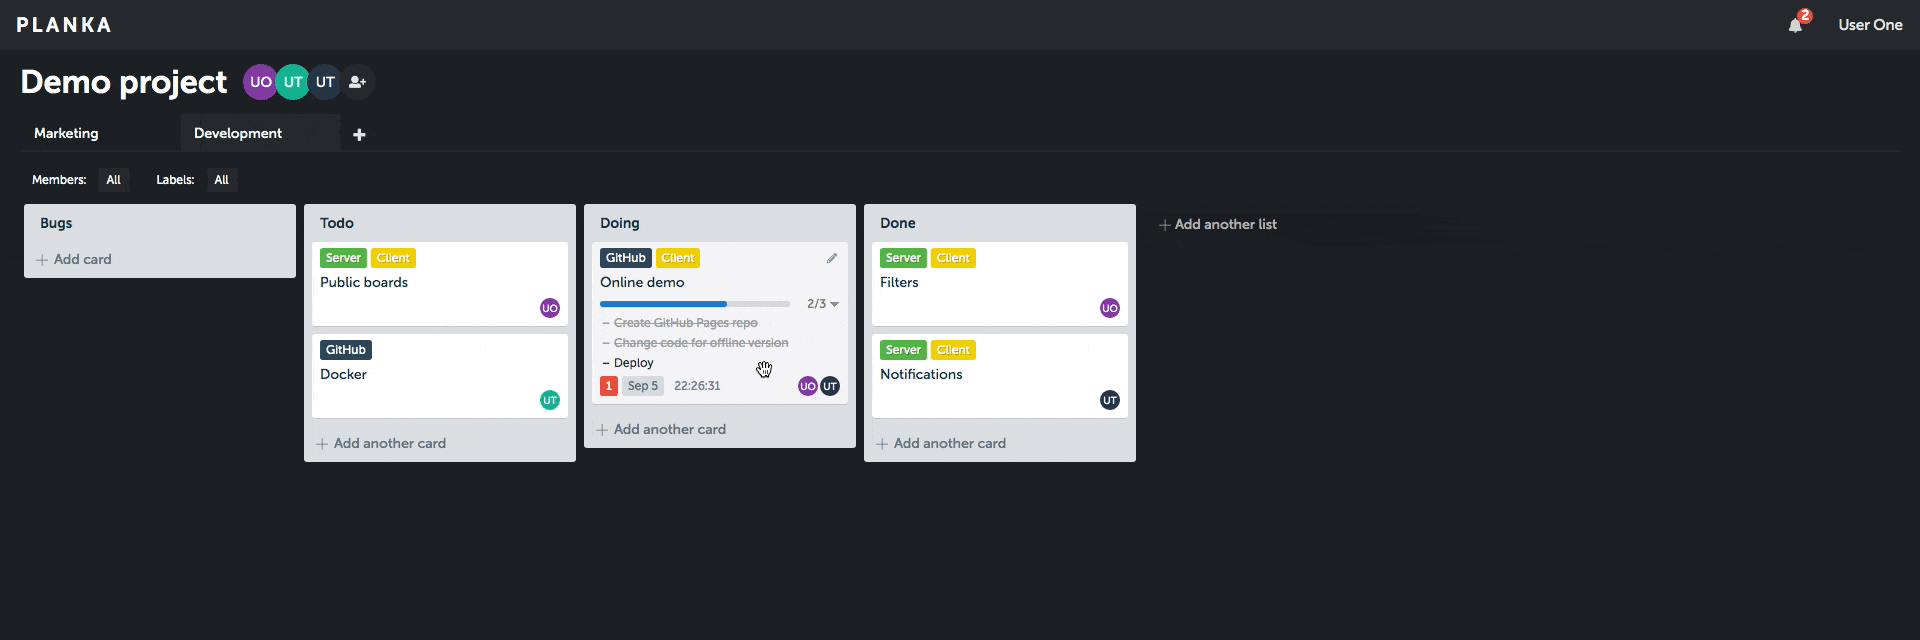
A Trello-like kanban board built with React and Redux.
Client demo (without server features).
- Create projects, boards, lists, cards, labels and tasks
- Add card members, track time, set a due date, add attachments, write comments
- Markdown support in a card description and comment
- Filter by members and labels
- Customize project background
- Real-time updates
- User notifications
- Internationalization
There are 2 types of installation:
- Make sure you have Docker and Docker Compose installed and operational.
- Create
docker-compose.ymlbased on the example. This is the ONLY file you will need. You can create this file on your own machine by copy and pasting the content. - Edit
BASE_URLto match your domain name or IP address. - Edit
SECRET_KEYwith random value. You can generate it byopenssl rand -hex 64.
Download the docker-compose.yml:
curl -L https://raw.githubusercontent.com/plankanban/planka/master/docker-compose.yml -o docker-compose.yml
Pull images and start services:
docker-compose up -d
Demo user: demo@demo.demo demo
Installing without Docker is a bit more complicated, here's what you need to do:
- Clone this repository into a directory of your choice. (e.g.
/var/www/planka)
mkdir -p /var/www/planka
cd /var/www/planka
git clone https://github.com/plankanban/planka.git .- Install dependencies and build the client.
npm install
npm run client:buildNote: You can use yarn or pnpm instead of npm.
- Copy the content of the
client/builddirectory to the server.
cp -r client/build/. server/public
cp client/build/index.html server/views/index.ejs- Copy the start script and navigate to the
serverdirectory.
cp start.sh server
cd server- Configure environment variables.
cp .env.sample .env

# Edit .env file (You could use nano, vim, etc.)
nano .envNote: Before continuing, make sure you have your selected database created and running.
- Start the server.
./start.shNote: You can use pm2 or systemd to run the server in the background.
Here is an example of Nginx configuration for Planka, make sure to replace <domain> with your domain name, and make sure to configure the SSL.
upstream planka {
   server localhost:1337;
   keepalive 32;
}

server {
    listen 443 ssl http2;
    listen [::]:443 ssl http2;
    server_name <domain>;

    access_log /var/log/nginx/planka-access.log;
    error_log  /var/log/nginx/planka-error.log error;

    # SSL Configuration - Replace the example <domain> with your domain
    ssl_certificate /etc/letsencrypt/live/<domain>/fullchain.pem;
    ssl_certificate_key /etc/letsencrypt/live/<domain>/privkey.pem;
    ssl_session_cache shared:SSL:10m;
    ssl_protocols TLSv1.2 TLSv1.3;
    ssl_ciphers "ECDHE-ECDSA-AES128-GCM-SHA256:ECDHE-RSA-AES128-GCM-SHA256:ECDHE-ECDSA-AES256-GCM-SHA384:ECDHE-RSA-AES256-GCM-SHA384:ECDHE-ECDSA-CHACHA20-POLY1305:ECDHE-RSA-CHACHA20-POLY1305:DHE-RSA-AES128-GCM-SHA256:DHE-RSA-AES256-GCM-SHA384";
    ssl_prefer_server_ciphers on;

    client_max_body_size 120M;
    add_header Access-Control-Allow-Origin *;
    add_header Access-Control-Max-Age 3600;
    add_header Access-Control-Expose-Headers Content-Length;
    add_header Access-Control-Allow-Headers Range;

    # Make sure to allow socket.io connections
    location ~* \.io {
        proxy_set_header Upgrade $http_upgrade;
        proxy_set_header Connection "upgrade";
        client_max_body_size 50M;
        proxy_set_header Host $http_host;
        proxy_set_header X-Real-IP $remote_addr;
        proxy_set_header X-Forwarded-For $proxy_add_x_forwarded_for;
        proxy_set_header X-Forwarded-Proto $scheme;
        proxy_set_header X-Frame-Options SAMEORIGIN;
        proxy_buffers 256 16k;
        proxy_buffer_size 16k;
        client_body_timeout 60;
        send_timeout 300;
        lingering_timeout 5;
        proxy_connect_timeout 1d;
        proxy_send_timeout 1d;
        proxy_read_timeout 1d;
        proxy_pass http://planka;
    }

    location / {
        client_max_body_size 50M;
        proxy_set_header Connection "";
        proxy_set_header Host $http_host;
        proxy_set_header X-Real-IP $remote_addr;
        proxy_set_header X-Forwarded-For $proxy_add_x_forwarded_for;
        proxy_set_header X-Forwarded-Proto $scheme;
        proxy_set_header X-Frame-Options SAMEORIGIN;
        proxy_buffers 256 16k;
        proxy_buffer_size 16k;
        proxy_read_timeout 600s;
        proxy_cache_revalidate on;
        proxy_cache_min_uses 2;
        proxy_cache_use_stale timeout;
        proxy_cache_lock on;
        proxy_http_version 1.1;
        proxy_pass http://planka;
    }
}Planka currently allows you to expose the application's logfile directory to the host machine via a shared volume. This feature is not enabled by default.
To expose the logfile director to the host machine, add the item ./logs/:/app/logs/ under services.planka.volumes.
Note that the directory to the left of the semicolon is regarding the host machine while the directory to the right of the semicolon is regarding the Docker container.
For example, in the above step, ./logs/:/app/logs/ will create the folder logs in the same directory where the docker-compose.yml file lives.
Logrotate is designed to ease administration of systems that generate large numbers of log files. It allows automatic rotation, compression, removal, and mailing of log files. Each log file may be handled daily, weekly, monthly, or when it grows too large.
Create a file in /etc/logrotate.d named planka with the following contents:
/path/to/planka/logs/planka.log {
  daily
  missingok
  rotate 14
  compress
  delaycompress
  notifempty
  create 640 root adm
  sharedscripts
}
Ensure to replace logfile directory with your installation’s /logs/planka.log location.
Restart the logrotate service.
Fail2ban is a service that uses iptables to automatically drop connections for a pre-defined amount of time from IPs that continuously failed to authenticate to the configured services.
A filter defines regex rules to identify when users fail to authenticate on Planka's user interface.
Create a file in /etc/fail2ban/filter.d named planka.conf with the following contents:
[Definition]
failregex = ^(.*) Invalid (email or username:|password!) (\"(.*)\"!)? ?\(IP: <ADDR>\)$
ignoreregex =
The jail file defines how to handle the failed authentication attempts found by the Planka filter.
Create a file in /etc/fail2ban/jail.d named planka.local with the following contents:
[planka]
enabled = true
port = http,https
filter = planka
logpath = /path/to/planka/logs/planka.log
maxretry = 5
bantime = 900
Ensure to replace logpath's value with your installation’s /logs/planka.log location. If you are using ports other than 80 and 443 for your Web server you should replace those too. The bantime and findtime are defined in seconds.
Restart the fail2ban service. You can check the status of your Planka jail by running:
fail2ban-client status plankaIt's already available in Planka, or you can also use the great tool trello2planka to do the import.
Planka comes with two scripts that allow for manual backup and restore when running Planka with docker-compose.yml.
Backups can be triggered with docker-backup.sh which will export the Database, User Avatars, Project Backgrounds and Attachments into a single tgz file.
$ ./docker-backup.sh
Exporting postgres database ... Success!
Exporting user-avatars ... Success!
Exporting project-background-images ... Success!
Exporting attachments ... Success!
Creating final tarball 2023-01-17T15-37-22Z-backup.tgz ... Success!
Cleaning up temporary files and folders ... Success!
Backup Complete!
The resulting backup can be restored using the docker-restore.sh script.
$ ./docker-restore.sh 2023-01-17T15-37-22Z-backup.tgz
Extracting tarball 2023-01-17T11-10-54Z-backup.tgz ... Success!
Importing postgres database ...

[Many lines of postgres output]
...

Success!
Importing user-avatars ... Success!
Importing project-background-images ... Success!
Importing attachments ... Success!
Cleaning up temporary files and folders ... Success!
Restore complete!
Clone the repository and install dependencies:
git clone https://github.com/plankanban/planka.git

cd planka
npm install
Either use a local database or start the provided development database:
docker-compose -f docker-compose-dev.yml up
Create server/.env based on server/.env.sample and edit DATABASE_URL if needed, then initialize the database:
npm run server:db:init
Start the development server:
npm start
Demo user: demo@demo.demo demo
- React, Redux, Redux-Saga, Redux-ORM, Semantic UI React, react-beautiful-dnd
- Sails.js, Knex.js
- PostgreSQL
Planka is AGPL-3.0 licensed.