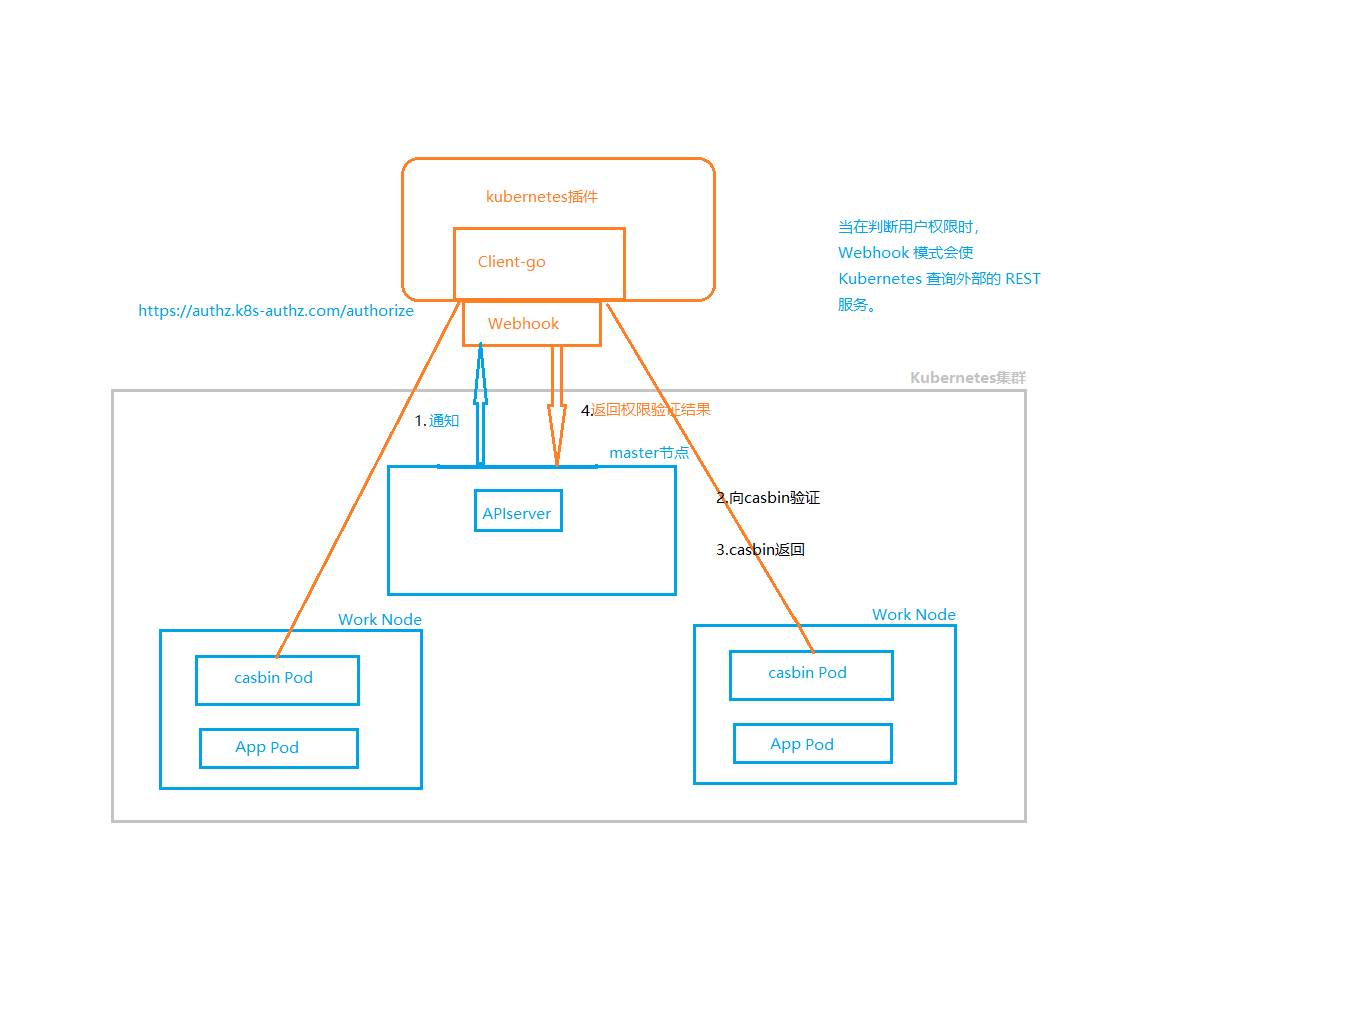
The plug-in refers to the library of casbin and listens for the verification request from webhook on the default port 8888 After receiving, it will be processed by a handler calling caspin, and the result will be returned
-Create a TLS certificate, that is, a certificate -Write the server-side code, the server-side code needs to use the certificate -Create k8s sercret based on certificate -Create k8s deployment and service -Create k8s webhookconfiguration, where you need to use the certificate you created earlier
Ensure that the kubernetes cluster version is at least v1.16(In order to use admissionregistration.k8s.io/v1 API) or v1.9 (In order to use admissionregistration.k8s.io/v1beta1 API)
Use this command to check
kubectl api-versions | grep admissionregistration.k8s.io
The result should be
admissionregistration.k8s.io/v1
admissionregistration.k8s.io/v1beta1
kubernetes 1.16.7
In the model is the caspin model file The policy file of caspin is put in the policy In deployment is the script used for testing, yaml file casbin_ The server is caspin_ server main.go Is to start the main function webhook.go Is the main permission access logic
-
In order to deploy the webhook server, we need to create a service and deployment resource object in our Kubernetes cluster. Deployment is very simple, only the TLS configuration of the service under configuration is required.We can see it under the deployment folder under the code root directory
Deployment.yamlThe configuration statement for the certificate in the file will find that the certificate and private key files read from the command line parameters are mounted through a secret object:args: - -tlsCertFile=/etc/webhook/certs/cert.pem - -tlsKeyFile=/etc/webhook/certs/key.pem [...] volumeMounts: - name: webhook-certs mountPath: /etc/webhook/certs readOnly: true volumes: - name: webhook-certs secret: secretName: admission-webhook-example-certs
In a production environment, the processing of TLS certificates (especially private keys) is very important, and we can use something like [cert-manager](Https://www.qikqiak.com/post/automatic-kubernetes-ingress-https-with-lets-encryptTools such as) automatically process TLS certificates or store private key keys in Vault instead of directly in the secret resource object.We can use any type of certificate, but it is important to note that the CA certificate we set here needs to be authenticated by apiserver, and we can reuse the [certificate signature request script] generated in the Istio project.Https://github.com/istio/istio/blob/release-0.7/install/kubernetes/webhook-create-signed-cert.sh).Get authentication information by sending a request to apiserver, then use the results to create the required secret object.
First, run [the script] (Https://github.com/cnych/admission-webhook-example/blob/blog/deployment/webhook-create-signed-cert.sh) Check if there is certificate and private key information in the secret object:
$ ./deployment/webhook-create-signed-cert.sh
creating certs in tmpdir /var/folders/x3/wjy_1z155pdf8jg_jgpmf6kc0000gn/T/tmp.IboFfX97
Generating RSA private key, 2048 bit long modulus (2 primes)
..................+++++
........+++++
e is 65537 (0x010001)
certificatesigningrequest.certificates.k8s.io/admission-webhook-example-svc.default created
NAME                                    AGE   REQUESTOR          CONDITION
admission-webhook-example-svc.default   1s    kubernetes-admin   Pending
certificatesigningrequest.certificates.k8s.io/admission-webhook-example-svc.default approved
secret/admission-webhook-example-certs created

$ kubectl get secret admission-webhook-example-certs
NAME                              TYPE     DATA   AGE
admission-webhook-example-certs   Opaque   2      28s
一旦 secret 对象创建成功,我们就可以直接创建 deployment 和 service 对象。
$ kubectl create -f deployment/deployment.yaml
deployment.apps "admission-webhook-example-deployment" created

$ kubectl create -f deployment/service.yaml
service "admission-webhook-example-svc" created
Now our webhook service is running, and it can receive requests from apiserver.But we also need to create some configuration resources on kubernetes.First, configure the validating webhook to see [webhook configuration] (Https://github.com/cnych/admission-webhook-example/blob/blog/deployment/validating webhook.yaml) we will notice that it contains a
CA_Placeholder for BUNDLE:clientConfig: service: name: admission-webhook-example-svc namespace: default path: "/validate" caBundle: ${CA_BUNDLE}
The CA certificate should be provided to the admission webhook configuration so that apiserver can trust the TLS certificate provided by webhook server.Since we have already signed a certificate above using the Kubernetes API, we can use the CA Certificate in our kubeconfig to simplify our operations.A small script is also provided in the code repository to replace CA_BUNDLE This placeholder, run this command before creating validating webhook:
$ cat ./deployment/validatingwebhook.yaml | ./deployment/webhook-patch-ca-bundle.sh > ./deployment/validatingwebhook-ca-bundle.yaml
You can view
validating webhook-ca-Bundle.yamlCA_in fileHas the value of the BUNDLEplaceholder been replaced?It is important to note that the path path in clientConfig is/validate', because our code is integrating validate and mutate into one service. Then there are some RBAC rules to configure that we want to intercept API requests when a deployment or service is created, so the values forapiGroups'andapiVersions' areapps/v1for deployment andv1for service, respectively.For RBAC configuration methods, check our previous articles: [Kubernetes RBAC details].Https://www.qikqiak.com/post/use-rbac-in-k8s) The last part of the webhook is to configure a `namespace Selector', and we can define a selector for the namespace in which the webhook works. This configuration is not required, for example, if we add the following configuration here:namespaceSelector: matchLabels: admission-webhook-example: enabled
Our webhook will only work on namespaces with the
admission-webhook-example=enabled'tag set, and you can see the full layout of this resource configuration in the Kubernetes reference document. So first you need to add this tag to thedefault'namespace:$ kubectl label namespace default admission-webhook-example=enabled namespace "default" labeledFinally, create this validating webhook configuration object, which dynamically adds the webhook to the webhook chain, so once the resource is created, the request is intercepted and our webhook service is invoked:
$ kubectl create -f deployment/validatingwebhook-ca-bundle.yaml validatingwebhookconfiguration.admissionregistration.k8s.io "validation-webhook-example-cfg" createdNow let's create a deployment resource to verify that it's valid, and there's a
under the code repositorySleep.yamlResource manifest file, created directly:$ kubectl create -f deployment/sleep.yaml Error from server (required labels are not set): error when creating "deployment/sleep.yaml": admission webhook "required-labels.qikqiak.com" denied the request: required labels are not set
Normally this error message will appear when creating and then deploying another
sleep-with-Labels.yamlList of resources::$ kubectl create -f deployment/sleep-with-labels.yaml deployment.apps "sleep" createdYou can see that deployment works. First we delete the deployment above and then deploy another
sleep-no-Validation.yamlResource List, which does not have the required tags, but is configured withadmission-webhook-Example.qikqiak.com/validate=falseSuch annotations are normally created as well:$ kubectl delete deployment sleep $ kubectl create -f deployment/sleep-no-validation.yaml deployment.apps "sleep" createdFirst, we delete the validating webhook above to prevent interference with mutating, and then deploy the new configuration.The mutating webhook configuration is basically the same as the validating webhook configuration, but the path to the webook server is
/mutate', so we also need to populateCA_BUNDLE`This placeholder.$ kubectl delete validatingwebhookconfiguration validation-webhook-example-cfg validatingwebhookconfiguration.admissionregistration.k8s.io "validation-webhook-example-cfg" deleted $ cat ./deployment/mutatingwebhook.yaml | ./deployment/webhook-patch-ca-bundle.sh > ./deployment/mutatingwebhook-ca-bundle.yaml $ kubectl create -f deployment/mutatingwebhook-ca-bundle.yaml mutatingwebhookconfiguration.admissionregistration.k8s.io "mutating-webhook-example-cfg" created
Now we can redeploy the `sleep'application above and see if we added the label tag correctly:
$ kubectl create -f deployment/sleep.yaml
deployment.apps "sleep" created

$ kubectl get  deploy sleep -o yaml
apiVersion: extensions/v1beta1
kind: Deployment
metadata:
  annotations:
    admission-webhook-example.qikqiak.com/status: mutated
    deployment.kubernetes.io/revision: "1"
  creationTimestamp: 2018-09-24T11:35:50Z
  generation: 1
  labels:
    app.kubernetes.io/component: not_available
    app.kubernetes.io/instance: not_available
    app.kubernetes.io/managed-by: not_available
    app.kubernetes.io/name: not_available
    app.kubernetes.io/part-of: not_available
    app.kubernetes.io/version: not_available
...
Finally, we re-create the validating webhook to test together.Now, try creating the sleep application again.Normally it can be created successfully, so we can look at [admission-controllers documentation] (Https://kubernetes.io/docs/reference/access-authn-authz/admission-controllers/#what-are-they)
Access control is divided into two phases: the first phase runs the mutating admission controller and the second phase runs the validating admission controller.
So mutating webhook adds the missing labels tag in the first stage, and validating webhook will not reject this deployment in the second stage because the tag already exists, using
not_AvailableSet their values.$ kubectl create -f deployment/validatingwebhook-ca-bundle.yaml validatingwebhookconfiguration.admissionregistration.k8s.io "validation-webhook-example-cfg" created $ kubectl create -f deployment/sleep.yaml deployment.apps "sleep" createdReference
https://banzaicloud.com/blog/k8s-admission-webhooks/
https://kubernetes.io/docs/reference/access-authn-authz/admission-controllers/#what-are-they