Simple nodejs server using express webserver that can be used as provider of push notifications for both GCM and APNs.
APNs stands for Apple Push Notification Service and GCM for Google Cloud Messaging. These services enable us to send push notifications to Android and/or iOS and WatchOS apps. After you have configured and registered your app correctly a 2-way secure connection can be established between your app and the service.
GCM and APNs only relay notifications, the notifications themselves have to be created (provided) by a service called the provider. A provider creates and sends a notification based on criteria that you can decide yourself. This could be for instance an incoming chat message, an updated weather forecast, a software update and so on. The provider in this project just sends generic messages.
You can send push notifications directly to a specific device, or to a specific topic. In the latter case the notification is sent to all devices that have subscribed to that specific topic. In this example we will focus on notifications that are directly sent to a device. To be able to do this, we need to have a unique device id, and we obtain this as soon as the app registers itself to GCM or APNs. Both services return a token that identifies the app running on that specific device.
Our provider service stores these tokens in a PostgreSQL database. Besides the token we also store which service we use to relay the notification: GCM or APNs. You might think that all Apple devices use APNs and all Android devices use GCM, but you can use GCM for Apple devices as well. GCM has a wrapper for the APNs service so you can use GCM for all devices; we will discuss how this is done later.
But first we have to set up the server and the database.
Clone the repository and cd into the server folder and run npm install to install all dependencies:
$ git clone git@github.com:abudaan/push-notification-server.git
$ cd push-notification-server/server
$ npm install
The server is written in es6, if you run the script npm run watch the es6 code gets automatically converted to es5 and stored in the build folder every time you change something in the es6 code.
You can start the server by running this command from within the server folder:
$ node build/server.js
server listening at port 5000
Before we can start the server we need to set up a database, in this database we store the device tokens of the registered devices. Assuming you have PostgreSQL server and psql client installed run:
$ psql
psql (9.5.2)
Type "help" for help.

your_username=#
By default you are connected to your default database which is named after your user name. You can connect to another existing database using \connect another_database:
$ psql
psql (9.5.2)
Type "help" for help.

your_username=# \connect another_database
You are now connected to database "another_database" as user "your_username".
another_database=#
Alternately you can create a new database for this project with SQL:
$ psql
psql (9.5.2)
Type "help" for help.

your_username=# CREATE DATABASE your_new_database;
CREATE DATABASE
your_username=# \connect your_new_database
You are now connected to database "your_new_database" as user "your_username".
your_new_database=#
Next we create the table tokens where we will store the tokens of the devices by running the file table.tokens.sql:
$ psql
psql (9.5.2)
Type "help" for help.

your_new_database=# \i table.tokens.sql
CREATE TABLE
your_new_database=#
Now that we have set up the database let's have a look at line 6 of the file src/database.js:
pg.connect(process.env.DATABASE_URL, function(error, client, done){
  ...
}))
This means that server retrieves the address of the database from an environment variable named DATABASE_URL. This way we can run the server on a platform like heroku. You set the environment variable like so:
export DATABASE_URL=postgres://username:password@localhost

# test if it works
echo $DATABASE_URL
Note that if you want to run the server on your local computer you have to set the environment variable every time you startup the terminal. You might want to add it to your bash profile or simply hardcode the database address in src/database.js (not recommended though).
We are going to setup the first test client. This example is iOS only but later we will set up another example that works with both iOS and Android devices.
First cd to the client folder then initialize react-native for the pushtest1 example:
$ cd ../client
$ react-native init pushtest1
Now you get a warning "Directory pushtest1 already exists. Continue?", type "yes" and press enter.

During initialization you get several conflict warnings; always choose "n" for "do not overwrite"

Once the process has completed, we can open the file ./client/pushtest1/ios/pushtest1.xcodeproj in Xcode. Unfortunately, you can not test push notifications in an emulator; you need to test on a physical iOS device, hence you need a paid developer account which will cost you $99 see here.
After you are enrolled you can use your developer account to set up push notifications, follow the steps outlined here up to the section "Installing a Client SSL Signing Identity on the Server"
In this last section the connection certificate and key is created, we need these to set up a secure connection between our provider and APNs. You can follow the steps described in this section but you only need to export the certificate. Export the certificate as a p12 file and save it with a meaningful name at an easy to find location on your hard disk. During this step you are asked to use set a password for the certificate, you can omit this. You will also be asked for your administrator password for security reasons. Next open a terminal and cd to the folder where you have save the certificate and run this command:
$ openssl pkcs12 -in a_meaningful_name.p12 -out a_meaningful_name.pem -nodes -clcerts
Copy the .pem file to the folder ./server/conf/ and edit the code from line 93 in the file ./server/src/server.js. You need to replace the value of key and cert with the name you have chosen for the .pem file.
apn.start({
  // both the key and the certificate are in the .pem file so we can use the same file for both key and certificate
  key: 'conf/apn.pem',
  cert: 'conf/apn.pem',
})
If you haven't npm run watch already running, do this now and restart the server with the command node build/server.js from within the "server" folder.
Now back to the client for the last 2 steps: open the file AppDelegate.m and at line 36 you have put the local (internal) ip address of the computer that runs Xcode, you can leave the port number at 8081:
jsCodeLocation =
  [NSURL URLWithString:@"http://192.168.0.2:8081/index.ios.bundle?platform=ios&dev=true"]; // use your own local ip address
Next open the file ./client/pushtest1/index.ios.js and at line 16 replace the ip address to the ip address of the computer that is running the provider service, in this case it is the same address as we used above:
const providerUrl = 'http://192.168.0.2:5000' // use your own local ip address
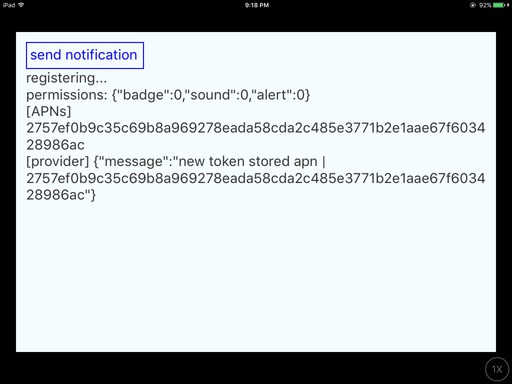
Now we can test the client. Connect your device, select this device as build target and build the project. Note that you need to have wifi enabled because in debug / testing mode the javascript will be streamed to the app via a http connection. If all goes well the app opens and shows a popup asking you to allow notifications, press "OK" and you will see something similar to this:
The app registers itself at the APNs and gets back a token that uniquely identifies the app on this specific device: the token is printed at the line that start with "[APNs]". The next line is the response from the provider.
The line that starts with "permissions" tells us which notifications are allowed. This might worry you because all values are set to 0 but that is because the permission where queried you pressed "OK" in the popup. The app requests permissions every time the app launches because the user might have revoked permissions.
Finally it is time to actually send a notification to the app. This can be done with curl in the terminal or by posting a message via a browser.
$ curl -X POST -H "Content-Type: application/json" -d '{"message" : "testing testing 1,2,3"}' http://192.168.0.2:5000/message
As you can see the message is a simple json object. We can post the same message via a browser like this:
http://192.168.0.2:5000/message/?message=testing%20testing%201,2,3
Now you should see a notification popup. If you lock your device and send another notification you will hear a sound and the message will appear on your lock screen.
In the next example we are going to use GCM for Android and APNs for Apple devices. We use a npm module called react-native-push-notification that abstracts away the differences between Android and iOS. It contains some native Android code that makes push notifications available for the react-native layer and it acts as a wrapper around the PushNotificationIOS library from react-native. The API is a bit different as you can see if you compare the file index.ios.js with the same file in the "pushtest1" folder.
To set up the project cd to the client folder then initialize react-native for the pushtest2 example:
$ cd ../client
$ react-native init pushtest2
You will get the same warnings as described above, choose yes if you get the message "Directory pushtest2 already exists. Continue?" and choose "n" when prompted to overwrite an existing file. Follow all other steps as described in the previous section.
Now we are going to set up the Android client. First we need to register the app with Google Developers Console, follow this link. You have to choose a name for your app, you can pick any name you want except the name of an existing app. The Android package name should match the package of the MainActivity.java file. In this case the package name is com.push.
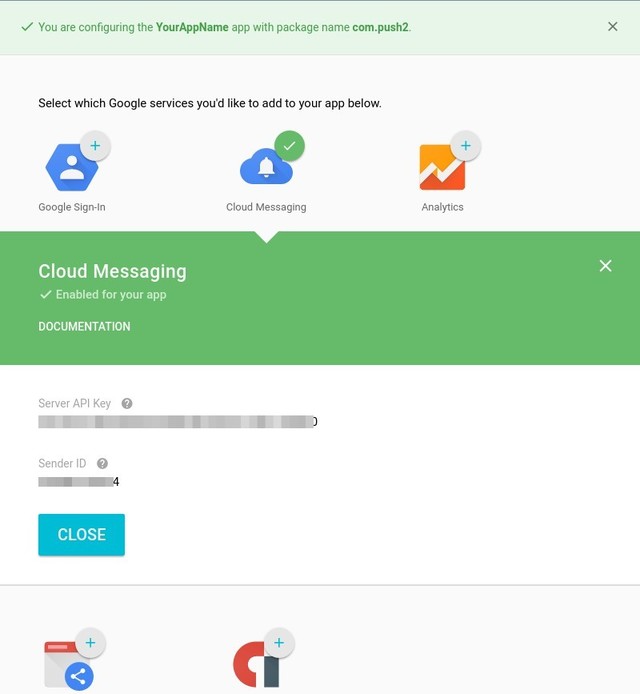
Next you may choose a region, then click the green button "continue to Choose and configure services". In the screen that follows select "Cloud Messaging" and click the big blue button "Enable Google Cloud Messaging". You now see a page that shows the credentials that we need to set up the Android client and the connection of our provider with GCM.
First copy the Server API Key to a new file and save it with a meaningful name in the folder ./server/conf. Open the file ./server/src/server.js and edit line 102. For instance if you have saved the Server API key in a file named "pushtest2.gcm.key", line 102 should read:
gcm.start({
  key: 'conf/pushtest2.gcm.key', // should be a plain text file containing nothing but the key
  url: 'https://gcm-http.googleapis.com/gcm/send' // not mandatory
})
Next copy the Sender ID and store it in the senderID' variable in the file ./client/pushtest2/index.android.js`:
import PushNotification from 'react-native-push-notification'
const providerURL = 'http://192.168.0.10:5000'
const senderID = 'your_sender_id'
Change the value of providerURL to the url of your provider. I assume that you are running the provider on your own computer so use its local ip address.
Scroll down to the bottom of the page where you will find a button "Generate configuration files", click this button and on the screen that follows click "Download google-services.json". Save this file in the folder ./client/pushtest2/android/app.
All credentials are in place now. Open a terminal and cd to the "server" folder, rebuild and start the server by typing:
$ npm run provider
Open another terminal (tmux is very handy for this) and start react-native:
$ react-native start
And finally build the Android app:
$ react-native run-android

