![]()
jenkinsfile-pipeline
A reusable pipeline template to build and deploy an application serially across multiple environments, using Jenkins and Jenkinsfile.
Requirements and Assumptions
- Your application source code is available in a git repo.
- You have an application that can be built in some way. By default, you can provide a
./bin/build.shto build your artifact. - Your application artifact can be deployed to an environment in some way. By default, you can provide a
./bin/deploy.shto deploy your artifact. An$ENVIRONMENTvariable will be available to you by default (from the DefaultEnvironmentPlugin) to help you identify the environment being deployed. - You've imported jenkinsfile-pipeline to your Jenkins instance.

How to Use
- Create a Jenkinsfile in your application project and import the version of jenkinsfile-pipeline that you want to use. It's recommended that you always use the latest version.
// Jenkinsfile
@Library('jenkinsfile-pipeline@<VERSION>') _
- Provide jenkinsfile-pipeline with a reference to the Jenkinsfile context, so that it can do all of it's magic under the hood.
// Jenkinsfile
...
Jenkinsfile.init(this)
- Create a pipeline. In this case, we'll make it Scripted.
def pipeline = new ScriptedPipeline()
- Create a stage to build your deployment artifact.
// Jenkinsfile
...
def buildArtifact = new BuildStage()
- Create a stage to deploy to each of your environments. This example creates stages to deploy to qa, uat, and prod environments. The number and names of your environments can differ from this example. Choose the environments and environment names that reflect your own development process to go from Code to Customer.
// Jenkinsfile
...
def deployQa = new DeployStage('qa')
def deployUat = new DeployStage('uat')
def deployProd = new DeployStage('prod')
- Link the Stages together in your pipeline in the order that you want them to run. This examples builds your deployment artifact, then deploys qa, then uat, then prod. Each step MUST succeed before it can proceed on to the next.
// Jenkinsfile
...
pipeline.startsWith(buildArtifact)
        .then(deployQa)
        .then(deployUat)
        .then(deployProd)
- The design of this library is influenced by the Builder Pattern - your pipeline has been configured, but hasn't been constructed just yet. Finalize and create your pipeline by calling the
build()method. This should only be done once - no code should come after calling this method.
// Jenkinsfile
...
        .build()
- From beginning to end, your Jenkinsfile should roughly look like this:
@Library('jenkinsfile-pipeline@<VERSION>') _

Jenkinsfile.init(this)

def pipeline = new ScriptedPipeline()
def buildArtifact = new BuildStage()
def deployQa = new DeployStage('qa')
def deployUat = new DeployStage('uat')
def deployProd = new DeployStage('prod')

pipeline.startsWith(buildArtifact)
        .then(deployQa)
        .then(deployUat)
        .then(deployProd)
        .build()
-
Load your project into Jenkins, and point it to your newly created Jenkinsfile.
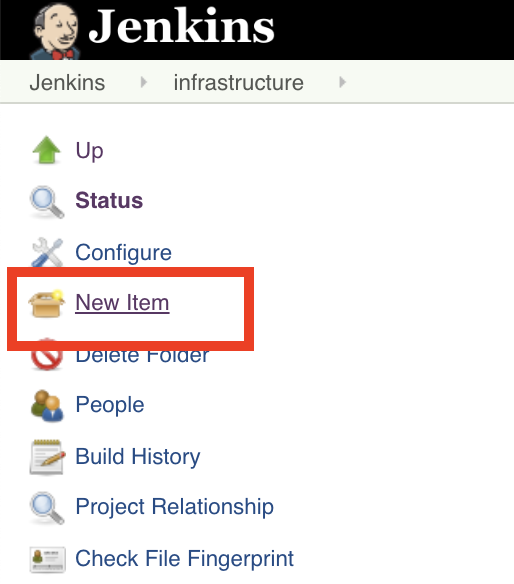
-
Create a new job using the 'New Item' menu
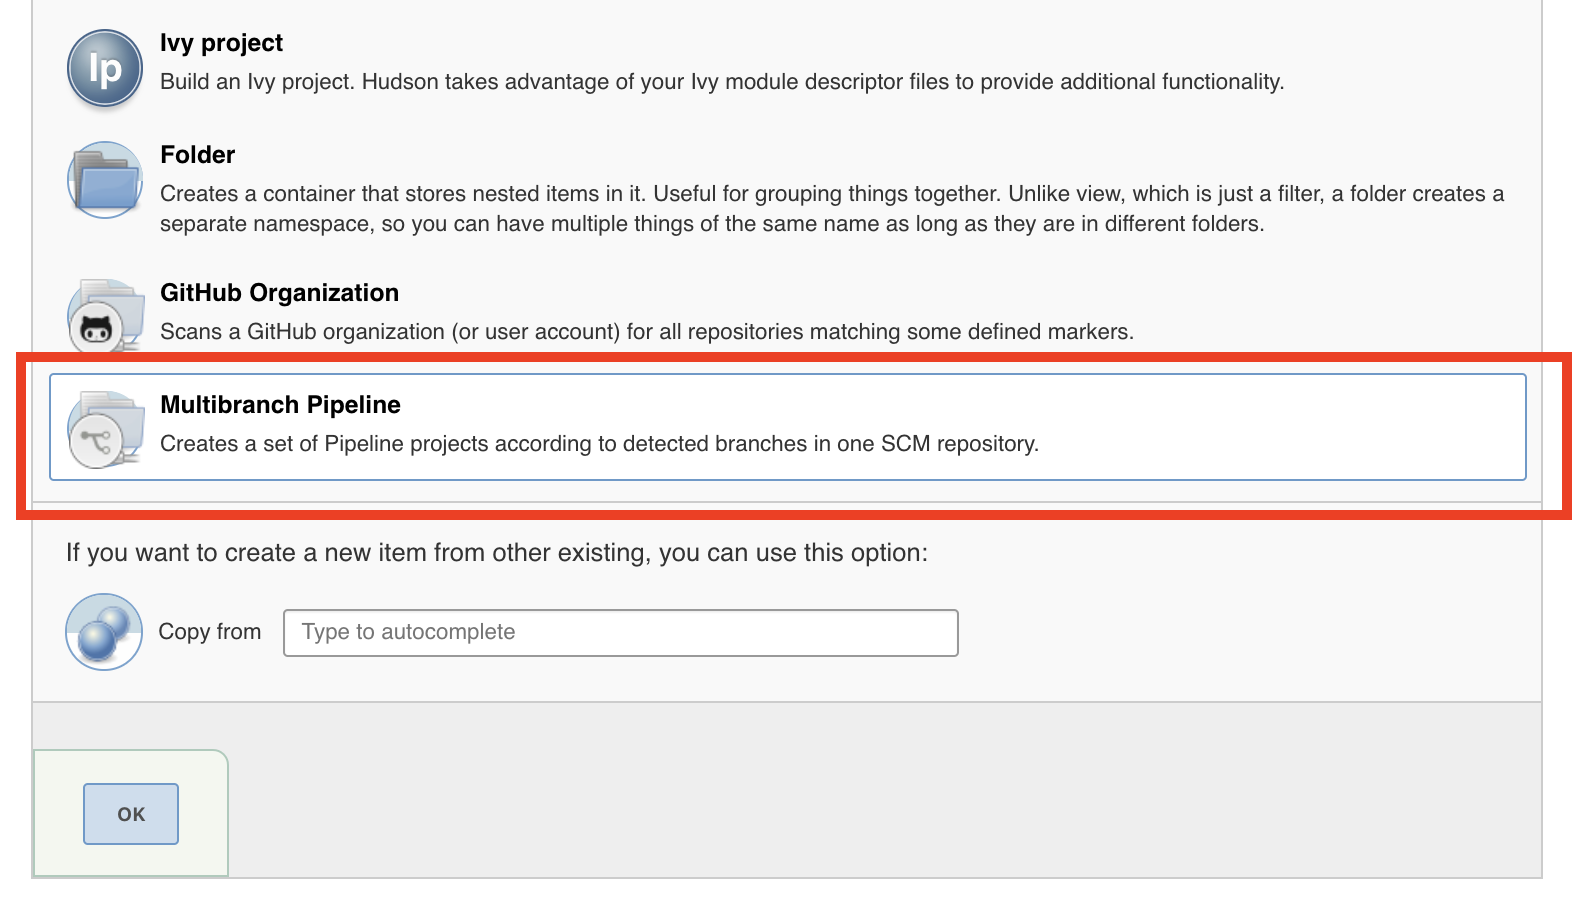
-
Select Multibranch Pipeline after naming your new job
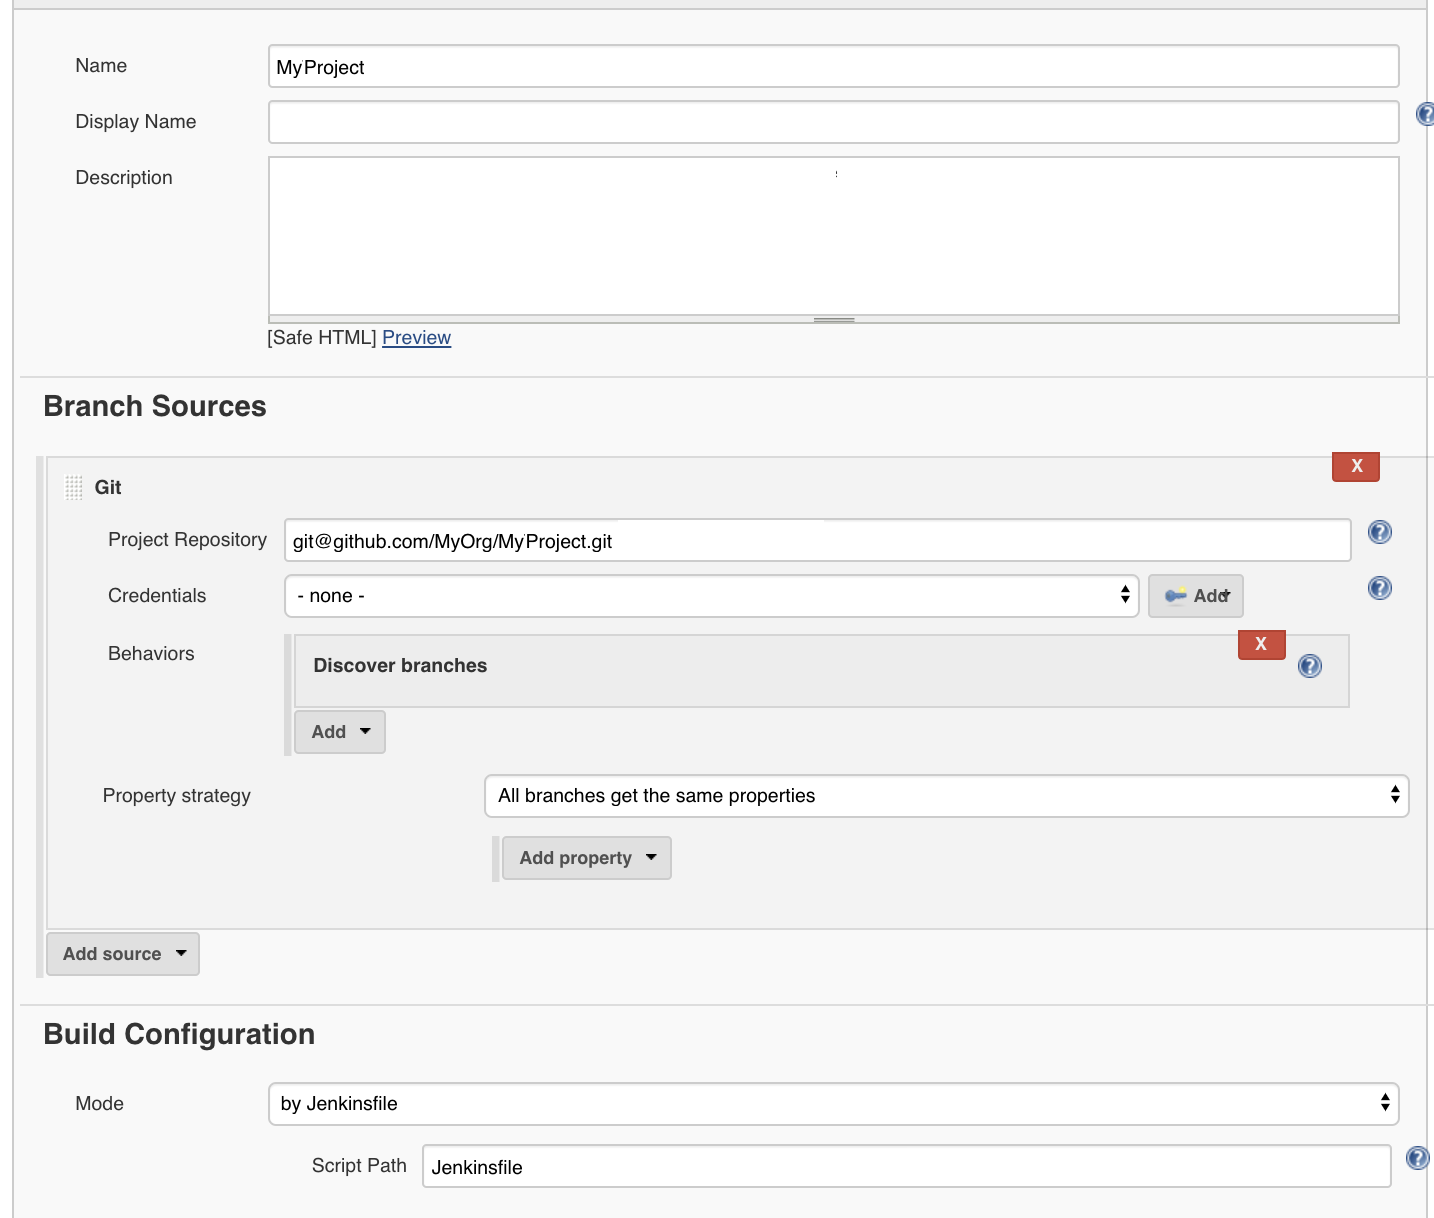
-
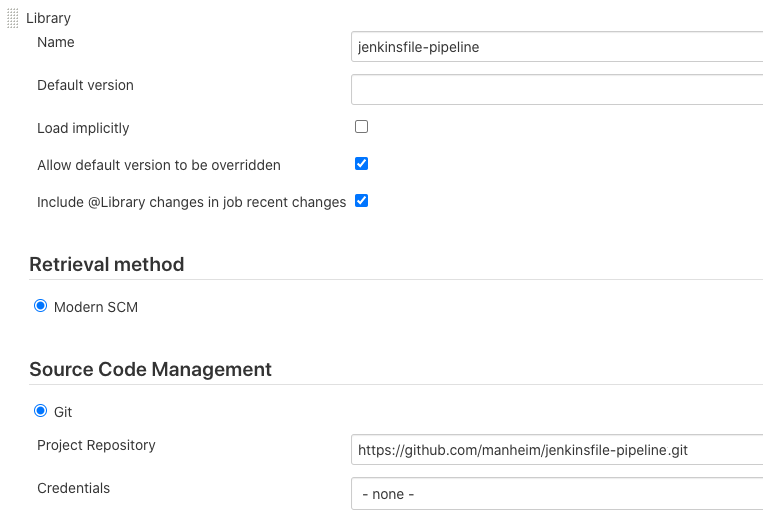
Configure your new job, and point it to the location of your source code.
-
-
If everything was successful, you should see something like this:


Control Where Your Jobs Are Run
By default, the pipeline jobs are not assigned to a particular Jenkins node. If you want to tie your pipeline to particular Jenkins node label, you can do so using the NodePlugin, which is enabled by default when you call Jenkinsfile.init(this)
NodePlugin.withLabel('myLabel')
Customizing Your Pipeline With Plugins
The example above gives you a bare-bones pipeline, and there may be Jenkinsfile features that you'd like to take advantage of. Some of these features have been pre-defined as Plugins for this library. Pre-defined plugins can be enabled by simply calling their static init() method.
Default Plugins
- ConfirmBeforeDeployPlugin: Wait for confirmation before deploying an environment
- DefaultEnvironmentPlugin: Provide an environment variable containing the DeployStage's environment.
- NodePlugin: Control where jobs are run
- ScmPlugin: Checkout the project's code
- StageDisplayPlugin: Wraps each Stage with Jenkinsfile DSL
stage
Build Artifact Management
- StashUnstashPlugin: Stash your artifact after BuildStage, and unstash it for each of your subsequent DeployStages.
Credentials and Configuration Management
- CredentialsPlugin: Inject Jenkins credentials into your stages.
- EnvironmentVariablePlugin: Add environment variables across your stages.
- ParameterStorePlugin: Inject environment variables from ParameterStore parameters.
IAM Role Management
- WithAwsPlugin: Use
withAwsto assume different IAM roles during deployment.
Workspace Management:
- DeleteDirPlugin: Optionally delete directories between runs
- DockerPlugin: Optionally run your pipeline on a Docker image
Plugin Order
Plugins often work by wrapping your stages in Jenkinfile DSL blocks. If multiple plugins wrap your stages simultaneously, the order in which they are wrapped can be very important. On the whole, jenkinsfile-pipeline strives to preserve and maintain the order you initialize the plugins, so that the corresponding Jenkinsfile DSL blocks execute predictably.
Take the following example:
ParameterStorePluginwraps your pipeline stages with the Jenkinsfile DSLwithAWSParameterStore { }and can inject environment variables into your stage from ParameterStore key/value pairs.WithAwsPluginwraps your pipeline stages with the Jenkinsfile DSLwithAws { }and can execute your stage under the context of an IAM role that's defined by an environment variable.- The two plugins can be used together - an IAM role can be defined in ParameterStore and translated to an environment variable
AWS_ROLE_ARN, and that environment variable can in turn be used to configure the IAM role assumed byWithAwsPlugin.
Using jenkinsfile-pipeline, you might initialize your pipeline as such:
// Wrap everything before this in withAWS { }
WithAwsPlugin.init()

// Wrap everything before this in withAWSParameterStore { }
ParameterStorePlugin.init()
The above would generate roughly the following Jenkinsfile DSL:
...

    // Set a key value pair in ParameterStore so that AWS_ROLE_ARN=<SomeArn>
    withAWSParameterStore {
        ...
        // Use AWS_ROLE_ARN which was set in ParameterStore
        withAWS(role: AWS_ROLE_ARN) {
            ...
        }
    }
...
The order in which the DSL was executed was determined the order that the jenkinsfile-pipeline plugins were initialized. Had the plugins been initialized in the reverse order, the Jenkinsfile DSL would likewise be reversed, and would lead to an undesirable outcome.
// Wrap everything before this in withAWSParameterStore { }
ParameterStoreBuildWrapperPlugin.init()

// Wrap everything before this in withAWS { }
WithAwsPlugin.init()
...

    // AWS_ROLE_ARN is not defined/null - withAWS does nothing
    withAWS(role: <?>) {
        ...
        // AWS_ROLE_ARN=<SomeArn> is now retrieved from ParameterStore, but it's too late - withAWS was already evaluated
        withAWSParameterStore {
            ...
        }
    }
...
DRY'ing your Plugin configuration
It's likely that you'll use a number of different Plugins for your particular application's pipeline. It's also likely that you'll have a number of different applications using jenkinsfile-pipeline, and many of these applications may share the same plugin configuration. Rather than duplicate and clutter your Jenkinsfile with these details, it may help to group all of your Plugin initialization into a single class, and share that class across your pipelines with a shared library.
- Create a new repository for the shared library. You can pick any name - in this example, we'll use
jenkinsfile-pipeline-customizations. - In that repository, create a new file called
Customizations.groovy. - Create a static
init()method in your class, and add your Plugin configuration there. In the example below, the Customization will enable theParameterStorePlugin, and theWithAwsPlugin.
// Customizations.groovy

class Customizations {
    public static void init() {
        ParameterStorePlugin.init()
        WithAwsPlugin.init()
    }
}
- Load your repository as a shared library (See: Using Libraries). Be sure to version your library, to maintain control over how changes propagate across your pipelines.
- Import your shared library, just like you imported jenkinsfile-pipeline.
- Call the
Customizations.init()method in your pipeline to initialize your plugins.
// Jenkinsfile
@Library('jenkinsfile-pipeline@<VERSION>', 'jenkinsfile-pipeline-customizations@<VERSION>') _

Customizations.init()
Jenkinsfile.init(this)

def pipeline = new ScriptedPipeline()
def buildArtifact = new BuildStage()
def deployQa = new DeployStage('qa')
def deployUat = new DeployStage('uat')
def deployProd = new DeployStage('prod')

pipeline.startsWith(buildArtifact)
        .then(deployQa)
        .then(deployUat)
        .then(deployProd)
        .build()
- Repeat Step 5-6 above for every project that you want to apply the same set of Plugins/Customizations to.
- If you have multiple groups of pipelines that require different groups of plugins, you can create multiple Customization libraries with unique names. Eg:
jenkinsfile-pipeline-lambda-customizations.
// Jenkinsfile
@Library('jenkinsfile-pipeline@<VERSION>', 'jenkinsfile-pipeline-lambda-customizations@<VERSION>') _

Customizations.init()
Jenkinsfile.init(this)

def pipeline = new ScriptedPipeline()
def buildArtifact = new BuildStage()
def deployQa = new DeployStage('qa')
def deployUat = new DeployStage('uat')
def deployProd = new DeployStage('prod')

pipeline.startsWith(buildArtifact)
        .then(deployQa)
        .then(deployUat)
        .then(deployProd)
        .build()
Scripted vs Declarative Pipelines (+Restart From Stage)
Jenkinsfile has a number of quirks, which in turn creates a number of frustrating short-comings. The most noticeable quirk is the two distinctive syntaxes for creating a pipeline:
Scripted Pipelines are much easier to work with, and offer a lot of flexibility and programmability. Declarative Pipelines on the otherhand, are much less flexible, but offer the really important feature known as 'Restart From Stage' - the ability to re-run portions of a previous pipeline run.
jenkinsfile-pipeline attempts to abstract away these two different types of pipelines, so that you can get the features that you want, without needing to write your pipeline code in a specific/arbitrary way.
You can convert to a DeclarativePipeline by instantiating it in place of a Scripted one.
def pipeline = new DeclarativePipeline()
A short-coming of Declarative Pipelines is the inability to use variables when defining Stage names (See: JENKINS-43820). The compromise made by terraform-pipeline is to name each of the top-level Stage names using consecutive numbers '1', '2', '3', etc. The following code:
// Jenkinsfile
@Library('jenkinsfile-pipeline@<VERSION>', 'jenkinsfile-pipeline-lambda-customizations@<VERSION>') _

Customizations.init()
Jenkinsfile.init(this)

def pipeline = new DeclarativePipeline()
def buildArtifact = new BuildStage()
def deployQa = new DeployStage('qa')
def deployUat = new DeployStage('uat')
def deployProd = new DeployStage('prod')

pipeline.startsWith(buildArtifact)
        .then(deployQa)
        .then(deployUat)
        .then(deployProd)
        .build()
will produce a Declarative Pipeline that looks like this:

When using the Restart from Stage feature, you'll need to map the numbered Stages to the Stages that you've defined in your Jenkinsfile. In this example, 1 = Build, 2 = Qa, 3 = Uat, 4 = Prod.

Mapping arbitrary numbers to your Stages can likely be annoying. If you want to give your Stages more meaningful names, you can override the underlying Declarative Pipeline template with your own, using the DeclarativePipeline.withPipelineTemplate() method, and a Customizations library (See: DRY'ing your Plugin Configuration).
As an example, we'll create a vars/CustomPipelineTemplate.groovy in our Customizations library, and define top-level Stages that match the Stages of our pipeline - build, deploy-qa, deploy-uat, and deploy-prod. In the example below, we'll use a global helper method findStageByName, which will search args for the Stage that matches the enclosing stage name. configureStage will do the magic-under-the-hood necessary create our stage using Jenkinsfile DSL.
// ./vars/CustomPipelineTemplate.groovy

def call(args) {
    pipeline {
        agent none
        options { preserveStashes() }

        stages {
            stage('build') {
                steps {
                    script {
                        configureStage(findStageByName(args))
                    }
                }
            }

            stage('deploy-qa') {
                steps {
                    script {
                        configureStage(findStageByName(args))
                    }
                }
            }

            stage('deploy-uat') {
                steps {
                    script {
                        configureStage(findStageByName(args))
                    }
                }
            }

            stage('deploy-prod') {
                steps {
                    script {
                        configureStage(findStageByName(args))
                    }
                }
            }
        }
    }
}
In your Jenkinsfile, override the default pipelineTemplate, and point it to your new pipeline template function. (This will automatically disable the StageDisplayPlugin, to prevent duplicate stages from appearing in our pipeline view).
Jenkinsfile.init(this)
DeclarativePipeline.withPipelineTemplate(this.CustomPipelineTemplate)

def pipeline = new DeclarativePipeline(this)
def buildArtifact = new BuildStage()
def deployQa = new DeployStage('qa')
def deployUat = new DeployStage('uat')
def deployProd = new DeployStage('prod')

pipeline.startsWith(buildArtifact)
        .then(deployQa)
        .then(deployUat)
        .then(deployProd)
        .build()
This will generate a new Declarative Pipeline, using your custom template.

Restart from Stage will now display more sensible names.

Goals that this library is trying to achieve:
- Application code should be written once, and should be reusable for all environments.
- Configuration, especially environment-specific configuration, should be externalized. Where it's externalized to should be irrelevant.
- As much as possible, a pipeline should reflect what teams do to get from Code to Customer - no more, but also no less.
- Allow teams to specify their own steps in that process, and teams should choose how those steps are linked together.
- This is an OpenSource project - defaults should make reasonable sense for anyone that happens to use this project.
- Apply the Open/Closed Principle
- You should rarely need to change the base code, everything should be open for extension without modification to the base code.
- It should be possible to add behaviors through Plugins and Decorations - this makes behavior addable/removable/extenable.
- Think of plugins as interchangeable Lego pieces - you can swap one piece out for another, without fundamentally altering what it is to be a Pipeline.