Welcome to the GitHub repository containing all the code/files you'll need in order to start a new Local EA site! You can see an example of what it'll look like at https://rtcharity.github.io/lean-site-template/.
To get a shiny new site for your local EA chapter, follow the instructions below or see the video tutorials on YouTube.
(NOTE: The "home" buttons on the demo site do not work because a proper domain name has not been set up for it. Once you direct a domain name like "eamycity.org" to your site, you will not have this problem)
Deployment & Setting Up Your Domain Name
Developing/Customizing the Site Generator
- First, create a free GitHub account.
- After you've signed back into GitHub with your account, go to the top of this page and hit the 'Fork' button at the top-right of the page. Forking will create a copy of this repository of code that you can work with in your GitHub account. Once the copy has been made, GitHub should automatically redirect you to your copy at https://www.github.com/YOUR-USERNAME/lean-site-template.

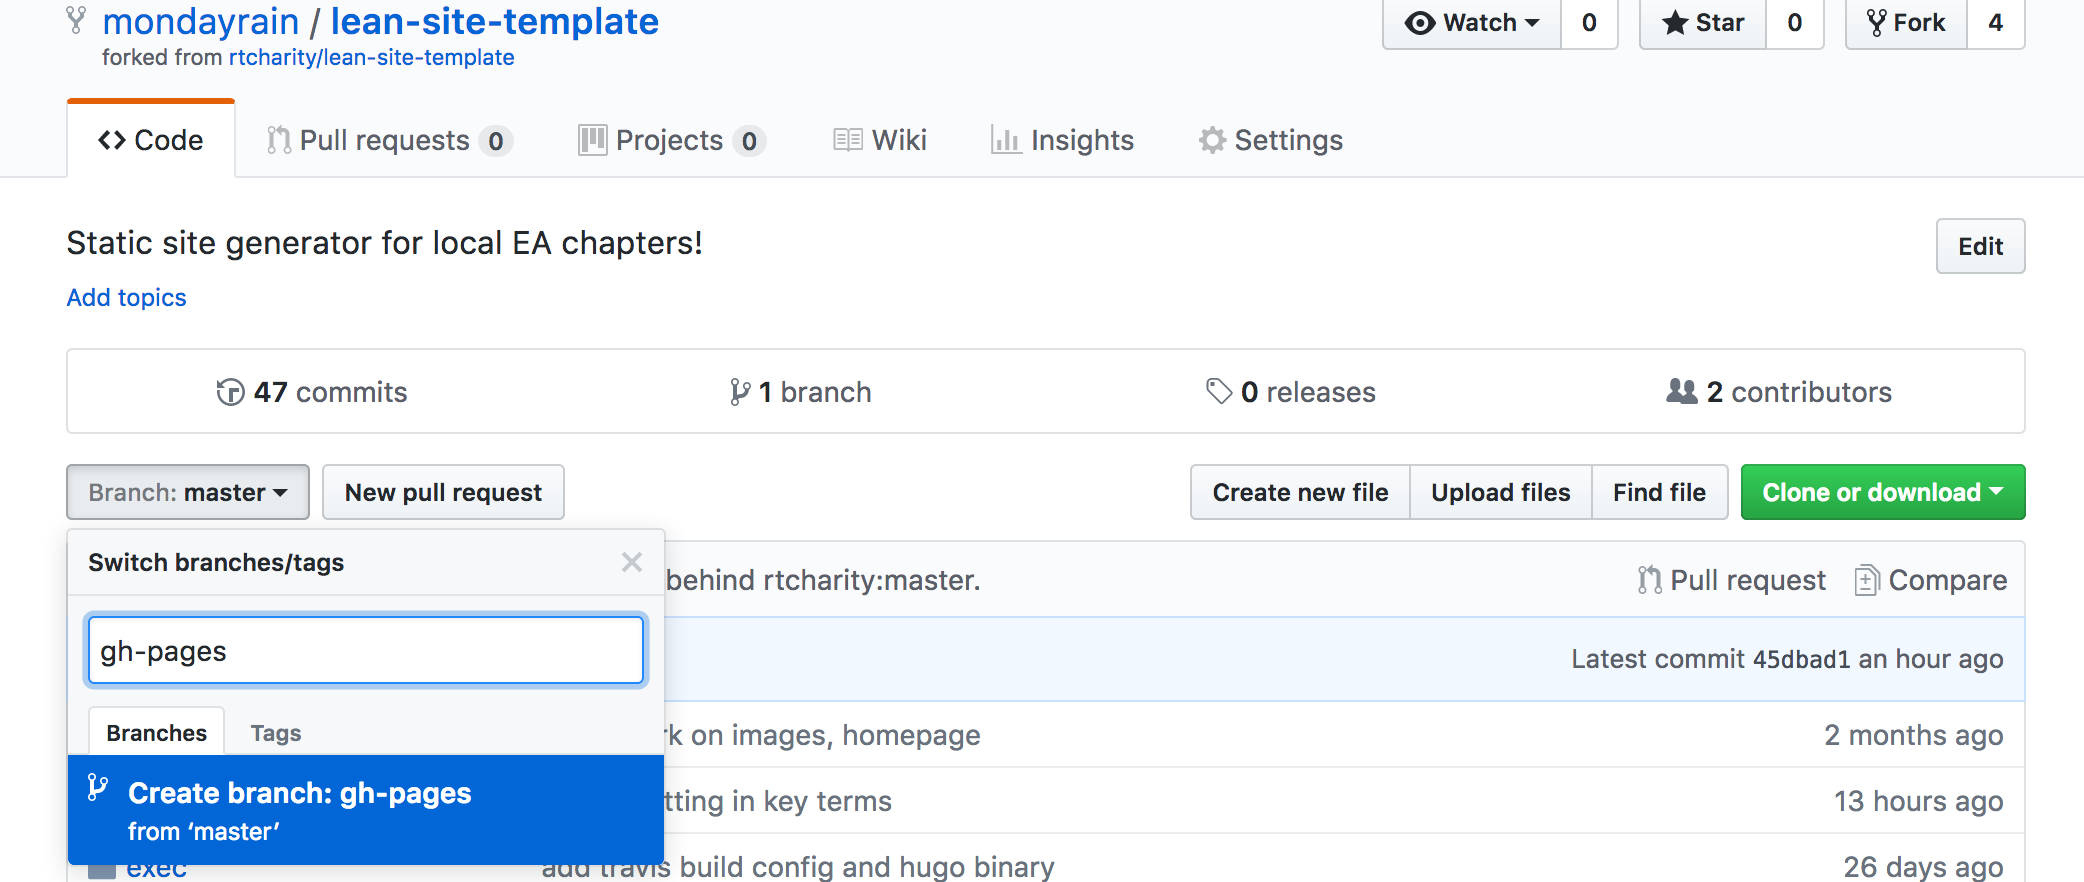
- Once at your forked copy of the code on Github, click on "Branch: master". A field should appear; type in gh-pages and then click "Create branch: gh-pages".
- Go to https://github.com/settings/tokens and hit "Generate new token". Fill in Token description with "Travis deployment" and check the "Repo" checkbox. Then scroll down and hit the green "Generate token" button.

- Copy the token in the green bar into your clipboard, or into a text file. You'll need it later!

- Go to travis-ci.org/ and sign in with your GitHub account.
- Once Travis has "synced" all your repositories from GitHub, you should be able to see the "lean-site-template" on your Travis dashboard. Click on the "X" beside the repository name, and it should turn into a checkmark.
- Click on the little gear next to the checkmark; this should take you to the settings page.
- Scroll down to "Environment Variables". Enter GITHUB_TOKEN into the Name field and paste the token you copied before into the Value field. Then hit "Add".

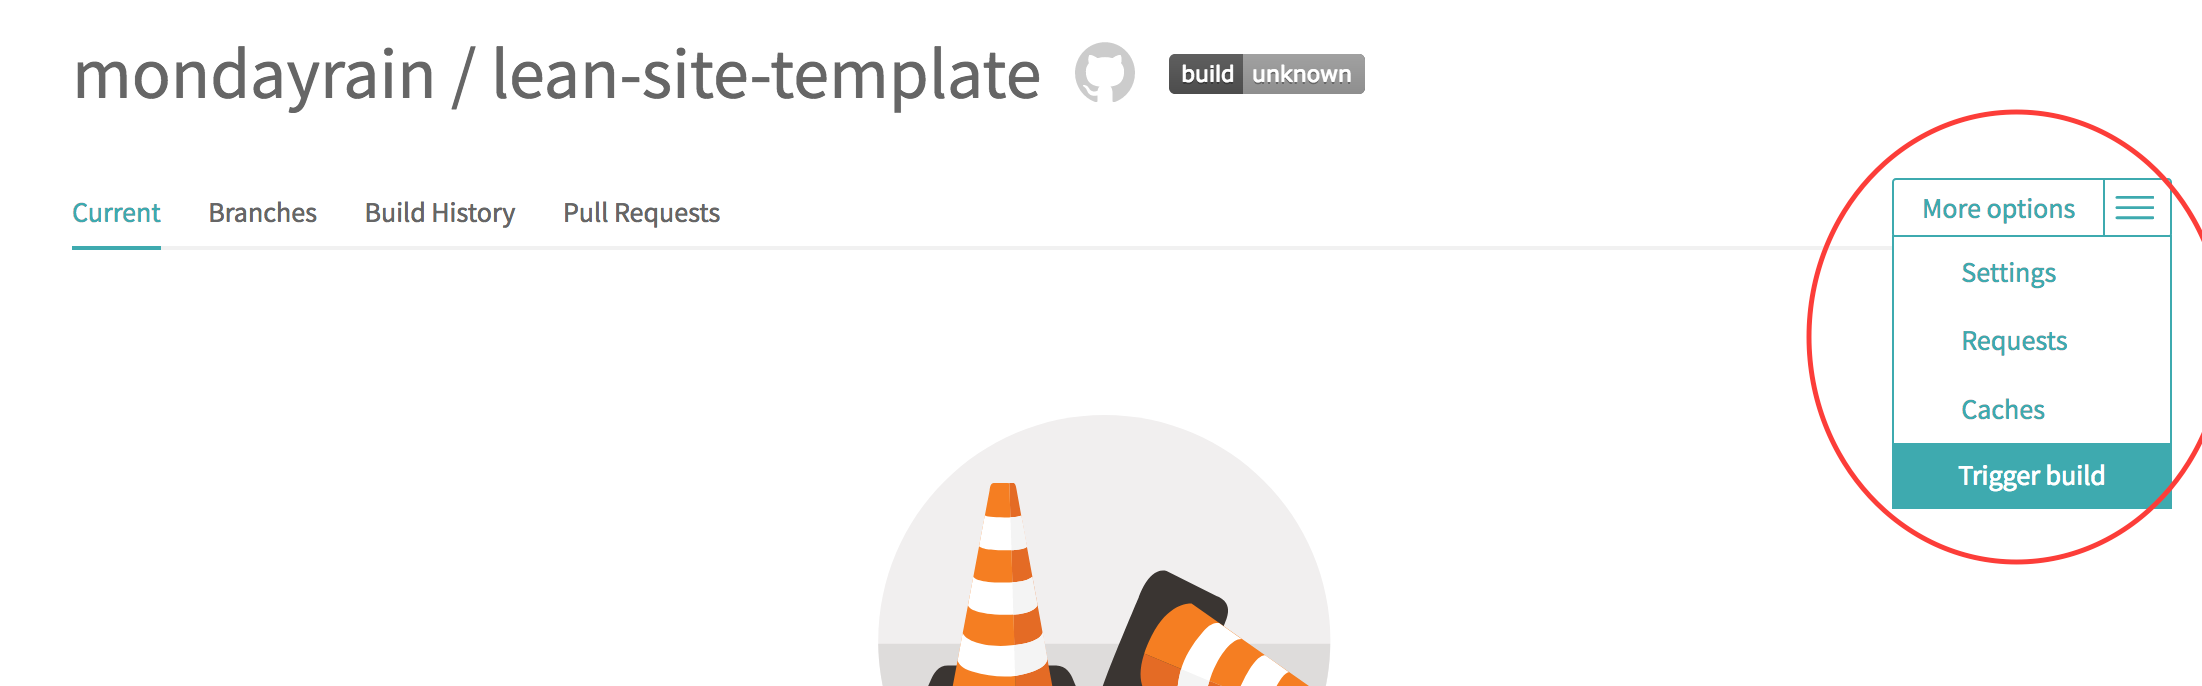
- Last step! Scroll back up to the top of the page and click on the "More options" button on the right, then hit "Trigger build" and "Trigger custom build" on the popup.
At this point, you should be able to see a live version of your site at https://YOUR-USERNAME.github.io/lean-site-template/.
NOTE: Because we haven't correctly set the base URL yet, the photos may be broken and the layout won't display properly. The "Home" button may also be broken. If this is the case, no worries: we'll fix this quickly in the next section. The important thing here is to make sure that things were set up properly and that we have a way to see the site as we change it.
Most of the text values are placeholder values for now. As we customize the values in the next section, you should be able to see the changes take place immediately.
The static site comes with default values (e.g. site title, your EA group name, page content, etc) that need to be changed for your group. These values are held in one of two places:
- The
config.tomlconfiguration file, which holds config such as your site name, your contact email, your Facebook/Twitter/Meetup URLs, what languages you support, what the navigation bar text is, and so on. - The markdown (
.md) files inside thecontentfolder. These files hold all the written copy for your pages. For example, if you want to change the information on the "Reading Materials" page, you would go tocontent/reading-materials.mdand change the writing in there.
In the next few sections we'll step through changing both the config.toml and .md files in order to customize your site.
Go to the repo that you forked on GitHub (the link should be www.github.com/YOUR-USERNAME/lean-site-template) and click on the config.toml file. This is the file that contains your site title, button names, navigation bar text, and so on. There are reasonable defaults for English, but there will be certain things you'll need to change such as the title, contactEmail, and so forth.
To change the file, hit the pencil icon near the top-right of the page.
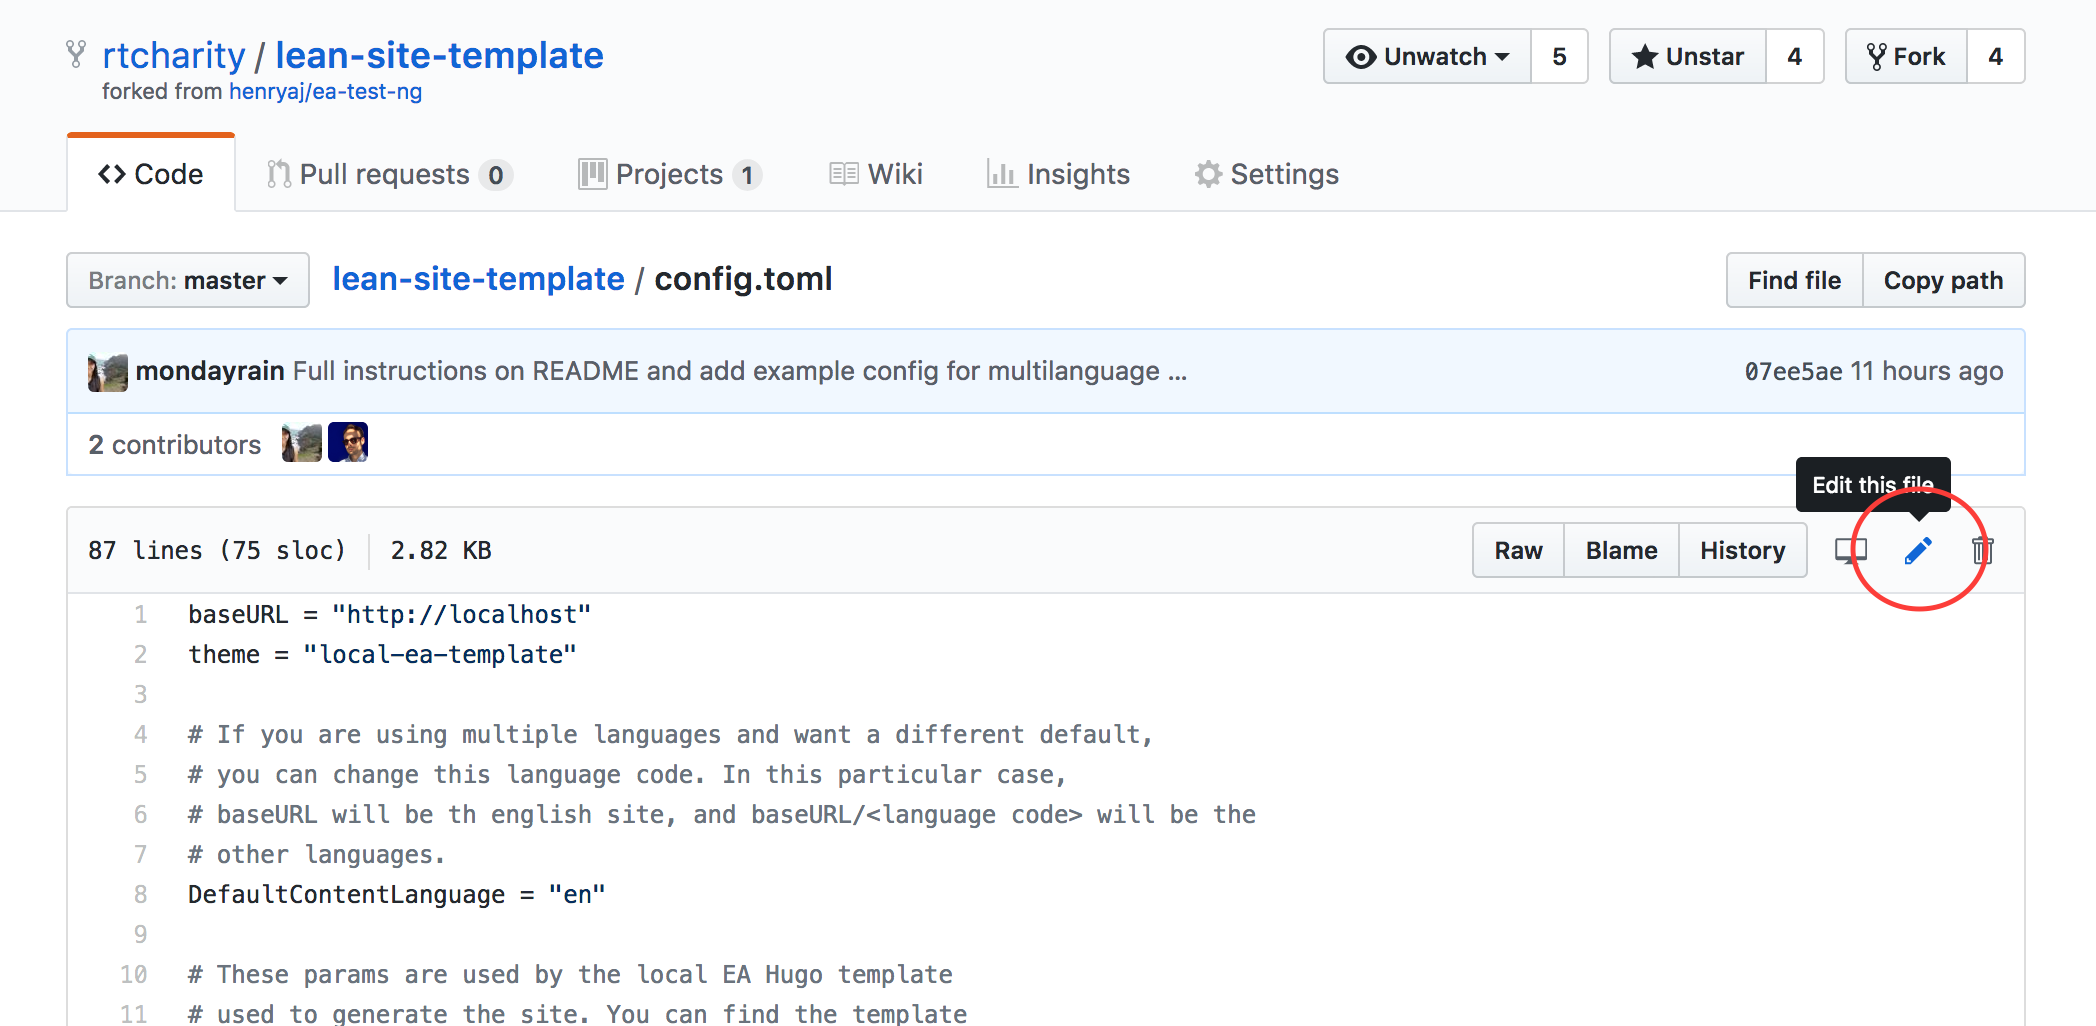
The first thing you'll need to do is to enter the correct value for "baseURL", so that the live site will display properly. Make sure you do this! You should change the value "https://YOUR-USERNAME.github.io/lean-site-template/". Don't forget the trailing slash!

Once you've done that, you can change the rest of the placeholder values to whatever applies to your group. If you need an example to follow, see the example config.toml file as a guide. If you need multilanguage support, be sure to read the Multilanguage Support section below.
When you're done, commit your changes (the big green button at the bottom of the edit page). ‘Commit’ is the equivalent of ‘apply’ or ‘save’ in GitHub terms. As a reminder, you should be able to see your changes live at https://YOUR-USERNAME.github.io/lean-site-template/ within a couple minutes of each commit.
All the written copy for the site is held in the "content" folder. If you go back to the index of your forked repository, and click on it, you should see a bunch of files such as _footer-left.md, contact.md, reading-material.md and so forth. Feel free to explore and change the content as you please.
Most of the files are pretty self-explanatory by their name or content. However, a few to note:
_footer-left.md- This holds the content that shows up on the left-side of the footer that appears on every page. By default it holds "More on EA" links._footer-right.md- This holds the content that shows up on the left-side of the footer that appears on every page. By default it holds "Useful links", but EA Dubai and EA NYU etc have used this section to instead link to pages more specific to their group. Perhaps you may want to as well._index.md- This file is not used at all at the time being so feel free to ignore it.contact.md- This file needs to exist for in order for the contact page to be created, but the contents in it are not used at all. Feel free to ignore it.homepage- This folder contains the text that gets created on the front page, under the homepage section headers (that you can define inconfig.toml). If you change a homepage section header (e.g.firstSectionHeader) inconfig.toml, you'll probably want to change the content in a homepage .md file as well.
Please note that the .md files used here use Github-flavoured markdown for formatting. Markdown is a simple code for making stylistic changes to the content of your webpage. If you're not familiar with it, this awesome Markdown Cheatsheet should help.
The site uses default banner photos. You can find the photos used in the static/img folder of this repository.
If you want to replace a banner photo (for example, the banner photo under "Who are we?" is usually of your city), just make sure that the name of the photo stays the same, since the site generator depends on the name of the file in order to display the picture.
You can do the following to replace a banner photo:
- Go to the
static/imgfolder. - Click on the photo file you want to replace, and click on the trash can button on the top-right to delete it.
- Once its been deleted, go back to the
static/imgfolder and click "Upload files" - Choose the photo you want to use as the new banner. Make sure you name it the same thing as the file you deleted.
Please remember that large image files can slow down your website and potentially cause other problems. We recommend using image files no larger than 5mb. If you have an image that is too large, you can easily and freely resize it using websites such as https://imgur.com/ or https://pixlr.com/express/. If you are a Mac user, the ‘Preview’ application in OSX will also allow you to resize your images.
Please also remember to pay attention to copyright permissions for images that you choose. An easy way to find free images is to search for images with creative commons licenses on https://commons.wikimedia.org/wiki/Main_Page or to use content from https://unsplash.com/.
Deployment is the step where your content goes live and your site becomes accessible to the public on the Internet.
- If you correctly set up your forked repo on Travis, any commit (change) to a file will trigger a 'build' on Travis – that is, Travis will turn your config and the site template into nice HTML file (set of instructions to a browser to display your content how you want it) to be served up.
- It's time to hook up a domain to the site! Contact the tech team at tech [at] rtcharity.org and provide a) The domain name you want to use, if you have one in mind, and b) the link to your GitHub repository.
- Once the domain is set up (this may take a few days), go to the file called
CNAMEand add your domain in one single line without any slashes or https (e.g. mydomain.com). Example: https://github.com/Martin-Riekert/lean-site-template/blob/master/CNAME - Now go to
config.tomland change the baseURL value to whatever your new domain is, with a trailing slash and the https (e.g. https://mydomain.com/). It is important to use https instead of http. Once you save this change and Travis has finished building your site, you should be able to access your site through the new domain name. - If you run into any trouble during this process, first go to 'Settings' > 'Collaborators & teams' and add 'jpzg' as well as 'michaltrzesimiech' as collaborators with 'Write' privileges. Then email tech [at] rtcharity.org with a description of your issues.
Note: at this point, all the links on your site should work (the Home button was, for example, broken because we had a weird GitHub baseURL). Multilanguage support should also work once the domain name is set up. If not, feel free to reach out to us.
The site uses Formspree in order to forward Contact messages from the site to the contactEmail you define in config.toml. However, before they'll forward messages for you, you will need to confirm your email.
You don't actually need to do anything ahead of time; the first time somebody sends a message through your contact form, Formspree will send an email to you asking you to confirm your email.

Once you've confirmed your email, Formspree will forward all messages entered into the contact form to your email.

Remember that if you would like an official EA email address for privacy reasons, LEAN can set this up for you if we have not already. Email Richenda at richenda [at] rtcharity.org
Note: If you don't want to wait for somebody to send you a message in order to set up your contact form, you can submit a test message into the contact form yourself.
This will only work if you have already set up your domain name!
Your site can support as many languages as you want. For each language you want to support, 2 things will need to be done:
- You'll need to add the appropriate sections to
config.toml. Basically what you'll need to do is duplicate everything from[Languages.en]onwards, but change the language code fromento whatever language you want to use. All you'll have to do then is fill in the parameter values as needed for that given language. See example-config.toml for an exampleconfig.tomlthat supports both English and German, withdebeing the German language code. - You'll have to create .md versions of every file inside the
contentandcontent/homepagefolders and populate them with translated copy as needed. This is the text that will be shown on the site for that language. For example, if I want to add German language support (and gave German thedecode inconfig.toml), then I would have to create_footer-left.de.md,faq.de.md,homepage/_first_section_text.de.mdand so on. You can create a file by going into thecontentfolder then clicking "Create new file" at the top-right. Make sure you get the name of the .md files right! Aside from the extra language code, they must be the same as the English version! If the site can't find the correct translation file based on the filename, it will just fall back on the English copy.
The URLS for translated content will always be www.your-domain.com/language-code/url. So, the German version of www.your-domain.com/about will be found at www.your-domain.com/de/about.
To see an example site structure with multilingual support, see this Hugo multilingual example or the official Hugo documentation on Multilingual Mode.
If this site generator is too inflexible for you and you would like to develop the site generator further, here are a few pointers to get you started.
Please note that we do not have the resources to teach individual folks how to develop the site generator. If the resources/notes below are not enough, please consider simply using the site as it comes.
- The site generator is built on Hugo, an open-source static site generator written in Go. They have great written documentation, as well as a Youtube playlist of tutorial screencasts to get you started.
- The site is split into 2 parts: the custom LEAN Hugo theme, and the actual site generator/template (this repo) which uses the theme. The template references the theme as a git submodule. When you clone the
lean-site-templategenerator, you'll need to rungit submodule update --init --recursivein order to initialize the theme submodule. - This repository contains all the config, written content, and static images; the theme repo contains all of the HTML and CSS for the site.
- The site generator is tied to a specific commit of the theme. Therefore, if you ever push an update the theme, you will need to also update this repo to point to the new theme commit. Otherwise, the site generator will keep using the older version of the theme.
git submodule update --init --recursiveshould always pull the latest version of the theme, so all you need to do is run that and then commit the changes to git.
The 1.0 version of this site generator was built by @henryaj & @mondayrain.
Additional thanks to those in the LEAN network for proofreading and editing!