


Porcupine is a self-service, highly-accurate, and lightweight wake word detection engine. It enables developers to build always-listening voice-enabled applications/platforms. Porcupine is
- self-service. Developers are empowered to choose any wake word and build its model within seconds.
- using deep neural networks trained in real-world situations (i.e. noise and reverberation).
- compact and computationally-efficient making it suitable for IoT applications.
- cross platform. It is implemented in pure ANSI C. Currently Raspberry Pi, Android, iOS, watchOS, Linux, Mac, and Windows are supported.
- scalable. It can detect tens of wake-words concurrently with virtually no added CPU/memory footprint.
- open-source. Anything you find in this repository is Apache 2.0 licensed.
- Try It Out
- Getting Started
- Performance
- Structure of Repository
- Running Demo Applications
- Creating Keyword Files
- Integration
- Contributing
- Tools used
- Releases
- License
Try out Porcupine by downloading it's Android demo application. The demo application allows you to test Porcupine on a variety of wake words in any environment.

A scientific comparison between accuracy of Porcupine and two other widely-used libraries, PocketSphinx and Snowboy, is provided here. Below is miss rate measurements for different engines given a fixed false alarm rate in noisy conditions. It can be seen that Porcupine achieves much lower miss rate for any given false alarm rate.

Porcupine is lightweight. It uses less than 1.4 MB of RAM. On a Raspberry Pi 3, it uses less than 7% of one of the CPU cores. The tiny model uses 2% of one of the CPU cores and less than 200 KB of RAM.
Porcupine is shipped as an ANSI C precompiled library. The binary files for supported platforms are located under lib/ and header files are at include/. Currently, Raspberry Pi, Android, iOS, watchOS, Linux, Mac, and Windows are supported. If you wish to run Porcupine on any other platform, please contact us at contact@picovoice.ai.
Bindings are available at binding/ to facilitate usage from higher-level languages/platforms. Demo applications are at demo/. When possible, use one of the demo applications as a starting point for your own implementation.
tools/ contains utility programs. Finally, resources/ is a placeholder for data used by various applications within the repository.
Below is a quick walk-through of the repository. For detailed instructions please visit relevant pages. Throughout the documentation it is assumed that the current working directory is the root of repository.
This demo application allows testing Porcupine using computer's microphone. It opens an input audio
stream, monitors it using Porcupine's library, and logs the detection events into the console. Below is an
example of running the demo for hotword Alexa from the command line. Replace ${SYSTEM} with the name of
the operating system on your machine (e.g. linux or mac).
python demo/python/porcupine_demo.py --keyword_file_paths resources/keyword_files/alexa_${SYSTEM}.ppnUsing Android Studio open demo/android as an Android project and then run the application. Note that you need an android phone with developer options enabled connected to your machine in order to run the application.
Using Xcode open demo/ios and run the application. Note that you need an iOS device connected to your machine and a valid Apple developer account.
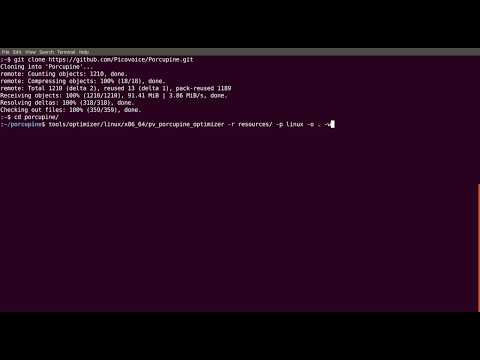
Porcupine enables developers to build models for any wake word. This is done using Porcupine's optimizer utility. It finds optimal model hyper-parameters for a given hotword and stores these parameters in a, so-called, keyword file. You could create your own keyword file using the Porcupine's optimizer from the command line
tools/optimizer/${SYSTEM}/${MACHINE}/pv_porcupine_optimizer -r resources/ -w ${WAKE_WORD} \
-p ${TARGET_SYSTEM} -o ${OUTPUT_DIRECTORY}
In the above example replace ${SYSTEM} and ${TARGET_SYSTEM} with current and target (runtime) operating
systems (linux, mac, or windows). ${MACHINE} is the CPU architecture of current machine (x86_64 or i386). ${WAKE_WORD}
is the chosen wake word. Finally, ${OUTPUT_DIRECTORY} is the output directory where keyword file will be stored.
Below are code snippets showcasing how Porcupine can be integrated into different applications.
Porcupine is implemented in ANSI C and therefore can be directly linked to C applications. include/pv_porcupine.h and include/picovoice.h header files contain relevant information. An instance of Porcupine object can be constructed as follows
const char *model_file_path = ... // The file is available at lib/common/porcupine_params.pv
const char *keyword_file_path = ...
const float sensitivity = 0.5;
pv_porcupine_object_t *handle;

const pv_status_t status = pv_porcupine_init(model_file_path, keyword_file_path, sensitivity, &handle);

if (status != PV_STATUS_SUCCESS) {
    // error handling logic
}
Sensitivity is the parameter that enables developers to trade miss rate for false alarm. It is a floating number within [0, 1]. A higher sensitivity reduces miss rate at cost of increased false alarm rate.
Now the handle can be used to monitor incoming audio stream. Porcupine accepts single channel, 16-bit PCM audio.
The sample rate can be retrieve using pv_sample_rate(). Finally, Porcupine accepts input audio in consecutive chunks
(aka frames) the length of each frame can be retrieved using pv_porcupine_frame_length()
extern const int16_t *get_next_audio_frame(void);

while (true) {
    const int16_t *pcm = get_next_audio_frame();
    bool result;
    const pv_status_t status = pv_porcupine_process(handle, pcm, &result);
    if (status != PV_STATUS_SUCCESS) {
        // error handling logic
    }
    if (result) {
        // detection event logic/callback
    }
}
Finally, when done be sure to release resources acquired.
pv_porcupine_delete(handle);/binding/python/porcupine.py provides Python binding for Porcupine library. Below is a quick demonstration of how to construct an instance of it to detect multiple keywords concurrently.
library_path = ... # Path to Porcupine's C library available under lib/${SYSTEM}/${MACHINE}/
model_file_path = ... # It is available at lib/common/porcupine_params.pv
keyword_file_paths = ['path/to/keyword/1', 'path/to/keyword/2', ...]
sensitivities = [0.5, 0.4, ...]
handle = Porcupine(library_path, model_file_path, keyword_file_paths=keyword_file_paths, sensitivities=sensitivities)
Sensitivity is the parameter that enables developers to trade miss rate for false alarm. It is a floating number within [0, 1]. A higher sensitivity reduces miss rate at cost of increased false alarm rate.
When initialized, valid sample rate can be obtained using handle.sample_rate. Expected frame length
(number of audio samples in an input array) is handle.frame_length. The object can be used to monitor
incoming audio as below
def get_next_audio_frame():
    pass

while True:
    pcm = get_next_audio_frame()
    keyword_index = handle.process(pcm)
    if keyword_index >= 0:
        # detection event logic/callback
        pass
Finally, when done be sure to explicitly release the resources as the binding class does not rely on the garbage collector
handle.delete()There are two possibilities for integrating Porcupine into your Android's application.
Porcupine provides a binding for Android using JNI. It can be initialized using
    final String modelFilePath = ... // It is available at lib/common/porcupine_params.pv
    final String keywordFilePath = ...
    final float sensitivity = 0.5f;

    Porcupine porcupine = new Porcupine(modelFilePath, keywordFilePath, sensitivity);
Sensitivity is the parameter that enables developers to trade miss rate for false alarm. It is a floating number within [0, 1]. A higher sensitivity reduces miss rate at cost of increased false alarm rate.
Once initialized, porcupine can be used to monitor incoming audio
    private short[] getNextAudioFrame();

    while (true) {
        final boolean result = porcupine.process(getNextAudioFrame());
        if (result) {
            // detection event logic/callback
        }
    }
Finally, be sure to explicitly release resources acquired by porcupine as the class does not rely on the garbage collector for releasing native resources.
porcupine.delete();Android demo application provides a high-level API for integrating Porcupine into Android applications. The PorcupineManager class manages all activities related to creating an input audio stream, feeding it into Porcupine's library, and invoking a user-provided detection callback. The class can be initialized as below
    final String modelFilePath = ... // It is available at lib/common/porcupine_params.pv
    final String keywordFilePath = ...
    final float sensitivity = 0.5f;

    PorcupineManager manager = new PorcupineManager(
            modelFilePath,
            keywordFilePath,
            sensitivity,
            new KeywordCallback() {
                @Override
                public void run() {
                    // detection event logic/callback
                }
            });
Sensitivity is the parameter that enables developers to trade miss rate for false alarm. It is a floating number within [0, 1]. A higher sensitivity reduces miss rate at cost of increased false alarm rate.
When initialized, input audio can be monitored using manager.start() . When done be sure to stop the manager using
manager.stop().
There are two approaches for integrating Porcupine into an iOS application.
Porcupine is shipped as a precompiled ANSI C library can directly be used in Swift using module maps. It can be initialized to detect multiple wake words concurrently using
let modelFilePath: String = ... // It is available at lib/common/porcupine_params.pv
let keywordFilePaths: [String] = ["path/to/keyword/1", "path/to/keyword/2", ...]
let sensitivities: [Float] = [0.3, 0.7, ...];
var handle: OpaquePointer?

let status = pv_porcupine_multiple_keywords_init(
    modelFilePath,
    keywordFilePaths.map{ UnsafePointer(strdup($0)) },
    sensitivities,
    &handle)
if status != PV_STATUS_SUCCESS {
    // error handling logic
}
Then handle can be used to monitor incoming audio stream
func getNextAudioFrame() -> UnsafeMutablePointer<Int16> {
    //
}

while true {
    let pcm = getNextAudioFrame()
    var keyword_index: Int32 = -1

    let status = pv_porcupine_process(handle, pcm, &keyword_index)
    if status != PV_STATUS_SUCCESS {
        // error handling logic
    }
    if keyword_index >= 0 {
        // detection event logic/callback
    }
}
When done release the resources via
pv_porcupine_delete(handle)PorcupineManager class manages all activities related to creating an input audio stream, feeding it into Porcupine's library, and invoking a user-provided detection callback. The class can be initialized as below
let modelFilePath: String = ... // It is available at lib/common/porcupine_params.pv
let keywordFilePaths: [String] = ["path/to/keyword/1", "path/to/keyword/2", ...]
let sensitivities: [Float] = [0.3, 0.7, ...];
let keywordCallback: ((Int32) -> Void) = {
    // detection event callback
}

let manager = PorcupineManager(
    modelFilePath: modelFilePath,
    keywordFilePaths: keywordFilePaths,
    sensitivities: sensitivities,
    keywordCallback: keywordCallback)
When initialized, input audio can be monitored using manager.start(). When done be sure to stop the manager using
manager.stop().
If you like to contribute to Porcupine, please read through CONTRIBUTING.md.
- Thank you @veeableful for adding C++ QT demo.
- Thank you @fquirin for adding non-blocking Python demo.
- Thank you @dyah10 for adding watchOS binding and demo application.
MXNet is used for training DNNs.
- Added tiny model for deeply embedded platforms.
- Improved model's accuracy.
- Runtime optimization and bug fixes.
- Runtime optimization across platforms.
- Added support for watchOS.
Added multiple wake-word detection capability. Porcupine can now detect multiple wake words with virtually no added CPU/memory footprint.
Initial release.
Anything you find in this repository is licensed under Apache 2.0. This allows running the library on all supported platforms. Furthermore, custom wake-words can be generated for Linux, Mac, and Windows. Custom wake-words for other platforms are provided with the purchase of commercial license. In order to purchase a commercial license contact contact@picovoice.ai.