Welcome to the xeokit SDK - a flexible and powerful tool for creating stunning visualizations of AECO models in your browser.
Built with TypeScript, xeokit offers lightning-fast loading and rendering of even the most complex models, while using minimal system resources.
The scene graph works seamlessly on both browser and NodeJS platforms, allowing you to create, convert and provide content for the model viewer.
Benefit from built-in support for multiple canvases, utility libraries with complete documentation, and the ability to import/export models as industry-standard AECO file formats. Collaborate with other BIM software via BCF Viewpoints and bring your AECO models to life with xeokit.
Work in progress;
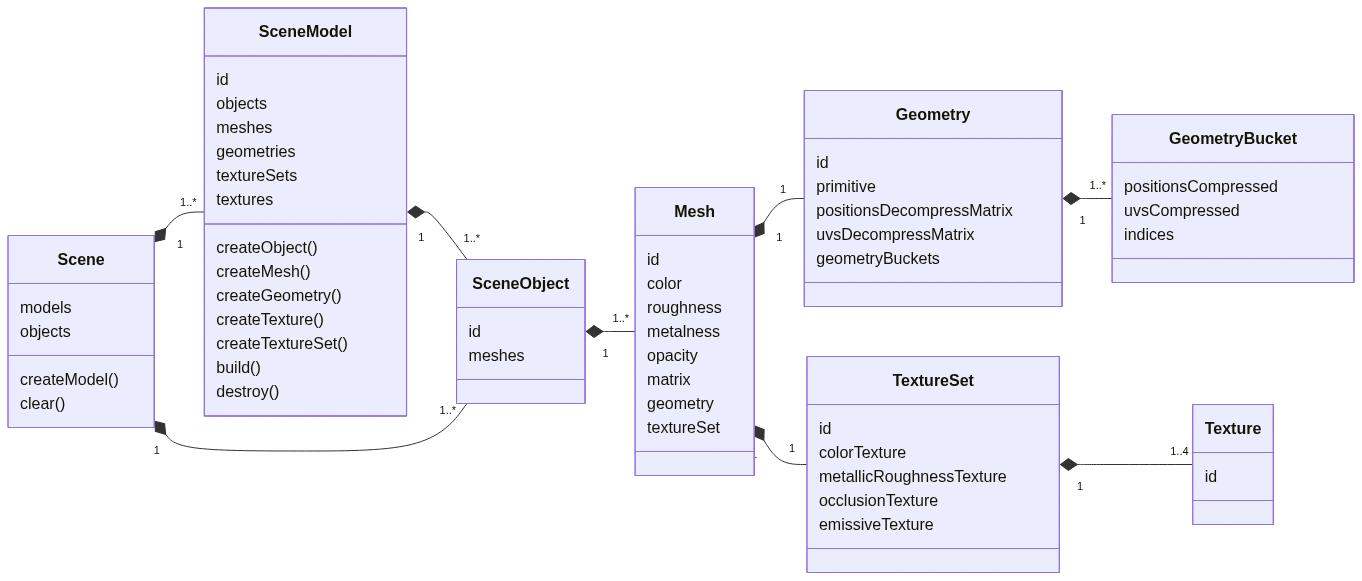
The SDK represents models in a scene graph that include the model's objects, geometries, and materials. This scene graph works on both the browser and NodeJS platforms and can be used to create models, convert between model formats, and provide content for the SDK's model viewer.
| Package | Modules | Description |
|---|---|---|
@xeokit/scene |
@xeokit/scene |
Scene graph that contains model representations (geometries, materials etc.) |
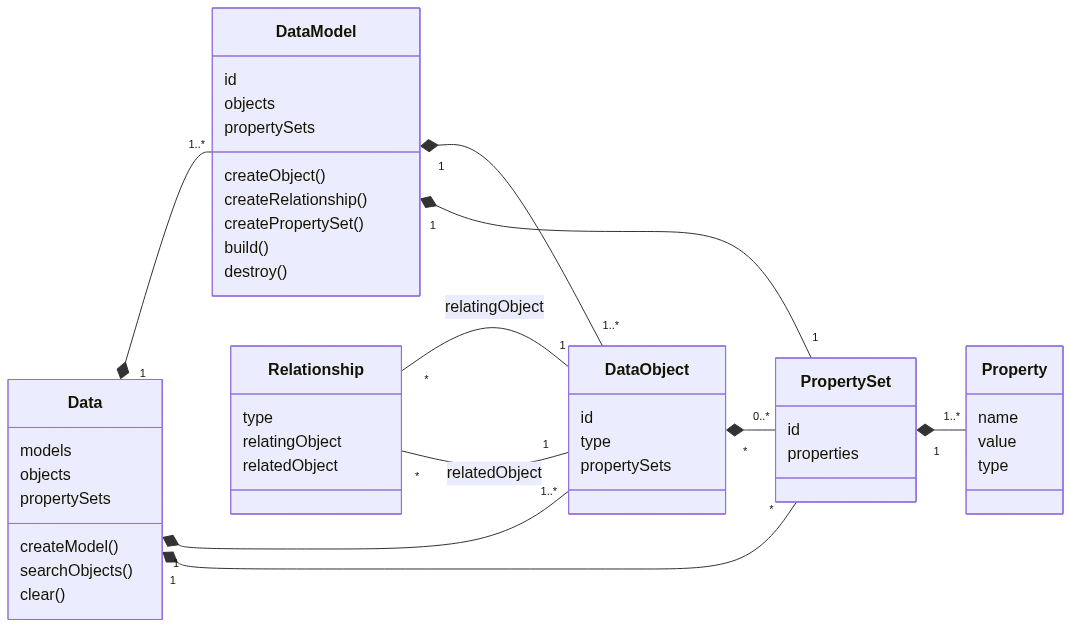
The SDK employs a generic entity-relationship data graph to manage model semantics, which includes entities, properties, and relationships. This data graph is compatible with both the browser and NodeJS and facilitates model generation, format conversion, and content navigation within the SDK's model viewer.
| Package | Modules | Description |
|---|---|---|
@xeokit/data |
@xeokit/data |
Entity-relationship graph that contains model semantic data. |
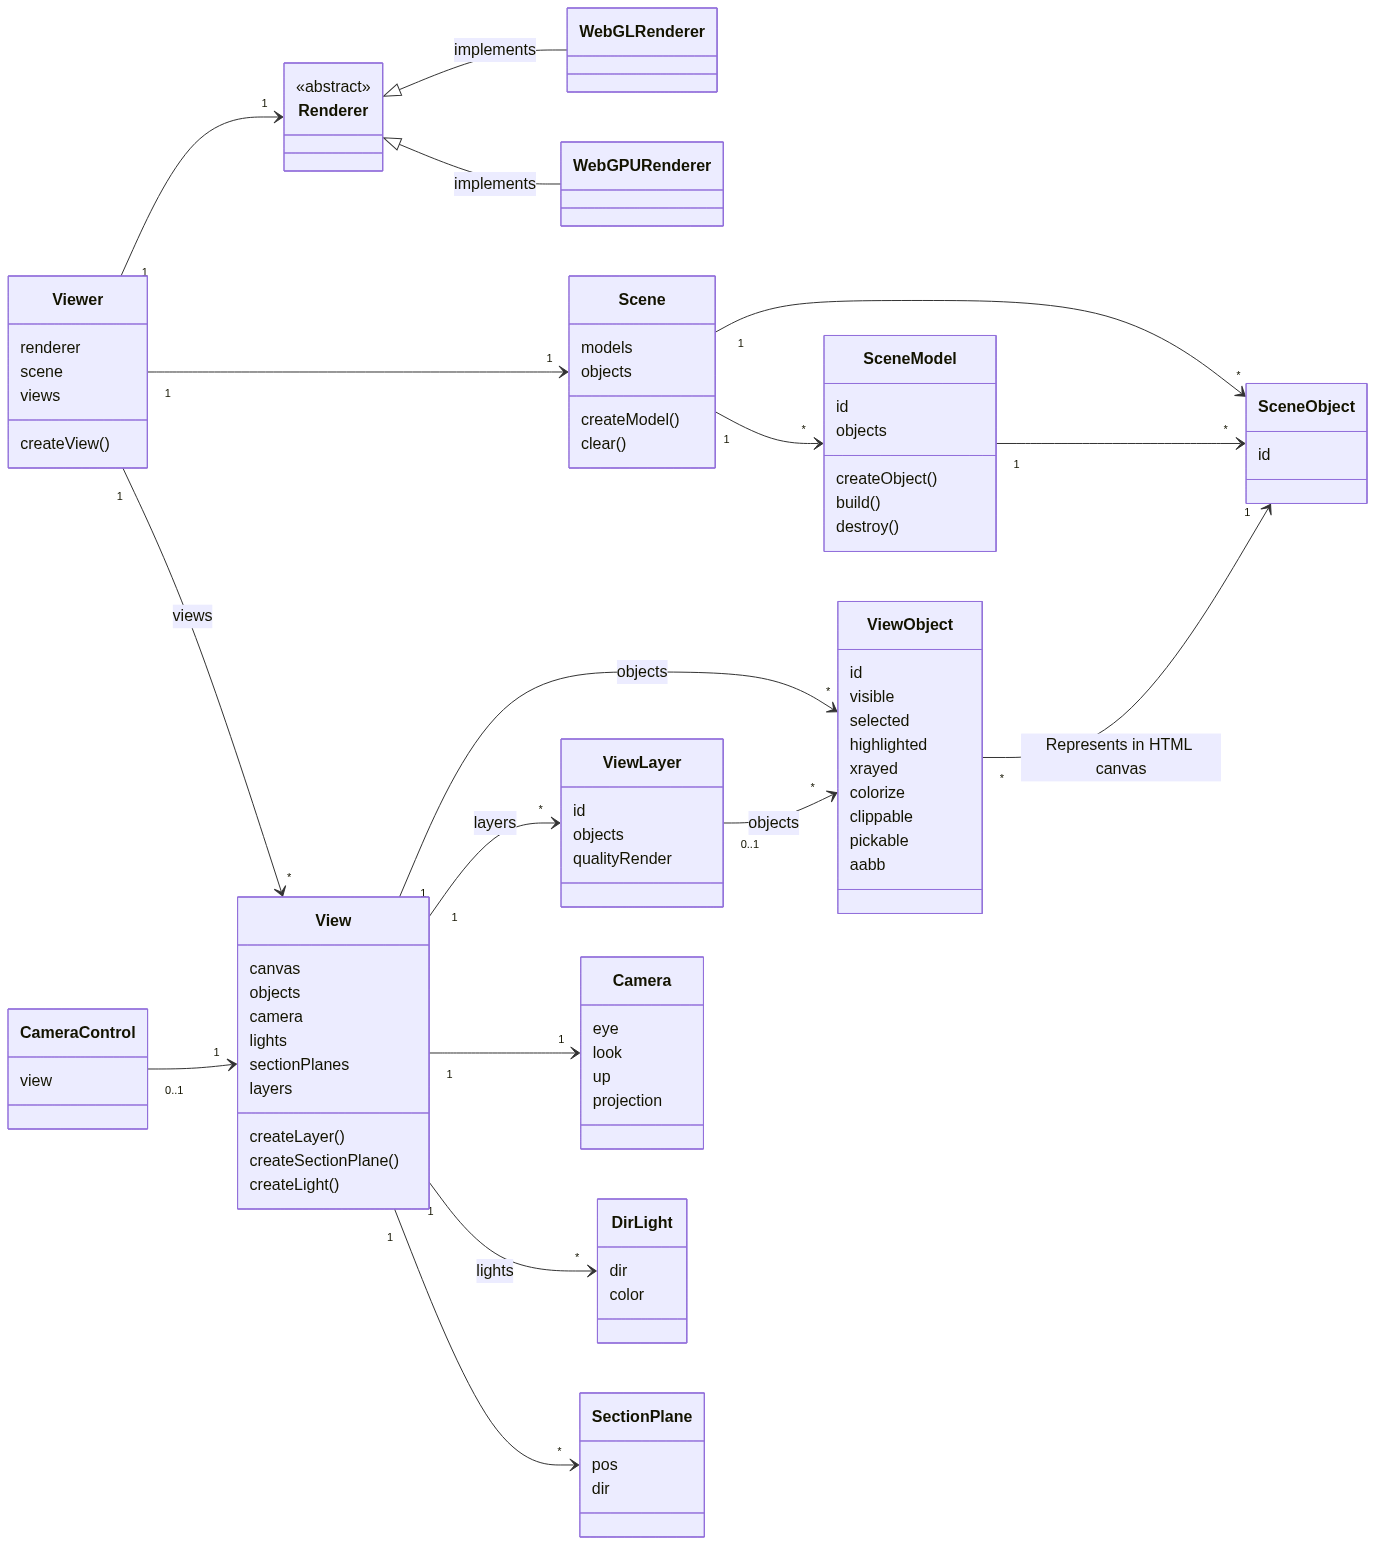
The SDK contains a high-performance Web viewer for displaying our model representations. Through a pluggable renderer strategy, the viewer can be extended to utilize various browser graphics APIs, including WebGL and WebGPU. Multiple models can be viewed simultaneously, and the viewer allows for the creation of separate canvases, featuring lights, section planes, annotations, and other elements, to display multiple views of our models.
| Package | Modules | Description |
|---|---|---|
@xeokit/viewer |
@xeokit/viewer |
Browser-based model viewer |
@xeokit/cameracontrol |
@xeokit/cameracontrol |
Interactive camera control for a viewer |
@xeokit/webglrenderer |
@xeokit/webglrenderer |
WebGL rendering strategy for a viewer |
@xeokit/treeview |
@xeokit/treeview |
HTML tree view widget for a Viewer |
@xeokit/locale |
@xeokit/locale |
Localization service for a viewer |
The SDK provides functions for importing and exporting its model representations and semantics as industry-standard AECO file formats. These functions can be used in NodeJS scripts for file format conversion or in the browser to load various file formats into the viewer.
| Package | Modules | Description |
|---|---|---|
@xeokit/dtx |
@xeokit/dtx |
Import and export XKT files |
@xeokit/gltf |
@xeokit/gltf |
Import glTF files |
@xeokit/las |
@xeokit/las |
Import LAS pointcloud scans |
@xeokit/cityjson |
@xeokit/cityjson |
Import CityJSON files |
@xeokit/webifc |
@xeokit/webifc |
Import IFC files |
The SDK offers functions for sharing bookmarks of viewer state with other BIM software as industry-standard BCF Viewpoints. These functions can be used to develop applications that facilitate collaboration on construction projects.
| Package | Modules | Description |
|---|---|---|
@xeokit/bcf |
@xeokit/bcf |
Load and save BCF |
The SDK's internal and lower-level functionalities are mostly available as utility libraries with complete documentation.
| Package | Modules | Description |
|---|---|---|
@xeokit/core |
@xeokit/core |
Basic component types used throughout the xeokit SDK |
@xeokit/core/constants |
Constants used throughout the xeokit SDK | |
@xeokit/core/utils |
Core utilities used throughout the xeokit SDK | |
@xeokit/basictypes |
@xeokit/basictypes/basicTypes |
Basic semantic data type constants |
@xeokit/ifctypes |
IFC data type constants | |
@xeokit/math |
@xeokit/math/math |
General math definitions and constants |
@xeokit/math/boundaries |
Boundaries math library | |
@xeokit/math/compression |
SceneGeometry de/compression utilities library | |
@xeokit/math/curves |
Spline curves math library | |
@xeokit/math/geometry |
SceneMesh generation functions | |
@xeokit/math/matrix |
Matrix and vector math utilities library | |
@xeokit/math/rtc |
Relative-to-center (RTC) coordinates math library | |
@xeokit/webgl |
@xeokit/webglutils |
WebGL utilities library |
@xeokit/procgen |
@xeokit/procgen/geometry |
SceneGeometry generation functions |
@xeokit/ktx2 |
@xeokit/ktx2 |
Compressed texture support |
Let's make a simple application using xeokit - a spinning, textured box.
First import the npm modules we need from the SDK:
npm install @xeokit/scene
npm install @xeokit/viewer
npm install @xeokit/webglrenderer
npm install @xeokit/core/constants
Then create a simple HTML page with a canvas element:
<!DOCTYPE html>
<html>
  <head>
    <title>xeokit Spinning Textured Box</title>
  </head>
  <body>
    <canvas id="myCanvas"></canvas>
  </body>
</html>
Now let's write some JavaScript to create the spinning, textured box.
import {Scene} from "@xeokit/scene";
import {TrianglesPrimitive, LinearEncoding, LinearFilter} from "@xeokit/core/constants";
import {Viewer} from "@xeokit/viewer";
import {WebGLRenderer} from "@xeokit/webglrenderer";

const scene = new Scene(); // Scene graph

const renderer = new WebGLRenderer({}); // WebGL renderers kernel

const viewer = new Viewer({ // Browser-base viewer
    scene,
    renderer
});

const view = myViewer.createView({ // Independent view
    id: "myView",
    canvasId: "myView1"
});

view.camera.eye = [0, 0, 10]; // Looking down the -Z axis
view.camera.look = [0, 0, 0];
view.camera.up = [0, 1, 0];

const sceneModel = scene.createModel(); // Start building the scene graph

sceneModel.createGeometry({ // Define a box-shaped geometry
    id: "boxGeometry",
    primitive: TrianglesPrimitive,
    positions: [-1, -1, -1, 1, -1, -1, ],
    uvs: [1, 0, 0, 0, 0, 1, 1, 1, 0, 0, 0, 1, ],
    indices: [0, 1, 2, 0, 2, 3, 4, 5, 6, 4, ]
});

sceneModel.createTexture({ //
    id: "boxColorTexture",
    src: "myTexture.png",
    encoding: LinearEncoding,
    magFilter: LinearFilter,
    minFilter: LinearFilter
});

sceneModel.createTextureSet({
    id: "boxTextureSet",
    colorTextureId: "boxColorTexture"
});

sceneModel.createLayerMesh({
    id: "boxMesh",
    geometryId: "boxGeometry",
    color: [1, 1, 1],
    metallic: 0.8, // PBR material attributes
    roughness: 0.3,
    textureSetId: "boxTextureSet"
});

sceneModel.createObject({
    id: "boxObject",
    meshIds: ["boxMesh"]
});

sceneModel.build().then(() => { // Compresses textures, geometries etc.

    // A textured box object now appears on our View's canvas.

    // We can now show/hide/select/highlight our box through the View:

    view.objects["boxObject"].visible = true;
    view.objects["boxObject"].highlighted = false;  // etc.

    // Start orbiting the camera:

    viewer.onTick.subscribe(() => {
        view.camera.orbitYaw(1.0);
    });
});Let's make a simple application that views a glTF file in the browser.
First import the npm modules we need from the SDK:
npm install @xeokit/scene
npm install @xeokit/viewer
npm install @xeokit/webglrenderer
npm install @xeokit/core/constants
npm install @xeokit/gltf
Here's the JavaScript for our glTF viewer app:
import {Scene} from "@xeokit/scene";
import {TrianglesPrimitive, LinearEncoding, LinearFilter} from "@xeokit/core/constants";
import {Viewer} from "@xeokit/viewer";
import {WebGLRenderer} from "@xeokit/webglrenderer";
import {loadGLTF} from "@xeokit/gltf";

const scene = new Scene(); // Scene graph

const renderer = new WebGLRenderer({}); // WebGL renderers kernel

const viewer = new Viewer({ // Browser-base viewer
    scene,
    renderer
});

const view = myViewer.createView({ // Independent view
    id: "myView",
    canvasId: "myView1"
});

view.camera.eye = [0, 0, 10]; // Looking down the -Z axis
view.camera.look = [0, 0, 0];
view.camera.up = [0, 1, 0];

const sceneModel = scene.createModel(); // Start building the scene graph

fetch("myModel.glb").then(response => {

    response.arrayBuffer().then(data => {

        loadGLTF({data, scene}).then(() => {

            sceneModel.build().then(() => { // Compresses textures, geometries etc.

                // A model now appears on our View's canvas.

                // We can now show/hide/select/highlight the model's objects through the View:

                view.objects["2hExBg8jj4NRG6zzE$aSi6"].visible = true;
                view.objects["2hExBg8jj4NRG6zzE$aSi6"].highlighted = false;  // etc.

                // Start orbiting the camera:

                viewer.onTick.subscribe(() => {
                    view.camera.orbitYaw(1.0);
                });
            });
        });
    });
});Let's make a simple NodeJS script that converts a glTF file into xeokit's native XKT format.
First import the npm modules we need from the SDK. Note that we don't need the viewer for this example.
npm install @xeokit/scene
npm install @xeokit/core/constants
npm install @xeokit/gltf
npm install @xeokit/dtx
Here's the JavaScript for our converter script.
import {Scene} from "@xeokit/scene";
import {Data} from "@xeokit/data";
import {TrianglesPrimitive, LinearEncoding, LinearFilter} from "@xeokit/core/constants";
import {loadGLTF} from "@xeokit/gltf";
import {saveXKT} from "packages/dtx";

const fs = require('fs');

const scene = new Scene(); // Scene graph
const sceneModel = scene.createModel({ id: "myModel" }); // Start building the scene graph

const data = new Data();
const dataModel = data.createModel({ id: "myModel" }); // Will model the glTF scene hierarchy

fs.readFile("./tests/assets/HousePlan.glb", (err, buffer) => {
    const arraybuffer = toArrayBuffer(buffer);
    loadGLTF({
        data: arrayBuffer,
        sceneModel,
        dataModel
    }).then(() => {
        sceneModel.build().then(() => { // Compresses textures, geometries etc.
            const arrayBuffer = saveXKT({ sceneModel, dataModel });
            fs.writeFile('myModel.dtx', arrayBuffer, err => {});
        });
    })
});

function toArrayBuffer(buf) {
    const ab = new ArrayBuffer(buf.length);
    const view = new Uint8Array(ab);
    for (let i = 0; i < buf.length; ++i) {
        view[i] = buf[i];
    }
    return ab;
}To start developing this project, you should first install it, preferably globally:
npm i pnpm -g
pnpm install turbo --global
Then clone the repository:
git clone https://github.com/xeokit/sdkInstall the project using:
pnpm iTo build all packages and their dependencies use:
pnpm distThis will automatically start all project building processes, a dist directory will be created in each package, this is a representation of the package's built source and its dependencies.
To run all tests:
pnpm testTo run tests for specific package:
turbo run test --filter=nameOfSelectedPackage Copyright 2020, AGPL3 License.
See Credits.


