This ia a self-paced lab for learning how to build, deploy and run serverless functions with OpenFaas.
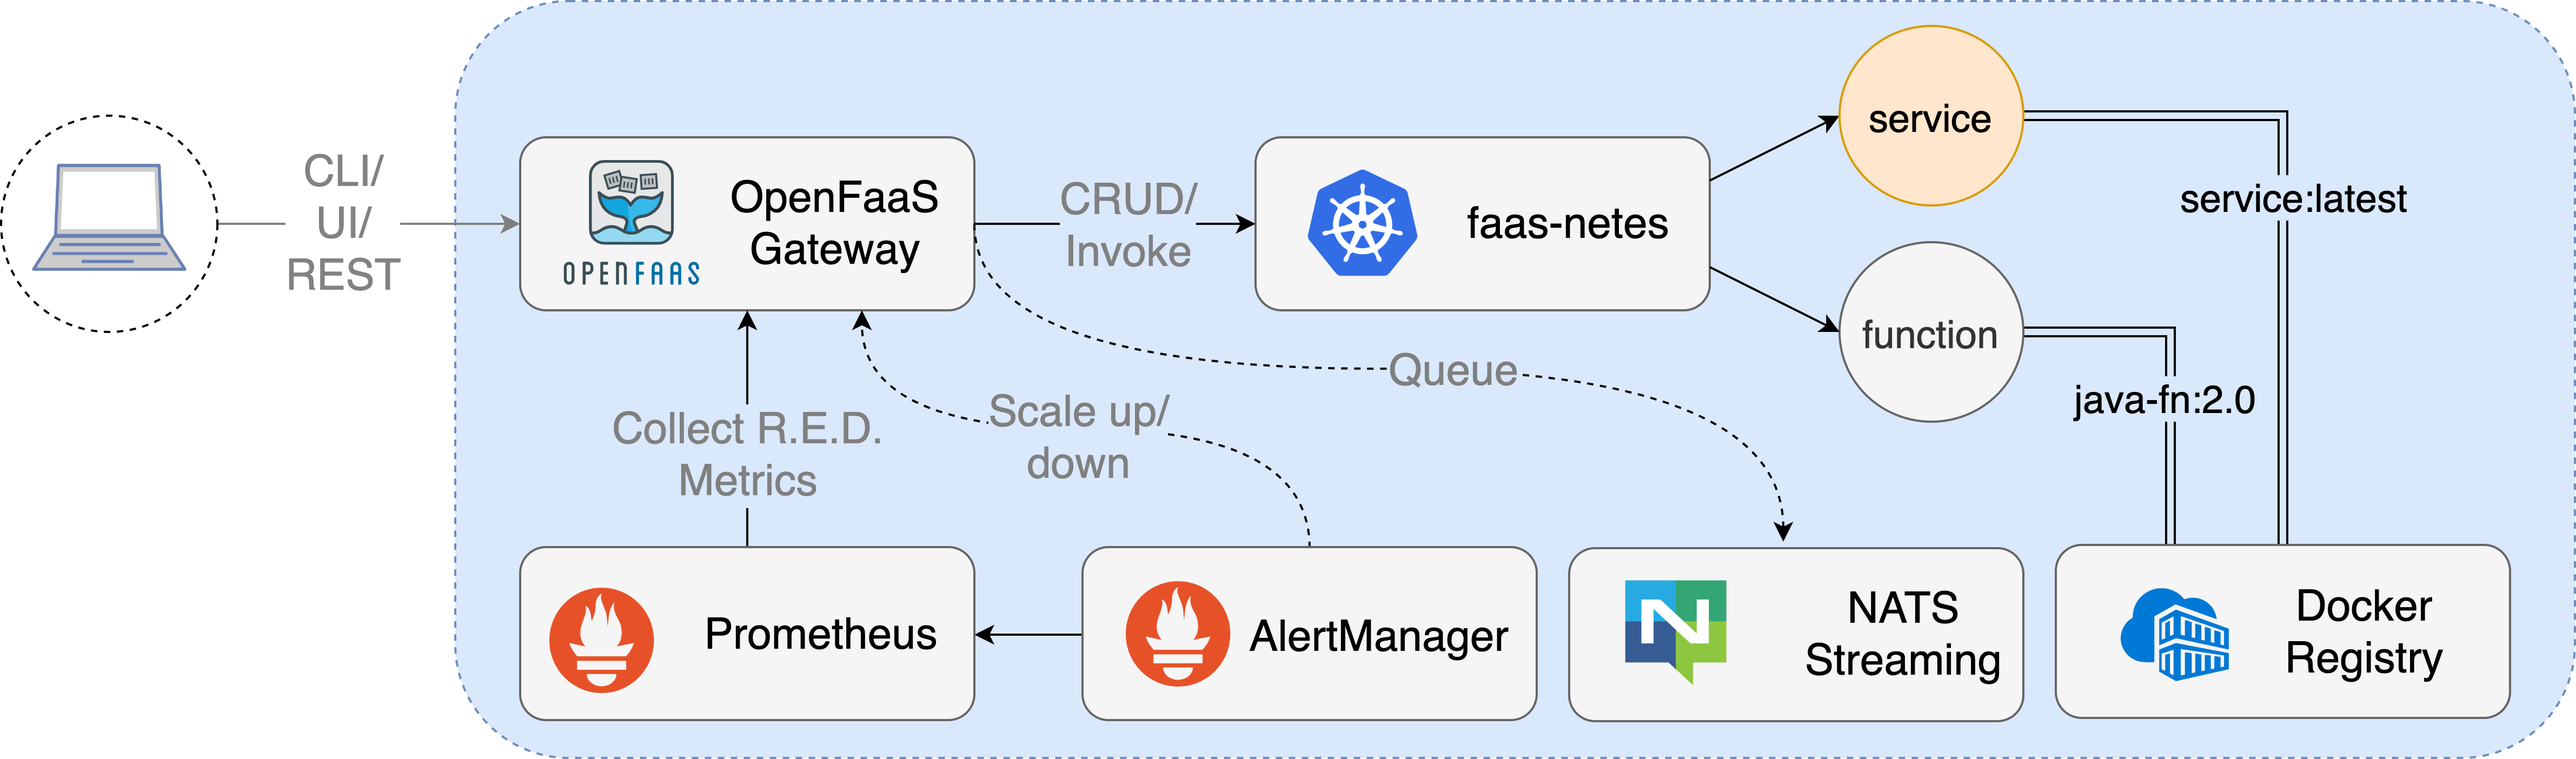
OpenFaaS makes it easy for developers to deploy event-driven functions and microservices to Kubernetes without repetitive, boiler-plate coding.
We can package our code or an existing binary in a Docker image to get a highly scalable endpoint with auto-scaling and metrics.
This is a quick and dirty example of how to start OpenFaas on K3S cluster using K3D.
Use below command to create a k3d cluster:
$ k3d cluster createYou should see similar console output.
INFO[0000] Created network 'k3d-k3s-default'
INFO[0000] Created volume 'k3d-k3s-default-images'
INFO[0001] Creating node 'k3d-k3s-default-server-0'
INFO[0007] Creating LoadBalancer 'k3d-k3s-default-serverlb'
INFO[0008] (Optional) Trying to get IP of the docker host and inject it into the cluster as 'host.k3d.internal' for easy access
INFO[0011] Successfully added host record to /etc/hosts in 2/2 nodes and to the CoreDNS ConfigMap
INFO[0011] Cluster 'k3s-default' created successfully!
INFO[0011] You can now use it like this:
kubectl cluster-info
Above command will create a k3d cluster named "k3s-default".
Using arkade is the most easy way to to install OpenFaas in kubernetes.
$ arkade install openfaasBelow information will show once arkade finish install OpenFaas.
Using kubeconfig: /home/witlab/.kube/config
Node architecture: "amd64"
Client: "x86_64", "Linux"
2020/10/30 07:15:52 User dir established as: /home/witlab/.arkade/
"openfaas" has been added to your repositories

VALUES values.yaml
Command: /home/witlab/.arkade/bin/helm [upgrade --install openfaas openfaas/openfaas --namespace openfaas --values /tmp/charts/openfaas/values.yaml --set gateway.directFunctions=true --set openfaasImagePullPolicy=IfNotPresent --set faasnetes.imagePullPolicy=Always --set gateway.replicas=1 --set ingressOperator.create=false --set queueWorker.maxInflight=1 --set basic_auth=true --set serviceType=NodePort --set clusterRole=false --set operator.create=false --set basicAuthPlugin.replicas=1 --set queueWorker.replicas=1]
Release "openfaas" does not exist. Installing it now.
NAME: openfaas
LAST DEPLOYED: Fri Oct 30 07:15:56 2020
NAMESPACE: openfaas
STATUS: deployed
REVISION: 1
TEST SUITE: None
NOTES:
To verify that openfaas has started, run:

  kubectl -n openfaas get deployments -l "release=openfaas, app=openfaas"
=======================================================================
= OpenFaaS has been installed.                                        =
=======================================================================

# Get the faas-cli
curl -SLsf https://cli.openfaas.com | sudo sh

# Forward the gateway to your machine
kubectl rollout status -n openfaas deploy/gateway
kubectl port-forward -n openfaas svc/gateway 8080:8080 &

# If basic auth is enabled, you can now log into your gateway:
PASSWORD=$(kubectl get secret -n openfaas basic-auth -o jsonpath="{.data.basic-auth-password}" | base64 --decode; echo)
echo -n $PASSWORD | faas-cli login --username admin --password-stdin

faas-cli store deploy figlet
faas-cli list

# For Raspberry Pi
faas-cli store list \
 --platform armhf

faas-cli store deploy figlet \
 --platform armhf

# Find out more at:
# https://github.com/openfaas/faas

Thanks for using arkade!
The OpenFaaS Gateway can be accessed through its REST API via CLI or UI.
# Forward the gateway to your machine
$ kubectl port-forward -n openfaas svc/gateway 8080:8080 &While arcade CLI install OpenFaaS, it will create a user "admin" with random generated password. Let's export the password as environment variable.
# If basic auth is enabled, you can now log into your gateway:
$ PASSWORD=$(kubectl get secret -n openfaas basic-auth -o jsonpath="{.data.basic-auth-password}" | base64 --decode; echo)

# Print out the password from environment
$ echo $PASSWORD
{YOUR_PASSWORD}Open a web browser to localhost:8080, and enter the credential:
- User Name:
admin - Password:
{YOUR_PASSWORD}

You can try various functions from the OpenFaaS store within the UI. For exmaple:
- Click the "Deploy New Function" button
- Search for "Figlet" and click it.
- Click "Deploy"

The function should appear on the menu on the left, click it, and wait for the status to change to “Ready”. Then enter "hello" in the “Request Body” field and click Invoke.

You should able to see the result in "Response body":
 _          _ _
| |__   ___| | | ___
| '_ \ / _ \ | |/ _ \
| | | |  __/ | | (_) |
|_| |_|\___|_|_|\___/
Make sure you install faas-cli below below practice. If you're on MacOS and already have homebrew installed then installation is as simple as:
brew install faas-cliFor manual installation, you can use the following command:
curl -sSL https://cli.openfaas.com | sudo shConfigure the faas-cli to use your local OpenFaaS cluster by using the faas-cli login command. There are two environment variables needed for faas-cli:
- OPENFAAS_UR
- PASSWORD
$ export OPENFAAS_URL=http://localhost:8080
$ echo $PASSWORD | faas-cli login --password-stdinTo list current deployed functions in OpenFaas:
$ faas-cli list

Function                      	Invocations    	Replicas
figlet 0 1 $ echo "hello" | faas-cli invoke figlet
_ _ _
| |__ ___| | | ___
| '_ \ / _ \ | |/ _ \
| | | | __/ | | (_) |
|_| |_|\___|_|_|\___/ To clean up, execute below commands:
$ k3d cluster deleteThat's it! You have a runing OpenFaaS to experiement.
To learn more how to use OpenFaas for designing/deploying serverless functions, you can continue with labs introduction and each well-craft labs:
- Lab 1 - Prepare for OpenFaaS
- Lab 2 - Test things out
- Lab 3 - Introduction to Functions
- Lab 4 - Go deeper with functions
- Lab 5 - Create a GitHub bot
- Lab 6 - HTML for your functions
- Lab 7 - Asynchronous Functions
- Lab 8 - Advanced Feature - Timeouts
- Lab 9 - Advanced Feature - Auto-scaling
- Lab 10 - Advanced Feature - Secrets
- Lab 11 - Advanced feature - Trust with HMAC