| tags | languages |
|---|---|
git, github, bash, command line, learn.co, tutorial |
bash, objc |
Your First Lab
On Learn, labs are exercises you have to complete.
The goal of this lab is to practice the workflow to complete a lab and to see if you can make a new file or directory using terminal.
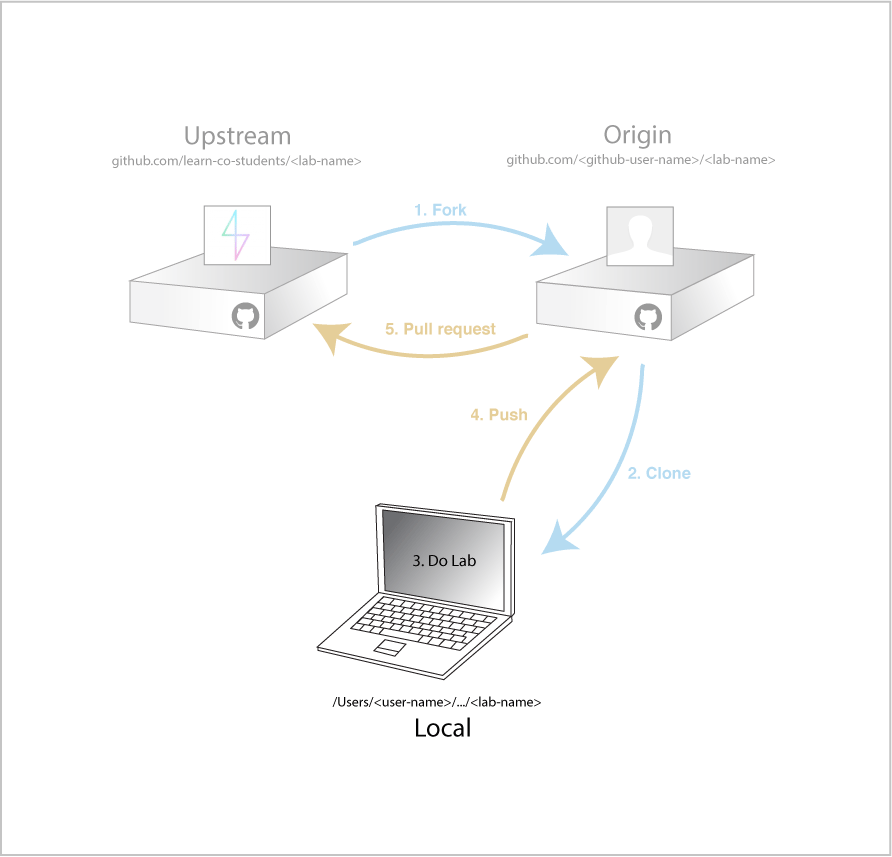
To complete this lab you will have to:
- Fork the lab via github.
- Clone your fork.
- Solve the Lab
- Push that commit to your fork.
- Open a Pull Request for your fork.
1. Forking from Github
Forking is the process of making a personal remote copy of the Learn lab.

To get started, in Learn click the title of the lab to go to Flatiron School's copy of the lab on Github.

Next on Flatiron's Github page for the lab click the Fork button.

Then select your personal Github account as the location to fork to.

2. Clone Your Fork
Cloning is the process of making a local copy of the lab from your personal remote on Github.

To clone, make sure you've first clicked on the SSH link, then click the copy button next to the Clone URL to copy it to your clipboard.

Next, in Terminal navigate to the parent directory where you would like to
place this lab. Then type: git clone <paste the clone URL here>
Note: You should replace the <paste the clone URL here> including the < and > symbols in the snippet above with your actual clone URL by pressing command+v on mac or ctrl+v on windows. Example: git clone git@github.com:jongrover/first-lab-000.git

3. Solving this Lab
Now that you have forked and cloned your fork, your goal is simple. Just create a new file within this lab.
You should be cd'd into this lab's directory. Confirm that your working
directory in terminal is this lab: ls
You should see something like this. Notice there is a my-first-lab.xcworkspace file:
Podfile       Pods        my-first-lab      my-first-lab.xcworkspace  test_runner.sh
Podfile.lock      README.md     my-first-lab.xcodeproj    my-first-labTests
- Open the
my-first-lab.xcworkspaceXCode project by typingopen my-first-lab.xcworkspace - Navigate to the
AppDelegate.mfile - Remove the
//in front of line 25 and add//in front of line 24. - Run the test by going to Product -> Test at the top menu bar.
- You should get a test succeeded notification, and the local build lights on Learn should turn on.
- Head back to your terminal and add the changes with
git add .Don't forget that dot! - Commit your changes with
git commit -m "My first commit"
4. Push Your Code to Github

After adding and commiting your most recent work next we want to push our work up to our personal Github remote (origin).
git push origin master

Go to github and confirm the push.

5. Opening a Pull Request
Submitting a pull request can be described as the process of asking the maintainer of the Learn lab (upstream remote) to consider pulling (fetching & merging) in your work from your personal remote copy (origin remote).

To do so, in Learn click the title of the lab to go to your forked copy on Github.

Then click the green Pull Request button.

After reviewing the comparison code and making sure it shows your solution, click the Create pull request button.

Then click Create pull request button again.

That's it, you're done! Now go back to Learn and you should see the Pull Request flip to green, and the remote build will be kicked off. Once it passes, you will be able to proceed to the Next Lesson.