This repo is field tested on Ubuntu 16.04, RTX 3070 GPU
Demo Video: https://youtu.be/eORfhaLjZts
Please create a virtual environment via conda or other method
Command: conda create -n NLP python=3.7 conda activate NLP
For those who are just wanting to
- try the demo (gui.py)
- run the test dataset (test.py)
- run the single input inference function (inference.py)
Install the envirnoment with requirements file with no CUDA support
Command:
pip install -r requirements.txt
For those who are interested in training, delete the "torch" in requiremnts file Follow the instruction of installing torch CUDA support on https://pytorch.org/get-started/locally/
Command Example:
conda install pytorch torchvision torchaudio cudatoolkit=10.2 -c pytorch
L archive
L config
L data
L graphical_interface
L test
L trainer
  L model  #For saving trained model
  L tokenizer # For saving tokenizer
L utils
The training takes the dataset inside the data file and runs with a Bert Classifier on Adam optimzer for 5 epoches. To configure the learning rate , optimizer hyperparameter or the epoches, please edit ./config/config.py
Lists of HyperParam in config.py :
  learning_rate = 2e-5
  adam_epsilon = 1e-8
  num_of_epoch = 1
  num_labels = 6
To start training:
Command:
python trainer/train.py
Log:
  Handling dataset:  train
  Handling dataset:  val
  Epoch Number:  1
  [ train dataset]
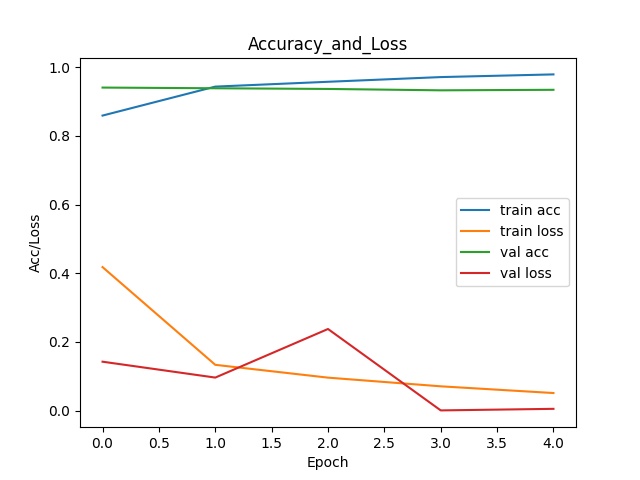
  Progress: [------------------> ] 99 %(dataset_type) acc: 0.8594375, loss: 0.41807940747216343
  [ val dataset]
  Progress: [------------------> ] 99 %(dataset_type) acc: 0.941, loss: 0.14256180822849274
  ...
After running the command , the
- model --> saved in ./trainer/model
- tokenizer --> saved in ./trainer/tokenizer
- results and other metrics --> saved in ./trainer
Result showcase
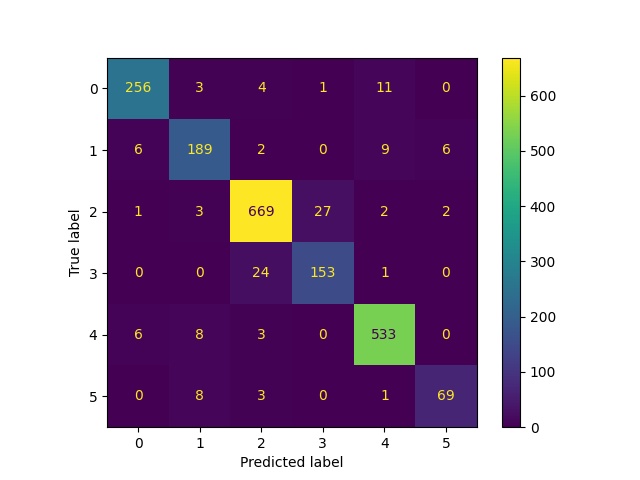
- Accuracy and Loss / Confusion Matrix
- Confusion Matrix
The test.py takes the test data in ./data folder and runs with the trained model. The result will be saved in ./test folder as test_prediction.txt
This command requires trained model and tokenizer, if the model and tokenizer folder are empty, please download them in here : https://drive.google.com/drive/folders/1JZv_7skWp4OMUQGsfu1idlz7suWhRR-N?usp=sharing
Command:
python test/test.py
Result showcase:
  sadness
  sadness
  sadness
  joy
The gui.py takes the input via the text editing box and runs with the trained model.
This command requires trained model and tokenizer, if the model and tokenizer folder are empty, please download them in here : https://drive.google.com/drive/folders/1JZv_7skWp4OMUQGsfu1idlz7suWhRR-N?usp=sharing
Command:
python graphical_interface/gui.py


