這個專案要教你如何使用 create-react-app 和 rollup 還有 verdaccio 建立一個私人的 react component library,我們將在 library 中使用 TypeScript, SASS, TailwindCSS 還有其他的 third-libraries,以及架設好 Storybook 以及測試環境。
- About
- Installation
- Library Structure
- Tailwind Config
- TypeScript Config
- Rollup Config
- Package.json
- Verdaccio NPM Proxy
- Storybook
- Adding Test
- TroubleShooting
這個專案基於 alexeagleson / template-react-component-library,並且做了以下的調整:
- npm init =>
create-react-app - Github + npm => Verdaccio + npm
- Add TailwindCSS
- Add third-party libraries
感謝 alexeagleson 的優質文章和教材 😄
// create new library with CRA and TypeScript
npx create-react-app ts-react-component-library --template typescript

// install SASS
npm i sass

// install other dependencies, for example I want to also use recharts
npm i recharts

// install jest and react-testing-library for testing
npm install @testing-library/react jest @types/jest --save-dev我們會用 postcss 方式安裝 TailwindCSS,你只要照著 create-react-app-guides 中提供的步驟安裝 TailwindCSS 即可。如果你使用 create-react-app 以外的方式安裝 TailwindCSS,你可以到 framework-guides 尋找安裝方法。
我們將使用 rollup.js 來打包我們的 component-library。因為 rollup.js 和 webpack 一樣是使用多個 plugins 來分工進行打包工作,所以我們必須要安裝以下的 dependencies:
// for basic bundling
npm install rollup @rollup/plugin-node-resolve @rollup/plugin-typescript @rollup/plugin-commonjs rollup-plugin-dts --save-dev

// for postcss & sass
npm install rollup-plugin-postcss --save-dev

// for optimization
npm install rollup-plugin-peer-deps-external rollup-plugin-terser --save-dev
專案的整體架構如下。如果你想使用不同的架構,要記得到進行以下的調整:
- Change the
includepath intsconfig.json - Change the first
inputinrollup.config.js - You need to create a css file in the same folder as the entry point in order to import tailwind correctly.
.npmrc                  # config npm registry
.package.json           # config dependency, publish
postcss.config.js       # config postcss with tailwind
rollup.config.js        # config run rollup flow
tailwind.config.js      # config tailwind content, styles
tsconfig.json           # config TypeScript compilation

src/
┣  components/
┃ ┣  MyLineChart/
┃ ┃ ┣  MyLineChart.scss
┃ ┃ ┣  MyLineChart.tsx
┃ ┃ ┗  index.ts
┃ ┣  index.scss         # IMPORTANT: import tailwind for library
┃ ┗  index.ts           # IMPORTANT: library entry point
┃
┣  App.tsx              # for develop use
┣  index.scss           # for develop use
┣  index.tsx            # for develop use
┗ setupTests.ts # for unit test using jest & react-testing-library在 postcss.config.js 中,除了基本的 Tailwind 設定以外,我還為 tailwind plugin 設定了 config 路徑:
module.exports = {
    plugins: {
        tailwindcss: { config: "./tailwind.config.js" },
        autoprefixer: {},
    },
};因為我們使用 create-react-app --template typescript 來建立專案,所以 tsconfig.json 已經被建立好,而且已經有一些預設的設定。
最終的設定檔可以查看 tsconfig.json。我們主要增加和改變的地方為:
"compilerOptions": {
    ...
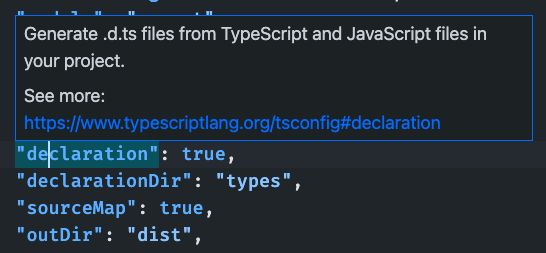
    "declaration": true,
    "declarationDir": "types",
    "sourceMap": true,
    "outDir": "dist",
    "moduleResolution": "node",
    "allowSyntheticDefaultImports": true,
    "emitDeclarationOnly": true,
},
"include": [
    "src/components"  // should be your entry point
]
如果你使用 VSCode 等 IDE 開啟時,將指標放在每個設定上就可以看到用途。
關於更詳細的設定介紹和每個 config 的意義,你可以查看 alexeagleson/template-react-component-library#adding-typescript
Rollup 的設定可以分成三大部分,分別為基本設定、CSS 設定、優化設定,最終的設定檔可以查看 rollup.config.js。我們將把 library 分別打包成一個 Commonjs 和一個 ESM。
在 rollup 中的設定 (config) 可以分成兩大部分:第一部分定義我們的程式碼要如何被編譯、打包成純 JavaScript、如何處理 CSS 檔案、還有優化設定。第二部分主要是定義如何處理生成的 Types 檔案,以及避開 css 的 Type 生成。
{
    input: "src/components/index.ts",  // entry point
    output: [
        {
            file: packageJson.main,    // cjs output point
            format: "cjs",
            sourcemap: true,
        },
        {
            file: packageJson.module,  // esm output point
            format: "esm",
            sourcemap: true,
        },
    ],
    plugins: [
        // 用來打包你有用到的第三方庫
        resolve(),

        // Convert CommonJS modules to ES6
        commonjs(),

        // Teaches rollup how to process Typescript files
        typescript({ tsconfig: "./tsconfig.json" }),
    ],
},
{
    input: "dist/esm/types/index.d.ts",
    output: [{ file: "dist/index.d.ts", format: "esm" }],
    plugins: [dts()],  // rollup your .d.ts files
},
更詳細的介紹: alexeagleson/template-react-component-library#adding-rollup
只做 basic 設定不會幫我們打包 CSS/SASS/LESS 等 PreCSS。我們需要引入 rollup-plugin-postcss 來幫我們打包這些 css 並寫入 js 當中:
// NEW
import postcss from "rollup-plugin-postcss";

{
    // first part
    // ...
    plugins: [
            resolve(),
            commonjs(),
            typescript({ tsconfig: "./tsconfig.json" }),

            // NEW
            postcss({
                config: {
                    path: "./postcss.config.js",
                },
                minimize: true,
            }),
        ],
}, {
    // second part
    // ...
    plugins: [dts()],
    external: [/\.(css|less|scss)$/], // NEW: avoid generate css types
}
更詳細的介紹: alexeagleson/template-react-component-library#adding-css
我們可以輕鬆的使用 rollup-plugin-terser 把打包的 bundle-size 縮得更小。另一個是使用 rollup-plugin-peer-deps-external 來實現 peerDependencies,一樣可以使 bundle-size 縮小,並且避免和引入我們 library 的專案發生衝突。
// NEW
import { terser } from "rollup-plugin-terser";
import peerDepsExternal from 'rollup-plugin-peer-deps-external';

{
    // first part
    // ...
    plugins: [
        // NEW
        peerDepsExternal(),

        resolve(),
        commonjs(),
        typescript(...),
        postcss(...),

        // NEW
        terser(),
    ]
}
設定完後記得到 package.json 設定 peerDependencies:
"peerDependencies": {
    "react": "^18.1.0",
    "react-dom": "^18.1.0"
  }
更詳細的介紹: alexeagleson/template-react-component-library#optimizing
不管你是要 publish 到 npm 還是 verdaccio,你都需要設定一下 package.json 中的幾個參數:
{
  // required: your npm-title
  "name": "ts-react-component-library",

  // required: need to be incremented before each publish
  "version": "1.0.0",

  // required: need to set false
  "private": false,

  "publishConfig": {
    "registry": "http://your-local-npm-server"
  },

  "scripts": {
    "test": "react-scripts test",
    "rollup": "rm -rf dist && rollup -c"  // npm run rollup
  },

  // required: output path for commonjs modules
  "main": "dist/cjs/index.js",

  // required: output path for es6 modules
  "module": "dist/esm/index.js",

  // required: output directory for our entire library
  "files": [
    "dist"
  ],

  // required: location for our library's types
  "types": "dist/index.d.ts",

  "peerDependencies": {
      ...
  }

  // optional
  "description": "A library for building react components",
  "author": "Jay Wang",
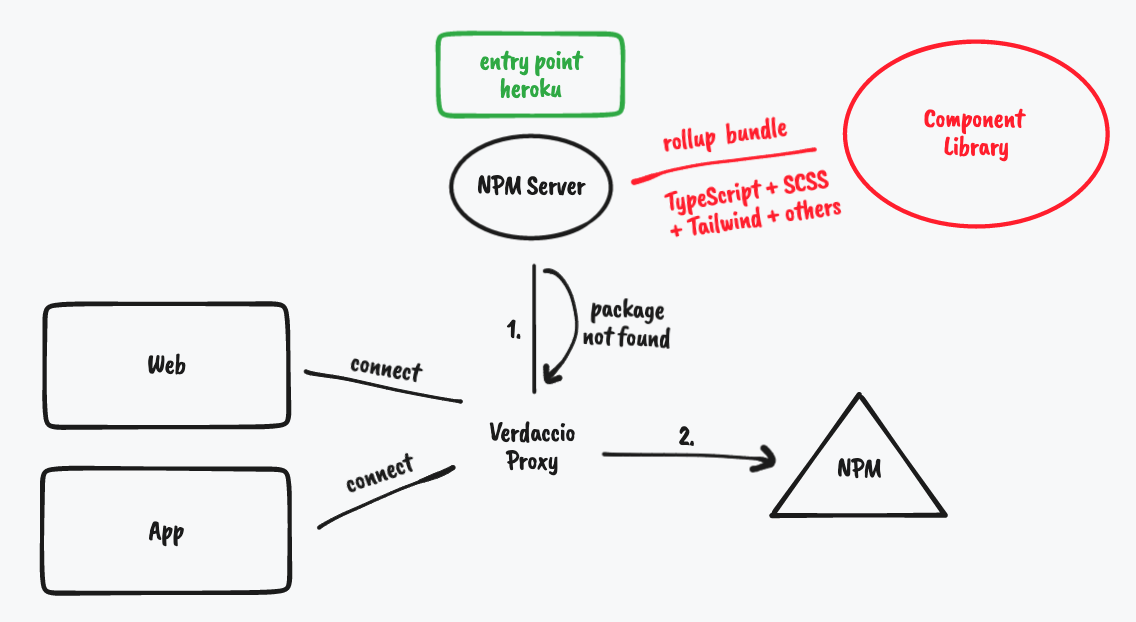
}我們要使用 verdaccio 和 heroku 建立所謂的 npm proxy 和本地的 npm server,當我們設定好後,執行 npm install --registry entrypoint 會讓 npm 先到 heroku 上下載我們私人的 library,然後再到 npm 中下載其他網路上的 library,例如 react, typescript 等。
我們可以在專案最上層建立 .npmrc 並設定 registry 的網址,這可以讓我們將 npm install --registry http://your-local-npm-server 省略為 npm install。
// .npmrc
registry=http://your-local-npm-server
其他常用的指令還有:
npm get registry- 可以查看 registry 的設定有沒有正確npm login --registry http://your-local-npm-server- 需要在 publish 前登入
-
透過以下指令安裝 storybook 到你正在開發的專案中 (Ref: Install Storybook)
npx storybook init -
開始撰寫每個元件的 story
-
由於我的元件引入了
.scss的檔案,我必須要為 Storybook 導入 SCSS preset- Follow this configuration
-
你可以在
preview.js中添加以下的設定,這樣你的 storybook 就會按照字母順序排列export const parameters = { options: { storySort: (a, b) => a[1].kind === b[1].kind ? 0 : a[1].id.localeCompare(b[1].id, undefined, { numeric: true }), }, };
當你的元件庫越寫越大時,可能會將多個元件寫在一個 Story,或是將多個元件組成一個頁面。我們可以透過引入其他 Story 和其 args 來加快 Story 的編寫。
-
Building Stories for multiple componenets
-
Building Stories for a page or screen
你也可能需要控制 API 的回傳狀態 (成功或失敗) 來展示元件,這時候你可以使用 MSW (mock service worker) 來模擬 API 的回傳。
- Mocking with MSW
因為我們使用 create-react-app 來創建這個專案,所以我們可以很輕鬆的使用內建的 npm test 來運行 react-scripts test 進行測試。記得專案中必須保留 src/setupTests.ts 才能進行元件的測試哦!
如果你想進一步了解如何編寫 unit test,歡迎查看另外一個 repo - web testing for beginners。
// installation
// https://www.npmjs.com/package/@storybook/testing-react
npm install --save-dev @storybook/testing-react
// MyLineChart.stories.tsx
import { render, screen } from "@testing-library/react";
import { composeStories } from "@storybook/testing-react";
import * as stories from "./MyLineChart.stories";
// processes all the information needed for this story (e.g. args)
const { Small } = composeStories(stories);
describe("Testing with Storybook", () => {
it("should render empty chart", () => {
render(<Small />);
const uv_legend = screen.getByText("uv");
expect(uv_legend).toBeInTheDocument();
});
});- NPM warn: You must install peer dependencies yourself.
- Failed to parse source map

