VJlxnr
… (one more) simple VJing tool made with Max/Jitter/Max4Live …
What it does …
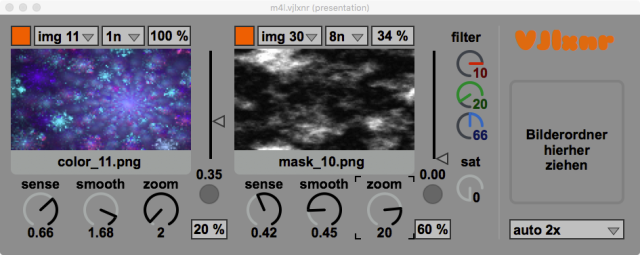
It moves and zooms an image (image layer) according to the audio level which is sampled at periodic intervals or when exceeding a given threshold. Optional a second layer (mask layer) can be switched on, which is moved independently with it's own set of parameters. The resulting image is calculated by multiplicating the pixel values. The calculated video effect can be faded in and out or be modified by color filters. The design of this VJing tool is focussed on being mostly programmable/automatable. This way musicians can integrate video effects in their performance without the need of taking hands off their musical intruments.
What it contains …
The project contains a Max4Live audio device for use in Ableton Live and a folder containing a set of sample images for free use. (See License)
How it works …
- Drop the M4L audio device onto a track in Ableton Live.
- Select a resolution for the target window containing the video FX.
- Drop a folder containing (up to 32) images (currently only PNGs are supported) onto the dropfile zone.
- Stream in sound.
- Play with the knobs, buttons and sliders.
- Enjoy that psychedelic shit …
- … or read the user manual below …
Details / Manual
Install
System requirements
The device is built using Ableton Live 9.5 and Max 7.1 (64 bit) - it is not guaranteed to work with lower versions or on 32 bit systems. At least 8 GB RAM is required - depends on the media data to process.
Getting vjlxnr
vjlxnr is hosted on GitHub.
The recomended way to get it is via git; see below.
Download not using git
Alternatively you can follow the download link, which will provide you with a zip archive containing the whole project data. Unpack the archive to a folder where your Max4Live devices live and drop the file 'm4l.vjlxnr.amxd' onto an Ableton Live track. The media folder contains some sample images, you can drop onto the drop file area of the device (the grey, framed area right hand side).
In case you just want to get the device file without the media folder, simply try this link - this should trigger the download.
Download using git
If you are not familiar with command line tools on your computer, there are several graphical user interfaces you can use, for example GitHub Desktop or Sourcetree.
Just open a terminal, point to a directory you want vjlxnr installed and type
git clone https://github.com/AliTe/vjlxnr.git
This will create a folder 'vjlxnr' in which you will find the Max4Live project. If an update is available you simply have to do a
git fetch; git pull
and you got the new version.
Quickstart
After dropping the device onto a track …
- Choose a resolution (for fullscreen mode) in the menu at the right bottom.
- Drop a folder containing up to 32 PNG images onto the drop file zone.
- Choose an image in the menu on the left top and enable the FX with the toggle left to it (1.).
- Fade in the image by increasing the value of the number box on the right top of the image previews (4.); play with the filter functionality by changing the RGB-values (10. to 12.).
- Stream in music. Play with the various knobs, menus and faders; change zoom depth, intensity, tempo and smoothness of movement.
- Choose a second image in the right image menu, enable it by the toggle left to it and fade in the layer using the number box on the top right. Try various combinations. Hint: b/w images work good for masking!
- Change the snyc rate in the menus (3. and 7.) - the images will move in sync with the metronome.
- Increase the threshold values, so the image movement will be influenced by beats, too.
- Press 'ESC' to toggle fullscreen mode.
Overview
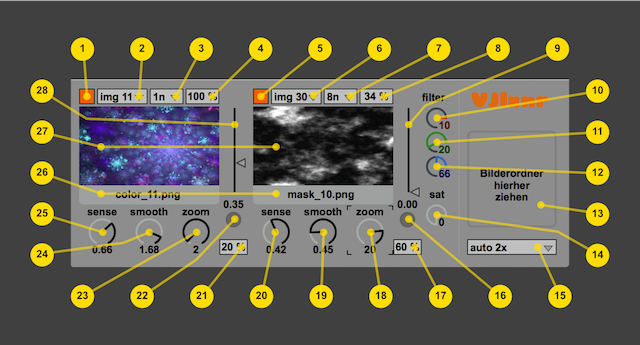
Controls of the vjlxnr user interface:
Detailed description of GUI elements
- Turn on/off the device
- Select image for image layer
- Sync rate of image layer; the audio level is read in this interval and triggers a movement impulse
- Global fade in/out
- Turn on/off mask layer
- Select image for mask layer
- Sync rate mask layer; see 3.
- Fade in/out of mask layer
- Threshold mask layer; if the audio level exceeds the threshold, an additional impulse is triggered independent of the sync rate; a value of '0' disables threshold triggering
- Red filter; fades in and out out the red channel of the resulting image; changing this parameter has global effect
- Green filter; fades in and out out the green channel of the resulting image; changing this parameter has global effect
- Blue filter; fades in and out out the blue channel of the resulting image; changing this parameter has global effect
- Drop zone; move and drop a folder containing up to 32 PNG files onto this area; the media data gets compiled (according the resolution parameter, see 15.) and buffered for effective use during performance (this process can take some time); keep in mind that the video can get stuck during this operation, so it should be avoided while the transport of your DAW is running; once the media data is prepared, ist is saved within the Live Set
- Saturation (color) of the mask layer
- Video resolution; this parameter changes the size of the buffered media data (it does NOT set the size of the video window! The size aof the video window must be set manually or by pressing 'ESC' to enter full screen mode.); should be choosen according to the device playing the video (i.e. for use with a full HD beamer, set it to 1920x1080), but keep in mind the higher the resolution, the more memory and CPU is used (every change of an image causes copying image data from RAM memory to the graphics card memory); lsetting this value to 'auto' scales the image to fit in the actual size of the video window, 'auto 2x' sets it to 4 times the actual size (if you want to choose these values, you should do it after sizing the video window!)
- Indicator of a threshold impulse - mask layer
- Random damping of the movement in x- and y-direction of the mask layer; a value of '0' means no damping occurs, a value of '100' means deflection happens to 100% by accident
- Influences the amount of movement in z-direction of the mask layer
- Influences the smoothness of movement of the mask layer; a value of '1' means, moving the layer to the new/next position takes exactly as long as set by the parameter sync rate; higher values lead to slower, 'smoother' and shorter movement (the layer will never reach it's next position), smaller values speed up movement so the layer will remain at the target position until the next position is requested (leads to a more chopped movement)
- Sensitivity of the movement of the mask layer; sets the amount the audio level influences the layer movement
- Random damping - image layer; see 17.
- Indicator of a threshold impulse - image layer
- Zoom - image layer; see 18.
- Smooth - image layer; see 19.
- Sensitivity - image layer; see 20.
- Title/file name of the selected image
- Preview of the selected image
- Threshold - image layer; see 9.
All parameters - except 13, 15, 16, 22, 26 and 27 - can be used by automation and are saved within the Live Set in Ableton Live.
For release notes refer to Changelog.md.
Caveats / known issues
- Before changing the image resolution or loading a new set of images it is recommended to stop the Live transport, since these actions need a lot of ressources so performance could lag.
- Currently only PNG images are supported.
- When using Ableton Push switching between note- and session-mode causes a short lag of video movement.
- Some PNG files happen to show not correctly in preview window and won't render in [jit.window] - this seems possibly to happen due to color profile issues - maybe ...
The recommended place for reporting issues is the github issue tracker

