🔔 Notice: Don't change any *.tfstate.* files manually during the whole process.
They are managed by Terraform automatically.
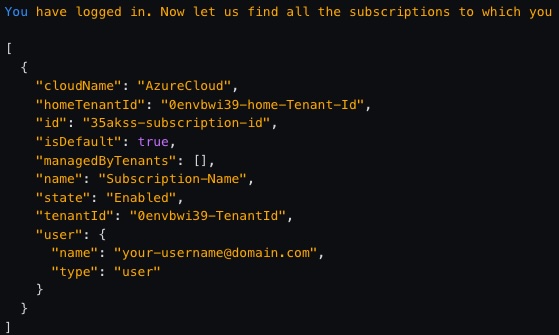
az loginIf you have successfully logged in, you'll see output like this:
Write down the id (subscription id) and tenantId here, you'll need them later. If you don't see or have missed the above output for some reason, you can try this command to recall it (a successful login is still required):
az account listOnce you've got your subscription id and tenant id, carry on with the following steps:
# set current active subscription
az account set --subscription "<SUBSCRIPTION_ID>"
# create a service principal
az ad sp create-for-rbac --role="Contributor" --scopes="/subscriptions/<SUBSCRIPTION_ID>"Write down the appId and password from the output. Now set some necessary environment variables.
For shell:
export ARM_CLIENT_ID="<APPID_VALUE>"
export ARM_CLIENT_SECRET="<PASSWORD_VALUE>"
export ARM_SUBSCRIPTION_ID="<SUBSCRIPTION_ID>"
export ARM_TENANT_ID="<TENANT_ID>"

# check it
printenv | grep '^ARM*'
For PowerShell:
$Env:ARM_CLIENT_ID = "<APPID_VALUE>"
$Env:ARM_CLIENT_SECRET = "<PASSWORD_VALUE>"
$Env:ARM_SUBSCRIPTION_ID = "<SUBSCRIPTION_ID>"
$Env:ARM_TENANT_ID = "<TENANT_ID>"

# check it
gci env:ARM_*terraform init
# optional:
terraform plan
terraform applyIf the last command terraform apply succeeds, you should be able to see something like this:
The values of the last few output variables *_name may vary for each run. Now connect to AKS:
For shell:
echo "$(terraform output kube_config | grep -v EOT)" > ./aks_cfg

export KUBECONFIG=./aks_cfg

kubectl get nodes
For PowerShell:
# According to my test with Windows, this command would leave quite a lot annoying
# line breakers among those BASE64 key values. If you face the same thing, please
# open this file with your favorite editor, and remove them before you continue.
terraform output kube_config | Select-String -NotMatch EOT > ./aks_cfg

$Env:KUBECONFIG = "./aks_cfg"

kubectl get nodesThis step is just to create a very basic get-started application. If you want to see a fuller example, please use this manifest instead, or dive deeper to the official repository: Azure-Samples/aks-store-demo.
kubectl apply -f apps/one-single-nginx.ymlCheck it
kubectl get deployment
kubectl get pod

kubectl get service -w
When you've just executed the last command, before a valid public IP is assigned, you should be able to see something
like below, EXTERNAL-IP is pending there:
After a while, once you see a valid public IP is assigned, press CTRL+C to terminate the command.
Now you can use the external IP above to access the service via a browser:
http://<EXTERNAL_IP>:8080
terraform destroy


