
This is a 3-in-1 project:
- A real product for DJs to help with identifying BPM (beats per minute) of the track currently playing.
- A real-world demo and a playground for Azure Static Web Apps service.
- Proof of concept for a Progressive Web App (PWA) driven by Workbox-powered service worker.
BPMTech.no - Free Online Real-Time BPM Counter for DJ

(click to watch on YouTube)
git clone https://github.com/webmaxru/bpm-counter.git
cd bpm-counter
npm install

# Installing tools for Static Web Apps and Azure Functions
npm install -g @azure/static-web-apps-cli
npm install -g azure-functions-core-tools@3 --unsafe-perm true# Instead of CRA's "npm start" we use SWA CLI's command to start everything at once
swa start http://localhost:3000 --run "npm start" --api-location ./apiOpen http://localhost:4280 in your browser.
To deploy this project to Azure, you need to fork this repo to your own GitHub account. You will also need an Azure subscription. If you don't have it, you can get Azure subscription here for free with $200 credit.
Please note, that Azure Static Web Apps service has a generous free tier which is enough for many types of the personal projects.
After you have the repo in your GitHub account, and Azure subscription ready, use an Azure Static Web Apps extension for Visual Studio Code or Azure Portal to create an SWA resource.
 - or -

Use the following parameters:
- App location: /
- Api location: api
- Output location: build
What will happen:
- In a few seconds, you will see the website deployed to Azure with a development URL like random-word.azurestaticapps.net (example). You can connect your own custom domain to it using "Custom domain" option in the portal.

- A GitHub Actions file will be created in
.github/workflowsfolder of your repo. Similar to the one in the original repo.
You are now ready to explore the Azure Static Web Apps features.
- Do any code change in the application. Something that will be clearly visible on the first page, for example app name in the header.
- Commit and push the changes to
mainbranch (or the branch you specified during resource creation). - Go to Actions page of your repo to make sure that the workflow is running.
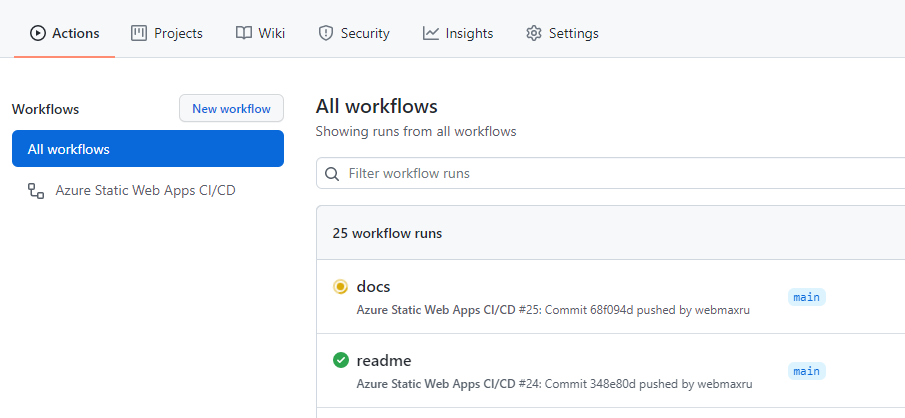
- On completion, open your website in a browser, you will see the new version.
Please note, this is a service worker-driven application, so you will see the prompt to reload the page.

You can review pull requests in pre-production environment before they are merged to the main branch.
- Create a branch for your new feature.
git checkout -b new-featureDo any code change in the application. Something that will be clearly visible on the first page, for example change background color.
- Commit and push the changes to the branch.
git add .
git commit -m "New feature"
git push origin new-feature-
Go to you GitHub repo page and create a new Pull Request from the branch.
-
Go to Actions page of your repo to make sure that the workflow is running.

-
On completion, you will have a new version of the website deployed to Azure to a new URL. You can get this URL either from the workflow output on Azure or in the Azure Portal on Environments tab. GitHub Actions bot will also post this URL to your Pull Request comments.
-
Now, you can run various tests on your new version.
If the new version looks good and you merge this Pull Request to the main (tracked by SWA) branch, the workflow will automatically deploy the new version to this tracked branch and delete staging environment.

Please note, staged versions of your application are currently accessible publicly by their URL, even if your GitHub repository is private.
You can use the Azure Functions to build your own API for your static web app. The simplest option is using Managed Functions option: all Azure Functions you create in api directory will be automatically deployed to the SWA. In this project, we use feedback function to gather statistics on correct or wrong BPMs detected.
To test it even without the music playing, you can pass a "hardcoded" BPM value to the application: by using bpm parameter. How to test it:
- Click "Start listening" button.
- Click "Thumbs up" button.
- Check the network POST request made to
https://bpmtech.no/api/feedbackendpoint and its response.
How to create a new API function:
- Use "Create HTTP Function" button in VS Code extension.

- Follow the creation wizard.
- Write your code.
- Commit and push the changes to the branch.
- Your function will be automatically deployed to the SWA.

Azure SWA supports custom routing which allows you to:
- Set up redirects
- Organize navigation fallback for the single-page applications
- Set up custom headers
- Register MIME types
- Define custom pages for HTTP errors
- Protect resources by a role-based access control (RBAC)
You configure the rules in staticwebapp.config.json which you can put anywhere in the application folder of the repo, there is no requirement to put it in the output (public) folder).
How to test it:
- Go directly to /about page. You will see the application, not error 404 because of the navigation fallback rule.
- Go to any non-existing resource from the navigationFallback exclude list. You will see the custom 404 error page configured in this rule.
- Check the response headers. They contain "X-Powered-By: Maxim Salnikov and Azure Static Web Apps" set on this line.
- Go to /aboutme page. You will be redirected to /about because of this rule.
Please note, the hosted application is controlled by a service worker. So after the first load, the routing might look not exactly like explained above. To test the app without a service worker, start a new browser session in Private/Incognito mode.
With the help of Azure Static Web Apps, you can protect your application resources with the role-based access control (RBAC).
Setting up authentication:
- You specify the role(s) needed to access particular URLs in the staticwebapp.config.json file. There are two built-in roles:
anonymous(for all users) andauthenticated(for those who are logged in). - If the user tries to access URL without the required role, they will get error 401. You might want to set up a redirect to the login page.
- To let users log in, you direct users to one of the built-in identity providers (Azure Active Directory, GitHub, Twitter) login pages. For example, /.auth/login/twitter. (You can also create a custom URL for this page using routing rules.). The folder
.authon your Azure SWA project is built-in, it's so called system folder which contains some useful endpoints. - After logging in using the selected identity provider and giving consent on sharing personal information (email or user handle), the user will be redirected back to the application. And if the role is correctly set, they will get an access to the requested URL.
- To give user a custom role (for example,
administrator), you use "Role management" tab in the Azure Portal. Click on "Invite" button, fill in the form and click "Generate". You will receive a link to send to the user to accept the role.

You can manage the users and roles in the "Role management" tab.

- You can read authenticated user credentials (for example to implement some logic in UI) by sending request to /.auth/me endpoint. To check authentication info of the API calls, you read the
x-ms-client-principalheader in the request. - To log out, you redirect users to /.auth/logout page.
- To remove personally identifying information (email or user handle) from the application, you direct users to the link that is related to a particular identity provider: /.auth/purge/twitter.
Demo:
- Try to access /account page. It's configured to be available only for
authenticatedusers by this rule. You will be redirected to the Twitter login page and asked for consent. - After logging in with Twitter, you will be redirected back to the application, and now can access /account page.
- Open /.auth/me URL in the separate tab to see the information returned by the server.
- Log out by going to /.auth/logout URL.
- You can repeat the steps above to test the custom role needed to access /admin page. In this case, you need to give the user the role
administratoras described above.
In the project directory, you can run:
Runs the app in the development mode.
Open http://localhost:3000 to view it in the browser.
The page will reload if you make edits.
You will also see any lint errors in the console.
The service worker is not in use in the development environment.
Builds the app for production to the build folder.
It correctly bundles React in production mode and optimizes the build for the best performance.
The build is minified and the filenames include the hashes.
Your app is ready to be deployed!
The production-ready service worker will also be generated.
- Real-time BPM detection is based on realtime-bpm-analyzer library by David Lepaux
- BPM detection in the files is based on bpm-detective library by Carl Törnqvist
- Spectrum analyzer is based audioMotion-analyzer library by Henrique Vianna
Maxim Salnikov. Feel free to contact me if you have any questions about the project, PWA, Azure Static Web Apps.