

It's an extension for Torchbox's Wagtail CMS to help you manage and render multi-level navigation and simple flat menus in a consistent, flexible way.
The current version is compatible with Wagtail >= 1.5, and Python 2.7, 3.3, 3.4 and 3.5.
The MainMenu model lets you define the root-level items for your projects's main navigation (or one for each site, if it's a multi-site project) using an inline model MainMenuItem. These items can link to pages (you can append an optional hash or querystring to the URL, too) or custom URLs. The custom URL field won't force you to enter a valid URL either, so you can add things like "#request-callback" or "#signup" to link to areas on the active page (perhaps as JS modals).
The site's page tree powers everything past the root level, so you don't have to recreate it elsewhere. And as you'd expect, only links to published pages will appear when rendering.
Pages still need to have show_in_menus checked to appear in menus (if you really needed to hide a page for some reason, it would be frustrating if they didn't), but your project's main navigation (likely displayed in a way that is sensitive to change) will be protected from accidental additions.
Have you ever hard-coded a menu into a footer at the start of a project, only for those pages never to come into existence? Or maybe the pages were created, but their URLs changed later on, breaking the hard-coded links? How about 'secondary navigation' menus in headers? Flat menus allow you to manage these kind of menus via the CMS, instead of hard-coding them. This means that the page URLs dynamically update to reflect changes, and making updates is possible without having to touch a single line of code.
As you'd expect, only links to published pages will appear when rendering, and just like main menu items, pages must have show_in_menus checked in order to appear in flat menus.
Flat menus are designed for outputting simple, flat lists of links, but they CAN be made to display multiple levels of pages too. See the instructions below for using the {% flat_menu %} tag.
3. Offers a solution to the issue of key page links becoming 'toggles' in multi-level drop-down menus
Extend the wagtailmenus.models.MenuPage model instead of the usual wagtail.wagtailcore.models.Page to create your custom page types, and gain a couple of extra fields that will allow you to configure certain pages to appear again alongside their children in multi-level menus. Use the menu tags provided, and that behaviour will remain consistent in all menus throughout your site.
No more adding additional pages into the tree. No more hard-coding additional links into templates, or resorting to javascript hacks.
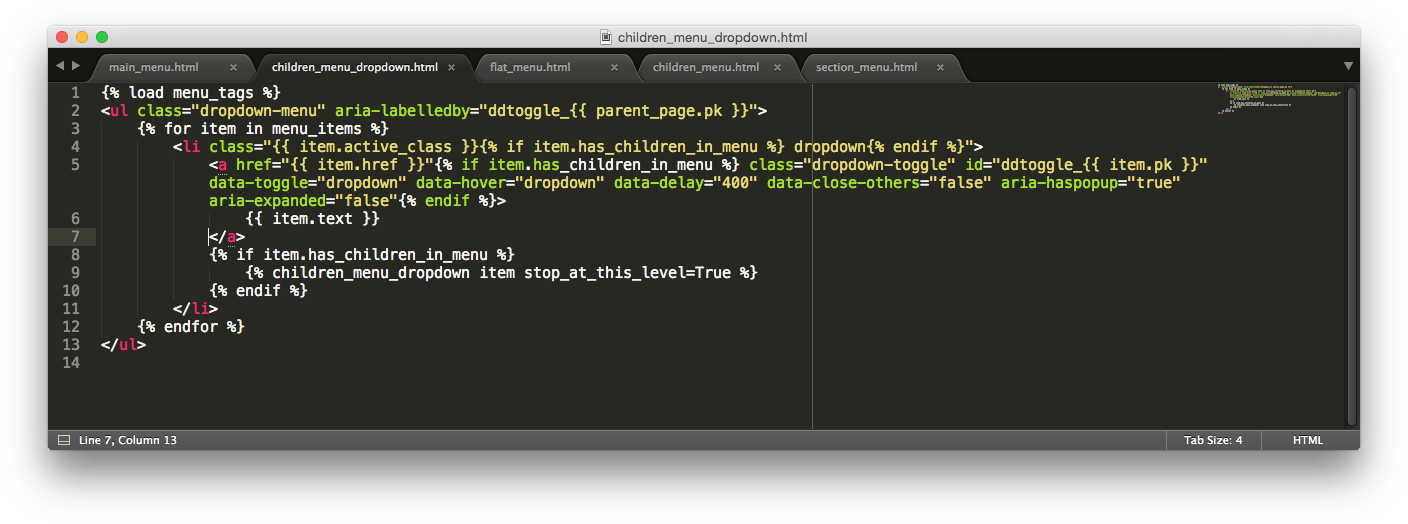
Each tag comes with a default template that's designed to be fully accessible and compatible with Bootstrap 3. Limiting any project to a set of pre-defined templates would be silly though, which is why every template tag allows you to render menus using a template of your choosing. You can also override the templates in the same way as any other Django project... by putting templates of the same name into a preferred location.
- Install the package using pip:
pip install wagtailmenus. - Add
wagtail.contrib.modeladmintoINSTALLED_APPSin your project settings, if it's not there already. - Add
wagtailmenustoINSTALLED_APPSin your project settings. - Run
python manage.py migrate wagtailmenusto set up the initial database tables.
Since version 1.2, watailmenus has depended on the wagtail.contrib.modeladmin package that was added to wagtail in 1.5. However, earlier versions of wagtailmenus can be used with earlier versions of wagtail with the help of another third-party package, wagtailmodeladmin.
- Install
wagtailmodeladminby following these instructions: https://github.com/rkhleics/wagtailmodeladmin. - Install this package using pip:
pip install wagtailmenus>=1.1.1,<1.2.0. - Add
wagtailmenustoINSTALLED_APPSin your project settings (afterwagtailmodeladminand before yourcoreapp). - Run
python manage.py migrate wagtailmenusto set up the initial database tables.
NOTE: It is not necessary to extend MenuPage for all custom page types; Just ones you know will be used for pages that may have children, and will need the option to repeat themselves in sub-menus when listing those children.
- In your
coreapp and other apps (wherever you have defined a custom page/content model to use in your project), importwagtailmenus.models.MenuPageand extend that instead ofwagtail.wagtailcore.models.Page. - Run
python manage.py makemigrationsto create migrations for the apps you've updated. - Run
python manage.py migrateto add apply those migrations.
Skip to a section:
- Defining root-level main menu items in the CMS
- Using the
{% main_menu %}tag - Defining flat menus in the CMS
- Using the
{% flat_menu %}tag - Using the
{% section_menu %}tag - Using the
{% children_menu %}tag - Using the
{% sub_menu %}tag - Writing your own menu templates
- Optional repetition of selected pages in menus using
MenuPage - Overriding default behaviour with settings
- Log into the Wagtail CMS for your project (as a superuser).
- Click on
Settingsin the side menu to access the options in there, then selectMain menu. - You'll be automatically redirected to the
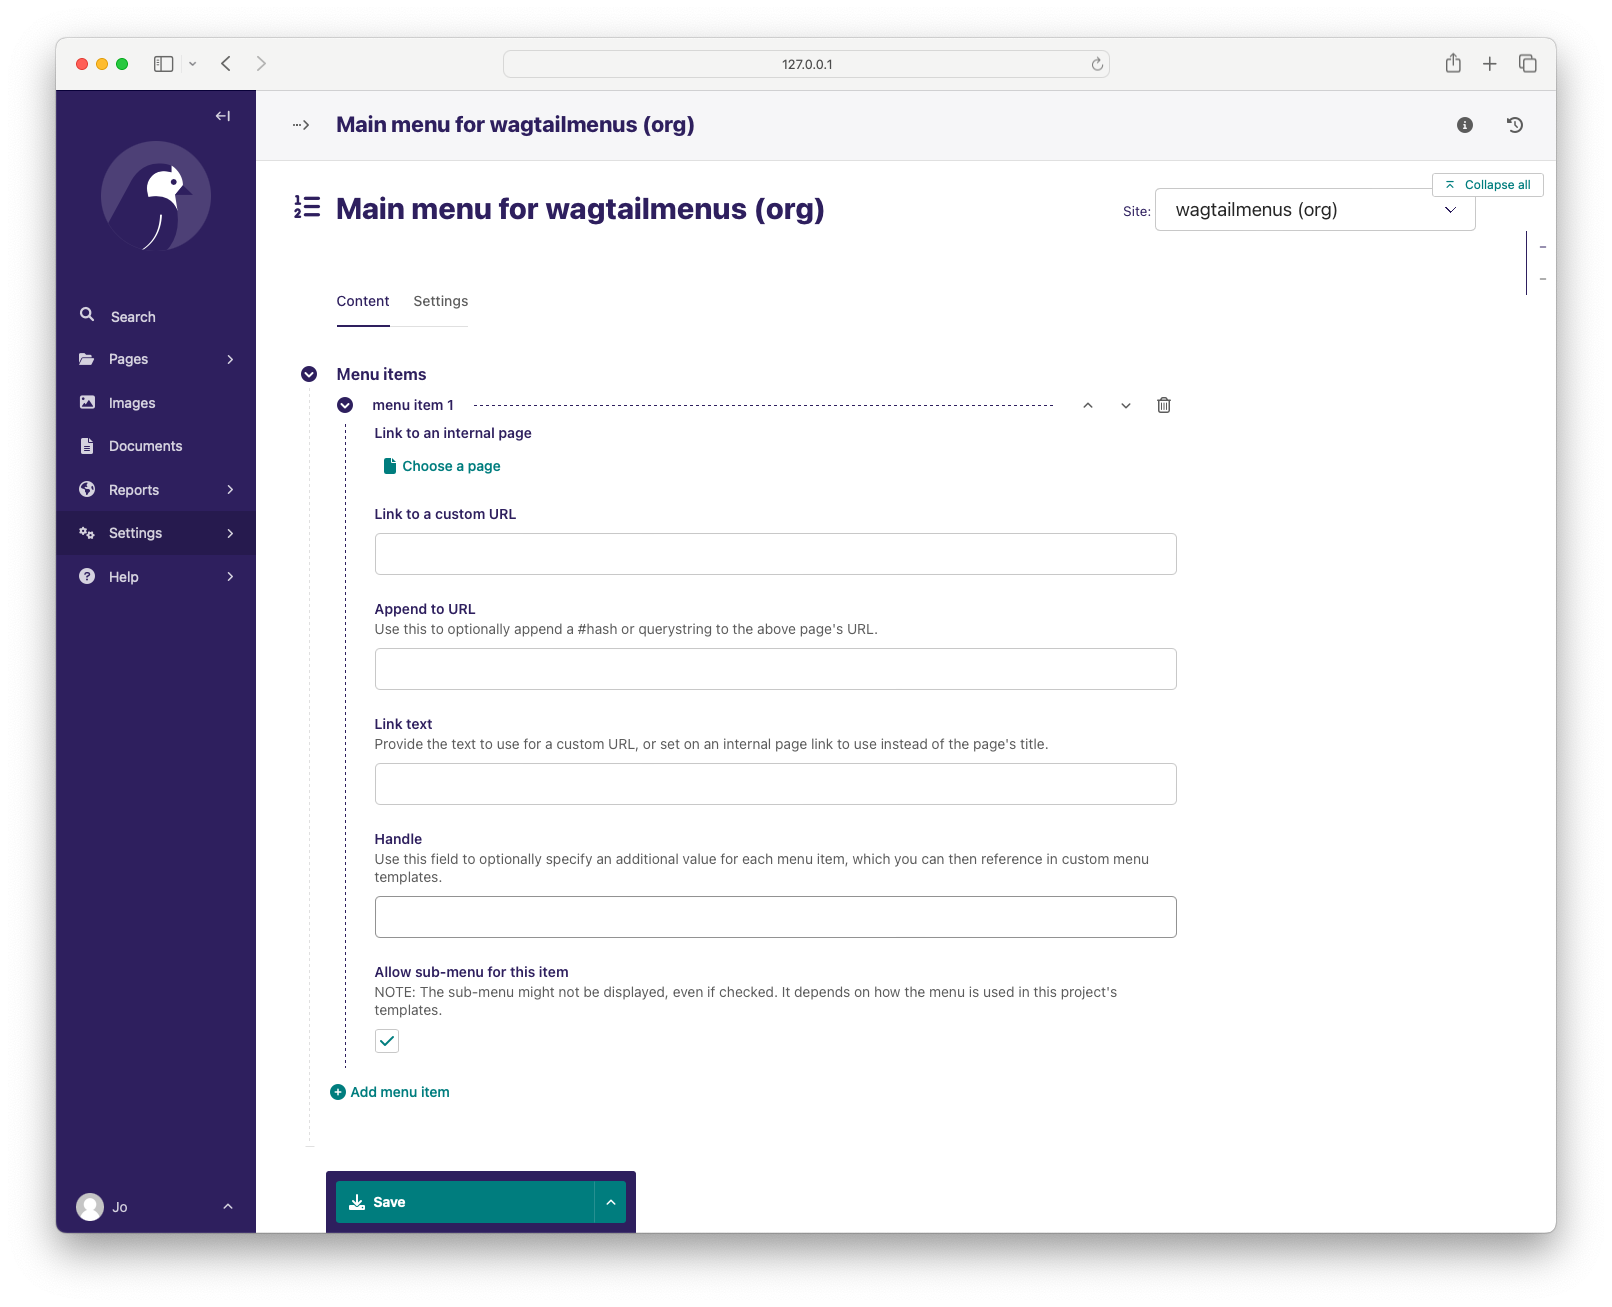
Main menuedit page for the current site (or the 'default' site, if the current site cannot be identified). For multi-site projects, a 'site switcher' will appear in the top right, allowing you to edit main menus for each site. - Use the MENU ITEMS inline panel to define the root-level items, and save your changes when finished.
- Log into the Wagtail CMS for your project (as a superuser).
- Click on
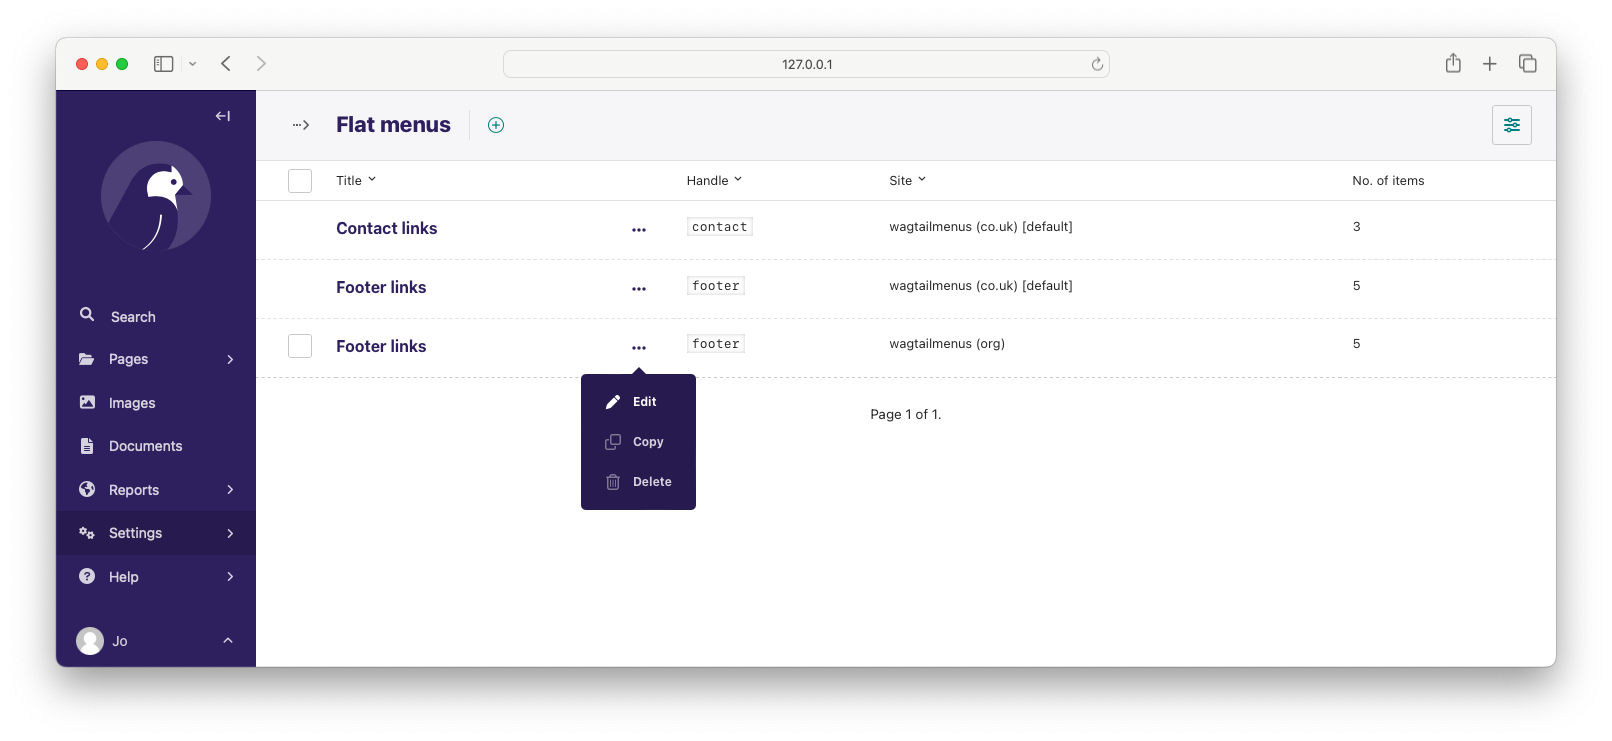
Settingsin the side menu to access the options in there, then selectFlat menus. - Click the button at the top of the page to add a flat menu for your site (or one for each of your sites if you are running a multi-site setup).
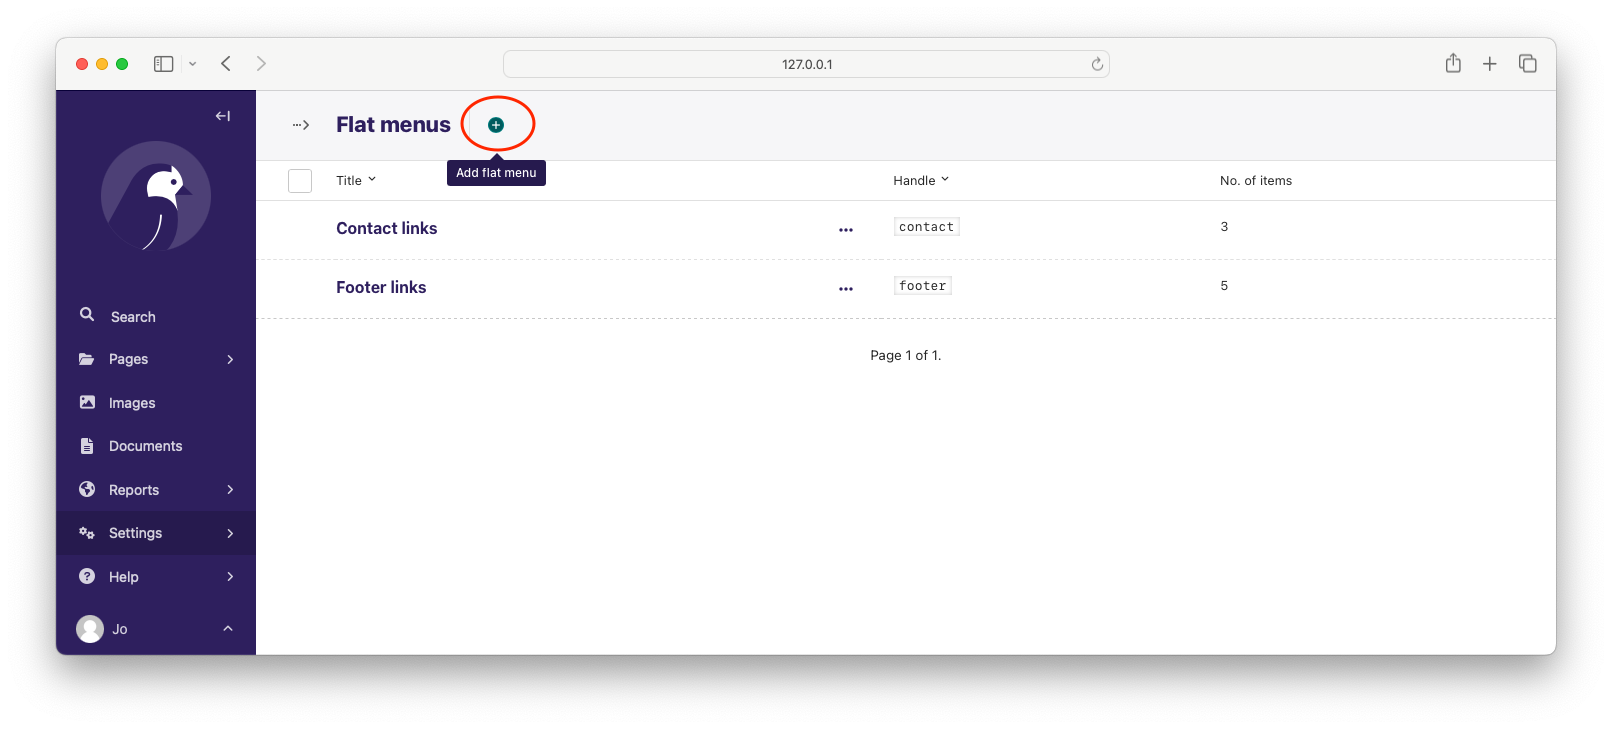
- Fill out the form, choosing a 'unique for site'
handleto reference in your templates, and using the MENU ITEMS inline panel to define the links you want the menu to have. Save your changes when finished.
The {% main_menu %} tag allows you to display the MainMenu defined for the current site in your Wagtail project, with CSS classes automatically applied to each item to indicate the current page or ancestors of the current page. It also does a few sensible things, like never adding the 'ancestor' class for a homepage link, or outputting children for it.
- In whichever template you want your main menu to appear, load
menu_tagsusing{% load menu_tags %}. - Add
{% main_menu %}to your template, where you want the menu to appear.
Optional params for {% main_menu %}
max_levels(default:2): Provide an integer value to control how many levels of pages should be rendered. If you only want to display the root-level menu items defined as inlines in the CMS (whether the selected pages have children or not), addmax_levels=1to the tag in your template. You can display additional levels by providing a higher value. You can also override the default value by adding aWAGTAILMENUS_DEFAULT_MAIN_MENU_MAX_LEVELSsetting to your project's settings module.show_multiple_levels(default:True): Addingshow_multiple_levels=Falseto the tag in your template essentially overridesmax_levelsto1. It's just a little more descriptive.allow_repeating_parents(default:True): Repetition-related settings on your pages are respected by default, but you can addallow_repeating_parents=Falseto ignore them, and not repeat any pages in sub-menus when rendering multiple levels.apply_active_classes(default:True): The tag will attempt to add 'active' and 'ancestor' CSS classes to the menu items (where applicable) to indicate the active page and ancestors of that page. To disable this behaviour, addapply_active_classes=Falseto the tag in your template. You can change the CSS classes used by addingWAGTAILMENUS_ACTIVE_CLASSandWAGTAILMENUS_ACTIVE_ANCESTOR_CLASSsettings to your project's settings module.template(default:'menus/main_menu.html'): Lets you render the menu to a template of your choosing. You can also name an alternative template to be used by default, by adding aWAGTAILMENUS_DEFAULT_MAIN_MENU_TEMPLATEsetting to your project's settings module.
- In whichever template you want your menu to appear, load
menu_tagsusing{% load menu_tags %}. - Add
{% flat_menu 'menu-handle' %}to your template, where you want the menu to appear (where 'menu-handle' is the unique handle for the menu you added).
Optional params for {% flat_menu %}
show_menu_heading(default:True): Passed through to the template used for rendering, where it can be used to conditionally display a heading above the menu.show_multiple_levels(default:False): Flat menus are designed for outputting simple, flat lists of links. But, if the need arises, you can addshow_multiple_levels=Trueto the tag in your template to output multiple page levels. If you haven't already, you may also need to check the "Allow sub-menu for this item" box for the menu items you wish to show further levels for.max_levels(default:2): Ifshow_multiple_levels=Trueis being provided to enable multiple levels, you can use this parameter to specify how many levels you'd like to display.apply_active_classes(default:False): Unlikemain_menuandsection_menu,flat_menuwill NOT attempt to add 'active' and 'ancestor' classes to the menu items by default, as this is often not useful. You can override this by addingapply_active_classes=trueto the tag in your template.template(default:'menus/flat_menu.html'): Lets you render the menu to a template of your choosing. You can also name an alternative template to be used by default, by adding aWAGTAILMENUS_DEFAULT_FLAT_MENU_TEMPLATEsetting to your project's settings module.
The {% section_menu %} tag allows you to display a context-aware, page-driven menu in your project's templates, with CSS classes automatically applied to each item to indicate the active page or ancestors of the active page.
- In whichever template you want the section menu to appear, load
menu_tagsusing{% load menu_tags %}. - Add
{% section_menu %}to your template, where you want the menu to appear.
Optional params for {% section_menu %}
show_section_root(default:True): Passed through to the template used for rendering, where it can be used to conditionally display the root page of the current section.max_levels(default:2): Lets you control how many levels of pages should be rendered (the section root page does not count as a level, just the first set of pages below it). If you only want to display the first level of pages below the section root page (whether pages linked to have children or not), addmax_levels=1to the tag in your template. You can display additional levels by providing a higher value.show_multiple_levels(default:True): Addingshow_multiple_levels=Falseto the tag in your template essentially overridesmax_levelsto1. It's just a little more descriptive.allow_repeating_parents(default:True): Repetition-related settings on your pages are respected by default, but you can addallow_repeating_parents=Falseto ignore them, and not repeat any pages in sub-menus when rendering.apply_active_classes(default:True): The tag will add 'active' and 'ancestor' classes to the menu items where applicable, to indicate the active page and ancestors of that page. To disable this behaviour, addapply_active_classes=Falseto the tag in your template.template(default:'menus/section_menu.html'): Lets you render the menu to a template of your choosing. You can also name an alternative template to be used by default, by adding aWAGTAILMENUS_DEFAULT_SECTION_MENU_TEMPLATEsetting to your project's settings module.
The {% children_menu %} tag can be used in page templates to display a menu of children of the current page. You can also use the parent_page argument to show children of a different page.
- In whichever template you want the menu to appear, load
menu_tagsusing{% load menu_tags %}. - Use the
{% children_menu %}tag where you want the menu to appear.
Optional params for {% children_menu %}
parent_page: The tag will automatically pick upselffrom the context to render the children for the active page, but you render a children menu for a different page, if desired. To do so, addparent_page=page_objto the tag in your template, wherepage_objis thePageinstance you wish to display children for.max_levels(default:1): Lets you control how many levels of pages should be rendered. For example, if you want to display the direct children pages and their children too, addmax_levels=2to the tag in your template.allow_repeating_parents(default:True): Repetition-related settings on your pages are respected by default, but you can addallow_repeating_parents=Falseto ignore them, and not repeat any pages in sub-menus when rendering.apply_active_classes(default:False): Unlikemain_menuandsection_menu,children_menuwill NOT attempt to add 'active' and 'ancestor' classes to the menu items by default, as this is often not useful. You can override this by addingapply_active_classes=trueto the tag in your template.template(default:'menus/children_menu.html'): Lets you render the menu to a template of your choosing. You can also name an alternative template to be used by default, by adding aWAGTAILMENUS_DEFAULT_CHILDREN_MENU_TEMPLATEsetting to your project's settings module.
The {% sub_menu %} tag is used within menu templates to render additional levels of pages within a menu. It's designed to pick up on variables added to the context by the other menu tags, and so can behave a little unpredictably if called directly, without those context variables having been set. It requires only one parameter to work, which is menuitem_or_page, which can either be an instance of MainMenuItem, FlatMenuItem, or Page.
Optional params for {% sub_menu %}
stop_at_this_level: By default, the tag will figure out whether further levels should be rendered or not, depending on what you supplied asmax_levelsto the original menu tag. However, you can override that behaviour by adding eitherstop_at_this_level=Trueorstop_at_this_level=Falseto the tag in your custom menu template.allow_repeating_parents: By default, the tag will inherit this behaviour from whatever was specified for the original menu tag. However, you can override that behaviour by adding eitherallow_repeating_parents=Trueorallow_repeating_parents=Falseto the tag in your custom menu template.apply_active_classes: By default, the tag will inherit this behaviour from whatever was specified for the original menu tag. However, you can override that behaviour by adding eitherapply_active_classes=Trueorapply_active_classes=Falseto the tag in your custom menu template.template(default:'menus/sub_menu.html'): Lets you render the menu to a template of your choosing. You can also name an alternative template to be used by default, by adding aWAGTAILMENUS_DEFAULT_SUB_MENU_TEMPLATEsetting to your project's settings module.
The following variables are added to the context by all of the above tags, which you can make use of in your templates:
menu_items: A list ofMenuItemorPageobjects with additional attributes added to help render menu items for the current level.current_level: The current level being rendered. This starts at1for the initial template tag call, then increments each timesub_menuis called recursively in rendering that same menu.current_template: The name of the template currently being used for rendering. This is most useful when rendering asub_menutemplate that callssub_menurecursively, and you wish to use the same template for all recursions.max_levels: The maximum number of levels that should be rendered, as determined by the originalmain_menu,section_menu,flat_menuorchildren_menutag call.allow_repeating_parents: A boolean indicating whetherMenuPagefields should be respected when rendering further menu levels.apply_active_classes: A boolean indicating whethersub_menutags should attempt to add 'active' and 'ancestor' classes to menu items when rendering further menu levels.
Each item in menu_items has the following attributes:
href: The URL that the menu item should link totext: The text that should be used for the menu itemactive_class: A class name to indicate the 'active' state of the menu item. The value will be 'active' if linking to the current page, or 'ancestor' if linking to one of it's ancestors.has_children_in_menu: A boolean indicating whether the menu item has children that should be output as a sub-menu.
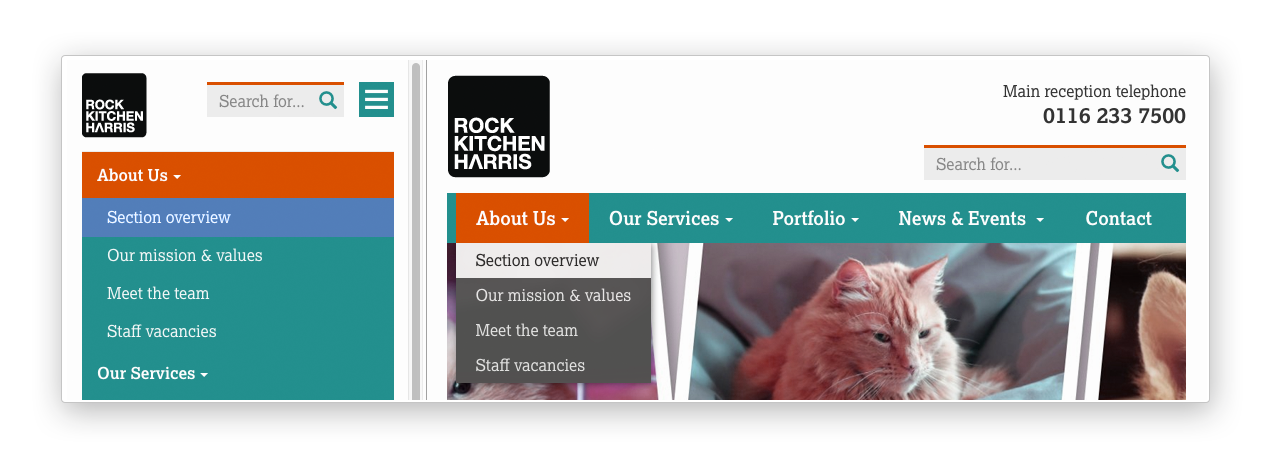
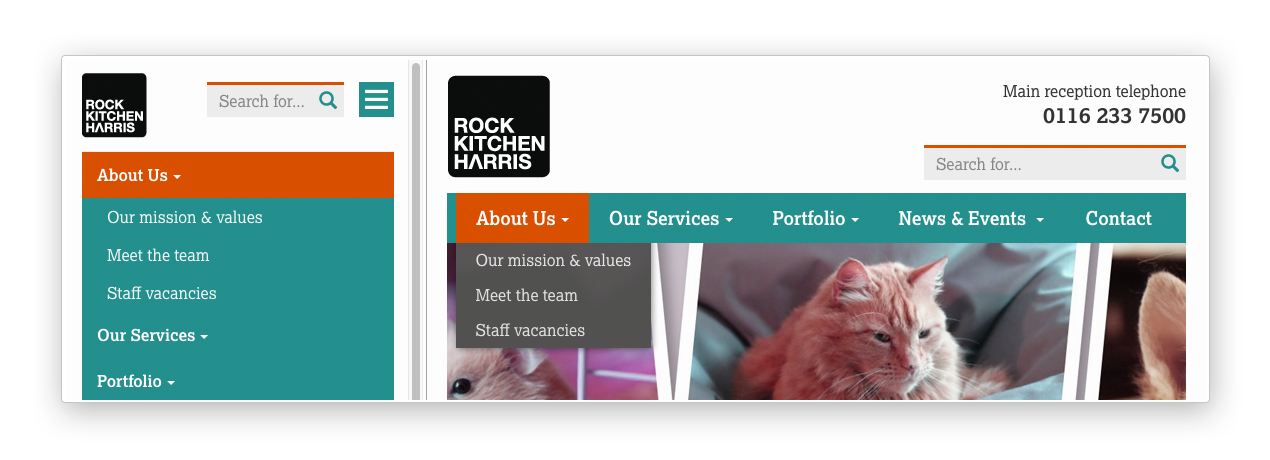
Let's say you have an 'About Us' section on your site. The top-level 'About Us' page has content that is just as important as that on the more specific pages below it (e.g. 'Meet the team', 'Our mission and values', 'Staff vacancies'). Because of this, you'd like visitors to be able to access the 'About Us' page from your navigation as easily as those pages. But, your site uses drop-down navigation, and the 'About Us' link no longer takes you to that page when clicked... it simply acts as a toggle for hiding and showing the pages below it:
Presuming the 'About Us' page extends wagtailmenus.models.MenuPage:
- Edit the 'About Us' page in the CMS, and click on the
Settingstab. - Uncollapse the
ADVANCED MENU BEHAVIOURpanel by clicking the downward-pointing arrow next to the panel's label.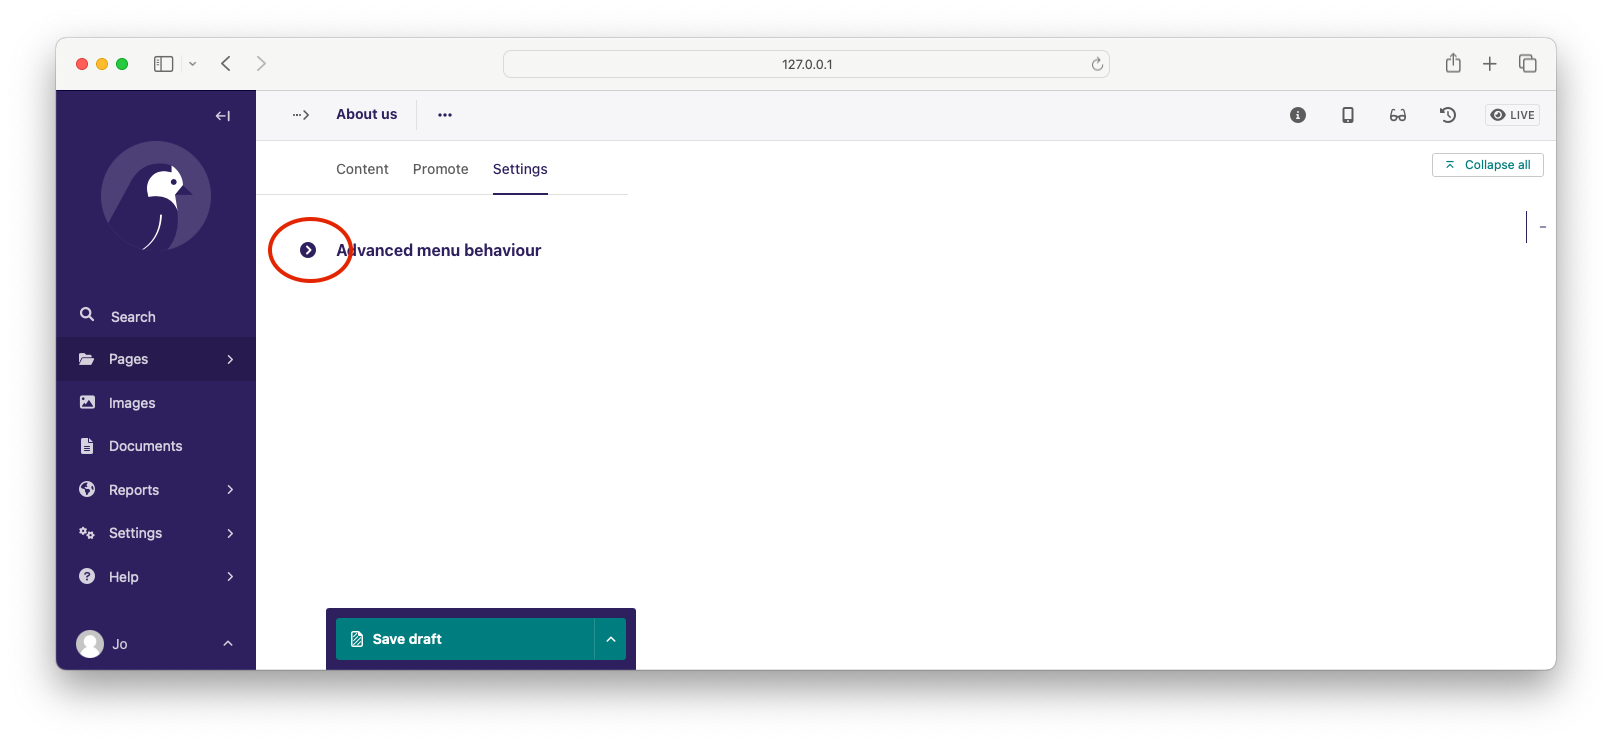
- Tick the Repeat in sub-navigation checkbox that appears, and publish your changes.


Now, wherever the children of the About Us page are output (using one of the above menu tags), an additional link to the About Us page will appear alongside them, allowing the page to be accessed more easily. In the example above, you'll see I've added the text Section overview into the Repeated item link text field. With this set, the repeated item text should be 'Section overview', instead of just repeating the page's title, like so:
The menu tags do some extra work to make sure both links are never assigned the 'active' class. When on the 'About Us' page, the tags will treat the repeated item as the 'active' page, and just assign the 'ancestor' class to the original, so that the behaviour/styling is consistent with other page links rendered at that level.
You can override some of wagtailmenus' default behaviour by adding one of more of the following to your project's settings:
WAGTAILMENUS_ACTIVE_CLASS(default:'active'): The class added to menu items for the currently active page (when using a menu template withapply_active_classes=True)WAGTAILMENUS_ACTIVE_ANCESTOR_CLASS(default:'ancestor'): The class added to any menu items for pages that are ancestors of the currently active page (when using a menu template withapply_active_classes=True)WAGTAILMENUS_MAINMENU_MENU_ICON(default:'list-ol'): Use this to change the icon used to representMainMenuin the Wagtail admin area.WAGTAILMENUS_FLATMENU_MENU_ICON(default:'list-ol'): Use this to change the icon used to representFlatMenuin the Wagtail admin area.WAGTAILMENUS_SECTION_ROOT_DEPTH(default:3): Use this to specify the 'depth' value of a project's 'section root' pages. For most Wagtail projects, this should be3(Root page = 1, Home page = 2), but it may well differ, depending on the needs of the project.WAGTAILMENUS_DEFAULT_MAIN_MENU_TEMPLATE(default:'menus/main_menu.html'): The name of the template used for rendering by the{% main_menu %}tag when atemplateparameter value isn't provided.WAGTAILMENUS_DEFAULT_FLAT_MENU_TEMPLATE(default:'menus/flat_menu.html'): The name of the template used for rendering by the{% flat_menu %}tag when atemplateparameter value isn't provided.WAGTAILMENUS_DEFAULT_SECTION_MENU_TEMPLATE(default:'menus/section_menu.html'): The name of the template used for rendering by the{% section_menu %}tag when atemplateparameter value isn't provided.WAGTAILMENUS_DEFAULT_CHILDREN_MENU_TEMPLATE(default:'menus/children_menu.html'): The name of the template used for rendering by the{% children_menu %}tag when atemplateparameter value isn't provided.WAGTAILMENUS_DEFAULT_SUB_MENU_TEMPLATE(default:'menus/sub_menu.html'): The name of the template used for rendering by the{% sub_menu %}tag when atemplateparameter value isn't provided.WAGTAILMENUS_DEFAULT_MAIN_MENU_MAX_LEVELS(default:2): The default number of maximum levels rendered by{% main_menu %}when amax_levelsparameter value isn't provided.WAGTAILMENUS_DEFAULT_FLAT_MENU_MAX_LEVELS(default:2): The default number of maximum levels rendered by{% flat_menu %}whenshow_multiple_levels=Trueand amax_levelsparameter value isn't provided.WAGTAILMENUS_DEFAULT_SECTION_MENU_MAX_LEVELS(default:2): The default number of maximum levels rendered by{% section_menu %}when amax_levelsparameter value isn't provided.WAGTAILMENUS_DEFAULT_CHILDREN_MENU_MAX_LEVELS(default:1): The default number of maximum levels rendered by{% children_page_menu %}when amax_levelsparameter value isn't provided.
If you'd like to become a wagtailmenus contributor, we'd be happy to have you. You should start by taking a look at our contributor guidelines