Parlez-vous Django? Internationalization with Wagtail
What you should know
To complete this tutorial, you should be familiar with the following:
- Writing Python code
- Entering commands and in the command line
While it's not strictly necessary, you might find that you'll get more out of this tutorial if you complete the introductory Django tutorial first.
Prerequisites
To complete this tutorial, you will need:
- Python 3.8 or greater
- Git
- A text editor or IDE
- A GitHub account (required for GitPod)
- Any web browser
Step One: Set up Wagtail
Create a virtual environment
Gitpod
If you don't have Python already installed on your machine or if you would prefer not to troubleshoot environment issues, then you can complete this workshop in Gitpod. You will have to be more careful about saving your work since Gitpod environments deactivate after a period of inactivity.
Click the button below to launch Gitpod.
NOTE: A GitHub account is required to use Gitpod

Venv
If you already have Python installed on your machine, you can create a local virtual environment using venv. Open your command line and navigate to the directory you want to build your project in. Then enter the following commands to creative a virtual environment.
python
python -m venv env
source env/bin/activate
Set up Wagtail
Once you have a virtual environment set up, we can install Wagtail and start setting up our very first Wagtail website. In your project directory, enter the following command in your command line:
pip install wagtail
This command tells the Python package manager pip to install the latest release of Wagtail along with all of the dependencies that are needed for Wagtail. After Wagtail is installed, you can confirm that it is installed with:
pip show wagtail
After Wagtail is installed, you can use one of Wagtail's built-in commands to start a brand new website. For this tutorial, we're going to be creating a mini-blog project called myblog.
wagtail start myblog .
Don't forget the . at the end of the command. It is telling Wagtail to put all of the files in the current working directory.
Once all of the files are set up, you'll need to enter some commands to set up the test database and all of the migration files that Wagtail needs. You can do that with the migrate command.
python manage.py migrate
After the migrations are complete, you'll need to create a superuser so that you can access the backend of your Wagtail website. Use the following command:
python manage.py createsuperuser
Follow the prompts in your command line to create your superuser. Once you have a superuser set up, you can start up the test server to see your new Wagtail site in action.
python manage.py runserver
If the server has started up without any errors, you can navigate to http://127.0.0.1:8000 in your web browser to see your Wagtail website. If you've successfully installed Wagtail, you should see a home page with a large teal egg on it.
To test that your superuser works, navigate to http://127.0.0.1:8000/admin and login with the credentials you created.
Now you have a basic Wagtail website set up. Next, we're going to add a package that will help you organize and translate content across different languages and locales.
📝 A quick note for Gitpod users 📝
To log into the Wagtail backend, you're going to have to add a line of code to your dev.py file in settings. Navigate to myblog/settings/dev.py and add the following line of code to your file:
CSRF_TRUSTED_ORIGINS = ['https://*.gitpod.io']
Step Two: Install and configure Wagtail Localize
Wagtail Localize is a package that will help you set up a translation workflow for your website. It provides a few different options for translation workflows, but one of the most useful features is the ability to sync content from the main language to other languages.
First, a quick migration update
Before we install Wagtail Localize, you'll need to change a migration because there is currently a bug that creates a table conflict in the database with Wagtail Localize. To prevent that headache, execute thise command in your terminal
python manage.py migrate wagtailcore 0058
Do NOT, I repeat, DO NOT do a regular migration after executing this command until after you add the configuration for Wagtail Localize. This command reverts the wagtailcore migrations back to wagtailcore 0058 to prevent a table conflict from occurring. This step should hopefully be unnecessary after the next Wagtail release.
Install the Wagtail Localize package
For this tutorial, we're going to use Wagtail 4.0 and an alpha version of Wagtail Localize. To install that version of Wagtail Localize, enter the following command in your command line:
pip install wagtail-localize==1.3a4
With that update in place and the package installed, now you are going to make some changes to base.py and urls.py. Most of the steps you're going to perform next come from the Wagtail Localize documentation.
Add Wagtail Localize to INSTALLED_APPS
Go to myblog\settings\base.py and open the file in your text editor or IDE. Find the INSTALLED_APPS setting, and insert 'wagtail_localize' and 'wagtail_localize.locales' in between
'search and 'wagtail.contrib.forms':
INSTALLED_APPS = [
    "home",
    "search",
    # Insert these here
    "wagtail_localize",
    "wagtail_localize.locales",
    "wagtail.contrib.forms",
    "wagtail.contrib.redirects",
    # ...
]
Note that the wagtail_localize.locales module is a temporary replacement for Wagtail's builtin wagtail.locales
module.
Enable internationalization in Wagtail
Find the "Internationalisation" section, and add the WAGTAIL_I18N_ENABLED setting:
USE_I18N = True

USE_L10N = True

# Add this
WAGTAIL_I18N_ENABLED = True

USE_TZ = True
Configure languages
In the "Internationalisation" section, add the following to set the LANGUAGES and WAGTAIL_CONTENT_LANGUAGES
settings to English and French:
WAGTAIL_CONTENT_LANGUAGES = LANGUAGES = [
    ("en", "English"),
    ("fr", "French"),
]
Add machine translation configuration
Wagtail Localize has a few different options for machine translation. Two common configurations are for Google Cloud Translation and Deepl. Both of those options require setting accounts up with credit cards, so were going to use the dummy translator for this tutorial to show you how things work. But if you want to integrate a machine translator, you can follow the steps in the Wagtail Localize Documentation to add the configuration for your preferred translator to base.py. There is also an integration available for Pontoon.
To add the dummy translator, add the following code to your base.py file:
WAGTAILLOCALIZE_MACHINE_TRANSLATOR = {
    "CLASS": "wagtail_localize.machine_translators.dummy.DummyTranslator",
}
Enable LocaleMiddleware
Django's LocaleMiddleware detects a user's browser language and forwards them to the most appropriate language
version of the website.
To enable it, insert "django.middleware.locale.LocaleMiddleware" into the middleware setting
above RedirectMiddleware:
MIDDLEWARE = [
    "django.contrib.sessions.middleware.SessionMiddleware",
    "django.middleware.common.CommonMiddleware",
    "django.middleware.csrf.CsrfViewMiddleware",
    "django.contrib.auth.middleware.AuthenticationMiddleware",
    "django.contrib.messages.middleware.MessageMiddleware",
    "django.middleware.clickjacking.XFrameOptionsMiddleware",
    "django.middleware.security.SecurityMiddleware",
    # Insert this here
    "django.middleware.locale.LocaleMiddleware",
    "wagtail.contrib.redirects.middleware.RedirectMiddleware",
]
Configure URL paths
Next, you need configure which URL paths are translatable so that Django will prefix them with the language code.
Open myblog/urls.py. You'll see that there are two groups of URL patterns with an
if settings.DEBUG: block in between them.
The patterns that need to be made translatable are:
path('search/', search_views.search, name='search'),path("", include(wagtail_urls)),
To make these translatable, move the 'search/' pattern into the second block, above the wagtail_urls pattern. Then,
replace the square brackets around that block with
i18n_patterns:
from django.conf.urls.i18n import i18n_patterns


# These paths are translatable so will be given a language prefix (eg, '/en', '/fr')
urlpatterns = urlpatterns + i18n_patterns(
    path("search/", search_views.search, name="search"),
    # For anything not caught by a more specific rule above, hand over to
    # Wagtail's page serving mechanism. This should be the last pattern in
    # the list:
    path("", include(wagtail_urls)),
    # Alternatively, if you want Wagtail pages to be served from a subpath
    # of your site, rather than the site root:
    #    path("pages/", include(wagtail_urls)),
)
With the search pattern removed, the first group should now look like:
# These paths are non-translatable so will not be given a language prefix
urlpatterns = [
    path("django-admin/", admin.site.urls),
    path("admin/", include(wagtailadmin_urls)),
    path("documents/", include(wagtaildocs_urls)),
]
At this point, you might want to take a quick peak at the urls.py file in the step-2 branch to make sure they match. This step can be a little tricky.
Migrate the database
Run the migrate command again to set up the tables for Wagtail Localize in the database:
python manage.py migrate
Check your site
Go back to http://localhost:8000. If your browser is configured for English or any other language except French,
you should be redirected to http://localhost:8000/en/.
If your browser is configured in French, you should be redirected to http://localhost:8000/fr/.
In either case, you can view the site in /en/ or /fr/ (no differences yet).
If this is all working as described, that means i18n_patterns and LocaleMiddleware are working!
Step Three: Extend and add Wagtail Models
Before you start adding content and translating it, you'll need to add some models to Wagtail. Wagtail models are similar to Django models. One key difference is that Wagtail models handle views differently than Django models, but we'll go over that in a bit more detail when you add templates to your project. For right now, you mostly need to know that models provide the essential fields and structures for the content that will be stored in your database.
Many of the steps you'll be doing here have been borrowed from the Getting Started tutorial for Wagtail.
Extending the HomePage model
Right out of the box, Wagtail comes with a home app that provides a blank HomePage model. This model will define the home page of your website and what content appears on it. Go to the home directory in your project and open up models.py. You'll see that all the model currently has in it by default is a pass command. So you're going to have to extend it to add content to your home page.
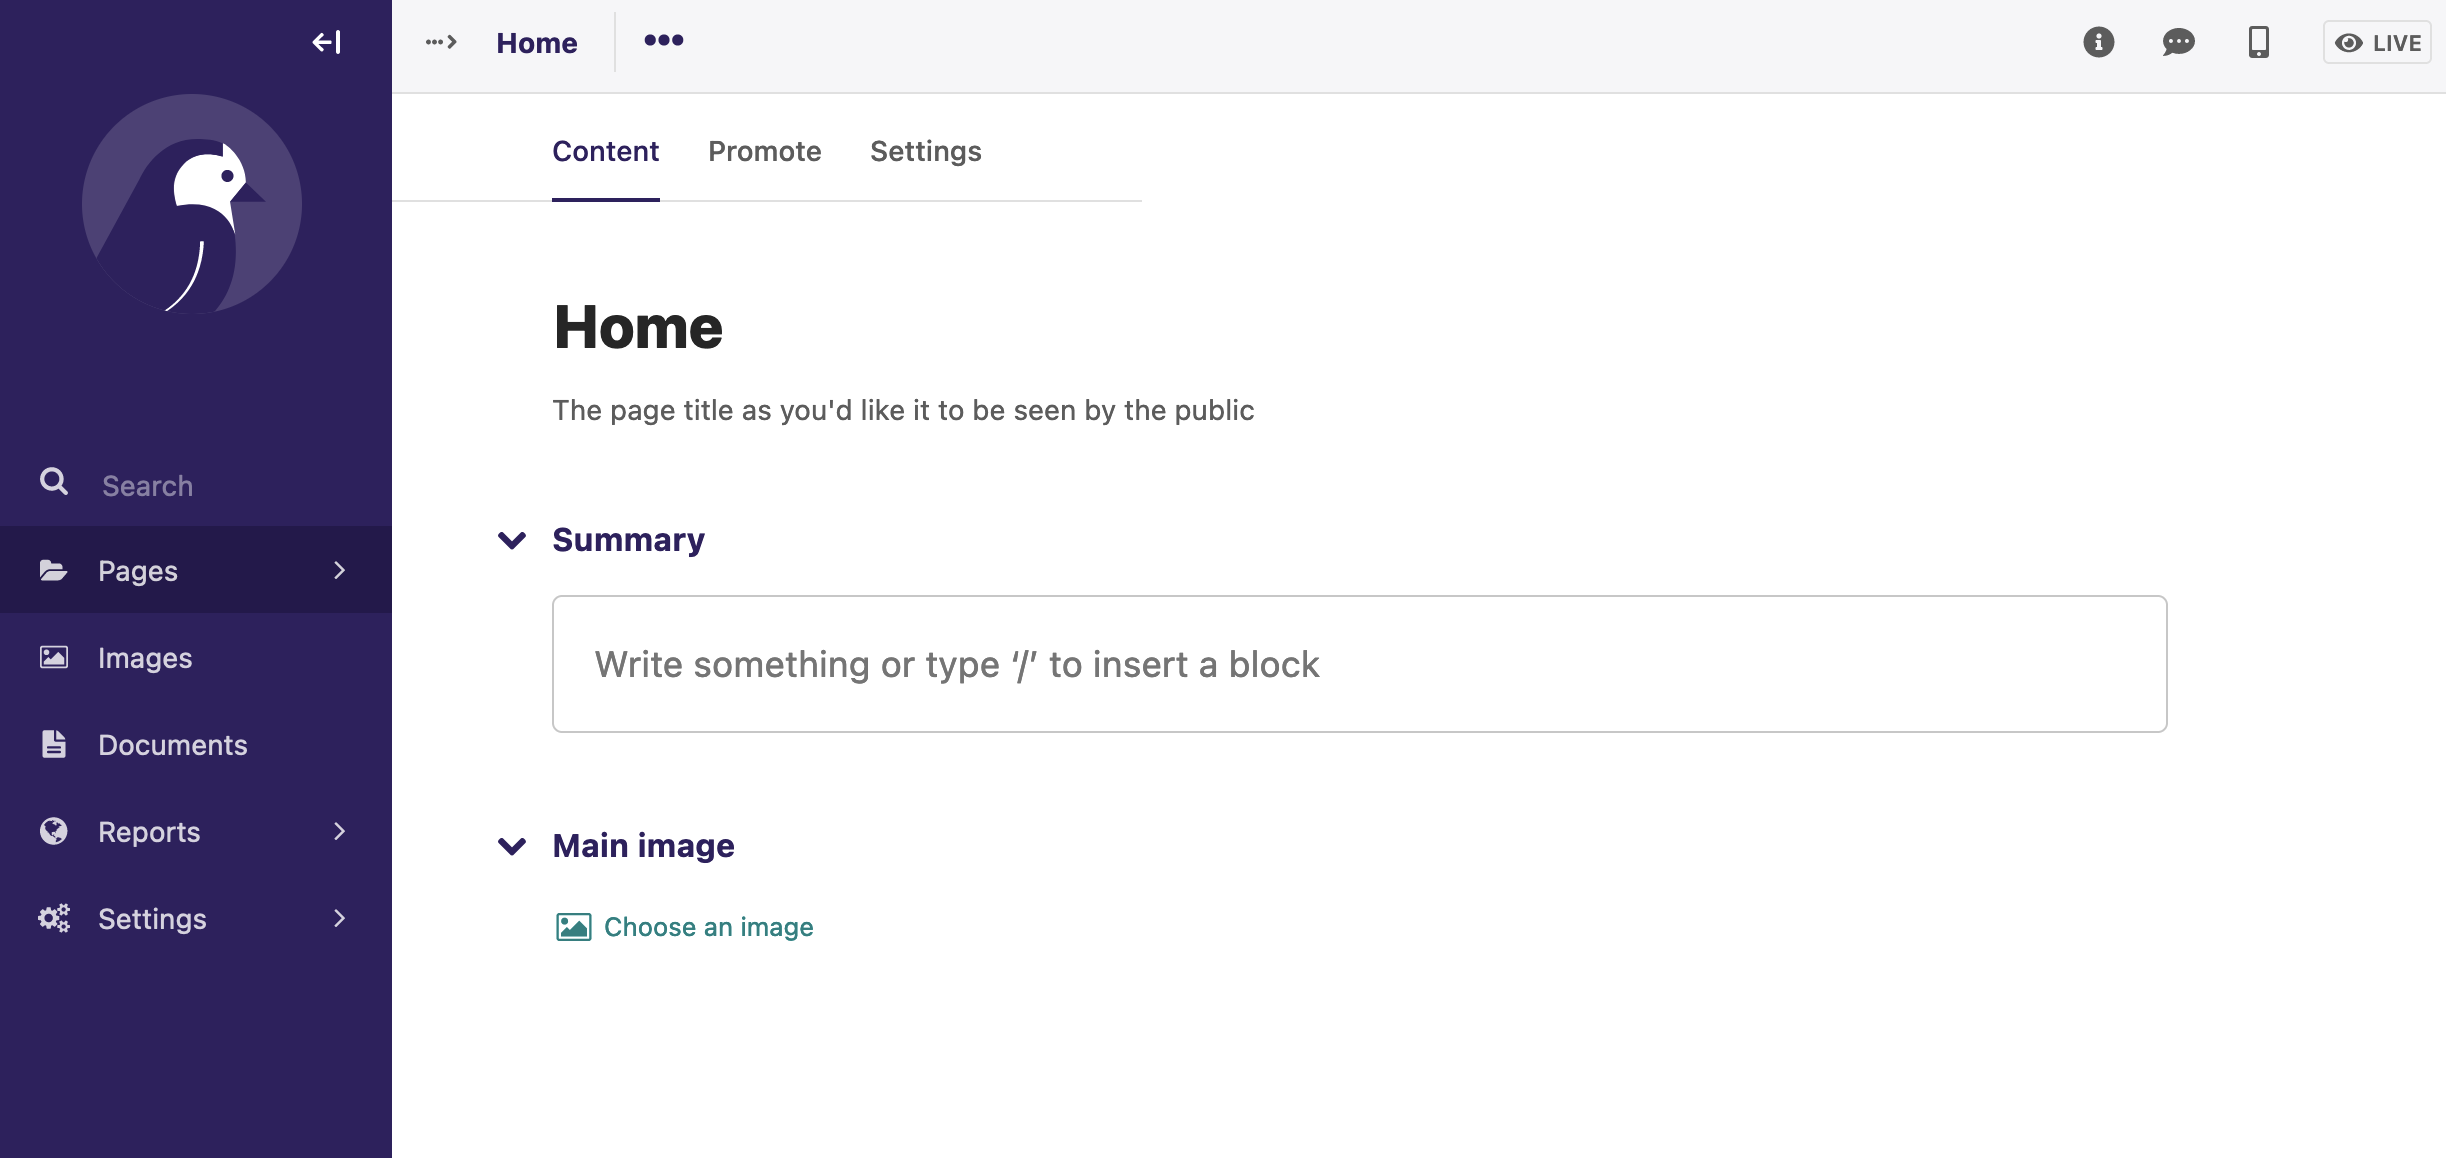
Since this is a blog site, you should probably tell your readers what the blog is about and give them a reason to read it. All pages in Wagtail have a title by default, so you'll be able to add the blog title easily. So let's extend the HomePage model by adding text field for a blog summary to the model.
First, you'll need to add some additional import statements to the top of the page. This statement will import the RichTextField (one that let's you use bold, italics, and other formatting) from Wagtail:
from wagtail.fields import RichTextField
And this statement will import the panel you need to make sure your new field appears in the Wagtail admin as well:
from wagtail.admin.panels import FieldPanel
Once those import statements are added, delete pass from your HomePage model and replace it with:
summary = RichTextField(blank=True)

    content_panels = Page.content_panels + [
        FieldPanel('summary'),
    ]
Your whole file should look like this right now:
from django.db import models

from wagtail.models import Page
from wagtail.fields import RichTextField
from wagtail.admin.panels import FieldPanel


class HomePage(Page):
    summary = RichTextField(blank=True)

    content_panels = Page.content_panels + [
        FieldPanel('summary'),
    ]
Awesome! So what else do we need to have an attractive home page for the blog? An image is something most readers find appealing, so let's add an image to the HomePage model as well. Add the following code beneath your summary variable:
main_image = models.ForeignKey(
        "wagtailimages.Image",
        null=True,
        blank=True,
        on_delete=models.SET_NULL,
        related_name="+",
    )
And then add another line to content_panels:
FieldPanel('main_image'),
Your full models.py file should like like this now:
from dataclasses import Field
from django.db import models

from wagtail.models import Page
from wagtail.fields import RichTextField
from wagtail.admin.panels import FieldPanel


class HomePage(Page):
    summary = RichTextField(blank=True)
    main_image = models.ForeignKey(
        "wagtailimages.Image",
        null=True,
        blank=True,
        on_delete=models.SET_NULL,
        related_name="+",
    )

    content_panels = Page.content_panels + [
        FieldPanel('summary'),
        FieldPanel('main_image'),
    ]
Now you have fields for a summary and for adding an image to your home page. To add those fields to the database, run the following migration commands:
python manage.py makemigrations
python manage.py migrate
You can run the development server if you like to check that the fields were successfully added to the admin panel.
NOTE: Do not add any content just yet unless you don't mind losing it. It's fairly common to reset migrations early in developing a Django or Wagtail project.
To do that, run python manage.py runserver and then navigate to http://127.0.0.1:8000/admin. Login with the credentials you created when you made your superuser. Then navigate to the Pages menu and click on Home. To edit the home page, click on the three little dots next to Home and click "Edit". You should see that your two fields have been added to the page.
Adding blog models
Now that you've extended the Home page and added some useful fields, let's add the key parts of our blog. To do that, you'll need to create a new app with the command:
python manage.py startapp blog
Then you need to add that app to INSTALLED_APPS in myblog/settings/base.py:
INSTALLED_APPS = [
    "home",
    "search",
    # Insert this
    "blog",
    "wagtail_localize",
    "wagtail_localize.locales",
    "wagtail.contrib.forms",
    "wagtail.contrib.redirects",
    # ...
]
📝 A quick note on project structure 📝
In Wagtail projects, it is generally a good idea to keep related models in separate apps because it makes it a little easier for you to manage changes that affect migrations. Also, it makes it a little easier to decide where to put new code or models. Some Wagtail developers like to use a "core" or "base" app for models that are used across their projects. Others prefer not to use that approach because it can make future migrations a little trickier to manage. Both approaches are valid! For this tutorial though, we're going to use the separate app approach.
Now that you have a blog app added to your project, navigate to blog/models.py. We're going to create two new page types for our blog. Wagtail is a CMS that uses a tree structure to organize content. There are parent pages and child pages. The ultimate parent page by default is the Home page. All other page types branch off of the Home page. Then child pages can branch off of those pages too.
First, you need to create a parent type for the blog. Most Wagtail developers will call these pages "index" pages, so this one will be called BlogPageIndex. Add the following code to your models.py file in the blog app:
from wagtail.models import Page
from wagtail.fields import RichTextField
from wagtail.admin.panels import FieldPanel


class BlogIndexPage(Page):
    intro = RichTextField(blank=True)

    content_panels = Page.content_panels + [
        FieldPanel('intro')
    ]
This is a very simple version of BlogIndexPage with only a single intro field to describe the blog. You'll be adding a few more things to it later, but this will work right now for getting your blog set up.
Next, we need to create a child page called BlogPage. Think about the fields you need for a reader to enjoy a blog post. The title is included by default, so what else do you need? Blogs can get pretty messy without dates to organize them, so you'll need a date frield for sure. Let's type:
class BlogPage(Page):
    date = models.DateField("Post date")

    content_panels = Page.content_panels + [
        FieldPanel('date'),
    ]
Let's add an intro field to this page type too so that you can use it to give readers a preview of the blog post.
class BlogPage(Page):
    date = models.DateField("Post date")
    intro = models.CharField(max_length=250)

    content_panels = Page.content_panels + [
        FieldPanel('date'),
        FieldPanel('intro'),
    ]
Note that intro has max_length added to it. This provides a character limit on the field so that writers won't get too long-winded and break your website's design with descriptions that are too long. You're welcome to give them more characters to work with if you want to.
You'll also need a body field to provide a place to put your post content (since creating a blog without a place to put content kind of defeats the purpose of a blog).
class BlogPage(Page):
    date = models.DateField("Post date")
    intro = models.CharField(max_length=250)
    body = RichTextField(blank=True)

    content_panels = Page.content_panels + [
        FieldPanel('date'),
        FieldPanel('intro'),
        FieldPanel('body'),
    ]
Making your blog searchable
Now, those fields are a good start for a basic blog. While we're here though, let's take a moment to make the content of your blog searchable. Update models.py with this code:
class BlogPage(Page):
    date = models.DateField("Post date")
    intro = models.CharField(max_length=250)
    body = RichTextField(blank=True)

    search_fields = Page.search_fields + [
        index.SearchField('intro'),
        index.SearchField('body'),
    ]

    content_panels = Page.content_panels + [
        FieldPanel('date'),
        FieldPanel('intro'),
        FieldPanel('body'),
    ]
Then add from wagtail.search import index to your import statements so that the whole file looks like this:
from django.db import models

from wagtail.models import Page
from wagtail.fields import RichTextField
from wagtail.admin.panels import FieldPanel
from wagtail.search import index


class BlogIndexPage(Page):
    intro = RichTextField(blank=True)

    content_panels = Page.content_panels + [
        FieldPanel('intro')
    ]

class BlogPage(Page):
    date = models.DateField("Post date")
    intro = models.CharField(max_length=250)
    body = RichTextField(blank=True)

    search_fields = Page.search_fields + [
        index.SearchField('intro'),
        index.SearchField('body'),
    ]

    content_panels = Page.content_panels + [
        FieldPanel('date'),
        FieldPanel('intro'),
        FieldPanel('body'),
    ]
Save all of your work. Then run python manage.py makemigrations and python manage.py migrate to check that the fields have been added to the Wagtail admin.
Adding Wagtail StreamField
One of the best parts of Wagtail is StreamField. StreamField gives users the power to mix and match different "blocks" of content rather than having a strict structure for a page. For example, someone writing a blog post could add a "quote" block to highlight a particular quote or phrase from their post. Or they could add a "sidebar" block that includes a little extra bonus content on the page. There aren't many limits to the types of blocks you can create.
To show you StreamField in action, you're going to create a simple StreamField implementation in the blog post body using some of the default blocks that come with Wagtail. First, add these import statements to your models.py file:
from wagtail.fields import StreamField
from wagtail.embeds.blocks import EmbedBlock
from wagtail import blocks
from wagtail.images.blocks import ImageChooserBlock
Next, replace the body definition from RichTextField in your BlogPage class with the following code:
    body = StreamField([
        ('heading', blocks.CharBlock(form_classname="title")),
        ('paragraph', blocks.RichTextBlock()),
        ('image', ImageChooserBlock()),
        ('embed', embed = EmbedBlock(max_width=800, max_height=400)),
    ], use_json_field=True)
Save your file and then run the migration commands python manage.py makemigrations and python manage.py migrate. Start up the development server real quick with python manage.py runserver then have a look at a blank Blog Page. You'll notice that the "body" section now has a row of blocks for you to choose from. You can experiment with combining blocks if you want to, but keep in mind that we are most likely going to reset our migrations at least once. So don't add any data you care about just yet.
Step Four: Add custom models
One thing I always like to call a beginner's attention to is custom models. Because Wagtail is built on top of Django, it has the same quirks as Django does when it comes to custom models. In the Django documentation, it says "It’s highly recommended to set up a custom user model, even if the default User model is sufficient for you." This is because creating a custom user model in the middle of a project or with an existing database is a huge hassle. Even very smart people haven't figure out how to create a migration fix for it yet. The ticket to solve this issue has been open for years.
Anyway, I bring this up because Wagtail has some other models that are worth customizing before you go too far into a project so that you can save yourself some grief later on. Those models include the Wagtail Image model, the Wagtail Documents model, and the Wagtail Renditions model in addition to the User model. You may need them, you may not. But it's better to set them up now rather than set them up later.
Because we're using the separate app structure, we're going to put the User model in its own app, and we're going to put the other models in a custom_media app because they are all related to media. Type the following commands into your terminal:
python manage.py startapp custom_user
python manage.py startapp custom_media
Then update the code in your INSTALLED_APPS in myblog/settings/base.py to include the new apps:
INSTALLED_APPS = [
    "home",
    "search",
    "blog",
    "custom_media",
    "custom_user",
    "wagtail_localize",
]
Custom media models
You should set up the custom media models first because those are more straightforward and won't cause issues with migrations. Navigate to custom_media/models.py and update your file so that it looks like this:
from django.db import models
from wagtail.documents.models import Document, AbstractDocument

from wagtail.images.models import Image, AbstractImage, AbstractRendition


class CustomImage(AbstractImage):
    # Add any extra fields to image here

    # To add a caption field:
    # caption = models.CharField(max_length=255, blank=True)

    admin_form_fields = Image.admin_form_fields + (
        # Then add the field names here to make them appear in the form:
        # 'caption',
    )


class CustomRendition(AbstractRendition):
    image = models.ForeignKey(CustomImage, on_delete=models.CASCADE, related_name='renditions')

    class Meta:
        unique_together = (
            ('image', 'filter_spec', 'focal_point_key'),
        )

class CustomDocument(AbstractDocument):
    # Custom field example:
    # source = models.CharField(
    #     max_length=255,
    #     blank=True,
    #     null=True
    # )

    admin_form_fields = Document.admin_form_fields + (
        # Add all custom fields names to make them appear in the form:
    )
Let's take a closer look at some of the comments in the code here. You'll notice that there is an option to add a caption field to the image model. Wagtail doesn't include an image caption for alt text by default. Many projects need an image caption field for crediting photographers and artists. So the CustomImage model is the best place to do that. Feel free to uncomment the text to add a caption if you would like one. You can make similar change for the CustomDocument model too if there is any information that would be useful for you to keep track of with documents. You don't have to add anything though. It's totally optional for completing the rest of this tutorial.
One thing that is not optional though is updating our image model references. First, you'll need to add the following settings to the bottom of your base.py settings file:
# Custom models

WAGTAILIMAGES_IMAGE_MODEL = 'custom_media.CustomImage'

WAGTAILDOCS_DOCUMENT_MODEL = 'custom_media.CustomDocument'
These settings tell Wagtail which custom models you're using. Even with those set though, you're going to have update some references in your code as well. Fortunately, you only need to make one update for this particular project. Navigate to home/models.py. Then add the following import statement to the top of your file:
from wagtail import images
Then update your main_image model so that it looks like this:
    main_image = models.ForeignKey(
        images.get_image_model_string(),
        null=True,
        blank=True,
        on_delete=models.SET_NULL,
        related_name="+",
    )
What you're doing with this code is collecting the string for the name of your CustomImage model so that you can point Wagtail to your custom model instead of the default wagtailimages model.
Custom User model
Now, you might be wondering why I didn't have you go through the migration steps after adding those last few models. Welp, it's because we've been reaching the part of the tutorial I've been warning you about. After we add the CustomUser model, we're going to have to reset our migrations. Why? Let's find out together here.
First, navigate to custom_user/models.py and add the following code to your file and save it:
from django.db import models

from django.contrib.auth.models import AbstractUser

class User(AbstractUser):
    pass
Then navigate to your base.py file in settings and update the Custom model section to include the custom user model:
# Custom models

WAGTAILIMAGES_IMAGE_MODEL = 'custom_media.CustomImage'

WAGTAILDOCS_DOCUMENT_MODEL = 'custom_media.CustomDocument'

AUTH_USER_MODEL = 'custom_user.User'
Now save your code and run the migration commands python manage.py makemigrations and python manage.py migrate. You should get an error message that is similar to "Migration admin.0001_initial is applied before its dependency app.0001_initial on database 'default' ". Tables related to the User model in Django are some of the very first that are set up when you start a new project. So if you try to apply a custom version of the User model after the initial migration for your first app, you're going to get an error.
How do we fix this then? There are a few different appraoches you can take. Because your project is still in development though and you're currently using the default sqlite database for working on it, one of the easiest approaches for beginners to learn is to reset the migrations.
There are multiple approaches to resetting migrations too. But for this project, we're going to delete all our existing migration files along with the database then run our migration commands again. Here's how you do that.
- Go to each
migrationsfolder for theblogapp (we'll go in alaphabetical order). - Delete all of the files in the folder except for
__init.py__. - Open the
pycachefolder in themigrationsfolder and delete all of the files there as well.
Repeat this process for the home app. There shouldn't be any migration files in custom_media or custom_user yet but you can doublecheck that if you want. Next, find your database. It should have a name like db.sqlite3. Delete your database file as well.
Make sure one more time that all of your migration files have been removed. Then run your first migration command python manage.py makemigrations to create the new migrations you need. If you receive an error, delete all of the migration files and the database again. Be extra sure the you removed the pycache files in each app as well. If there is no error, then run python manage.py migrate to create fresh migrations in your database.
Since you deleted the database, you're going to have to create a new superuser to access the admin section of Wagtail again. So run python manage.py createsuperuser to create a new superuser. Then test it by running python manage.py runserver and navigating to http://127.0.0.1:8000/admin to log in.
Now you have a good foundation for customizing these critical models. You might not feel like this has added a lot to the project. But trust me, you'll be glad you took these steps further down the line. Next, we're going to add some additional models to our code called snippets along with some templates that will help our website look a little nicer.
Step Five: Add templates and translatable content
Now that we have your models set up and your database has been configured for the data you're planning to use in your blog, we can start focusing more on how things will look on the frontend and how people will interact with your multilingual website.
Set up your home page
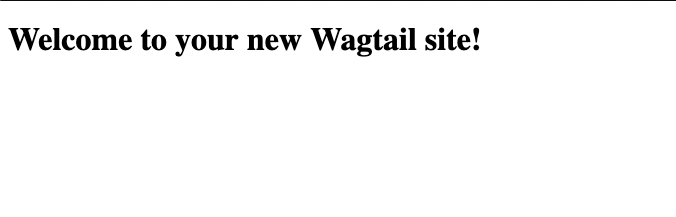
You may have noticed that the pretty moving egg page at http://127.0.0.1:8000 has been replaced with a drab "Welcome to your new Wagtail site!" page.
This happened because resetting the migrations removed the default home page that was created when you first set up the project. That's okay because you're going to have to create a new home page anyway.
Navigate to http://127.0.0.1:8000/admin and log in to the backend of the website. On the lefthand menu, click on "Pages" and then click on the little home icon next to "Pages" at the very top of the menu. It should be just above "Welcome to your new Wagtail site!".
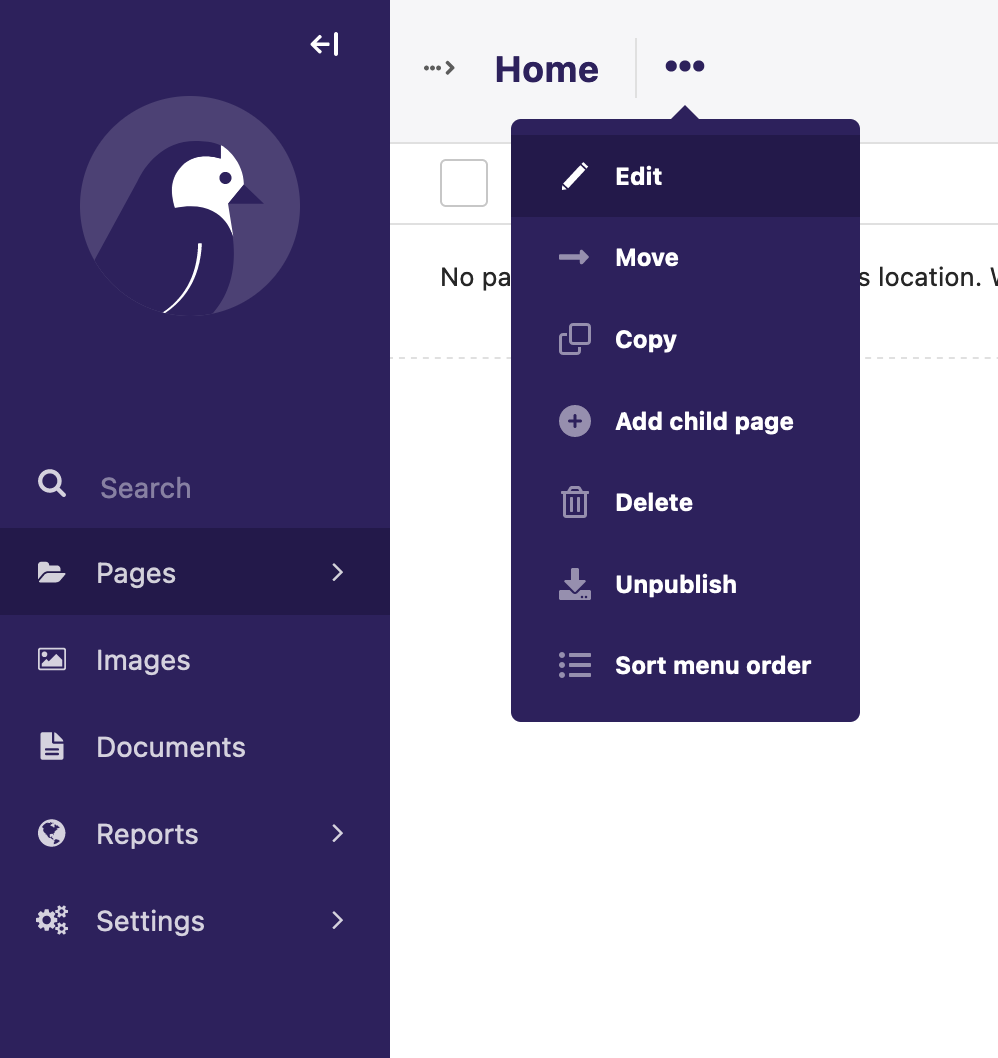
This will take you to the "Root" menu of Wagtail. In the root section, find the three purple dots to open the action menu and click "Add child page".
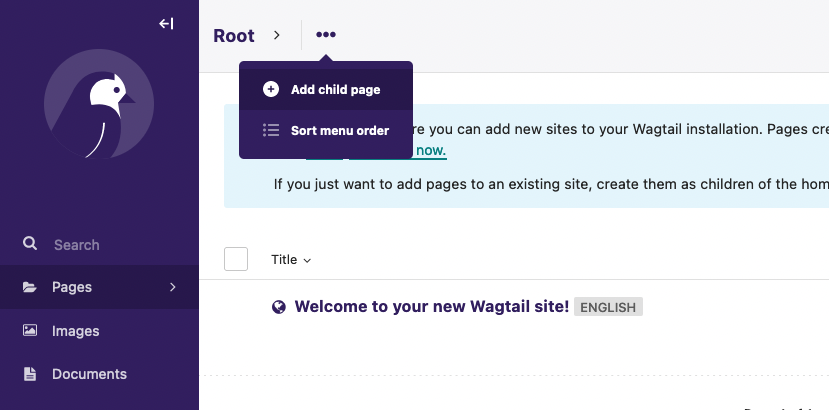
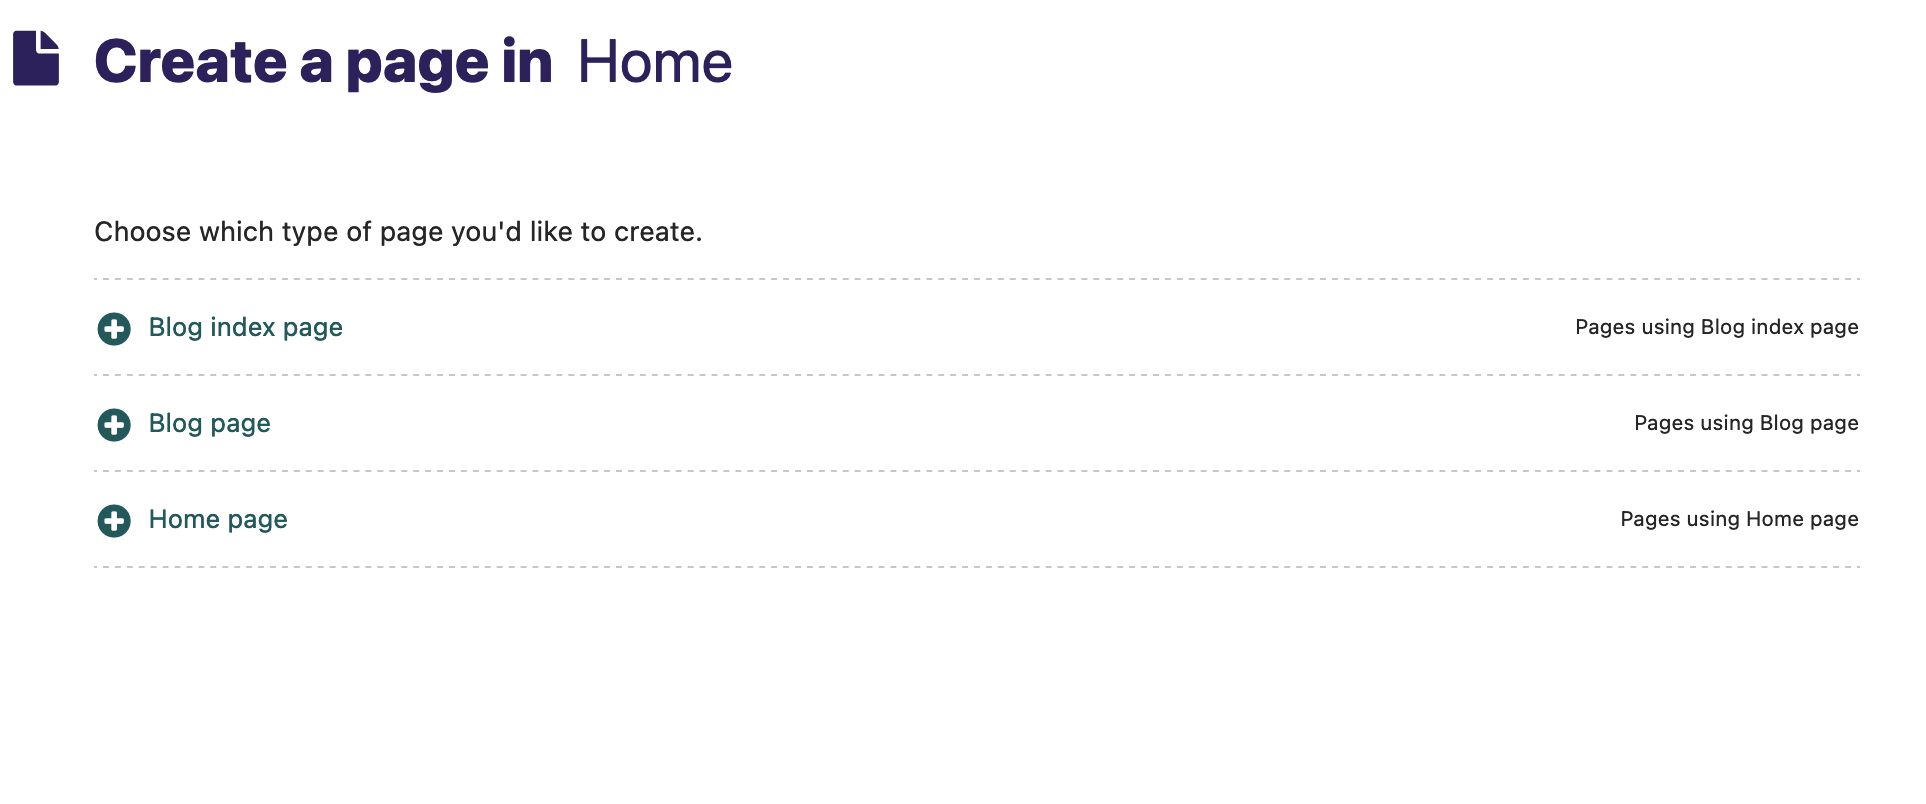
When you're prompted to choose a page type, choose "Home page".
Now we're (finally) going to add some data to our blog. Feel free to choose your own theme. But if you're not feeling particularly inspired, you can join me in filling out "Badger Blog" for the title and "Musings on Earth's most noble and distinctive mammal" for the summary. You'll need a picture too. Feel free to use this lovely badger from Wikimedia Commons. Click "Choose an image" and then upload the image to Wagtail.
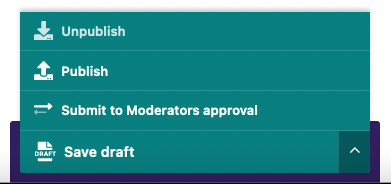
When you're done adding the content, go to the bottom of the page and use the big green button to save your draft. Then click on the arrow next to "Save draft" to open up the publish menu and click "Publish" to publish the page.
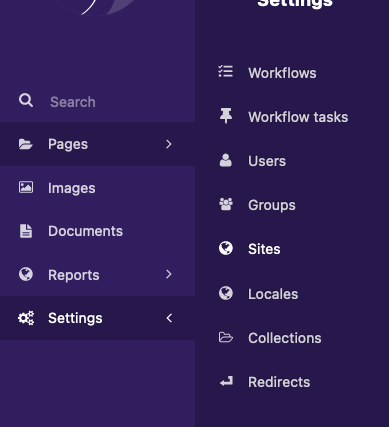
Now, if you were to navigate to http://127.0.0.1:8000 right now, you would still see that ugly default page. That's because we need to tell Wagtail that we have a new homepage. To change that, go to the menu on the lefthand side, click "Settings", and then click "Sites". The "Sites" panel should open up and you'll see one site inside it right now called "localhost".
Click on "localhost" and then scroll down to "Root page". Click on "Choose a different root page" and then choose your new home page from the menu. Click "Save" at the bottom of the page to save your changes.
Update the home page template
If you were to navigate to http://127.0.0.1:8000 right now, you'll find that the pretty egg animation has returned. With a home page designated, the default code in home/templates/home_page.html is now working again. You're going to update that code though so that you can pull the content you just created into your templates.
Go to home/templates/home/home_page.html and delete everything in the file except for the first line {% extends "base.html" %}. Update the file so it looks like this:
{% extends "base.html" %}
{% load wagtailcore_tags wagtailimages_tags %}

{% block body_class %}template-homepage{% endblock %}

{% block content %}

<h1>{{ page.title }}</h1>

<p>{{page.summary}}</p>

{% image page.main_image max-500x500 %}

{% endblock %}
Save the file and then reload your homepage. You should now see the title of your blog, the summary, and a beautiful badger (if you chose to go with my badger theme rather than your own).
Now, the summary might look a little funky. And that is because text fields do not print with escaped characters by default. Fortunately, Wagtail comes with a handy filter, among many other handy filters, that can render the text properly. Update the {{page.summary}} line so that it is:
<p>{{page.summary|richtext}}</p>
Refresh the page and the summary text should be displaying properly now.
Before you move on from this task, let's clean your templates and organize things a bit. Navigate to myblog\templates and create a new directory in it called home. Move home_page.html to the new home directory. Refresh the page to make sure it still works. The delete the templates directory in the home app. While you're there, you can also delete the static folder in the the home app because all that is in it is some CSS for the default home page.
This structure will help you stay organized by keeping all of your templates in one directory. Trust me, any frontend developers you work with will thank you. And then they will find something else to pick on, but that's the way of things.
Set up simple blog templates
Now that the home page is set up, let's set up some simple templates for your blog pages as well. First, let's create some content in the backend of Wagtail to work with. Go to http://127.0.0.1:8000/admin and click the "Pages" menu then click "Badger Blog" (or whatever title you chose) to open the menu for that page. Click the three purple dots to open the action menu and click "Add child page". Choose the "Blog index page" this time.
Fill out the title and intro line for your blog. I used the oh-so-creative title "Blog" and "The latest badger sightings" if you would like to steal those brilliant lines. Use the big green button at the bottom to "Publish" the page.
Back in the "Badger Blog" section of Wagtail, you should now see a line for your "Blog" page. When you hover over "Blog", a button should appear that says "Add child page." Click the button. Pick "Blog page".
Fill out some content on your blog page. If your creative muse has deserted you to sip margharitas on a beach, then you can add today's date, use the title "Badgers are brilliant" and the intro line "We have totally underestimated badgers".
Now the body is where you get to play with StreamField for the first time. All you need to do is add one block of content to the body. You can add an image if you want or a text paragaph like:
Here are three reasons badgers are more intelligent than we thought they were:

    1. They use tools
    2. They can solve puzzles
    3. They can break out of zoos
After you add your content, use the big green button at the bottom of the page and click "Publish".
Now that you entered some content, let's create some templates to go with it. First, go to myblog/templates and create a directory labeled blog. In that blog directory, create two blank files: blog_index_page.html and blog_page.html
In blog_index_page.html, let's add:
{% extends "base.html" %}

{% load wagtailcore_tags %}

{% block body_class %}template-blogindexpage{% endblock %}

{% block content %}
    <h1>{{ page.title }}</h1>

    <div class="intro">{{ page.intro|richtext }}</div>

    {% for post in page.get_children %}
        <h2><a href="{% pageurl post %}">{{ post.title }}</a></h2>
        {{ post.specific.intro }}
        {{ post.specific.body }}
    {% endfor %}

{% endblock %}
Save that file and then add the following code to blog_page.html:
{% extends "base.html" %}

{% block body_class %}template-blogpage{% endblock %}

{% block content %}
    <h1>{{ page.title }}</h1>
    <p class="meta">{{ page.date }}</p>

    <div class="intro">{{ page.intro }}</div>

    {{ page.body }}

    <p><a href="{{ page.get_parent.url }}">Return to blog</a></p>

{% endblock %}
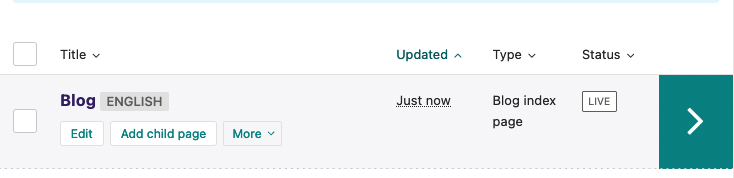
Excellent! Now you have some basic templates for your blog content in English that you can work with. Let's have a quick look at your content by checking that it works. In the Wagtail admin, navigate to "Pages" then click "Badger Blog". You should see your "Blog" page listed like this:
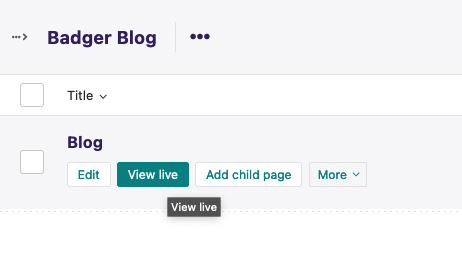
Hover over the "Blog" listing to make the buttons appear then click "View live" to see what your BlogIndex page looks like. You should be able to click on your blog article and open up your "Badgers are brilliant" blog then navigate back to your "Blog" page. The "Home" page and the "Blog" page aren't connected yet. Don't worry, we'll get there.
First, let's work on translating some of this content so that we have some content in French to work with as well.
Setting up your new locale
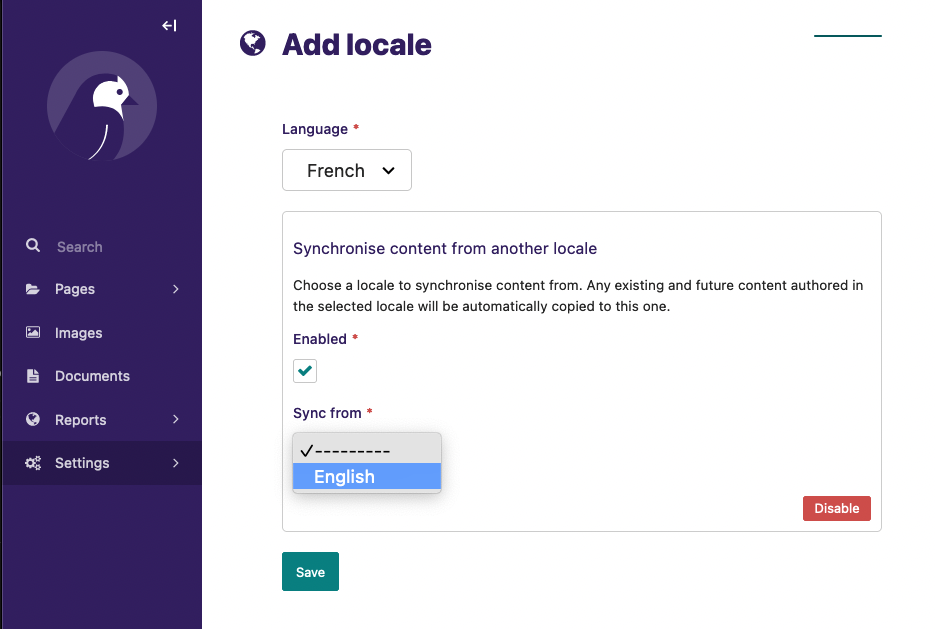
To set up a locale for French, go to the lefthand menu, click "Settings", then click "Locales". On the righthand side, click the green "Add a locale" button. In the "Language" dropdown menu, choose "French".
Beneath the dropdown is an option to synchronize content from the main language of your website. Click the green "Enable" button. Check the "Enabled" checkbox and then select "English" from the "Sync from" menu. Click "Save" to save your changes.
Now click "Pages" on the lefthand menu and you'll see there are now two versions of "Badger Blog." One says "English" next to it and the other says "French." You might also find two copies of the "Welcome to Wagtail!" page. Feel free to delete those or ignore them. They are not important anymore.
Click on the "French" version of "Badger Blog" to edit it. You'll be presented with an option to translate the "Badger Blog" page and all of the pages in the subtree. Check the box to translate all of the pages.

Now when you open the "Pages" menu, you should see two copies of your page trees: one labeled "English" and another labeled "French".
Click "Edit" for the French version of the "Badger Blog" Page to edit the content. The page will open up in a translation view. The translation view provides the content in the original language and provides you with some different options to translate it.
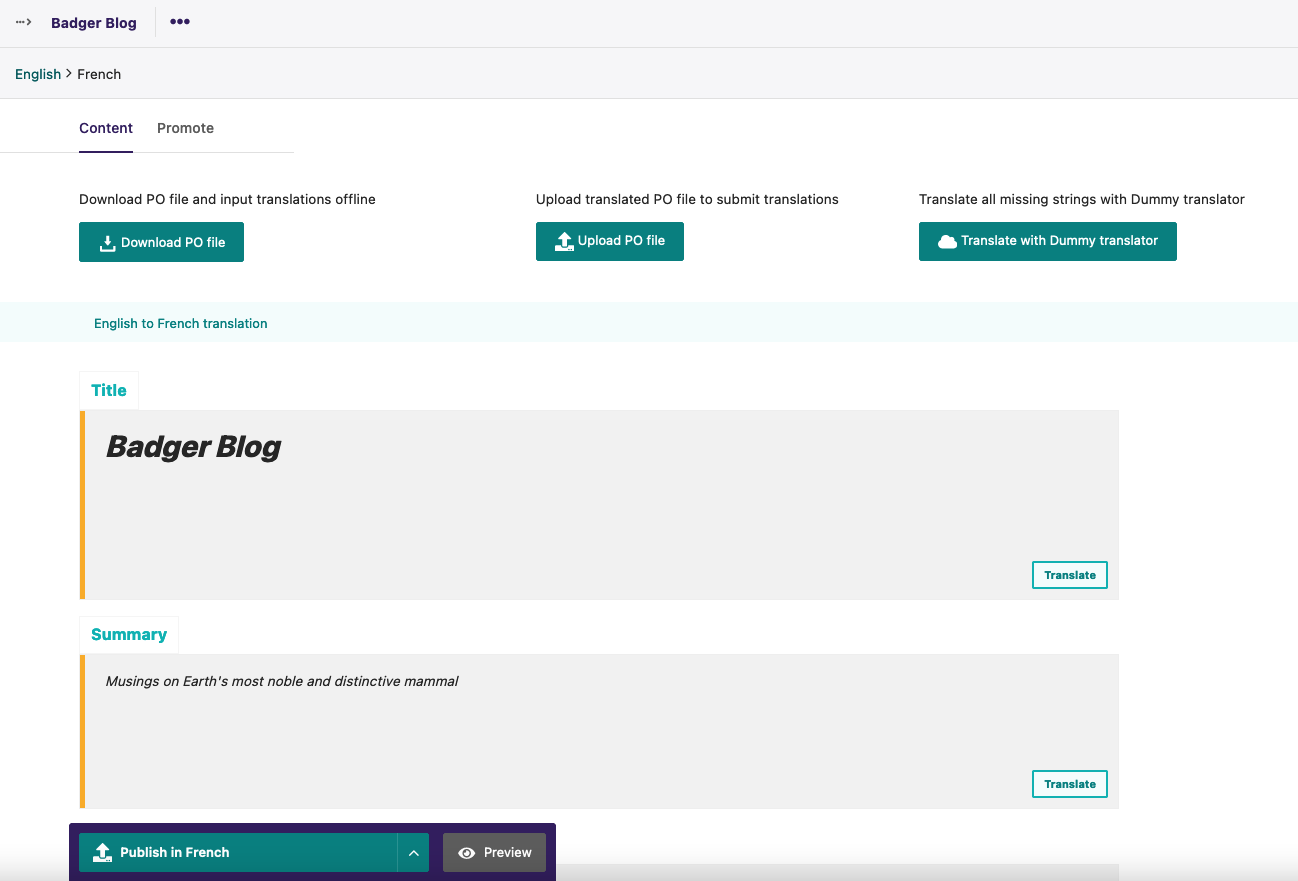
Translate using PO files
PO files are the file format used by professional translators for translating a variety of structured content, including websites. If you are going to be working with a living, breathing human translator, this could be a good option for your project. The advantages of the PO file is that everything can be translated in one file, and you can send that file to a translator without having to give them access to the admin section of your website.
To use the PO file method, click the "Download PO file" button to download the file. Then either send the file to a translator or use a program like Poedit to edit the file and translate it. Once the file has been translated, you can upload it to your page with the "Upload PO File" button.
Once the file is uploaded, check that there are green checkmarks throughout your page. Click the promote tab too and make sure the slug has been translated as well. Once everything is translated click the big green "Publish in French" button at the bottom to publish the page.
Translate manually
You can also use the Wagtail Localize plugin to translate content manually as well. This approach is best to use if you decide you are okay with creating a log in for your translator or if someone who will be working on the website regularly is also translating the content. To do manually translation, go through each item on the page and click "Translate". Once you are done adding the translation, click "Save" to save your changes. Do this for each piece of content on the page. Click the "Promote" tab to translate the slug as well. Once you're done, click "Publish in French" at the bottom of the page to publish the page.
NOTE Be very careful of using quote marks in your translations. Quote marks in certain languages are different from the quote marks used in HTML. So if there are any links in your content, you need to make sure you're using the right type of quote marks in any HTML included in your translations.
Machine translation
You can also hit the third button on the page to use the machine translation integration you set up earlier. Now since you set up the Wagtail Localize dummy translator, all it will do here is reverse all of the strings on the page. But it will give you an idea how Deepl or Google Cloud Translation would work if you set them up. If you use this option for your translation, you'll need to click back into the page and publish the results by clicking the "Publish in French" button.
Translate and publish your pages
Using whichever method you prefer, go through and translate your "Blog" page as well as your "Badgers are brilliant" article. Be sure to publish each one of those pages after you finish adding your translations.
Syncing content from your main language
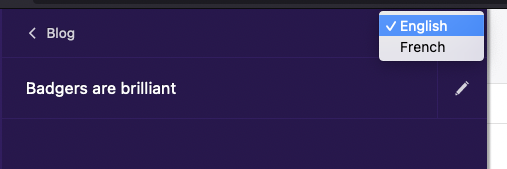
Let's try syncing some changes from a blog written in your main language. In the lefthand menu, go to "Pages" then click the arrow to the right until you see "Badgers are brilliant". Play with the language switcher in the admin above it if you want to see how easy it is to switch between the languages. Click on the pencil to open the edit page for "Badgers are brilliant".
Scroll down to the body. You're going to add the link to this YouTube video about an escape artist badger to the line "They can break out of zoos." Add the link by highlighting the text and selecting the link option from the menu. When the link menu pops up, click "External link" to add the link to text.
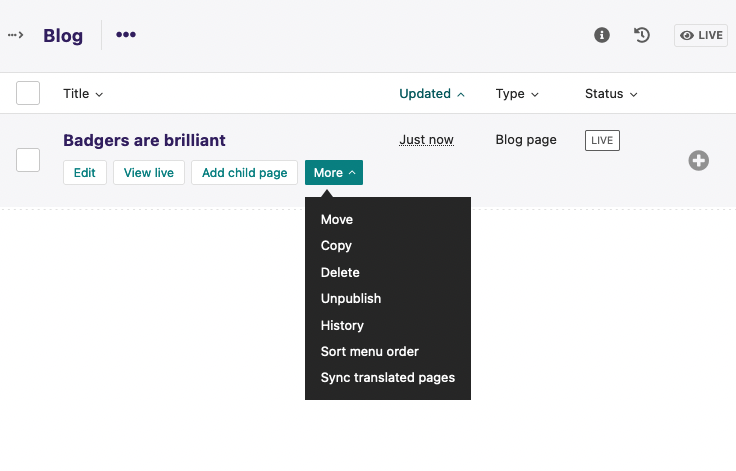
Publish the page with the new changes. After you hit Publish, you'll be returned to the menu for the "Blog" parent page. Hover over "Badgers are brilliant" and click the "More" button. Select "Sync translated pages."
After you set up the sync, navigate to the French version of the page. Your changes to the content will be highlighted in yellow and you can translate them or insert local content. Notice how links and images are separated from the text and can be changed to make them more appealing to a French audience. For example, if you wanted to include a link to a video that was in French or that had French subtitles switched on, you could include a unique link in the French version of the blog. You're welcome to try this by including a link to a different video in the French version. Perhaps this video on European badgers would be more appropriate for your French audience.
All right. Now that we've added some content to your blog and translated it into French, we're going to add a translatable menu and a translatable footer to our website so that you can see how Snippets work in Wagtail as well as how you can translate them.
Step Six: Add translatable navigation
In this step, you're going to learn about Wagtail Snippets. Snippets are pieces of code that can be used in multiple places across a project but that aren't a part of the page tree. Some common uses for Snippets include author profiles, menus, and footer content. The nice thing about Wagtail is you can use TranslatableMixin to make your snippets translatable by Wagtail Localize.
Add a navigation app
To follow the separate apps structure, you're going to create a new app for all of the pieces related to website navigation. To create the app, type the following command into your terminal:
python manage.py startapp navigation
You'll need to update your INSTALLED_APPS in myblog/settings/base.py so that the top of it looks like this:
INSTALLED_APPS = [
    "home",
    "search",
    "blog",
    "custom_media",
    "custom_user",
    "navigation",
    "wagtail_localize.locales",
    "wagtail.contrib.forms",
    "wagtail.contrib.redirects",
    # ...
]
You'll use this app to store the models related to your translatable navigation snippets as well as some template tags that we'll use to help display the correct text for each locale. Curious what template tags are? You'll find out soon.
Add a translatable footer model
First, you're going to add a translatable footer to your project. Having a translatable footer is handy for a blog because different countries can have different requirements when it comes to the legal notices you have to include on your website. To create your translatable footer, open navigation/models.py and add these import statements:
from wagtail.admin.edit_handlers import FieldPanel
from wagtail.fields import RichTextField
from wagtail.models import TranslatableMixin
from wagtail.snippets.models import register_snippet
You'll need RichTextField to add text to your foot, TranslatableMixin to make it translatable, FieldPanel to add a panel to the admin interface, and register_snippet to add this model as a Snippet rather than a Wagtail page model. Here's how you will set up the Snippet:
@register_snippet
class FooterText(TranslatableMixin, models.Model):
    body = RichTextField()


    panels = [
        FieldPanel("body"),
    ]

    def __str__(self):
        return "Footer text"

    class Meta:
        verbose_name_plural = "Footer text"
        unique_together = [
            ("translation_key", "locale"),
        ]
Let's look at the different pieces. In setting up the class, you're telling FooterText to call on TranslatableMixin and models.Model. In the next lines, you're telling Wagtail, the body of the footer will include one RichTextField and the field will be rendered in one panel labeled "body".
The next few lines are a little different from setting up Page models in Wagail. Unlike pages, which include titles by default, Snippets need to have names given to them. You can either set them up to be named by users in the admin interface or you can hard code a name like you just did here with return "Footer text" . You'll get to see an example of the other naming approach when we code the navigation menu.
Under Meta, verbose_name_plural provides a plural version of the Snippet label so that you can keep the grammar hawks at your workplace happy. The unique_together is required for TranslatableMixin. It ties key pieces of your models together in the database and helps keep your locales organized.
Once you've added these pieces, do your migrations steps to update the database:
python manage.py makemigrations
python manage.py migrate
Start up your website with python manage.py runserver. On the lefthand menu, you'll see now that you have a menu labeled "Snippets" now. Click on it and there will be an item labeled "Footer text". Click on it and you should be taken to a page with a button that says "Add Footer Text". Click the button and fill out the field to add your footer text. If you want to continue with the badger theme, you can add "Copyright 2022 Badgers Inc. All rights reserved." and then click "Save".
You'll be returned to the snippet menu and there will now be an item labeled "Footer text" added to the list. When you hover over that item, you should see three buttons. "Edit", "Delete", and "Translate". Go ahead and click on "Translate".
You'll see a translation workflow similar to the one you used previously for the pages. Let's go ahead and manually translate the footer to "Copyright 2022 Badgers Inc. Tous droits réservés" and save the changes.
Create a template tag for the footer
Now that you have some footer content and translated footer content, you're going to need a way to pull that content into the correct templates and locales. You're going to accomplish that with a custom template tag. Template tags are bits of code that process data provided by a model and organize it before you pull the data into a template.
Since the template tag is related to navigation, go ahead and add a new directory to the navigation app called templatetags. In the directory, add a blank __init__.py file and a file called navigation_tags.py. Open navigation_tags.py. Add these three import statements to the top of the file.
from django import template

from navigation.models import FooterText, MainNavigation

register = template.Library()
You'll need template to set up the register variable needed for custom template tags. You'll also need the Snippet model that you're going to be manipulating, which is why you're importing FooterText.
After adding the import statements, add this code beneath them:
@register.inclusion_tag("navigation/footer.html", takes_context=True)
def get_footer_text(context):
    footer_text = ""
    if FooterText.objects.first() is not None:
        footer_text = FooterText.objects.first().localized.body

    return {
        "footer_text": footer_text,
    }
In this section, you're telling Wagtail that your tag is connected to the template found at navigation/footer.html (which you'll create in the next section) and that your template tag needs to access the current context of the model.
In the definition of get_footer_text, you created an empty string variable for footer_text, then you used an if statement to check that a FooterText object exists. Because there is only one item for the footer text, .first() was used to collect that first object and .localized was used to select the footer text .body associated with the locale for the page that the footer appears on and store it in the footer_text variable.
Create templates for the footer
With this logic in place, now you can create templates for pulling the data onto your page. First, navigate to myblog/templates and create a directory labeled navigation. Then create a file called navigation and add a file labeled footer.html to it. In footer.html, let's add some code to collect and display the contents of the footer_text variable.
{% load wagtailcore_tags %}

<div class="copyright">
    {{ footer_text|richtext }}
</div>
You'll notice that the richtext filter is being applied again. Just like for the pages, this is to make sure that all of the characters in the rich text field display properly.
Now that you have a bit of code to display the footer, you can use the template tag you created to add this bit of code to your base.html file. Go to myblog/templates/base.html and update the statement at the top of the file so that it says:
{% load static wagtailcore_tags wagtailuserbar navigation_tags %}
At the bottom of the file, add the template tag {% get_footer_text %} after the closing </body> tag and just above the closing </html> tag.
Save all of your changes. Start your website with python manage.py runserver if you don't have it running already. Navigate to your home page at http://127.0.0.1:8000/en and confirm that your footer is displaying properly. Now navigate to http://127.0.0.1:8000/fr and you should see the same footer but in French.
Add a model for a translatable navigation menu
The footer is a fairly simple element to translate, especially if you put all of the content in a single rich text field. Now you're going to add a translatable main navigation menu at the top of the page.
To keep the amount of time needed for this tutorial maneagable, the approach you're going to use is a bit more manual. It relies on the content editor to add labels and URLs rather than collecting them programatically. If you have time later, you can upgrade the menu to one that automatically collects page titles and URLs. I'll provide some sample code in the resources at the end.
Now, let's add a model for the menu to navigation/models.py. You should already have all the import statements you need, so add the following code beneath your FooterText snippet:
@register_snippet
class MainNavigation (TranslatableMixin, models.Model):
    name = models.CharField(max_length=255)

    menu_text = models.CharField(max_length=255)
    menu_url = models.URLField()

    panels = [
        FieldPanel("name"),
        FieldPanel("menu_text"),
        FieldPanel("menu_url"),
    ]

    def __str__(self):
        return self.name

    class Meta:
        verbose_name_plural = "Main navigation"
        unique_together = [
            ("translation_key", "locale"),
        ]
This code is very similar to the code you used for the footer snippet. One difference you'll notice though is that there is a name field as well as a line to return self.name in a string. The reason this approach is used rather than hardcoding the name is that you're going to have multiple links in your menu navigation and you're going to need to be able to tell them apart in the admin. The other fields will be the menu_text and the menu_url so that you can add as many links to the navigation menu as you need and also include external links if you would like to use them.
Add a template tag for the navigation menu
Just like for the footer, you're going to add a template tag for the main navigation menu. Only with this template tag, you're going to collect all of the items for the menu rather than the first one, and then you're going to use a function to filter them. Open navigtation/templatetags/navigation_tags.py and add the following code above the code for your footer template tag:
def filter_nav_for_locale(cls, locale):
    menu_items = None

    try:
        menu_items = cls.objects.filter(locale=locale)
    except cls.DoesNotExist:
        pass

    if not menu_items:
        try:
            menu_items = cls.objects.filter(locale=default_language())
        except cls.DoesNotExist:
            pass

    return menu_items

@register.inclusion_tag("navigation/main_navigation.html", takes_context=True)
def get_main_navigation(context):
    menu_items = []
    if MainNavigation.objects.all() is not None:
        menu_items = MainNavigation.objects.all()

    return {
        "menu_items": menu_items,
    }
You could narrow down the objects to .localized objects in the template tag here if you wanted to rather than using Locale. But I want to demonstrate how you can select .localized objects in the template as well. So let's look at how to do that in the next section.
Add a template for the navigation menu
Under myblog/templates/navigation, add a file called main_navigation.html. Then add this code to the file:
<div class = "navigation">
    <ul>
        {% for menu_item in menu_items %}
            {% if menu_item.localized %}
               <li><a href = "{{ menu_item.localized.menu_url }}"> {{ menu_item.localized.menu_text }}</a></li>
            {% endif %}
        {% endfor %}
    </ul>
</div>
With this code, you're using a for statement to sort through all of the items in the menu_items variable and then an if statement to determine which ones are .localized and associated with the locale of that particular page. Then you're using the .menu_url and .menu_text attributes for each item to create links for your navigation menu.
Now you need to add the template tag to base.html. Insert this code after the <head> section and before the <body> section:
<header>
    {% get_main_navigation %}
</header>
Save all of your changes if you haven't already and then run python manage.py runserver. Navigate to your home page at http://127.0.0.1:8000/admin. Go to "Snippets" in the lefthand menu and choose "Main Navigation". Click "Add main navigation" to add a menu item. If you need some inspiration, you can name your first item "Home" with menu text "Home" and the menu URL "http://127.0.0.1:8000". You'll also want to add an item for your blog with the name "Blog", the menu text "Blog" and the URL "http://127.0.0.1:8000/blog." After adding these items, navigate to http://127.0.0.1:8000/en and confirm that your menu is displaying properly.
Now, go back to http://127.0.0.1:8000/admin and go back to the "Main Navigation" section of "Snippets". Use the same "Translate" button you used for the footer content to translate your items to French. Conveniently, "Blog" in French is "Blog." You will want to change the text for "Home" to "Accueil" though. After you save each translated item, navigate to http://127.0.0.1:8000/fr and you should see the same menu displayed in French.
Add a language switcher
One last item that is super handy on a website with multiple languages is a language switcher that can rotate through the different locales.
Add a file to myblog/templates/navigation called switcher.html. Then add these lines to the file:
{% load i18n wagtailcore_tags %}
{% if page %}
    {% for translation in page.get_translations.live %}
        {% get_language_info for translation.locale.language_code as lang %}
        <a href="{% pageurl translation %}" rel="alternate" hreflang="{{ lang.code }}">
            {{ lang.name_local }}
        </a>
    {% endfor %}
{% endif %}
This code uses a combination of the i18n features in Django and Wagtail's translation features to collect all of the available live translations with {% for translation in page.get_translations.live %} and then collects all of the available languages with {% get_language_info for translation.locale.language_code as lang %}.
The next lines create a URL for each one of the translations and connects them to the appropriate language for the page that is displaying. Because there are only two locales available in this tutorial, they will just toggle back and forth between English and French.
Next Steps
Now you have a working foundation for a multilingual website. You don't have all the pieces though. So what could you try next? Here are some ideas:
Add your favorite frontend
Wagtail was created to provide a backend framework that works well with as many frontend technologies as possible. Whether you prefer something simple like Bootstrap or something more complex like React or Next.js, you can try pretty much everything with Wagtail. If you need some inspiration, Kalob Taulien did a good video on Bootstrap and Michael Yin has a good package for a frontend setup using Webpack that works well with Django.
Level up your SEO
Marketing people have high expectations, and the default options in Wagtail don't typically satisfy them. So try adding one of the packages that expands your SEO options in Wagtail. The two most popular packages that are available include:
Experiment with adding different elements from the Wagtail Bakery Demo
The Wagtail Bakery Demo is an example project that can provide you with some code examples to borrow for your own project. Have a look at it and see if there are any bits you like and want to try out. The navigation menu you created for this tutorial is pretty basic. The template tag created for the main navigation in the bakery demo might be one worth borrowing.
Experiment with StreamField blocks
There is a whole list of default blocks you can use in Wagtail. You can also combine these blocks in custom arrangements with StructBlock. If the default blocks aren't quite what you need, you can even add custom blocks to your project. StreamField goes about as far as your imagination goes!
Final words
Thank you for going through this tutorial with me! I hope you found it useful. If you have any questions, don't hesitate to reach out to me on Twitter or through the Wagtail Slack Community.
Acknowledgments
I would like to thank some folks for helping make this tutorial and workshop possible.
- Katie McLaughlin (@glasnt) for an amazingly thorough review and test run that caught so, so many things that could be improved. Thank you Katie!
- Dan Bragis (@zerolab) for taking the time to walk through all of my Wagtail Localize questions and template questions.
- Chris Shaw (@chris48s) for patiently and thoroughly answering the Wagtail Localize questions I forgot to ask Dan as well as helping me learn the finer points of
.get()and.filter(). - Thibaud Colas (@thibaudcolas) for spotting typos like a hawk and correcting my language around Django migrations.