SUSI AI on Linux
This project aims at creating an implementation of Susi, capable to run on Linux Devices in a headless mode. It will enable you to bring Susi AI intelligence to all devices you may think like a Speaker, Car etc.
Current Status
- Voice Detection working with Google Speech API/ IBM Watson Speech to Text API.
- Voice Output working with Google TTS/ IBM Watson TTS/ Flite TTS.
- Susi AI response working through Susi AI API Python Wrapper(https://github.com/fossasia/susi_api_wrapper)
- Hotword Detection works for hotword 'Susi'
- SUSI Wake Button in Raspberry Pi is working.
- Audio parsing working through SOX
- Youtube audio working MPV player
- Connection between the mobile devices and the smart speaker is done through ssh by using Access Point Mode
Roadmap
- Offline Voice Detection (if possible with satisfactory results)
- Make Update Daemon check for the updates at regular intervals
General Working Of SUSI
- SUSI.AI follows a finite state system for the code architecture.
- Multiple daemons are created during installation (Media Daemon, Factory Daemon, Update Daemon)
- The Update Daemon updates the repo every time the Raspberry Pi is restarted up
- The Media Daemon detects for USB connection and scans the songs present in it to play from Smart Speaker
- The factory reset Daemon is a button on Port 17 which delete the repo completely and restores it from the backup
- A local Server is deployed every time the Rasperry Pi Starts and automatically switches to online server if there are any issues with the local server
- Google TTS and STT services are used as default services but if the internet fails, a switch to offline services PocketSphinx(STT) and Flite(TTS) is made automatically
Setting up Susi on Linux is pretty easy.
Note : For the app to work properly, repo must be cloned inside the folder /home/pi/SUSI.AI/ , i.e. the path of your repo will look like /home/pi/SUSI.AI/susi_linux/
- A hardware device capable to run Linux. It includes development boards like Raspberry Pi and other generic machines.
- A Debian based Linux Distribution. Tested on
- Raspbian on Raspberry Pi 3
- Ubuntu 64bit on x64 architecture
- A microphone for input. If you are using a development board like Raspberry Pi which does not have microphone inbuilt, you can use a USB Microphone.
- A Speaker for Output. On development boards like Raspberry Pi, you can use a portable speaker that connects through 3.5mm audio jack.
For installation on Raspberry Pi, read Raspberry Pi setup guide.
Step 1: Initial Setup
- Both the raspberry Pi with raspbian installed and the mobile device should be on a same wireless network
- One should have an SSH viewer like JuiceSSH(Android) and iTerminal(IOS) installed on their mobile devices
- Now we must enable SSH on our raspberry Pi
Step 2: Enabling SSH on Raspberry PI
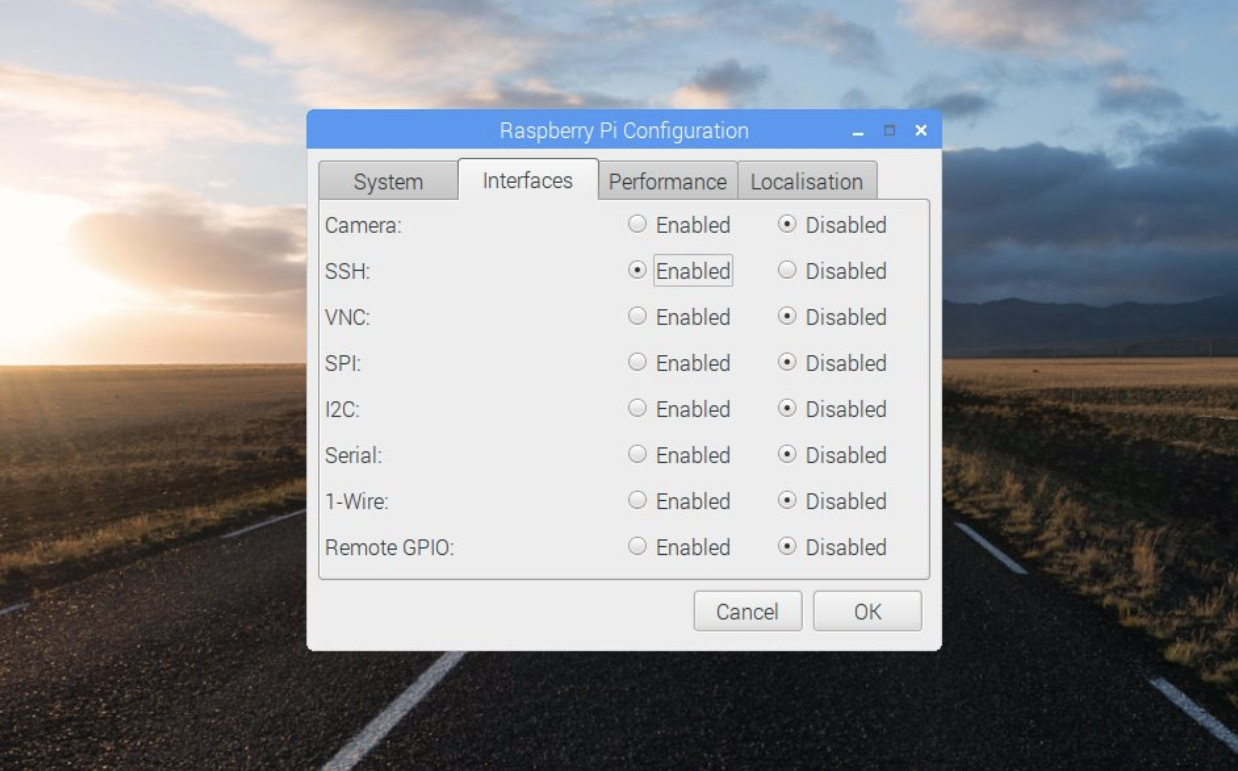
- To enable SSH on your Pi , follow the following steps:
Menu > Preferences > Raspberry Pi Configuration.
Choose the interfaces tab and enable SSH Step 3:Setting Up the client - Login to your raspberry pi as the root user (pi by default)
- Type the following command to know the broadcasting ip address
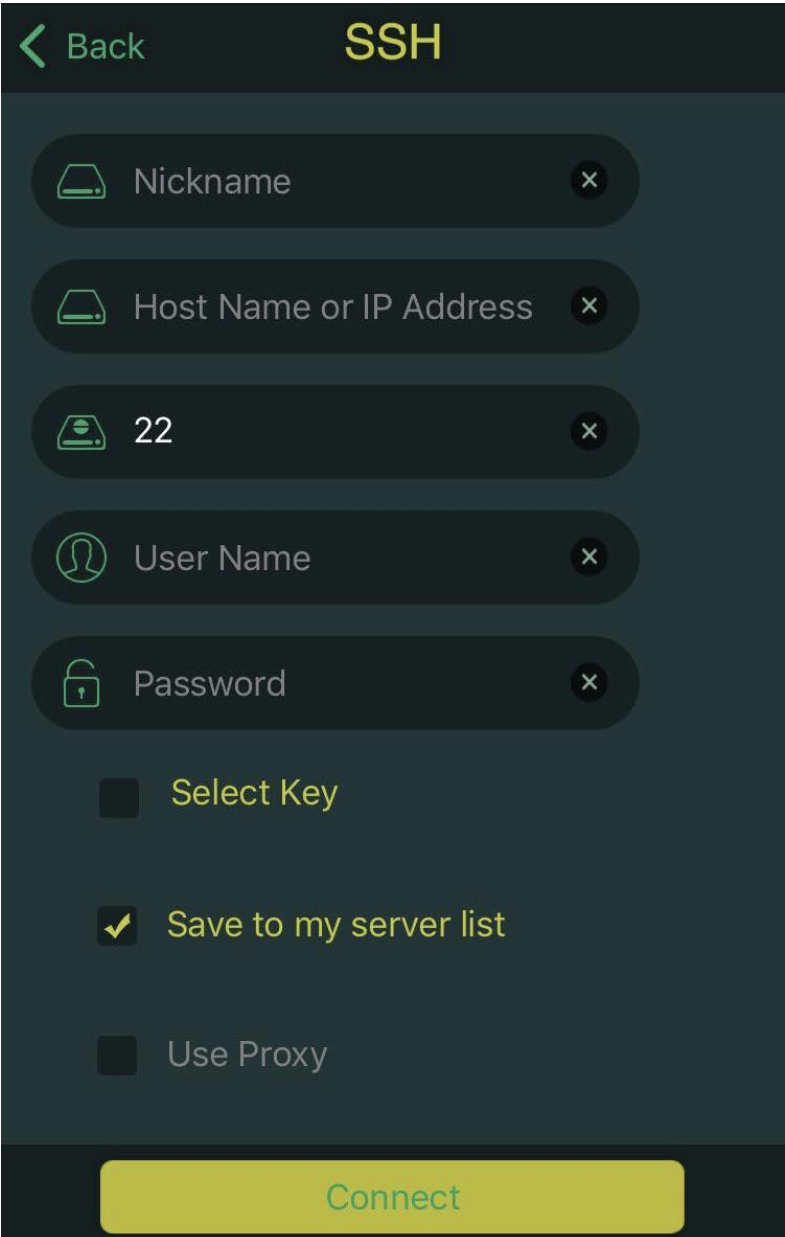
pi@raspberrypi:hostname -I - Now , open the client on your mobile device and add the configurations

By default the username of the system is ‘pi’ and the password is ‘raspberry’
- To login in the speaker , start the configuration script by
python3 config_generator.py <stt> <tts> <hotword_detection> <wake_button>Where- stt is the speech to text service
- You have the following choices
- 'google' if you want to use google as the stt service
- 'ibm' if you want to use ibm as the stt service
- 'sphinx'(offline) if you want to use pocket-sphinx as the stt service
- tts is the text to speech service
- Similarly,
- You have the following choices -'google' if you want to use google as the tts service
- 'ibm' if you want to use ibm as the tts service
- 'flite'(offline) if you want to use flite as the tts service
- hotword_detection is the choice if you want to use snowboy detector as the hotword detection or not
- 'y' to use snowboy
- 'n' to use pocket sphinx
- wake_button is the choice if you want to use an external wake button or not
- 'y' to use an external wake button
- 'n' to disable the external wake button
- stt is the speech to text service
- Eg. To google as the default stt and tts and using snowboy as the default hotword detection engine and no wake button , you have to use the following command
python3 config_generator.py google google y n
* To use SUSI in an authenticated mode, you have to use the script 'authentication.py'
`python3 authentication.py ` Where - authentication_choice is the choice if you want to use SUSI in an authenticated mode or not - email is your registered email id with SUSI.AI - password is your registered password of the corresponding email registered with SUSI.AI * Eg. to use SUSI.AI in authenticated mode use `python3 authentication.py y example@example.com password`
For installation on Ubuntu and other Debian based distributions, read Ubuntu Setup Guide
Use the following commands.
cd update_daemon/./update_daemon.sh
To initiate the factory reset command.
Use the following commands.
cd factory_reset/chmod +x factory_reset.sh./factory_reset.sh
To allow the raspberry Pi to behave as an access point
- Execute the wap.sh script by
./wap.sh - To convert RasPi back to normal mode use
./rwap.sh
- User can use
pacmdto change the audio card to piHat
- Use the following commands
pacmd list-sinksto check the index of the devicepacmd set-sink-port <sink name> <port name>'' is generally 1 , but you can choose depending on your list.- eg. if you want to use inbuilt speaker ports
pacmd set-sink-port alsa_output.platform-soc_sound.analog-stereo analog-output-speaker - if you want to use your headphones with it , we use
pacmd set-sink-port alsa_output.platform-soc_sound.analog-stereo analog-output-headphones
If the above approach doesn't work , you can use the following approach
- After running the installation script
- Type this command
cd /etc/pulse - Open the file
default.pa - Replace line 38 by
load-module module-alsa-sink device=hw:2,1(This will disable the default soundacards from loading up) - To enable default sound cards(usb mic,built-in headphone jack,etc ) , comment/delete out the above line
